2010 SKODA OCTAVIA TOUR fold seats
[x] Cancel search: fold seatsPage 54 of 199

Seats and Stowage53
Using the system
Safety
Driving Tips
General Maintenance
Breakdown assistance
Technical Data
Adjusting lumbar support*– Turn the wheel until you have set the most comfortable curvature of the seat
upholstery in the area of your spine.
The driver's seat should be adjusted in such a way that the pedals can be fully pressed
to the floor with slightly bent legs.
The seat backrest on the driver's seat should be adjusted in such a way that the upper
point of the steering wheel can be easi ly reached with slightly bent arms.
WARNING
Only adjust the driver seat when the vehicle is stationary - risk of injury!
Take care when adjusting the seat! Adjusting the seat without care can lead
to bruises or injuries.
The seat backrests must not be angled too far back when driving otherwise
this will affect proper operation of the se at belts and of the airbag system - risk
of injury!
Head restraintsFig. 48 Adjusting head restraint/pulling outBest protection is achieved if the top edge of the head restraint is at the same level as
the upper part of your head.
Adjusting the height of a head restraint– Grasp the side of the head restraint with both hands and push the head restraint up
or down in direction of arrow fig. 48 .
– Move the head restraint downwards if required by pressing the locking button with one hand in direction of arrow and by pressing with the other hand the head
restraint downwards.Removing and installing a head restraint– Pull the head restraint up out of the seat backrest as far as the stop (on the rear
head restraints fold forward the seat backrest).
– Press the locking button in the direction of arrow fig. 48 and pull the head
restraint out.
– To re-insert the head restraint, push it do wn into the seat backrest far enough until
you hear the locking button engage.
The position of the front and rear outer head restraints is adjustable in height. The
middle rear head restraint* is adjustable in two positions.
The head restraints must be adjusted to ma tch the size of the seat occupant. Correctly
adjusted head restraints together with the seat belts offer effective protection for the
occupants page 86, “Correct seated position”.
WARNING
The head restraints must be correctly adjusted in order to offer effective
protection for the occupants in the event of an accident.
Do not drive under any circumstance with removed head restraints - risk of
injury!
If the rear seats are occupied, the rear head restraint must not be in the
lower position.
A4
A1A2
A2
s2bs.2.book Page 53 Monday, September 27, 2010 9:53 AM
Page 55 of 199

Seats and Stowage
54
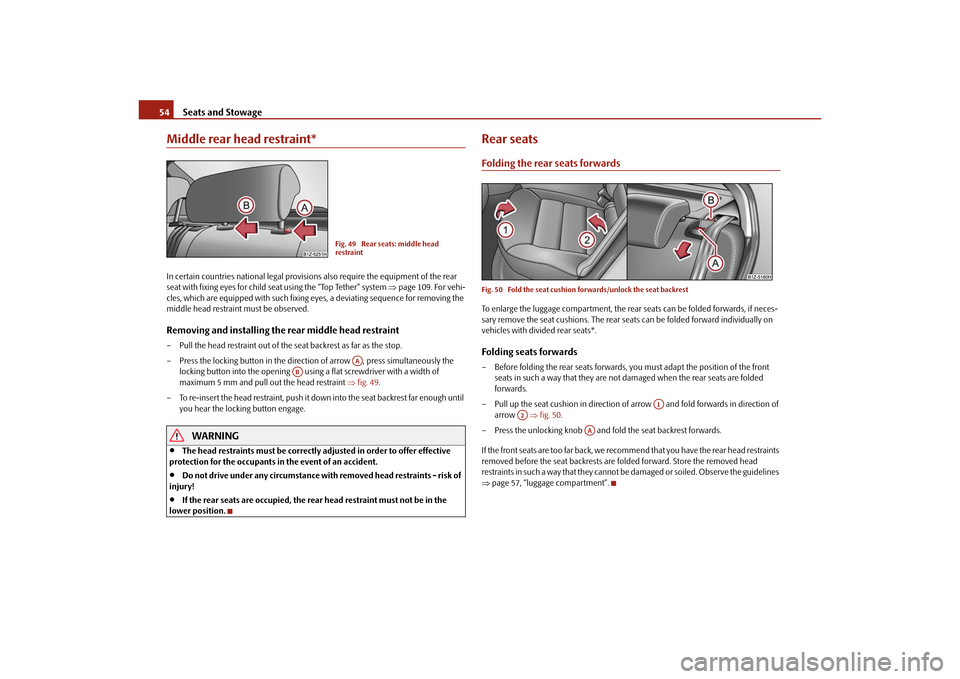
Middle rear head restraint*In certain countries national legal provisions also require the equipment of the rear
seat with fixing eyes for child seat using the “Top Tether” system page 109. For vehi-
cles, which are equipped with such fixing eyes, a deviating sequence for removing the
middle head restraint must be observed.Removing and installing the rear middle head restraint– Pull the head restraint out of the seat backrest as far as the stop.
– Press the locking button in the direct ion of arrow , press simultaneously the
locking button into the opening using a flat screwdriver with a width of
maximum 5 mm and pull out the head restraint fig. 49 .
– To re-insert the head restraint, push it down into the seat backrest far enough until you hear the locking button engage.
WARNING
The head restraints must be correctly adjusted in order to offer effective
protection for the occupants in the event of an accident.
Do not drive under any circumstance with removed head restraints - risk of
injury!
If the rear seats are occupied, the rear head restraint must not be in the
lower position.
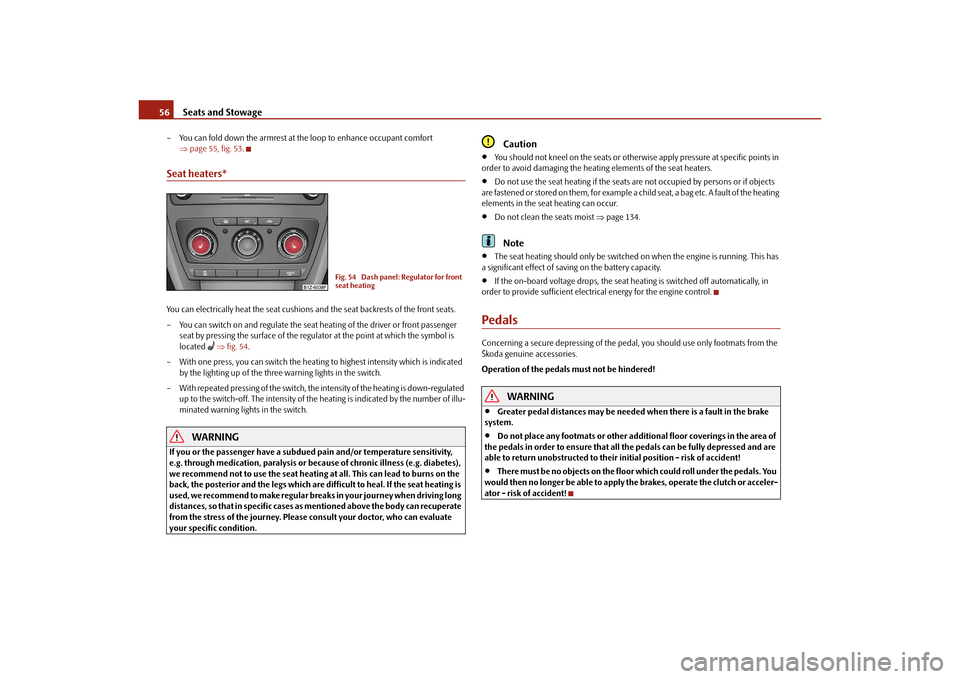
Rear seatsFolding the rear seats forwardsFig. 50 Fold the seat cushion forwards/unlock the seat backrestTo enlarge the luggage compartment, the rear seats can be folded forwards, if neces-
sary remove the seat cushions. The rear se ats can be folded forward individually on
vehicles with divided rear seats*.Folding seats forwards– Before folding the rear seats forwards, you must adapt the position of the front seats in such a way that they are not damaged when the rear seats are folded
forwards.
– Pull up the seat cushion in direction of arrow and fold forwards in direction of arrow fig. 50 .
– Press the unlocking knob and fold the seat backrest forwards.
If the front seats are too far back, we recomme nd that you have the rear head restraints
removed before the seat backrests are folded forward. Store the removed head
restraints in such a way that they cannot be damaged or soiled. Observe the guidelines
page 57, “luggage compartment”.
Fig. 49 Rear seats: middle head
restraint
AA
AB
A1
A2
AA
s2bs.2.book Page 54 Monday, September 27, 2010 9:53 AM
Page 56 of 199

Seats and Stowage55
Using the system
Safety
Driving Tips
General Maintenance
Breakdown assistance
Technical Data
Move seats into the initial positionMove seats into the initial position– Install the head restraint in the slightly lifted seat backrest.
– Place the rear lateral seat belt be hind the edge of the side trim panel fig. 51 .
– Then push the seat backrest back into th e upright position until the securing knob
clicks into place - check by pulling on the seat backrest.
– Make sure that the red pin is covered page 54, fig. 50 .
– Move the seat cushion into its original position.
WARNING
The belts and the belt locks must be in their original position after folding
back the seat cushions and the seat backrests - they must be ready to use.
The seat backrests must be securely interlocked in position so that no
objects in the luggage compartment can slide forwards if there is sudden
braking - risk of injury!
Pay attention that the seat backrests are correctly interlocked. It is only then
that the three-point seat belt for the middle seat can reliably fulfil its function.
Before folding the seat backrest back in to the secure position, place the rear
lateral seat belt behind the edge of the si de trim panel. Take suitable measures
to prevent that the seat belt is jammed between the seat backrest and the side
trim panel and is thus damaged.
Removing the seat cushionYou can enlarge the luggage compartment on vehicles with divided rear seats* by
removing the rear seat.Removing– Fold the seat cushion forwards completely.
– Press the wire clamps in the direction of the arrow fig. 52 and remove the seat
cushion from its holder.Installing– Press the wire clamps in the direction of the arrow and place it in its holder.
– Fold the seat cushion back into its original position.Rear seat armrest*
Fig. 51 Lock the seat backrest
AC
AB
Fig. 52 Removing seat cushionsFig. 53 Rear seats: Armrest
s2bs.2.book Page 55 Monday, September 27, 2010 9:53 AM
Page 57 of 199

Seats and Stowage
56
– You can fold down the armrest at the loop to enhance occupant comfort
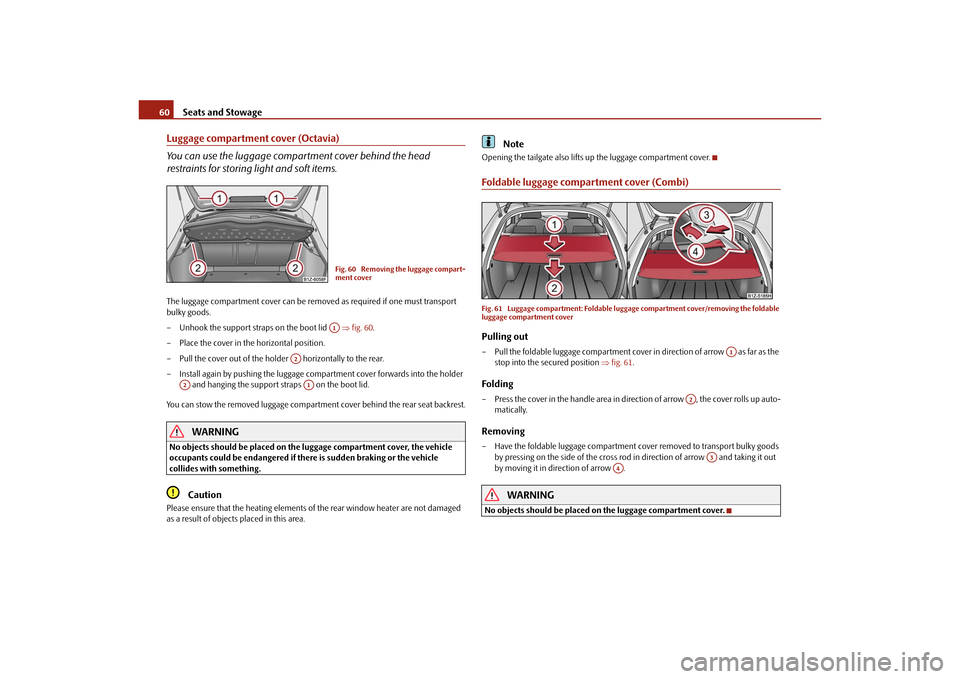
page 55, fig. 53 .Seat heaters*You can electrically heat the seat cushions and the seat backrests of the front seats.
– You can switch on and regulate the seat heating of the driver or front passenger
seat by pressing the surface of the regula tor at the point at which the symbol is
located
fig. 54 .
– With one press, you can switch the heating to highest intensity which is indicated by the lighting up of the three warning lights in the switch.
– With repeated pressing of the switch, the intensity of the heating is down-regulated up to the switch-off. The intensity of the heating is indicated by the number of illu-
minated warning lights in the switch.
WARNING
If you or the passenger have a subdued pain and/or temperature sensitivity,
e.g. through medication, paralysis or beca use of chronic illness (e.g. diabetes),
we recommend not to use the seat heating at all. This can lead to burns on the
back, the posterior and the legs which are di fficult to heal. If the seat heating is
used, we recommend to make regular brea ks in your journey when driving long
distances, so that in specific cases as mentioned above the body can recuperate
from the stress of the journey. Please consult your doctor, who can evaluate
your specific condition.
Caution
You should not kneel on the seats or otherwise apply pressure at specific points in
order to avoid damaging the heating elements of the seat heaters.
Do not use the seat heating if the seats ar e not occupied by persons or if objects
are fastened or stored on them, for example a child seat, a bag etc. A fault of the heating
elements in the seat heating can occur.
Do not clean the seats moist page 134.Note
The seat heating should only be switched on when the engine is running. This has
a significant effect of savi ng on the battery capacity.
If the on-board voltage drops, the seat heating is switched off automatically, in
order to provide sufficient electrical energy for the engine control.
PedalsConcerning a secure de pressing of the pedal, you should use only footmats from the
Škoda genuine accessories.
Operation of the pedals must not be hindered!
WARNING
Greater pedal distances may be needed when there is a fault in the brake
system.
Do not place any footmats or other additional floor coverings in the area of
the pedals in order to ensure that all the pedals can be fully depressed and are
able to return unobstructed to their initial position - risk of accident!
There must be no objects on the floor which could roll under the pedals. You
would then no longer be able to apply the brakes, operate the clutch or acceler-
ator - risk of accident!
Fig. 54 Dash panel: Regulator for front
seat heating
s2bs.2.book Page 56 Monday, September 27, 2010 9:53 AM
Page 60 of 199

Seats and Stowage59
Using the system
Safety
Driving Tips
General Maintenance
Breakdown assistance
Technical Data
Fixing nets - Net programme Combi*Fig. 57 Fixing net: Vertical pocket /division of the luggage compartmentFixing examples of the fixing net as pocket fig. 57 - left and as division of the luggage
compartment fig. 57 -right.
The floor fixing net is stow ed under the floor covering of the luggage compartment.
WARNING
The whole strength of the net makes it possible to load the pocket with objects
of up to 1.5 kg in weight. Heavy objects are not secured sufficiently - risk of
injury and net damage!
Caution
Do not place any objects with sharp edges in the nets - risk of net damage.
Folding hooks (Combi)Folding hooks for attaching small items of luggage, such as bags etc., are provided on
both sides of the luggage compartment fig. 58 .
An item of luggage weighing up to 10 kg can be attached to the hook.Fixing floor covering of the luggage compartmentFig. 59 Luggage compartment: Fixing of the floor covering Octavia/CombiThere is a loop (Octavia) or there are hook s (Combi) located on the floor covering of
the luggage compartment. You can fix the raised floor cover with a hook to the luggage
compartment cover (Octavia) fig. 59 - left, as if one needs to reach the spare wheel
or to the frame of the boot lid (Combi) fig. 59 - right.
Fig. 58 Luggage compartment: folding
hooks
s2bs.2.book Page 59 Monday, September 27, 2010 9:53 AM
Page 61 of 199

Seats and Stowage
60
Luggage compartment cover (Octavia)
You can use the luggage compartment cover behind the head
restraints for storing light and soft items.The luggage compartment cover can be removed as required if one must transport
bulky goods.
– Unhook the support straps on the boot lid fig. 60 .
– Place the cover in the horizontal position.
– Pull the cover out of the holder horizontally to the rear.
– Install again by pushing the luggage compartment cover forwards into the holder and hanging the support straps on the boot lid.
You can stow the removed luggage compartment cover behind the rear seat backrest.
WARNING
No objects should be placed on the luggage compartment cover, the vehicle
occupants could be endangered if ther e is sudden braking or the vehicle
collides with something.
Caution
Please ensure that the heating elements of the rear window heater are not damaged
as a result of objects placed in this area.
Note
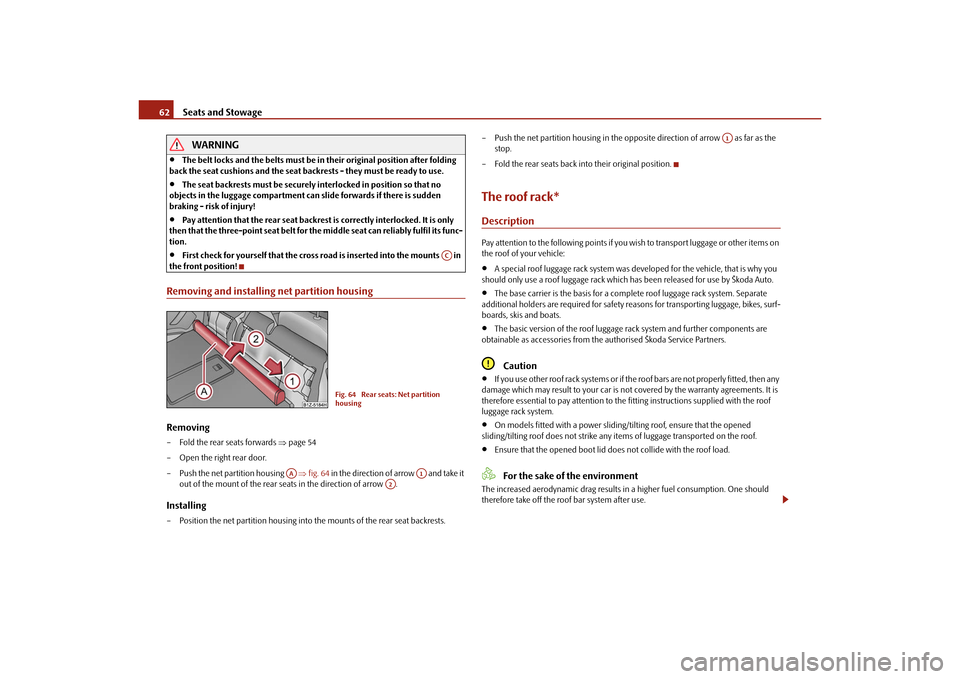
Opening the tailgate also lifts up the luggage compartment cover.Foldable luggage compartment cover (Combi)Fig. 61 Luggage compartment: Foldable lugg age compartment cover/removing the foldable
luggage compartment coverPulling out– Pull the foldable luggage compartment cover in direction of arrow as far as the
stop into the secured position fig. 61 .Folding– Press the cover in the handle area in di rection of arrow , the cover rolls up auto-
matically.Removing– Have the foldable luggage compartment cover removed to transport bulky goods
by pressing on the side of the cross rod in direction of arrow and taking it out
by moving it in direction of arrow .
WARNING
No objects should be placed on the luggage compartment cover.
Fig. 60 Removing the luggage compart-
ment coverA1
A2
A2
A1
A1
A2
A3
A4
s2bs.2.book Page 60 Monday, September 27, 2010 9:53 AM
Page 62 of 199

Seats and Stowage61
Using the system
Safety
Driving Tips
General Maintenance
Breakdown assistance
Technical Data
Net partition* (Combi)Use the net partition behind the rear seatsFig. 62 Folding down the storage compartment cover/pulling out the net partitionPulling out– Fold down the storage compartment cover behind the rear seats fig. 62 - left.
– Pull the net partition at the bracket out of the housing in direction of the holders .
– Insert the cross rod into one of the mounts and push the cross rod forwards.
– In the same way, fix the cross rod to the other side of the vehicle, mount .
– Fold the storage compartment cover downwards.Folding– Fold down the storage compartment cover behind the rear seats fig. 62 .
– Pull the cross rod back slightly, first on the one side then on the other side and take the cross rod out of the mounts .
– Hold the cross rod in such a way that the net partition can roll up slowly and
without damage into housing .
– Fold the storage compartment cover downwards.
If you wish to use the entire luggage compartment, you can remove the luggage
compartment cover fig. 61 .
WARNING
First check for yourself that the cross road is inserted into the mounts in
the front position!
Pay attention that the rear seat backrest is correctly interlocked. It is only
then that the three-point seat belt for the middle seat can reliably fulfil its
function.
Using the net partition behind the front seatsPulling out– Fold the rear seats forwards page 54
– Pull the net partition net at the plate out of the housing fig. 63 .
– Insert the cross rod into the mount first on the one side and push the cross rod forwards.
– In the same way, fix the cross rod to the other side of the vehicle, mount .Folding– Pull the cross rod back slightly, first on the one side then on the other side and take the cross rod out of the mounts fig. 63 .
– Hold the cross rod in such a way that the net partition can roll up slowly and
without damage into housing .
– Fold the rear seats back into their original position.
AA
AB
AC
AC
AC
ACAB
AC
Fig. 63 Pull out the net partition
AA
AB
AC
AC
ACAB
s2bs.2.book Page 61 Monday, September 27, 2010 9:53 AM
Page 63 of 199

Seats and Stowage
62WARNING
The belt locks and the belts must be in their original position after folding
back the seat cushions and the seat backrests - they must be ready to use.
The seat backrests must be securely interlocked in position so that no
objects in the luggage compartment can slide forwards if there is sudden
braking - risk of injury!
Pay attention that the rear seat backrest is correctly interlocked. It is only
then that the three-point seat belt for th e middle seat can reliably fulfil its func-
tion.
First check for yourself that the cross road is inserted into the mounts in
the front position!
Removing and installing net partition housingRemoving– Fold the rear seats forwards page 54
– Open the right rear door.
– Push the net partition housing fig. 64 in the direction of arrow and take it
out of the mount of the rear seats in the direction of arrow .Installing– Position the net partition housing into the mounts of the rear seat backrests. – Push the net partition housing in the oppo
site direction of arrow as far as the
stop.
– Fold the rear seats back into their original position.
The roof rack*DescriptionPay attention to the following points if you wish to transport luggage or other items on
the roof of your vehicle:
A special roof luggage rack system was de veloped for the vehicle, that is why you
should only use a roof luggage rack which has been released for use by Škoda Auto.
The base carrier is the basi s for a complete roof luggage rack system. Separate
additional holders are required for safety reasons for transporting luggage, bikes, surf-
boards, skis and boats.
The basic version of the roof luggage rack system and further components are
obtainable as accessories from the authorised Škoda Service Partners.Caution
If you use other roof rack systems or if the roof bars are not properly fitted, then any
damage which may result to yo ur car is not covered by the warranty agreements. It is
therefore essential to pay attention to the fitting instructions supplied with the roof
luggage rack system.
On models fitted with a power sliding/tilting roof, ensure that the opened
sliding/tilting roof does not strike any items of luggage transported on the roof.
Ensure that the opened boot lid do es not collide with the roof load.For the sake of the environment
The increased aerodynamic drag results in a higher fuel consumption. One should
therefore take off the roof bar system after use.
AC
Fig. 64 Rear seats: Net partition
housing
AA
A1
A2
A1
s2bs.2.book Page 62 Monday, September 27, 2010 9:53 AM