2010 MERCEDES-BENZ SLS COUPE oil
[x] Cancel search: oilPage 265 of 361
If there is
arisk of entrapment, sto pretracting
the rear aerofoil. To do so, release the button.
The rear aerofoil extends again.
Never leave children unsupervised in the vehi-
cle. They could inadvertently retract the
extended rear aerofoil. Somebody could
become trapped.
! Do not enter an automatic car wash with
the rear aerofoil extended. Otherwise, the
rear aerofoil may be damaged.
Only extend the rear aerofoil in order to
wash it by hand. Retract it again when you
have finished cleaning it.
You can extend the rear spoiler manually at
speeds below 120 km/h.
X Close the boot lid.
X Select key position 2with the Start/Stop
button.
X Press button 0001.
The rear spoiler is extended.
Button 0001flashes until the rear spoiler has
extended and then lights up in red.
You can retract the rear spoiler manually at
speeds below 120 km/h.
X At speeds between 120 km/h and
80 km/h: briefly press button 0001.
Button 0001flashes until the rear spoiler has
retracted and then goes out.
X At speeds below 80 km/h: press and hold
button 0001until the rear spoiler is fully
retracted.
Button 0001flashes until the rear spoiler has
retracted and then goes out.
Rear spoiler retracts manually
appears in the display.
i If you release button 0001while retracting
the rear spoiler, it extends again automati-
cally. Garage door opener*
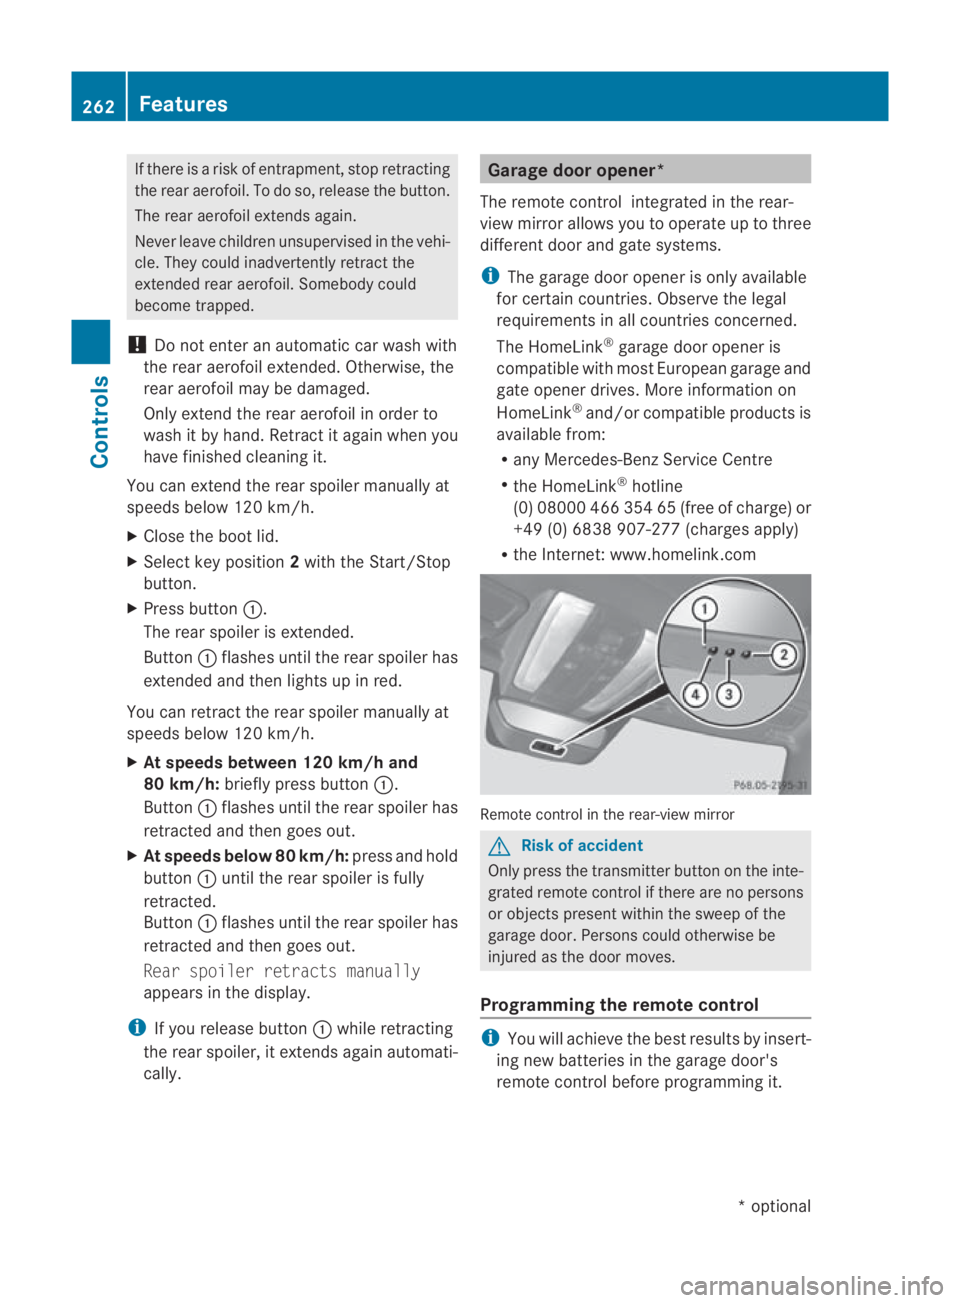
The remote control integrated in the rear-
view mirror allows you to operate up to three
differen tdoor and gate systems.
i The garage door opener is only available
for certain countries. Observe the legal
requirements in all countries concerned.
The HomeLink ®
garage door opener is
compatible with most European garage and
gate opener drives. More information on
HomeLink ®
and/or compatible products is
available from:
R any Mercedes-Benz Service Centre
R the HomeLink ®
hotline
(0) 08000 466 354 65 (free of charge) or
+49 (0) 6838 907-277 (charges apply)
R the Internet: www.homelink.com Remote control in the rear-view mirror
G
Risk of accident
Only press the transmitter button on the inte-
grated remote control if there are no persons
or objects present within the sweep of the
garage door. Persons could otherwise be
injured as the door moves.
Programming the remote control i
You will achieve the best results by insert-
ing new batteries in the garage door's
remote control before programming it. 262
FeaturesControls
*o
ptional
BA 197 ECE RE 2010/6a; 1; 2, en-GB
sabbaeu
Version: 3.0.3.6 2010-05-07T14:19:43+02:00 - Seite 262
Page 271 of 361
To avoid the risk of burns, only touch those
components described in the Owner's Manual
and observe the relevant safety notes. G
Risk of injury
The radiator fan between the radiator and the
engine can start automatically, even if the key
has been removed from the ignition lock. For
this reason, you must not reach into the fan
rotation area. Otherwise, you could be
injured.
The electronic ignition system uses high volt-
age. For this reason, you must never touch
ignition system components (ignition coil,
ignition cable, spark plug connector or test
socket) while:
R the engine is running.
R the engine is being started.
R the ignition is switched on and the engine
is being cranked by hand.
X Make sure that the windscreen wipers are
switched off. G
Risk of injury
The windscreen wipers and wiper linkage
could be set in motion.
When the bonnet is open, you or others could
be injured by the wiper linkage.
Make sure that the windscreen wipers are
switched off. Remove the key or make sure
that no ignition position has been selected
with KEYLESS-GO. All indicator lights must be
off in the instrument cluster.
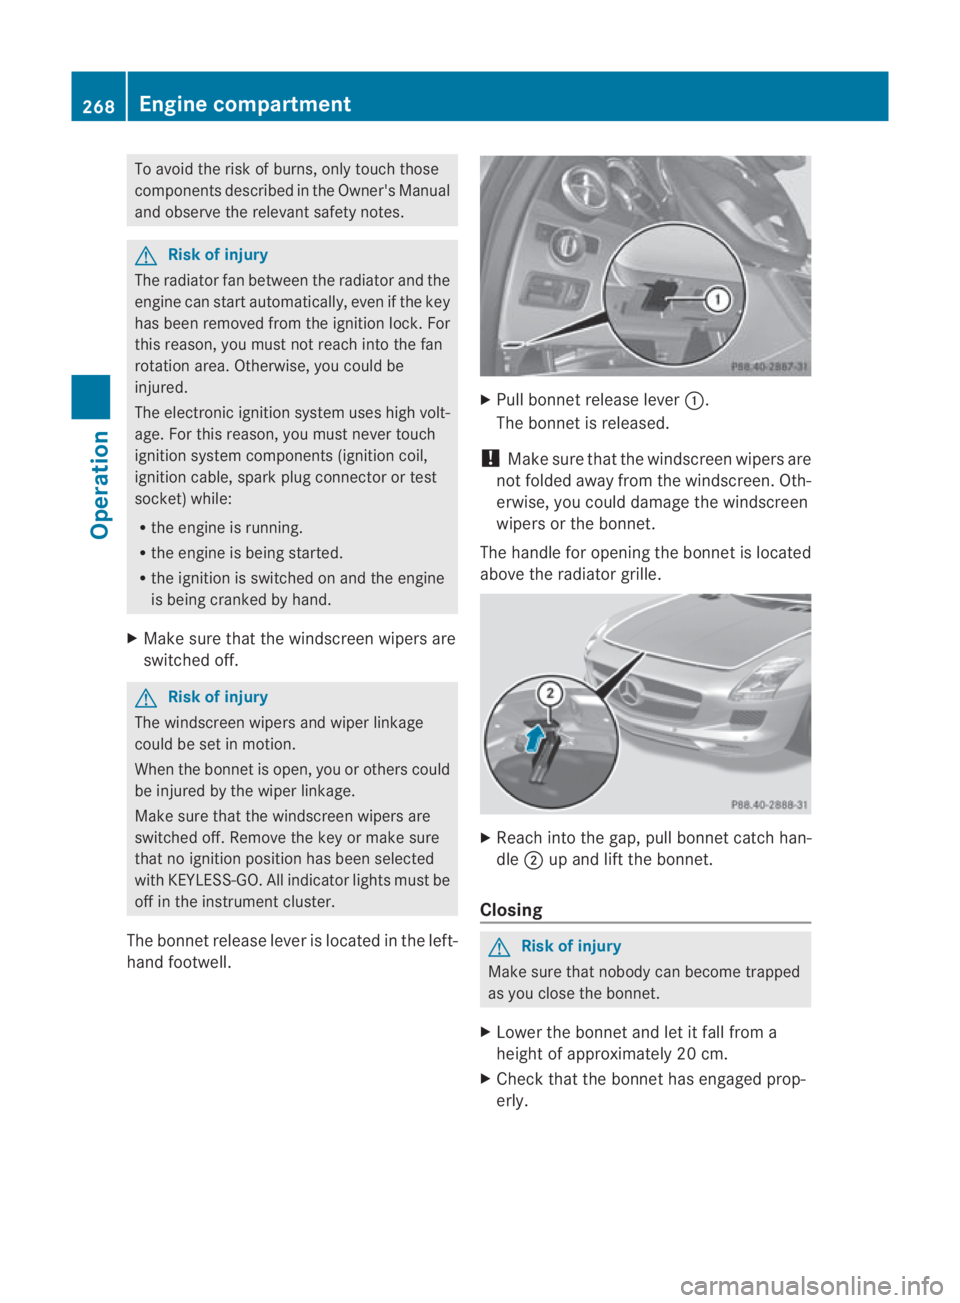
The bonnet release lever is located in the left-
hand footwell. X
Pull bonnet release lever 0001.
The bonnet is released.
! Make sure that the windscreen wipers are
not folded away from the windscreen .Oth-
erwise, you could damage the windscreen
wipers or the bonnet.
The handle for opening the bonnet is located
above the radiato rgrille. X
Reach into the gap, pull bonnet catch han-
dle 0002up and lift the bonnet.
Closing G
Risk of injury
Make sure that nobody can become trapped
as you close the bonnet.
X Lower the bonnet and let it fall from a
height of approximately 20 cm.
X Check that the bonnet has engaged prop-
erly. 268
Engine compartmentOperation
BA 197 ECE RE 2010/6a; 1; 2, en-GB
sabbaeu
Version: 3.0.3.6
2010-05-07T14:19:43+02:00 - Seite 268
Page 272 of 361
i
If the bonnet can be raised slightly, it is
not properly engaged. Open it again and
close it with a little more force. Engine oil
Depending on driving style, the vehicle con-
sumes a maximum of 0.8 l oil per 1000 km.
The oil consumption may be highert han this
when the vehicle is new or if you frequently
drive at high engine speeds.
Checking the engine oil level X
To check the engine oil, move the vehicle
to level ground. Switch off the engine at
normal operating temperature after run-
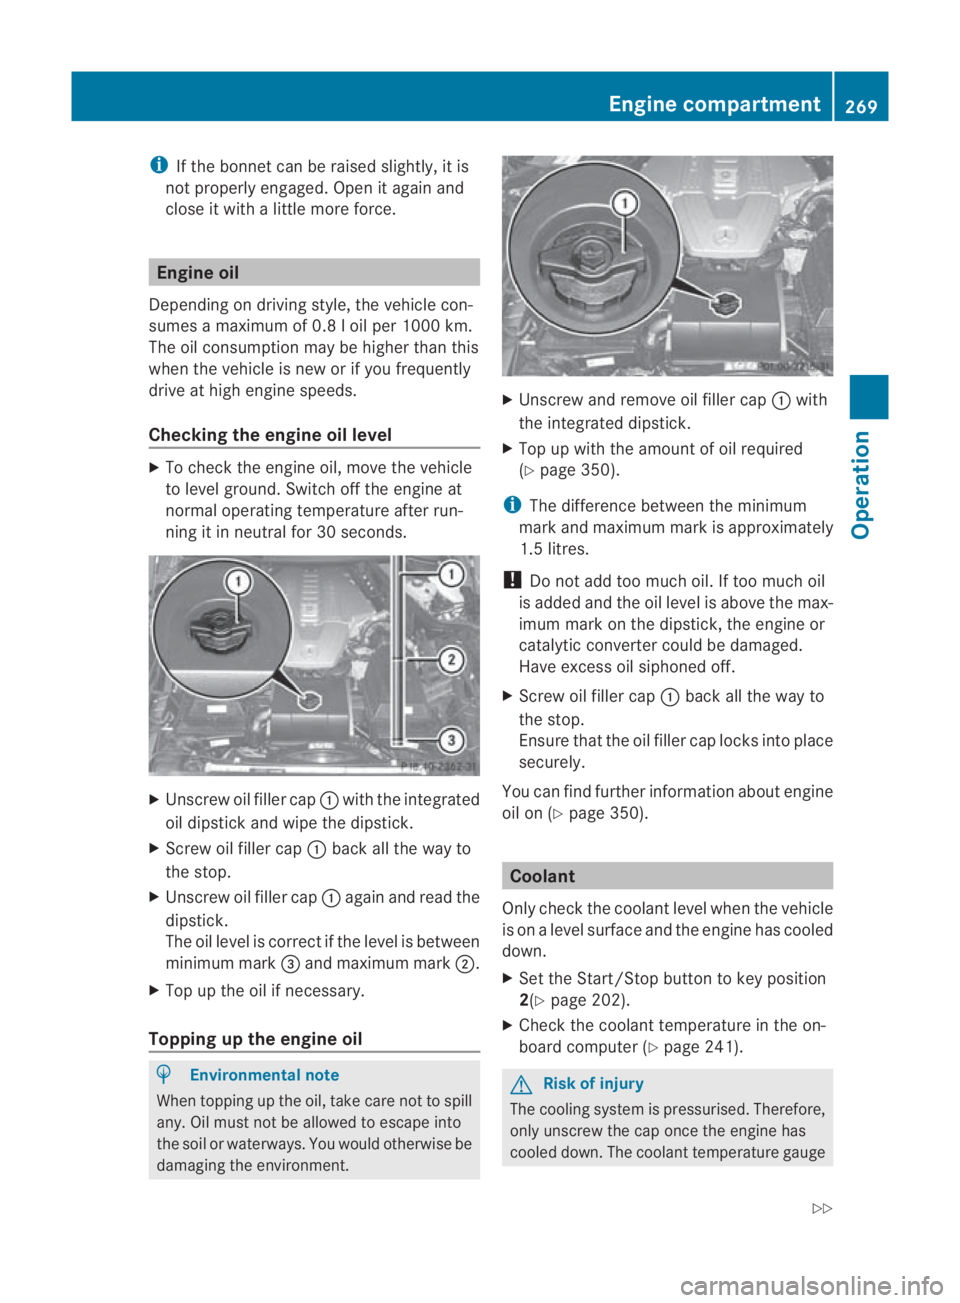
ning it in neutral for 30 seconds. X
Unscrew oil filler cap 0001with the integrated
oil dipstick and wipe the dipstick.
X Screw oil filler cap 0001back all the way to
the stop.
X Unscrew oil filler cap 0001again and read the
dipstick.
The oil level is correct if the level is between
minimum mark 0015and maximum mark 0002.
X Top up the oil if necessary.
Topping up the engine oil H
Environmental note
When topping up the oil, take care not to spill
any. Oil must not be allowed to escape into
the soil or waterways. You would otherwise be
damaging the environment. X
Unscrew and remove oil filler cap 0001with
the integrated dipstick.
X Top up with the amount of oil required
(Y page 350).
i The difference between the minimum
mark and maximum mark is approximately
1.5 litres.
! Do not add too much oil. If too much oil
is added and the oil level is above the max-
imum mark on the dipstick, the engine or
catalytic converter could be damaged.
Have excess oil siphoned off.
X Screw oil filler cap 0001back all the way to
the stop.
Ensure that the oil filler cap locks into place
securely.
You can find further information about engine
oil on (Y page 350). Coolant
Only check the coolant level when the vehicle
is on a level surface and the engine has cooled
down.
X Set the Start/Stop button to key position
2(Y page 202).
X Check the coolant temperature in the on-
board computer (Y page 241). G
Risk of injury
The cooling system is pressurised. Therefore,
only unscrew the cap once the engine has
cooled down. The coolant temperature gauge Engine compartment
269Operation
BA 197 ECE RE 2010/6a; 1; 2, en-GB
sabbaeu Version: 3.0.3.6 2010-05-07T14:19:43+02:00 - Seite 269 Z
Page 274 of 361
wheels which have been approved by
Mercedes-Ben
zspecifically for your vehi-
cle. These tyres have been specially adap-
ted for use with the driving safety systems,
such as ABS or ESP ®
.Ify ou use other tyres
and wheels, Mercedes-Benz cannot accept
any responsibility for damage that may
result from this. Further information about
tyres, wheels and approved combinations
can be obtained from any Mercedes-Benz
Service Centre.
If you use tyres other than those tested and
recommended for Mercedes-Benz vehi-
cles, characteristics such as handling, vehi-
cle noise emissions and fuel consumption
may be adversely affected. In addition, the
wheels may come into contact with the
body or axle components when heavily loa-
ded or when driving with snow chains. This
could result in damage to the tyres or the
vehicle.
! Retreaded tyres are neither tested nor
recommended by Mercedes-Benz, since
previous damage cannot always be detec-
ted on retreaded tyres. As a result,
Mercedes-Benz cannot guarantee vehicle
safety if retreaded tyres are fitted. Do not
fit used tyres if you have no information
about their previous usage. G
Risk of accident
Tyres, wheels or accessories which have not
been approved by Mercedes-Benz for your
vehicle or are not used as they should be, can
impair driving safety. As a result, you could
cause an accident .Before purchasing and
using them, enquire about their suitability,
legal stipulations and factory recommenda-
tions at a Mercedes-Benz Service Centre.
Modification work on the brake system and
wheels is not permitted, nor is the use of
spacer plates or brake dust shields. This inva-
lidates the General Operating Permit for the
vehicle. Notes on selecting, fitting and replacing
tyres R
Only fit tyres and wheels of the same type
and make.
R Only fit tyres of the correct size onto the
wheels.
R After fitting new tyres, run them in at mod-
erate speeds for the first 100 km as they
only reach their full performance after this
distance.
R Fit new tyres on the front wheels first if
tyres of the same size are required on the
fron tand rea rwheels.
R Replace the tyres after six years at the lat-
est, regardless of wear. This also applies to
the collapsible emergency spare wheel* 17
.
R Do not drive with tyres which have too little
tread depth, as this significantly reduces
the traction on wet roads (aquaplaning).
! Store tyres that are not being used in a
cool, dry and preferably dark place. Protect
the tyres against oil, grease, petrol and die-
sel.
Notes on regularly inspecting wheels
and tyres R
Regularly check the wheels and tyres of
your vehicle for damage (e.g. cuts, punctu-
res, tears, bulges on tyres and deformation,
cracks or severe corrosion on wheels), at
least every 14 days, as well as after driving
off-road or on rough roads. Damaged
wheels can cause a loss of tyre pressure.
R Regularly check the tyre tread depth and
the condition of the tread across the whole
width of the tyre (Y page 272). If neces-
sary, turn the front wheels to full lock in
order to inspect the inner side of the tyre
surface.
R All wheels must have a valve cap to protect
the valve against dirt and moisture. Do not
fit anything onto the valve (such as tyre
pressure monitoring systems) other than
17 Only for certain countries. Tyres and wheels
271Operation
*optional
BA 197 ECE RE 2010/6a; 1; 2, en-GB
sabbaeu
Version: 3.0.3.6 2010-05-07T14:19:43+02:00 - Seite 271 Z
Page 285 of 361
High-pressure cleaners
G
Risk of accident
Using high-pressure cleaners with circular-jet
nozzles (dirt grinders) may cause damage to
the vehicle, in particula rto the tyres.
Using damaged tyres results in an increased
risk of accident. A sudden loss of tyre pres-
sure while you are driving may cause you to
lose control of your vehicle, cause an accident
and injure yourself and others.
! Observe the instructions issued by the
equipment manufacturer concerning the
distance to be maintained between the
nozzle of the high-pressure cleaner and the
vehicle (at least 30 cm).
Move the high-pressure cleaner nozzle
around when cleaning your vehicle.
Do not aim directly at any of the following:
R tyres
R door joint
R electrical components
R battery
R connectors
R exterior lighting
R seals
R trim elements
Damaged seals or electrical components
can lead to leaks or failures.
Cleaning the wheels !
Do not use acidic wheel cleaning products
to remove brake dust. This could damage
wheel bolts and brake components.
! Do not park the vehicle for a long period
of time directly after cleaning, especially if
the wheels have just been cleaned with a
wheel cleaner. Wheel cleaners could cause
rapid corrosion of the brake discs and
brake pads/linings. After cleaning, park
the vehicle when it is at normal operating
temperature. Matt finish* Your vehicle is lacquered with a clear matt
finish. To avoid damage to the finish by
improper handling, observe the following
instructions.
!
Under no circumstances should you pol-
ish the vehicle. Polishing will make the
paintwork shine.
! Never use paint cleaner, buffing or pol-
ishing products such as gloss preserver
(wax). These products are only suitable for
high-gloss surfaces. Their use on vehicles
with matt finish leads to considerable sur-
face damage (shiny, spotted areas).
If wax comes into contact with the painted
surface by accident, remove it immediately
with commercially available petroleum
ether. Do so carefully and do not apply too
much pressure to the painted surface.
Ensure that no resinous, greasy or oily sub-
stances come into contact with the paint,
as these can leave a residue. If such sub-
stances do come into contact with the pain-
ted surface accidentally, remove these
immediately with commercially available
petroleum ether. Do so carefully and do not
apply too much pressure to the painted
surface.
Tar stains or marks on the painted surface
can be removed with a commercially avail-
able tar remover. Do so carefully and do not
apply too much pressure to the painted
surface.
Always have paintwork repairs carried out
at a qualified specialist workshop, e.g. a
Mercedes-Benz Service Centre.
! Do not affix stickers to the painted sur-
face. Adhesive residue could damage the
paintwork.
i Of the Mercedes-Benz care products, use
only insect remover and car shampoo. 282
CareOperation
*o
ptional
BA 197 ECE RE 2010/6a; 1; 2, en-GB
sabbaeu
Version: 3.0.3.6 2010-05-07T14:19:43+02:00 - Seite 282
Page 286 of 361
Cleaning paintwork
Scratches, corrosive deposits, areas affected
by corrosio nand damage caused by inade-
quate care canno talways be completely
repaired. In such cases, visit a qualified spe-
cialist workshop immediately, e.g. a
Mercedes-Benz Service Centre.
X Remove the following types of dirt immedi-
ately, whilst avoiding rubbin gtoo hard.
Soak:
R insect remains with insect remover
R bird droppings with water
and rinse off the treated surface after-
wards.
Remove:
R tree resin, oils, fuels and greases by rub-
bing gently with a cloth soaked in petro-
leum ether or lighter fluid
R tar stain with tar remover
R wax with silicone remover
! Do not affix:
R stickers
R films
R magnetic plates or similar items
to painted surfaces. Otherwise, you could
damage the paintwork.
Cleaning the windows X
Clean the inside and outside of the win-
dows with a damp cloth and a cleaning
product approved and recommended by
Mercedes-Benz.
! Clean the water drainage channels of the
windscreen and the rear window at regular
intervals. Under certain circumstances,
deposits such as leaves, petals and pollen
may prevent water from draining away
leading to corrosion damage. Cleaning wiper blades G
Risk of injury
Before cleaning the windscreen or wiper
blades, turn the key to position 0in the igni-
tion lock or press the Start/Stop button
repeatedly until all indicator lamps in the
instrument cluster have gone out. The wind-
screen wipers could otherwise move and
injure you.
! Only fold the windscreen wipers away
from the windscreen when vertical. Other-
wise, you will damage the bonnet.
! Do not clean the wiper blades too often
and do not rub them too hard, as this will
result in damage to the graphite coating.
This could cause wiper noise.
X Switch off the engine.
X Take your foot off the brake pedal.
X Set the windscreen wipers to posi-
tion 0014 on the combination switch.
X Press the Start/Stop button repeatedly
until the windscreen wipers start.
X When the wiper arms have reached a ver-
tical position: press the Start/Stop button.
X Fold the wiper arm away from the wind-
screen until it engages.
X Set the wiper blade at right angles to the
wiper arm.
X Clean the wiper blades carefully using a
damp cloth.
X Fold the windscreen wipers back again
before switching on the ignition.
Cleaning the headlamps X
Clean the plastic lenses of the headlamps
and rear lighting with a damp sponge and
windscreen washer fluid or cleaning cloths.
! Only use windscreen washer fluid or
cleaning cloths which are suitable for plas-
tic lamp lenses. Unsuitable windscreen
washer fluid or cleaning cloths could Care
283Operation
BA 197 ECE RE 2010/6a; 1; 2, en-GB
sabbaeu Version: 3.0.3.6 2010-05-07T14:19:43+02:00 - Seite 283 Z
Page 287 of 361
scratch or damage the plastic lamp lenses
of the headlamps and rear lighting.
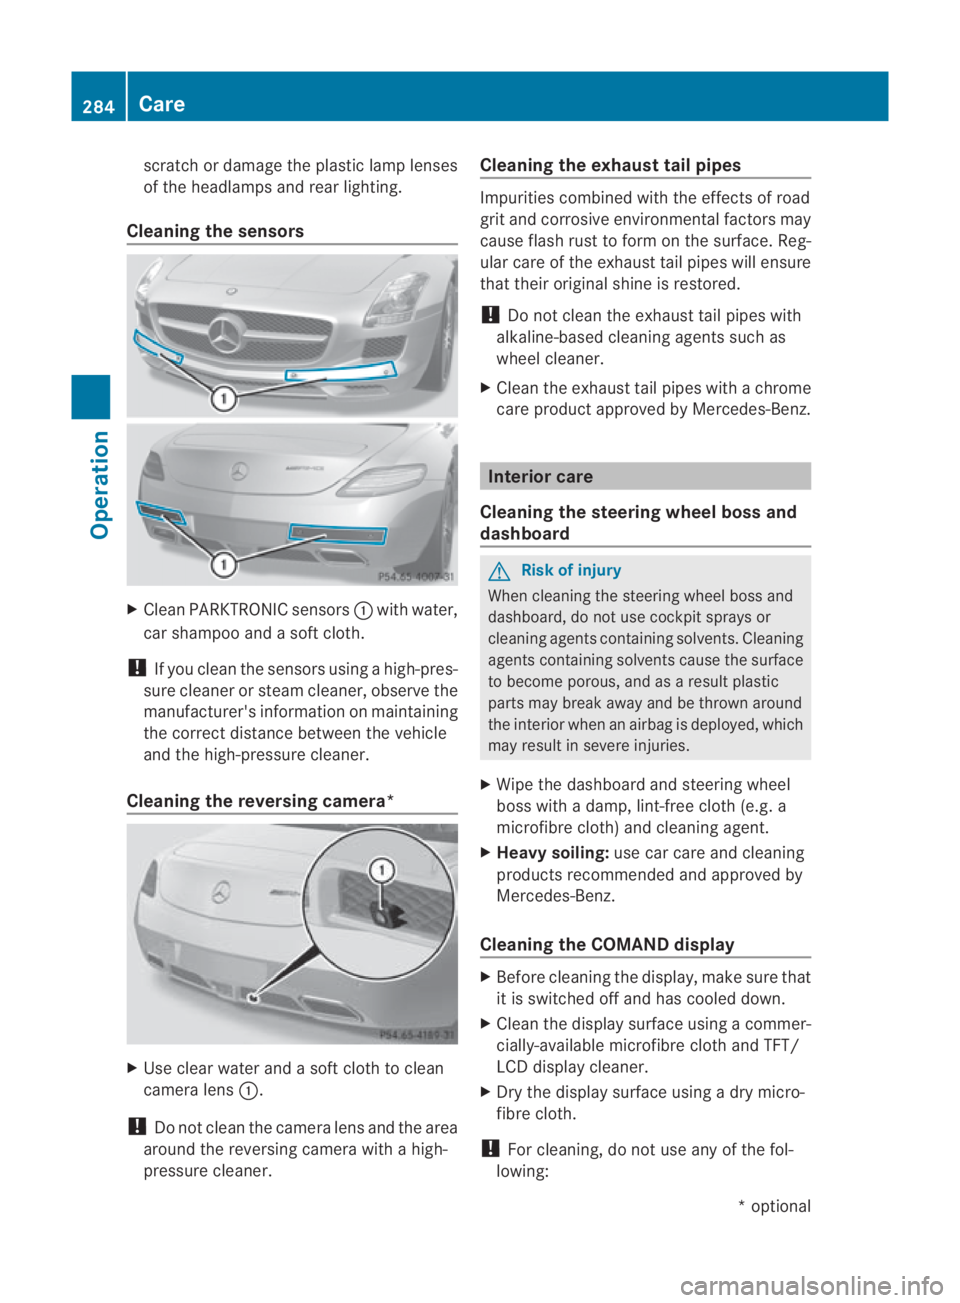
Cleaning the sensors X
CleanP ARKTRONIC sensors 0001with water,
car shampoo and a sof tcloth.
! If you clean the sensors using a high-pres-
sure cleaner or steam cleaner, observe the
manufacturer' sinformation on maintaining
the correct distance between the vehicle
and the high-pressure cleaner.
Cleaning the reversing camera* X
Use clear water and a sof tcloth to clean
camera lens 0001.
! Do not clean the camera lens and the area
around the reversing camera with a high-
pressure cleaner. Cleaning the exhaust tail pipes Impurities combined with the effects of road
grit and corrosive environmental factors may
cause flash rust to for monthe surface. Reg-
ular care of the exhaust tail pipes will ensure
that their original shine is restored.
! Do not clean the exhaust tail pipes with
alkaline-based cleaning agents such as
wheel cleaner.
X Cleant he exhaust tail pipes with a chrome
care product approved by Mercedes-Benz. Interior care
Cleaning the steering wheel boss and
dashboard G
Risk of injury
When cleaning the steering wheel boss and
dashboard, do not use cockpit sprays or
cleaning agents containing solvents. Cleaning
agents containing solvents cause the surface
to become porous, and as aresult plastic
parts may break away and be thrown around
the interior when an airbag is deployed, which
may result in severe injuries.
X Wipe the dashboard and steerin gwheel
boss with a damp, lint-free cloth (e.g. a
microfibre cloth) and cleaning agent.
X Heavy soiling: use car care and cleaning
products recommended and approved by
Mercedes-Benz.
Cleaning the COMAND display X
Before cleaning the display, make sure that
it is switched off and has cooled down.
X Cleant he display surface using a commer-
cially-available microfibre cloth and TFT/
LCD display cleaner.
X Dry the display surface using a dry micro-
fibre cloth.
! For cleaning, do not use any of the fol-
lowing: 284
CareOperation
*o
ptional
BA 197 ECE RE 2010/6a; 1; 2, en-GB
sabbaeu
Version: 3.0.3.6 2010-05-07T14:19:43+02:00 - Seite 284
Page 288 of 361
R
alcohol-based solvents or petrol
R abrasive cleaning agents
R commercially-available household clean-
ing agents
These may damage the display surface. Do
no te xert pressure when cleaning the dis-
play surface as this ma ylead to irreversible
damage.
Cleaning the seat covers !
Do not use microfibre cloths to clean gen-
uine leather covers, as these are too
aggressive and, if used often, may damage
the cover.
! Clean genuine leather cover swith a damp
cloth, the nwipe the covers down with a dry
cloth. Make sure that the leathe rdoes not
become soaked. Only use leather care
agents that have been tested and approved
by Mercedes-Benz. You can obtain these
from any Mercedes-Benz Service Centre.
i Note that regular care is essential to
ensure that the quality (both appearance
and comfort) of the covers is retained over
time.
Cleaning the plastic trim !
Do not affix to plastic surfaces:
R stickers
R films
R scented oil bottles or similar items
You can otherwise damage the plastic.
! Ensure that cosmetics, insect repellent
and suntan lotion do not come into contact
with the vehicle's trim. This will protec tthe
vehicle's high-quality trim and help retain
its overall appearance.
X Wipe the plastic trim with a damp, lint-free
cloth (e.g. a microfibre cloth).
X Heavy soiling: use car care and cleaning
products recommended and approved by
Mercedes-Benz. Cleaning trim strips X
Wipe the trim strips with a damp, lint-free
cloth (e.g. a microfibre cloth).
X Heavy soiling: use car care and cleaning
products recommended and approved by
Mercedes-Benz. Care
285Operation
BA 197 ECE RE 2010/6a; 1; 2, en-GB
sabbaeu Version: 3.0.3.6 2010-05-07T14:19:43+02:00 - Seite 285 Z