2010 MERCEDES-BENZ SLS COUPE engine oil
[x] Cancel search: engine oilPage 224 of 361
i
Observe the notes on the first 1500 km
when running-in the vehicle (Y page 266).
! During a cold start with low engine oil
temperatures (below 0†), the maximum
engine speed is restricted in order to pro-
tect the engine. To protect the engine and
maintain smooth engine operation, avoid
driving at full throttle when the engine is
cold.
X Depress the brake pedal and keep it
depressed.
X Use the selector lever to shift the trans-
mission to position Dor R.
X Release the brake pedal.
X Carefully depress the accelerato rpedal.
The electric parking brake is automatically
released (Y page 221).
i The vehicle locks centrally once you have
pulled away. The locking knobs in the doors
drop down.
Hill start assist Hill start assist helps you when pulling away
on uphill gradients. It holds the vehicle for a
short time after you have removed your foot
from the brake pedal. This gives you enough
time to move your foot from the brake pedal
to the accelerator pedal and depress it before
the vehicle begins to roll. G
Risk of accident
Never leave the vehicle when it is held by hill
start assist. After approximately one second,
hill start assist will no longer brake your vehi-
cle and it could roll away.
X Take your foot off the brake pedal.
i Once you have taken your foot off the
brake pedal, the vehicle is held for around
one second.
X Pull away. Hill start assist does not function if:
R
you are pulling away on a level road or a
downhill gradient.
R the transmission is in position N.
R the vehicle is secured with the electric
parking brake.
R ESP ®
is malfunctioning. Parking
G
Risk of accident
Never leave children unsupervised in the vehi-
cle. They might release the electric parking
brake. This could lead to aserious or fatal
accident. G
Risk of fire
Make sure that the exhaust system does not
under any circumstances come into contact
with flammable materials such as dry grass or
petrol. Do not park the vehicle on dry grass-
land or harvested grain fields. The material
could otherwise ignite and set the vehicle on
fire.
To ensure that the vehicle is secured against
rolling away unintentionally:
R the electric parking brake must be applied.
R the transmission must be in P.
R on steep uphill or downhill gradients, the
fron twheels must be turned towards the
kerb.
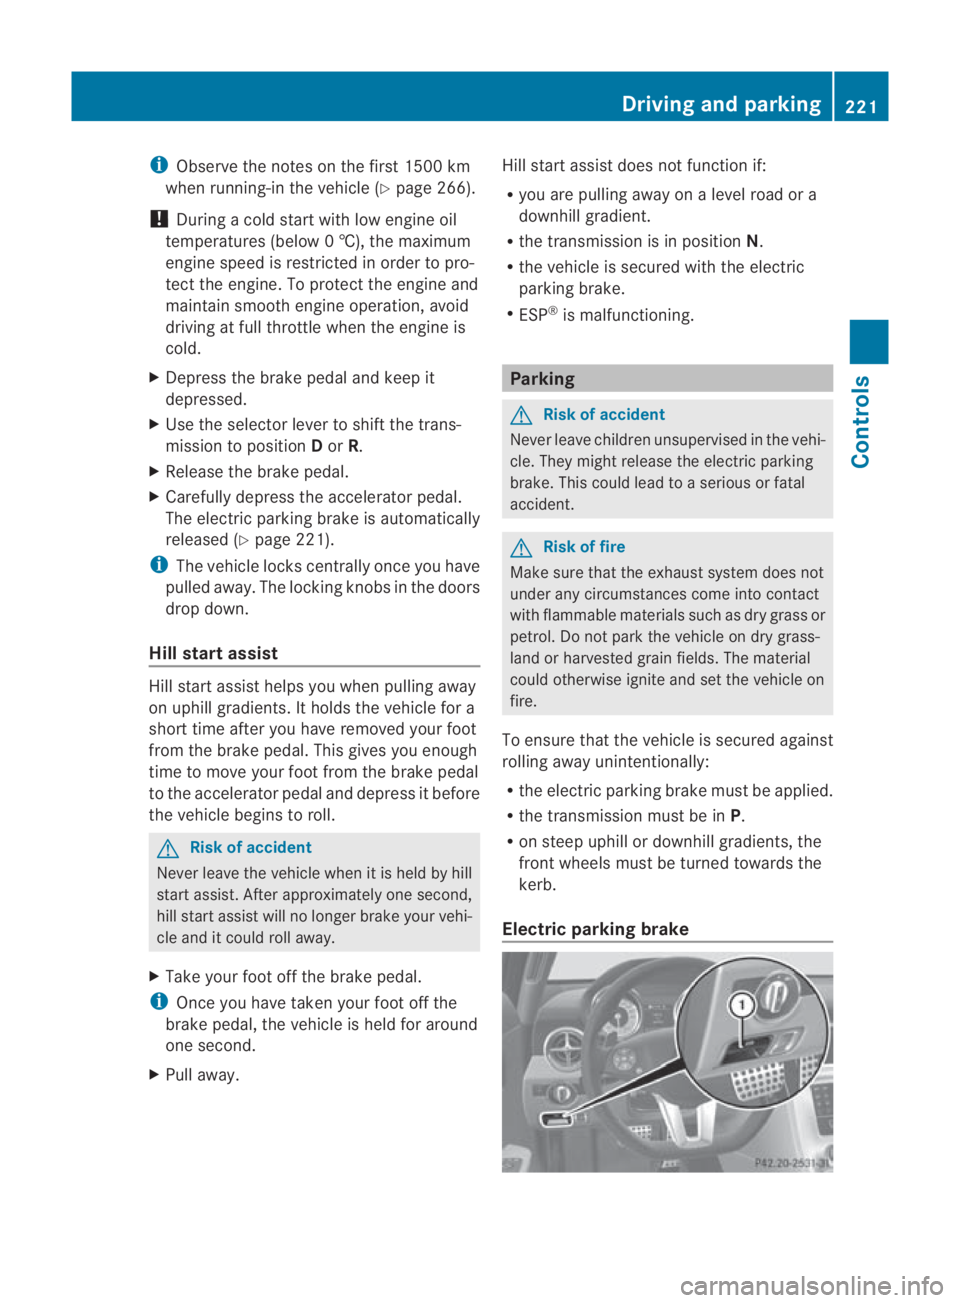
Electric parking brake Driving and parking
221Controls
BA 197 ECE RE 2010/6a; 1; 2, en-GB
sabbaeu Version: 3.0.3.6 2010-05-07T14:19:43+02:00 - Seite 221 Z
Page 232 of 361
Manual drive program
In manual drive program
M, you need to
change geary ourself using the steering wheel
gearshift paddles (Y page 228). At low engine
speeds, the transmission shifts down auto-
matically.
! In manual drive program M, the transmis-
sion does not shift up automatically even
when the engine limiting speed for the cur-
rent gear is reached. When the engine lim-
iting speed is reached, the fuel supply is cut
to prevent the engine from overrevving.
Always make sure that the engine speed
does not reach the red area of the rev coun-
ter and observe the upshift indicator. There
is otherwise a risk of engine damage.
X To activate the manual drive program:
turn the program selector switch until M
appears in the instrument cluster's multi-
function display.
M lights up in red on the program selector
switch.
X To deactivate the manual drive pro-
gram: turn the selector switch and select
another drive program.
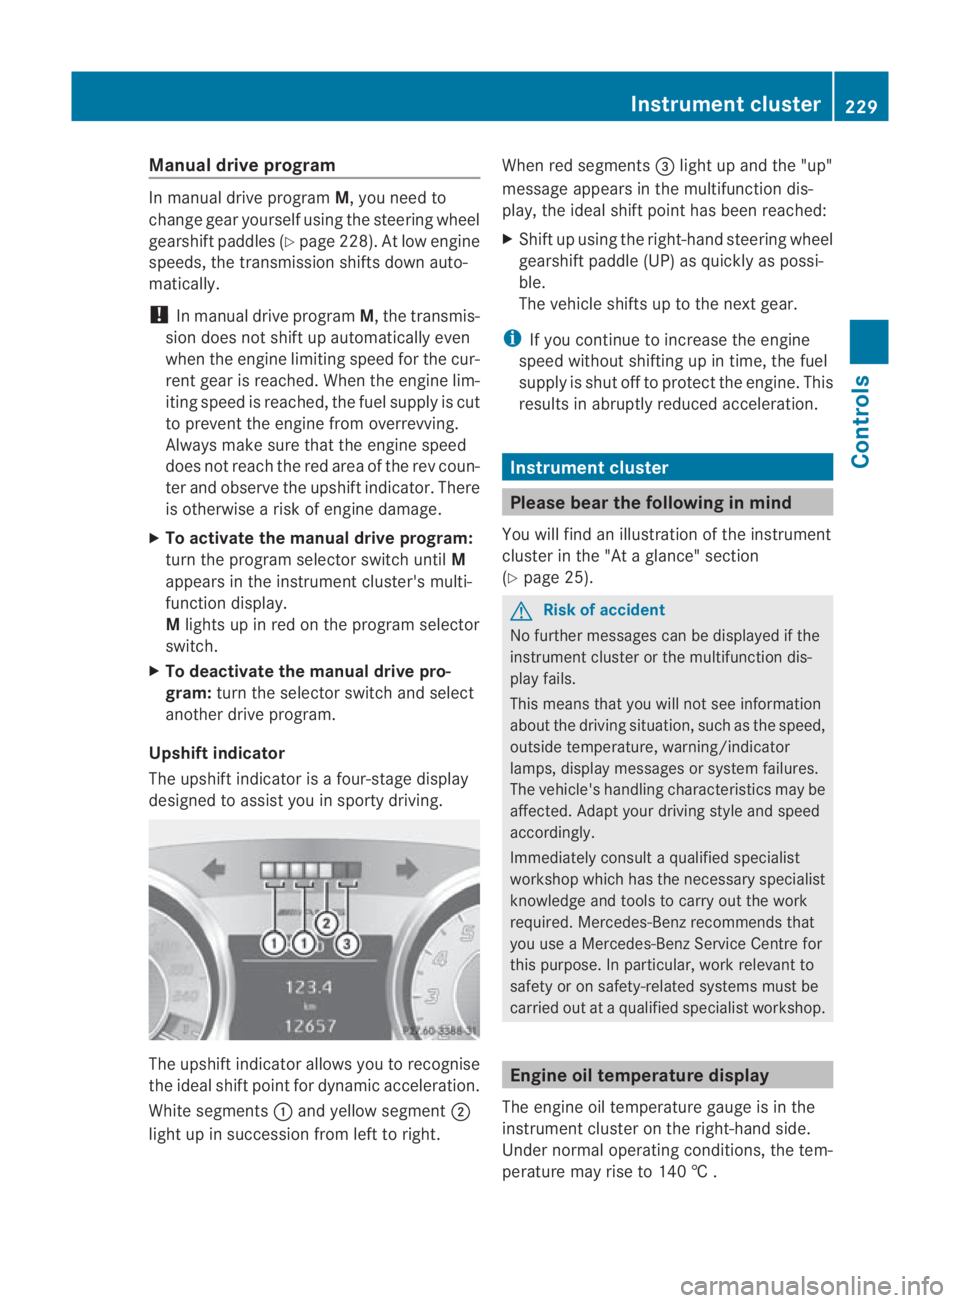
Upshift indicator
The upshift indicator is a four-stage display
designed to assist you in sporty driving. The upshift indicator allows you to recognise
the ideal shift point for dynamic acceleration.
White segments
0001and yellow segment 0002
light up in succession from left to right. When red segments
0015light up and the "up"
message appears in the multifunction dis-
play, the ideal shift point has been reached:
X Shift up using the right-hand steering wheel
gearshift paddle (UP) as quickly as possi-
ble.
The vehicle shifts up to the next gear.
i If you continue to increase the engine
speed without shifting up in time, the fuel
supply is shut off to protec tthe engine. This
results in abruptly reduced acceleration. Instrument cluster
Please bear the following in mind
You will find an illustration of the instrument
cluster in the "At a glance" section
(Y page 25). G
Risk of accident
No further messages can be displayed if the
instrument cluster or the multifunction dis-
play fails.
This means that you will not see information
about the driving situation, such as the speed,
outside temperature, warning/indicator
lamps, display messages or system failures.
The vehicle's handling characteristics may be
affected. Adapt your driving style and speed
accordingly.
Immediately consult a qualified specialist
workshop which has the necessary specialist
knowledge and tools to carry out the work
required. Mercedes-Ben zrecommends that
you use a Mercedes-Benz Service Centre for
this purpose. In particular, work relevant to
safety or on safety-related systems must be
carried out at a qualified specialist workshop. Engine oil temperature display
The engine oil temperature gauge is in the
instrument cluster on the right-hand side.
Under normal operating conditions, the tem-
perature may rise to 140 † . Instrument cluster
229Controls
BA 197 ECE RE 2010/6a; 1; 2, en-GB
sabbaeu Version: 3.0.3.6 2010-05-07T14:19:43+02:00 - Seite 229 Z
Page 244 of 361
X
Press the 0008or000E button on the steer-
ing wheel to select the Settingsmenu.
X Press the 000Cor000F button to select the
Factory setting submenu.
X Press the 000Abutton to confirm.
The Reset all message appears.
X Press the 000Cor000F button to select
Yes orNo.
X Press the 000Abutton to confirm the selec-
tion.
If you have selected Yes, the multifunction
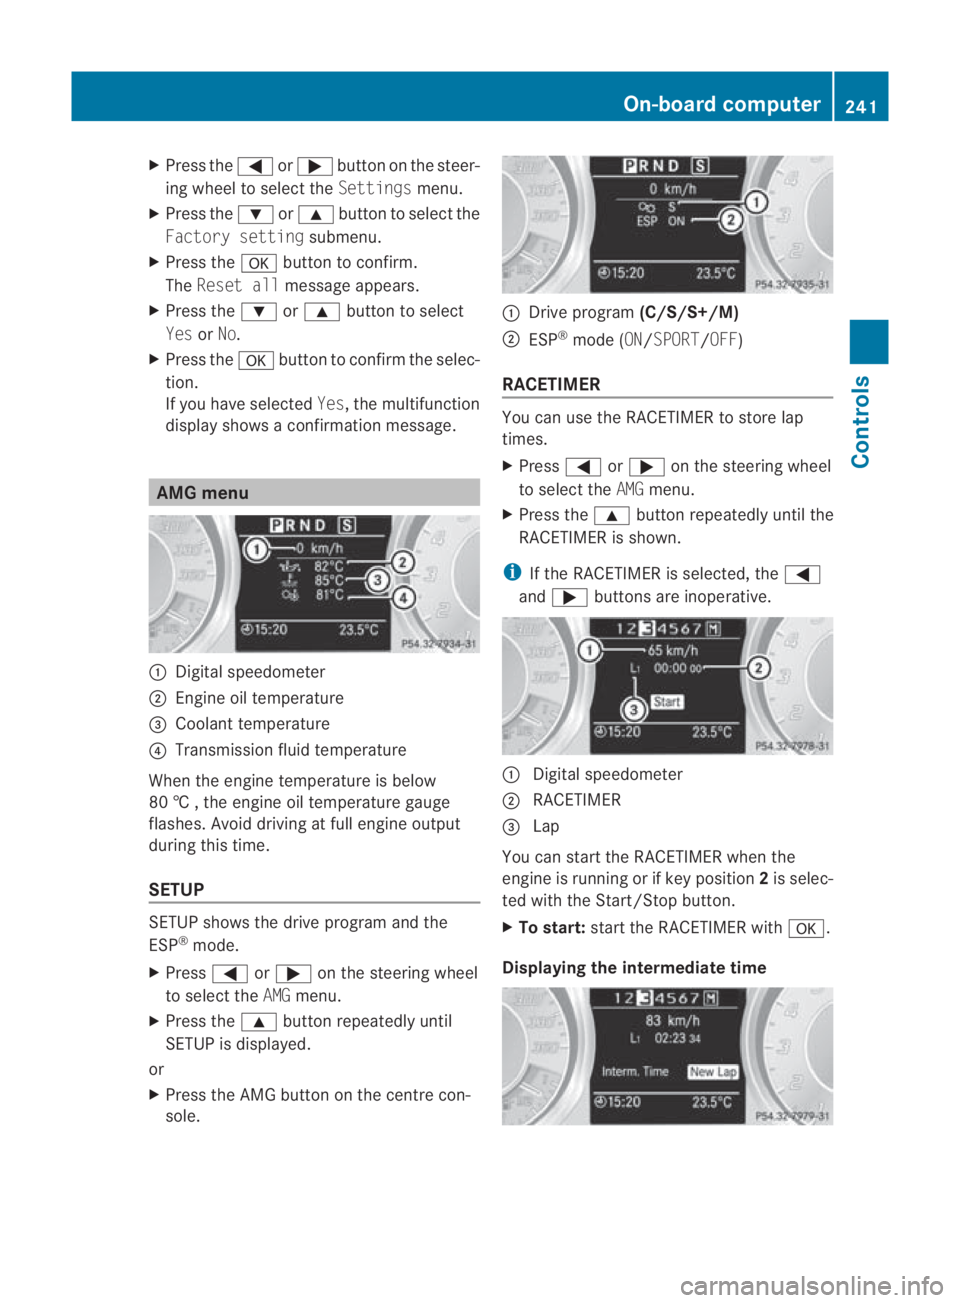
display shows a confirmation message. AMG menu
0001
Digital speedometer
0002 Engine oil temperature
0015 Coolant temperature
0014 Transmission fluid temperature
When the engine temperature is below
80 †,the engine oil temperature gauge
flashes. Avoid driving at full engine output
during this time.
SETUP SETUP shows the drive progra
mand the
ESP ®
mode.
X Press 0008or000E on the steering wheel
to select the AMGmenu.
X Press the 000Fbutton repeatedly until
SETUP is displayed.
or
X Press the AMG button on the centre con-
sole. 0001
Drive program (C/S/S+/M)
0002 ESP ®
mode (ON/ SPORT/OFF)
RACETIMER You can use the RACETIMER to store lap
times.
X
Press 0008or000E on the steering wheel
to select the AMGmenu.
X Press the 000Fbutton repeatedly until the
RACETIMER is shown.
i If the RACETIMER is selected, the 0008
and 000E buttons are inoperative. 0001
Digital speedometer
0002 RACETIMER
0015 Lap
You can start the RACETIMER when the
engine is running or if key position 2is selec-
ted with the Start/Stop button.
X To start: start the RACETIMER with 000A.
Displaying the intermediate time On-board computer
241Controls
BA 197 ECE RE 2010/6a; 1; 2, en-GB
sabbaeuV ersion: 3.0.3.6
2010-05-07T14:19:43+02:00 - Seite 241 Z
Page 271 of 361
To avoid the risk of burns, only touch those
components described in the Owner's Manual
and observe the relevant safety notes. G
Risk of injury
The radiator fan between the radiator and the
engine can start automatically, even if the key
has been removed from the ignition lock. For
this reason, you must not reach into the fan
rotation area. Otherwise, you could be
injured.
The electronic ignition system uses high volt-
age. For this reason, you must never touch
ignition system components (ignition coil,
ignition cable, spark plug connector or test
socket) while:
R the engine is running.
R the engine is being started.
R the ignition is switched on and the engine
is being cranked by hand.
X Make sure that the windscreen wipers are
switched off. G
Risk of injury
The windscreen wipers and wiper linkage
could be set in motion.
When the bonnet is open, you or others could
be injured by the wiper linkage.
Make sure that the windscreen wipers are
switched off. Remove the key or make sure
that no ignition position has been selected
with KEYLESS-GO. All indicator lights must be
off in the instrument cluster.
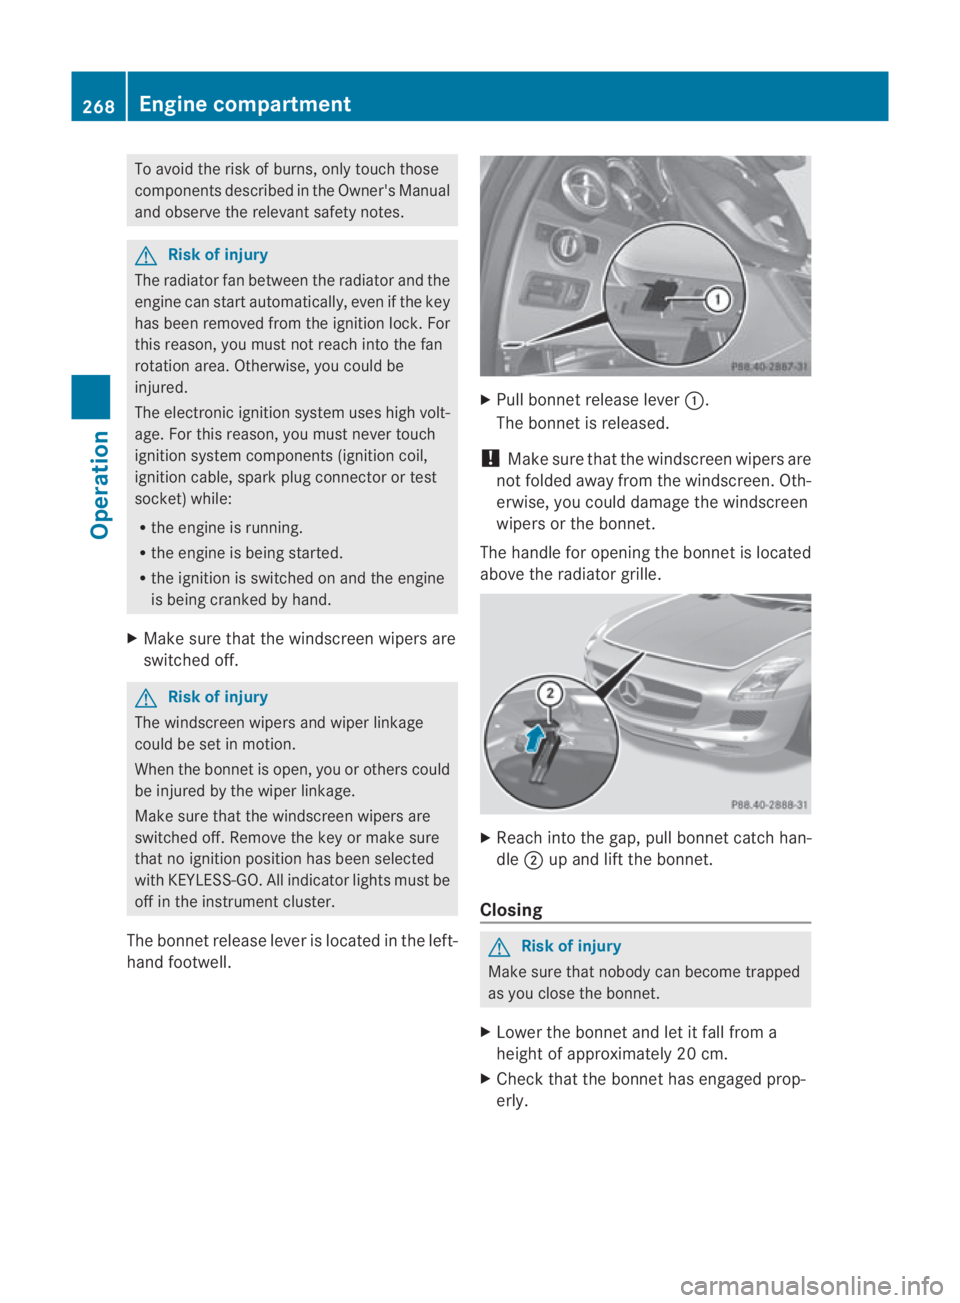
The bonnet release lever is located in the left-
hand footwell. X
Pull bonnet release lever 0001.
The bonnet is released.
! Make sure that the windscreen wipers are
not folded away from the windscreen .Oth-
erwise, you could damage the windscreen
wipers or the bonnet.
The handle for opening the bonnet is located
above the radiato rgrille. X
Reach into the gap, pull bonnet catch han-
dle 0002up and lift the bonnet.
Closing G
Risk of injury
Make sure that nobody can become trapped
as you close the bonnet.
X Lower the bonnet and let it fall from a
height of approximately 20 cm.
X Check that the bonnet has engaged prop-
erly. 268
Engine compartmentOperation
BA 197 ECE RE 2010/6a; 1; 2, en-GB
sabbaeu
Version: 3.0.3.6
2010-05-07T14:19:43+02:00 - Seite 268
Page 272 of 361
i
If the bonnet can be raised slightly, it is
not properly engaged. Open it again and
close it with a little more force. Engine oil
Depending on driving style, the vehicle con-
sumes a maximum of 0.8 l oil per 1000 km.
The oil consumption may be highert han this
when the vehicle is new or if you frequently
drive at high engine speeds.
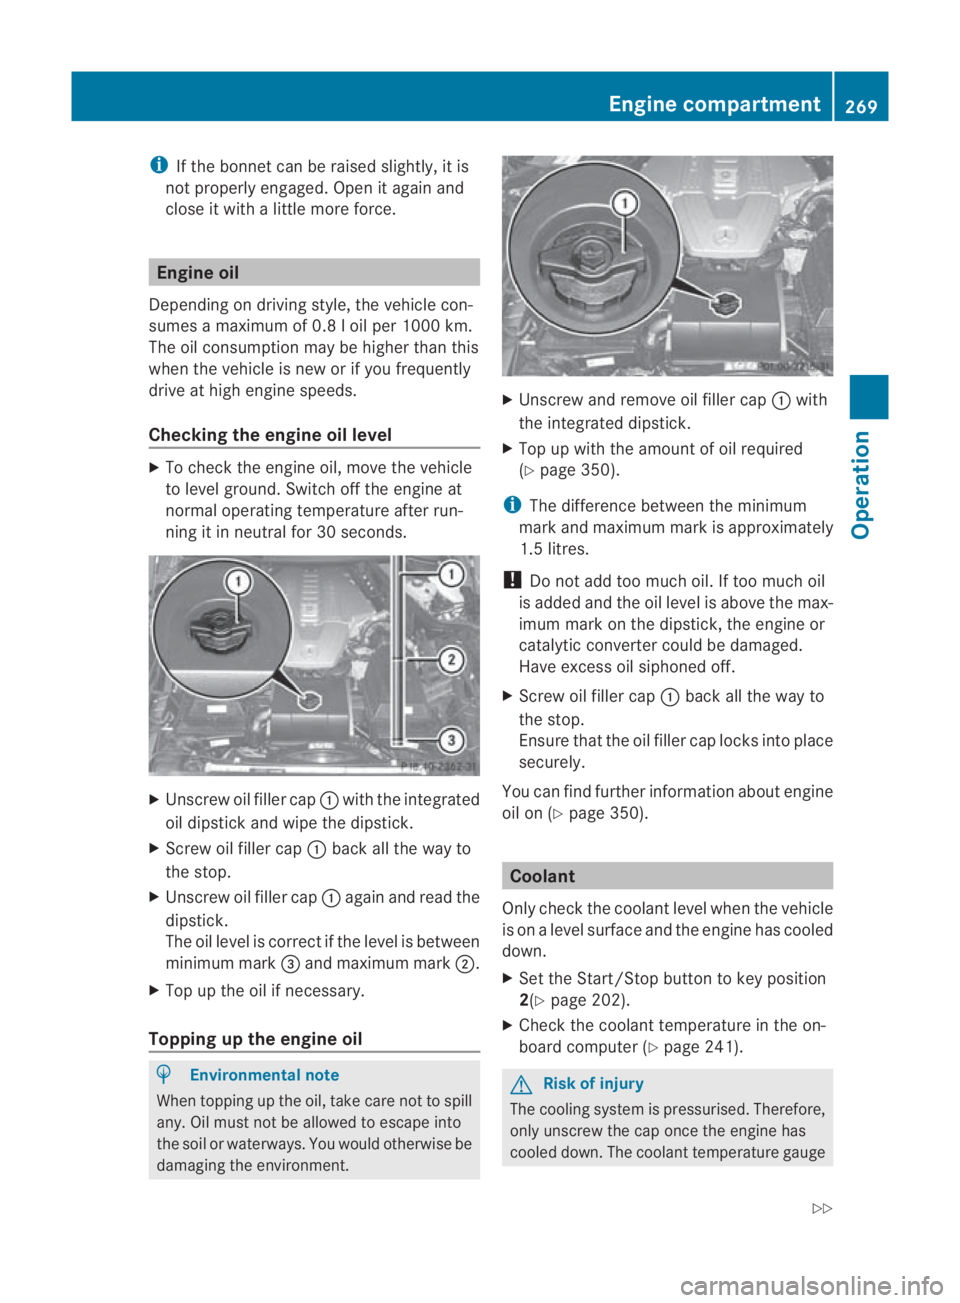
Checking the engine oil level X
To check the engine oil, move the vehicle
to level ground. Switch off the engine at
normal operating temperature after run-
ning it in neutral for 30 seconds. X
Unscrew oil filler cap 0001with the integrated
oil dipstick and wipe the dipstick.
X Screw oil filler cap 0001back all the way to
the stop.
X Unscrew oil filler cap 0001again and read the
dipstick.
The oil level is correct if the level is between
minimum mark 0015and maximum mark 0002.
X Top up the oil if necessary.
Topping up the engine oil H
Environmental note
When topping up the oil, take care not to spill
any. Oil must not be allowed to escape into
the soil or waterways. You would otherwise be
damaging the environment. X
Unscrew and remove oil filler cap 0001with
the integrated dipstick.
X Top up with the amount of oil required
(Y page 350).
i The difference between the minimum
mark and maximum mark is approximately
1.5 litres.
! Do not add too much oil. If too much oil
is added and the oil level is above the max-
imum mark on the dipstick, the engine or
catalytic converter could be damaged.
Have excess oil siphoned off.
X Screw oil filler cap 0001back all the way to
the stop.
Ensure that the oil filler cap locks into place
securely.
You can find further information about engine
oil on (Y page 350). Coolant
Only check the coolant level when the vehicle
is on a level surface and the engine has cooled
down.
X Set the Start/Stop button to key position
2(Y page 202).
X Check the coolant temperature in the on-
board computer (Y page 241). G
Risk of injury
The cooling system is pressurised. Therefore,
only unscrew the cap once the engine has
cooled down. The coolant temperature gauge Engine compartment
269Operation
BA 197 ECE RE 2010/6a; 1; 2, en-GB
sabbaeu Version: 3.0.3.6 2010-05-07T14:19:43+02:00 - Seite 269 Z
Page 286 of 361
Cleaning paintwork
Scratches, corrosive deposits, areas affected
by corrosio nand damage caused by inade-
quate care canno talways be completely
repaired. In such cases, visit a qualified spe-
cialist workshop immediately, e.g. a
Mercedes-Benz Service Centre.
X Remove the following types of dirt immedi-
ately, whilst avoiding rubbin gtoo hard.
Soak:
R insect remains with insect remover
R bird droppings with water
and rinse off the treated surface after-
wards.
Remove:
R tree resin, oils, fuels and greases by rub-
bing gently with a cloth soaked in petro-
leum ether or lighter fluid
R tar stain with tar remover
R wax with silicone remover
! Do not affix:
R stickers
R films
R magnetic plates or similar items
to painted surfaces. Otherwise, you could
damage the paintwork.
Cleaning the windows X
Clean the inside and outside of the win-
dows with a damp cloth and a cleaning
product approved and recommended by
Mercedes-Benz.
! Clean the water drainage channels of the
windscreen and the rear window at regular
intervals. Under certain circumstances,
deposits such as leaves, petals and pollen
may prevent water from draining away
leading to corrosion damage. Cleaning wiper blades G
Risk of injury
Before cleaning the windscreen or wiper
blades, turn the key to position 0in the igni-
tion lock or press the Start/Stop button
repeatedly until all indicator lamps in the
instrument cluster have gone out. The wind-
screen wipers could otherwise move and
injure you.
! Only fold the windscreen wipers away
from the windscreen when vertical. Other-
wise, you will damage the bonnet.
! Do not clean the wiper blades too often
and do not rub them too hard, as this will
result in damage to the graphite coating.
This could cause wiper noise.
X Switch off the engine.
X Take your foot off the brake pedal.
X Set the windscreen wipers to posi-
tion 0014 on the combination switch.
X Press the Start/Stop button repeatedly
until the windscreen wipers start.
X When the wiper arms have reached a ver-
tical position: press the Start/Stop button.
X Fold the wiper arm away from the wind-
screen until it engages.
X Set the wiper blade at right angles to the
wiper arm.
X Clean the wiper blades carefully using a
damp cloth.
X Fold the windscreen wipers back again
before switching on the ignition.
Cleaning the headlamps X
Clean the plastic lenses of the headlamps
and rear lighting with a damp sponge and
windscreen washer fluid or cleaning cloths.
! Only use windscreen washer fluid or
cleaning cloths which are suitable for plas-
tic lamp lenses. Unsuitable windscreen
washer fluid or cleaning cloths could Care
283Operation
BA 197 ECE RE 2010/6a; 1; 2, en-GB
sabbaeu Version: 3.0.3.6 2010-05-07T14:19:43+02:00 - Seite 283 Z
Page 305 of 361
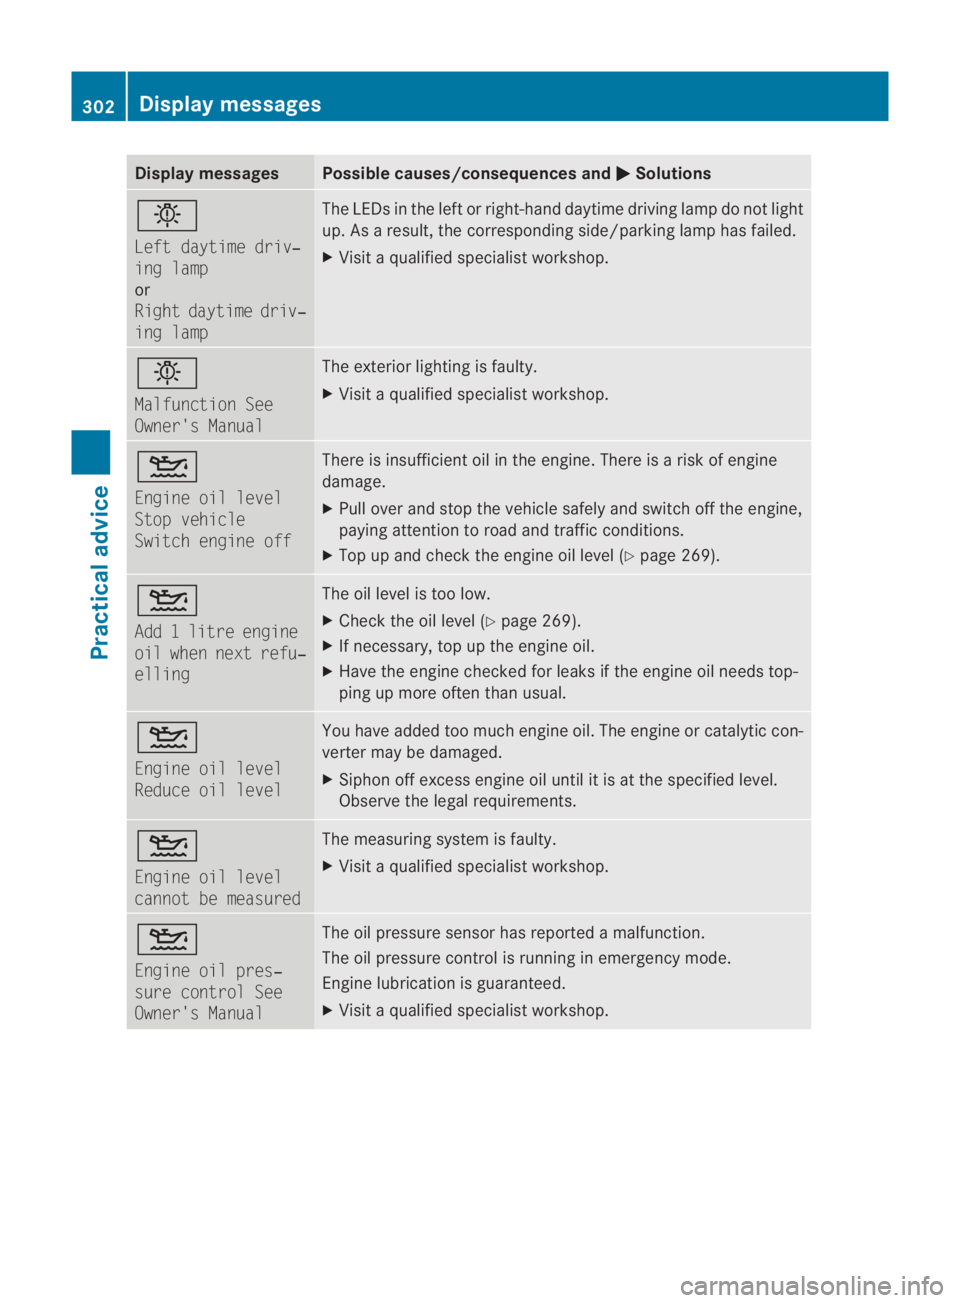
Display messages Possible causes/consequences and
0003 Solutions
0006
Left daytime driv‐
ing lamp
or
Right daytime driv‐
ing lamp The LEDs in the lef
torright-hand daytime driving lamp do not light
up. As a result, the corresponding side/parking lamp has failed.
X Visit a qualified specialist workshop. 0006
Malfunction See
Owner's Manual The exterior lighting is faulty.
X
Visit a qualified specialist workshop. 0002
Engine oil level
Stop vehicle
Switch engine off There is insufficient oil in the engine. There is a risk of engine
damage.
X
Pull over and stop the vehicle safely and switch off the engine,
paying attention to road and traffic conditions.
X Top up and chec kthe engine oil level (Y page 269).0002
Add 1 litre engine
oil when next refu‐
elling The oil level is too low.
X
Check the oil level (Y page 269).
X If necessary, top up the engine oil.
X Have the engine checked for leaks if the engine oil needs top-
ping up more often than usual. 0002
Engine oil level
Reduce oil level You have added too much engine oil. The engine or catalytic con-
verter may be damaged.
X
Siphon off excess engine oil until it is at the specified level.
Observe the legal requirements. 0002
Engine oil level
cannot be measured The measuring system is faulty.
X
Visit a qualified specialist workshop. 0002
Engine oil pres‐
sure control See
Owner's Manual The oil pressure sensor has reported a malfunction.
The oil pressure control is running in emergency mode.
Engine lubrication is guaranteed.
X Visit a qualified specialist workshop. 302
Display messagesPractical advice
BA 197 ECE RE 2010/6a; 1; 2, en-GB
sabbaeu
Version: 3.0.3.6 2010-05-07T14:19:43+02:00 - Seite 302
Page 306 of 361
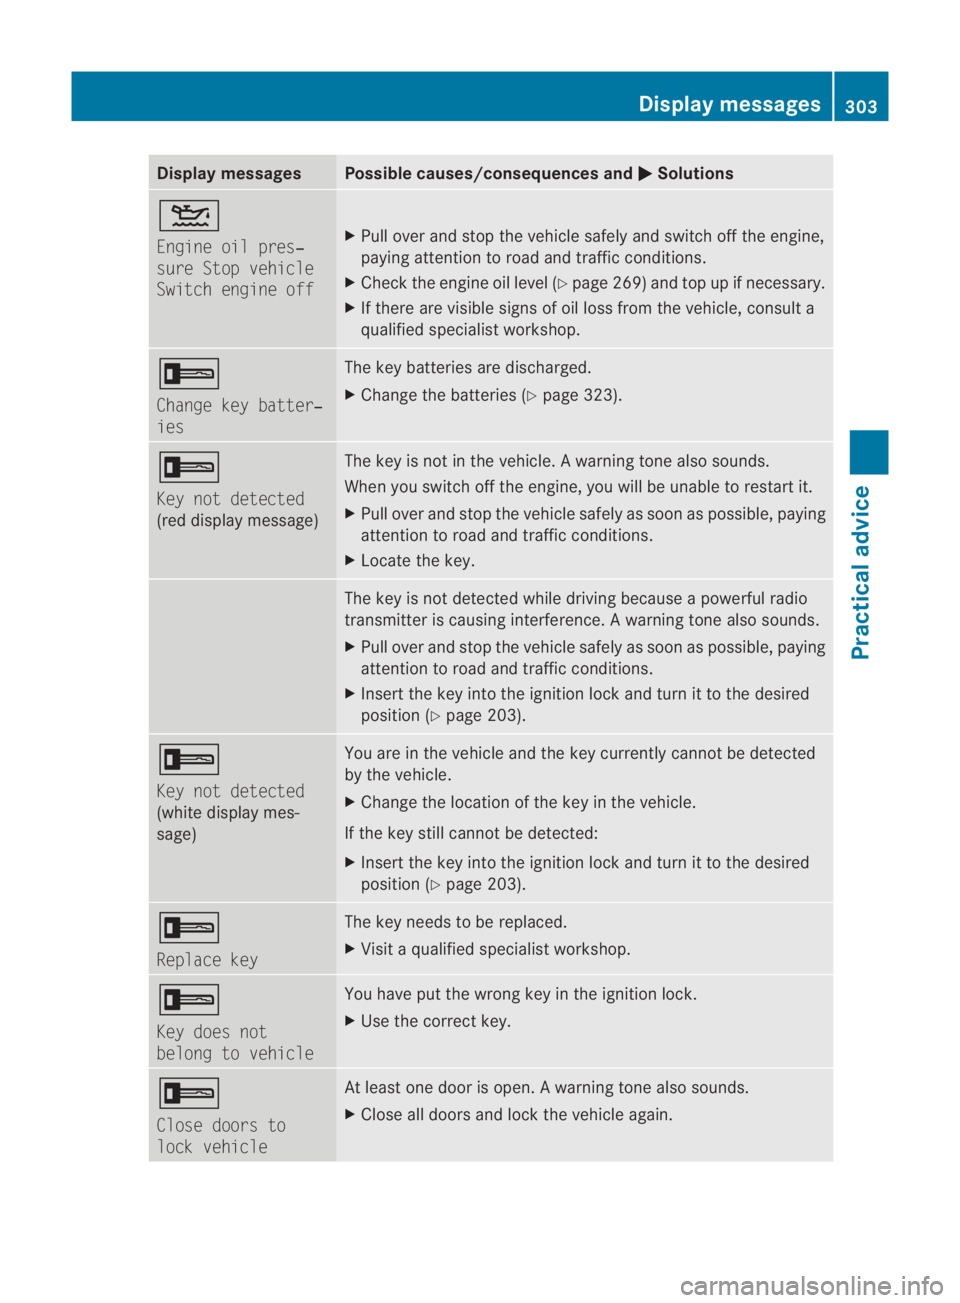
Display messages Possible causes/consequences and
0003 Solutions
0002
Engine oil pres‐
sure Stop vehicle
Switch engine off
X
Pull ove rand stop the vehicle safely and switch off the engine,
paying attention to road and traffic conditions.
X Check the engine oil level (Y page 269) and top up if necessary.
X If there are visible signs of oil loss from the vehicle, consult a
qualified specialist workshop. 0005
Change key batter‐
ies The key batteries are discharged.
X
Change the batteries (Y page 323).0005
Key not detected
(red display message) The key is not in the vehicle.
Awarning tone also sounds.
When you switch off the engine, you will be unable to restar tit.
X Pull ove rand stop the vehicle safely as soo nas possible, paying
attention to road and traffic conditions.
X Locate the key. The key is not detected while driving because a powerful radio
transmitter is causing interference. A warning tone also sounds.
X
Pull over and stop the vehicle safely as soon as possible, paying
attention to road and traffic conditions.
X Insert the key into the ignition lock and turn it to the desired
position (Y page 203). 0005
Key not detected
(white display mes-
sage) You are in the vehicle and the key currently cannot be detected
by the vehicle.
X
Change the location of the key in the vehicle.
If the key still cannot be detected:
X Insert the key into the ignition lock and turn it to the desired
position (Y page 203). 0005
Replace key The key needs to be replaced.
X
Visit a qualified specialist workshop. 0005
Key does not
belong to vehicle You have put the wrong key in the ignition lock.
X Use the correct key. 0005
Close doors to
lock vehicle At least one door is open.
Awarning tone also sounds.
X Close all doors and loc kthe vehicle again. Display messages
303Practical advice
BA 197 ECE RE 2010/6a; 1; 2, en-GB
sabbaeu Version: 3.0.3.6 2010-05-07T14:19:43+02:00 - Seite 303 Z