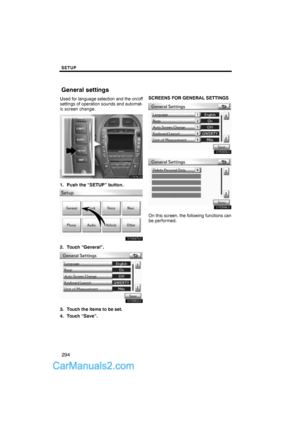
Page 49 of 76
SETUP
341
3. Touch “� REC”, and record a voice
tag.
4. Touch “� Play” to play the voice
tag.
When you complete the voice tag registra-
tion, touch “OK”.
INFORMATION
When you use the voice tag, do not
change the language setting from
the language setting used when reg-
istering.
If they are different, the voice recog-
nition can’t recognize the voice tag
that you have registered.
You can also register the voice tag in
the following way.
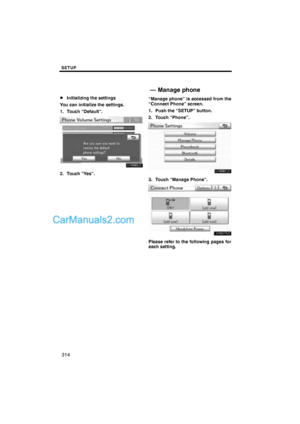
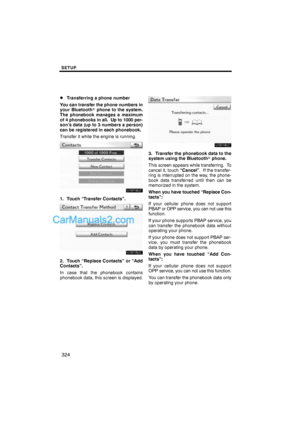
1. Push the “INFO/PHONE” button.
2. Touch “Phone”.
3. Touch “Contacts”.
4. Touch the desired data from the list.
5. Touch “Options”.
6. Touch “Set Voice Tag”.
Page 50 of 76
SETUP
342
7. This screen is displayed.
The following operations are the same
as the operation when you operate it
from “Setup” screen.
�Editing the voice tag
1. Touch “Edit Voice Tags”.
2. Touch the data you want to edit.
3. This screen is displayed.
The following operations are the same
as the operation when you register the
voice tag.
Page 51 of 76
SETUP
343 �
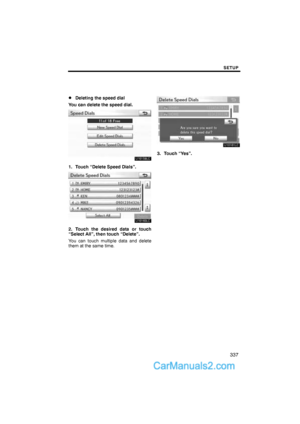
Deleting the voice tag
1. Touch “Delete Voice Tags”.
2. Touch the desired data or touch
“Select All”, then touch “Delete”.
You can touch multiple data and delete
them at the same time.
3. Touch “Yes”.You can confirm and change the
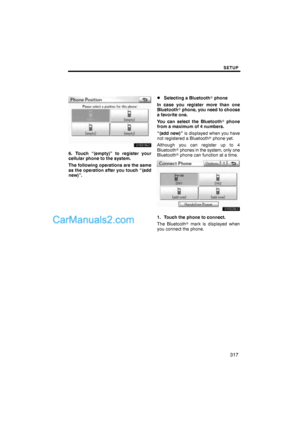
Bluetooth� settings.
1. Push the “SETUP” button.
2. Touch “Phone”.
3. Touch “Bluetooth*”.
4. This screen is displayed.
*: Bluetooth is a registered trademark of
Bluetooth SIG, Inc.
— Bluetooth�
Page 52 of 76

SETUP
344
The information displays the following
items.
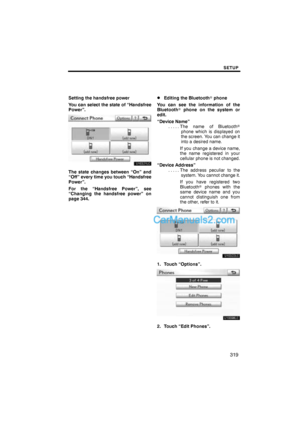
“Device Name”
The name in the Bluetooth� . . . . .
network. You can change it.
“Passcode”
The password when you regis- . . . . .
ter your cellular phone in the
system. You can change it.
“Device Address”
The address peculiar to the . . . . .
system. You can not change it.
If the same device name is
displayed on the screen of
your phone, refer to it.
If you want to change the settings, refer
to the following pages.
When you change the settings, touch
“Save” after changing them.�Changing the Bluetooth� settings
You can change the Bluetooth� set-
tings according to the following proce-
dures.
Changing the handsfree power
The “Handsfree Power” display shows
the following state.
When “Handsfree Power” is “On”:
The Bluetooth� phone is automatically
connected when the “ENGINE START
STOP” switch is in ACCESSORY or IGNI-
TION ON mode.
When “Handsfree Power” is “Off”:
The Bluetooth� phone is disconnected,
and the system will not connect to it next
time.
You can select the state of “Handsfree
Power”.
On: The auto connection is turned on.
Off: The auto connection is turned off.
You can not change the state from “On”
into “Off” while driving.
Page 53 of 76
SETUP
345
1. Touch “Handsfree Power”.
2. Touch “On” or “Off”.
3. Touch “Save”.
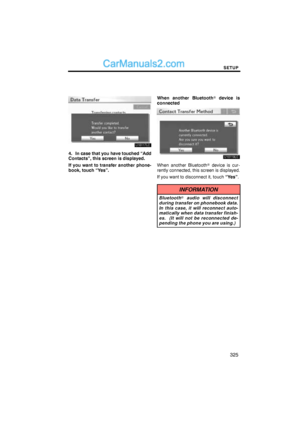
In case that the state of “Handsfree
Power” is changed from “Off” into
“On”, Bluetooth� connection will be-
gin.
When you connect the phone while
Bluetooth� audio is playing
This screen is displayed, and the
Bluetooth� audio will stop temporarily.
Page 54 of 76
SETUP
346
Editing the device name
1. Touch “Edit” of “Device Name”.
2. Use the software keyboard to input
the device name.
INFORMATION
The device names are common
Bluetooth� audio and Bluetooth�
phone.
If you change the device name of the
phone, the device name of the audio
will change at same time.
However, passcodes can be set sep-
arately.
Editing the passcode
1. Touch “Edit” of “Passcode”.
2. Input a passcode and touch “OK”.
Page 55 of 76
SETUP
347 �
Initializing the Bluetooth� settings
You can initialize the settings.
1. Touch “Default”.
2. Touch “Yes”.
If the state of “Handsfree Power” is
changed from “Off” into “On”, Bluetooth�
connection will begin.If you connect a phone while
Bluetooth� audio is playing
This screen is displayed, and the
Bluetooth� audio will stop temporarily.
Page 56 of 76
SETUP
348
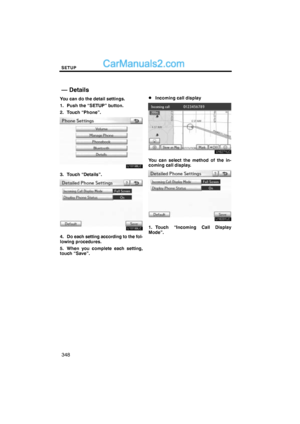
You can do the detail settings.
1. Push the “SETUP” button.
2. Touch “Phone”.
3. Touch “Details”.
4. Do each setting according to the fol-
lowing procedures.
5. When you complete each setting,
touch “Save”.
�Incoming call display
You can select the method of the in-
coming call display.
1. Touch “Incoming Call Display
Mode”.
— Details