2010 JAGUAR XFR brake sensor
[x] Cancel search: brake sensorPage 2093 of 3039

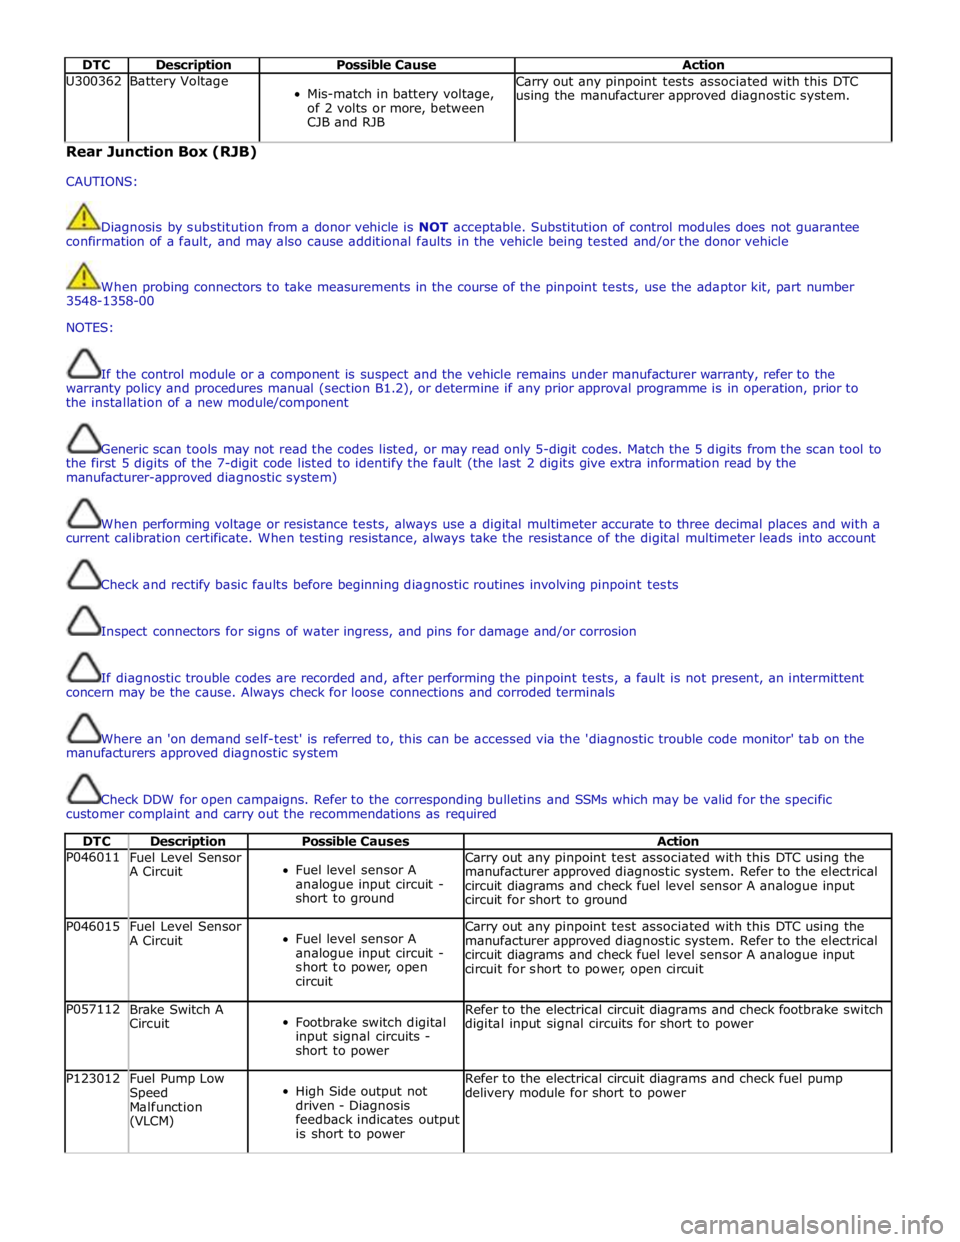
DTC Description Possible Cause Action U300362 Battery Voltage
Mis-match in battery voltage,
of 2 volts or more, between
CJB and RJB Carry out any pinpoint tests associated with this DTC
using the manufacturer approved diagnostic system. Rear Junction Box (RJB)
CAUTIONS:
Diagnosis by substitution from a donor vehicle is NOT acceptable. Substitution of control modules does not guarantee
confirmation of a fault, and may also cause additional faults in the vehicle being tested and/or the donor vehicle
When probing connectors to take measurements in the course of the pinpoint tests, use the adaptor kit, part number
3548-1358-00
NOTES:
If the control module or a component is suspect and the vehicle remains under manufacturer warranty, refer to the
warranty policy and procedures manual (section B1.2), or determine if any prior approval programme is in operation, prior to
the installation of a new module/component
Generic scan tools may not read the codes listed, or may read only 5-digit codes. Match the 5 digits from the scan tool to
the first 5 digits of the 7-digit code listed to identify the fault (the last 2 digits give extra information read by the
manufacturer-approved diagnostic system)
When performing voltage or resistance tests, always use a digital multimeter accurate to three decimal places and with a
current calibration certificate. When testing resistance, always take the resistance of the digital multimeter leads into account
Check and rectify basic faults before beginning diagnostic routines involving pinpoint tests
Inspect connectors for signs of water ingress, and pins for damage and/or corrosion
If diagnostic trouble codes are recorded and, after performing the pinpoint tests, a fault is not present, an intermittent
concern may be the cause. Always check for loose connections and corroded terminals
Where an 'on demand self-test' is referred to, this can be accessed via the 'diagnostic trouble code monitor' tab on the
manufacturers approved diagnostic system
Check DDW for open campaigns. Refer to the corresponding bulletins and SSMs which may be valid for the specific
customer complaint and carry out the recommendations as required
DTC Description Possible Causes Action P046011
Fuel Level Sensor
A Circuit
Fuel level sensor A
analogue input circuit -
short to ground Carry out any pinpoint test associated with this DTC using the
manufacturer approved diagnostic system. Refer to the electrical
circuit diagrams and check fuel level sensor A analogue input
circuit for short to ground P046015
Fuel Level Sensor
A Circuit
Fuel level sensor A
analogue input circuit -
short to power, open
circuit Carry out any pinpoint test associated with this DTC using the
manufacturer approved diagnostic system. Refer to the electrical
circuit diagrams and check fuel level sensor A analogue input
circuit for short to power, open circuit P057112
Brake Switch A
Circuit
Footbrake switch digital
input signal circuits -
short to power Refer to the electrical circuit diagrams and check footbrake switch
digital input signal circuits for short to power P123012
Fuel Pump Low
Speed
Malfunction
(VLCM)
High Side output not
driven - Diagnosis
feedback indicates output
is short to power Refer to the electrical circuit diagrams and check fuel pump
delivery module for short to power
Page 2104 of 3039

Wiring Harnesses - Wiring Harness
Description and Operation
Introduction Published: 21-Jan-2014
CAUTION: Do not use any other heat shrink sleeve other than the approved glue lined heat shrink sleeve mentioned in
the repair procedure.
The purpose of this document is to promote quick and efficient minor repair to harness connectors or cables using approved
methods. Repairs may only be made to cables and connectors which have been mechanically, not electrically damaged. It also
applies where the whole extent of the damage can be clearly identified and rectified.
Care and neatness are essential requirements in making a perfect repair.
Caution:
This harness repair guide, does not approve repairs to any of the following circuits:
1. Any media orientated system transport network harnesses.
2. Supplement restraint system (SRS) firing circuits (Air bags).
3. Link lead assembles, which are unique to safety critical circuits such as anti-lock brake system (ABS) and thermocouple
circuits. An example of this is the ABS wheel speed sensors with moulded connectors.
4. 4. Screened cables, leads and wiring harness(s).
If any harness(s) with defective electrical connector terminals or wires from the above circuits are a concern, new
components must be installed.
Repair Components
CAUTION: Where the repair procedure indicates that a glue lined heat shrink sleeve should be applied, apply sufficient
heat to the glue lined heat shrink to melt the glue in order to provide a water tight seal. Do not over heat the glue lined heat
shrink sleeve so that the wiring harness insulation becomes damaged.
The wiring harness repair components comprises:
Pre-terminated wiring harness(s) of different sizes and types
Three sizes of butt splice connectors
A selection of colored cable identification sleeves
Two sizes of glue lined heat shrink sleeves
A suitable heat source, for shrinking heat shrink sleeves will be required.
The pre-insulated diamond grip range of electrical connector terminals and in-line, butt splice connectors are the only
acceptable product for the repairs of wiring harnesses. The butt connectors not only grip the wire but also the insulation,
making a very secure joint.
If an electrical connector terminal is not available approval for the repair is NOT given and in these circumstances a new wiring
harness must be installed.
Pre-Terminated Wiring Harness(s) and Butt Splice Connectors
The pre-terminated wiring harness(s) are supplied with the insulation in one of three colors, red, blue or yellow. The colors do
not apply to any particular circuit but to the harness wire size. See the Relationship Table in the Repair Method section.
Butt splice connectors are also supplied with red, blue or yellow coverings, which must be matched to the pre-terminated
wiring harness insulation color.
Page 2152 of 3039

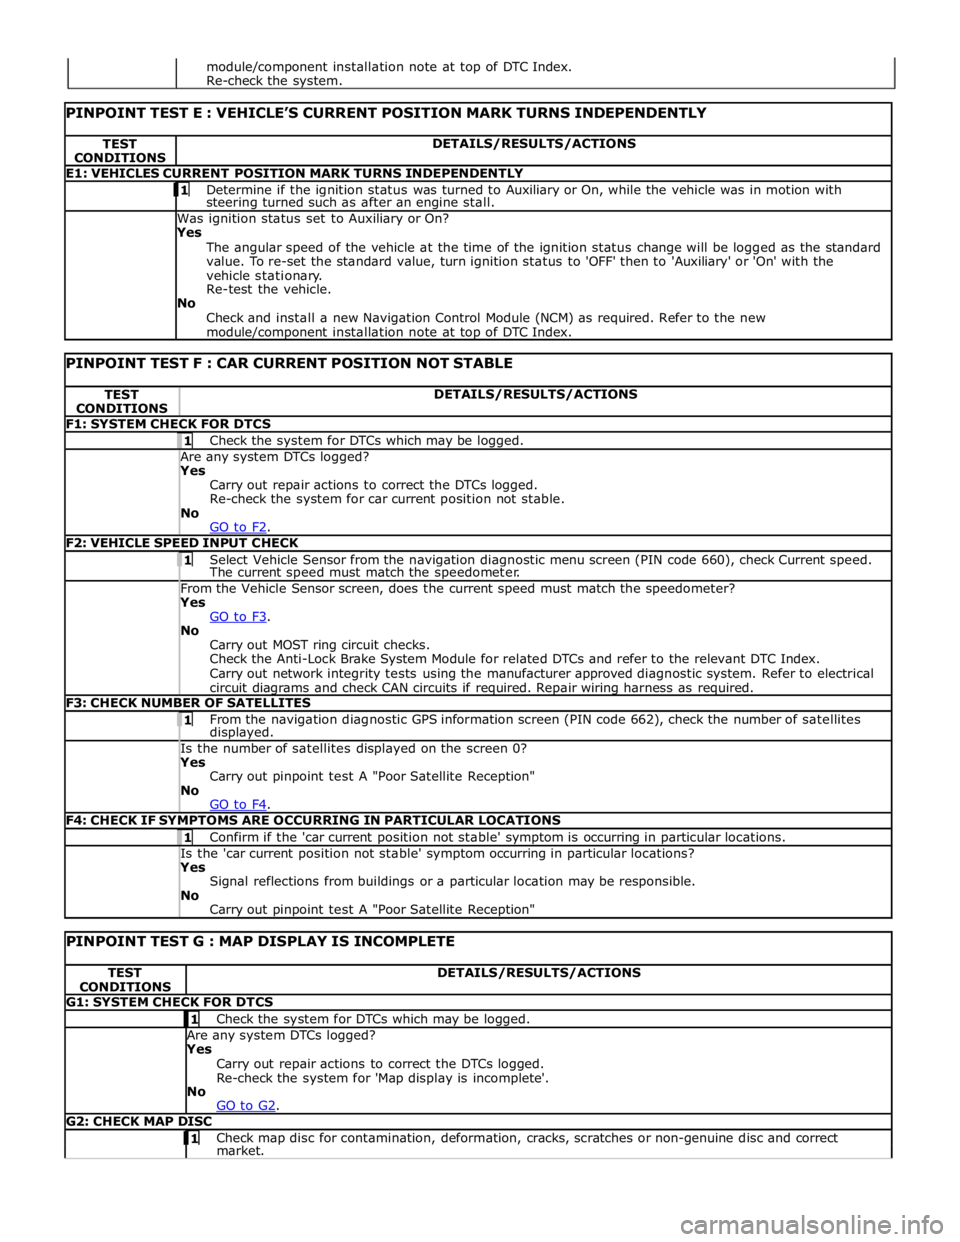
TEST
CONDITIONS DETAILS/RESULTS/ACTIONS E1: VEHICLES CURRENT POSITION MARK TURNS INDEPENDENTLY 1 Determine if the ignition status was turned to Auxiliary or On, while the vehicle was in motion with steering turned such as after an engine stall. Was ignition status set to Auxiliary or On?
Yes
The angular speed of the vehicle at the time of the ignition status change will be logged as the standard
value. To re-set the standard value, turn ignition status to 'OFF' then to 'Auxiliary' or 'On' with the
vehicle stationary.
Re-test the vehicle.
No
Check and install a new Navigation Control Module (NCM) as required. Refer to the new module/component installation note at top of DTC Index.
PINPOINT TEST F : CAR CURRENT POSITION NOT STABLE TEST
CONDITIONS DETAILS/RESULTS/ACTIONS F1: SYSTEM CHECK FOR DTCS 1 Check the system for DTCs which may be logged. Are any system DTCs logged? Yes
Carry out repair actions to correct the DTCs logged.
Re-check the system for car current position not stable.
No
GO to F2. F2: VEHICLE SPEED INPUT CHECK 1 Select Vehicle Sensor from the navigation diagnostic menu screen (PIN code 660), check Current speed. The current speed must match the speedometer. From the Vehicle Sensor screen, does the current speed must match the speedometer? Yes
GO to F3. No
Carry out MOST ring circuit checks.
Check the Anti-Lock Brake System Module for related DTCs and refer to the relevant DTC Index.
Carry out network integrity tests using the manufacturer approved diagnostic system. Refer to electrical
circuit diagrams and check CAN circuits if required. Repair wiring harness as required. F3: CHECK NUMBER OF SATELLITES 1 From the navigation diagnostic GPS information screen (PIN code 662), check the number of satellites displayed. Is the number of satellites displayed on the screen 0? Yes
Carry out pinpoint test A "Poor Satellite Reception"
No
GO to F4. F4: CHECK IF SYMPTOMS ARE OCCURRING IN PARTICULAR LOCATIONS 1 Confirm if the 'car current position not stable' symptom is occurring in particular locations. Is the 'car current position not stable' symptom occurring in particular locations? Yes
Signal reflections from buildings or a particular location may be responsible.
No
Carry out pinpoint test A "Poor Satellite Reception"
PINPOINT TEST G : MAP DISPLAY IS INCOMPLETE TEST
CONDITIONS DETAILS/RESULTS/ACTIONS G1: SYSTEM CHECK FOR DTCS 1 Check the system for DTCs which may be logged. Are any system DTCs logged? Yes
Carry out repair actions to correct the DTCs logged.
Re-check the system for 'Map display is incomplete'.
No
GO to G2. G2: CHECK MAP DISC 1 Check map disc for contamination, deformation, cracks, scratches or non-genuine disc and correct market. module/component installation note at top of DTC Index.
Re-check the system.