2010 JAGUAR XFR Interior
[x] Cancel search: InteriorPage 2097 of 3039

DTC Description Possible Causes Action B111E13 Boot/Trunk Lamps
Luggage compartment
lamp control circuit -
open circuit Refer to the electrical circuit diagrams and check luggage
compartment lamp control circuit for open circuit B111E-15 Boot/Trunk Lamps
- circuit short to
battery or open
Luggage compartment
lamp inoperative
Luggage compartment
lamp control circuit -
short circuit to power,
open circuit, high
resistance
Refer to the electrical circuit diagrams and check luggage
compartment lamp control circuit for short circuit to
power, open circuit, high resistance. Repair wiring harness
as required. Clear DTC and retest B112312
Restraints
Ignition Relay
High Side output not
driven - diagnosis
feedback indicates output
is short to power Carry out any pinpoint test associated with this DTC using the
manufacturer approved diagnostic system. Refer to the electrical
circuit diagrams and check restraints ignition relay output for
short to power B112314
Restraints
Ignition Relay
High Side output not
driven - diagnosis
feedback indicates output
is short to ground, open
circuit Carry out any pinpoint test associated with this DTC using the
manufacturer approved diagnostic system. Refer to the electrical
circuit diagrams and check restraints ignition relay output for
short to ground, open circuit B112393
Restraints
Ignition Relay
High Side output not
driven - diagnosis
feedback indicates output
is at open load or short
to power Carry out any pinpoint test associated with this DTC using the
manufacturer approved diagnostic system. Refer to the electrical
circuit diagrams and check restraints ignition relay output for
open load or short to power B112411
Lamp Fade
Control
Interior lamp fade control
circuit - short to ground Refer to the electrical circuit diagrams and check interior lamp
fade control circuit for short to ground B112412
Lamp Fade
Control
Interior lamp fade control
circuit - short to power Refer to the electrical circuit diagrams and check interior lamp
fade control circuit for short to power B113C12
Hazard Switch
Illumination
Hazard switch
illumination control
circuit - short to power Refer to the electrical circuit diagrams and check hazard switch
illumination control circuit for short to power B113C14
Hazard Switch
Illumination
Hazard switch
illumination control
circuit - short to ground,
open circuit Refer to the electrical circuit diagrams and check hazard switch
illumination control circuit for short to ground, open circuit B113E12
External
Boot/Trunk
Release Switch
External luggage
compartment lid release
switch digital input circuit
- short to power Refer to the electrical circuit diagrams and check external
luggage compartment lid release switch digital input circuit for
short to power B113E23
External
Boot/Trunk
Release Switch
External luggage
compartment lid release
switch digital input circuit
- signal stuck low Carry out any pinpoint test associated with this DTC using the
manufacturer approved diagnostic system. Refer to the electrical
circuit diagrams and check external luggage compartment lid
release switch digital input circuit for short to ground B11D949 Vehicle Battery
Vehicle battery
damaged/worn out Check battery is in fully charged and serviceable condition using
the Midtronics battery tester and the battery care manual B11DB49
Battery
Monitoring
Module
Internal electronic failure Suspect the battery monitoring module. Check and install a new
module as required, refer to the new module/component
installation note at the top of the DTC Index B11DB87
Battery
Monitoring
Module
Battery monitoring
module connector
dis-connected/poor
connection Battery
monitoring
module to RJB LIN circuit
- open circuit Carry out any pinpoint test associated with this DTC using the
manufacturer approved diagnostic system. If additional DTCs
B108783, B108786, B108787 are logged, suspect the RJB. Check
and install a new RJB as required, refer to the new
module/component installation note at the top of the DTC Index.
If additional DTCs B108783, B108786, B108787 are NOT logged,
check for good/clean contact at battery monitoring module
Page 2101 of 3039

Published: 11-May-2011
Module Communications Network - Auxiliary Junction Box (AJB)
Removal and Installation
Removal
NOTE: Removal steps in this procedure may contain installation details.
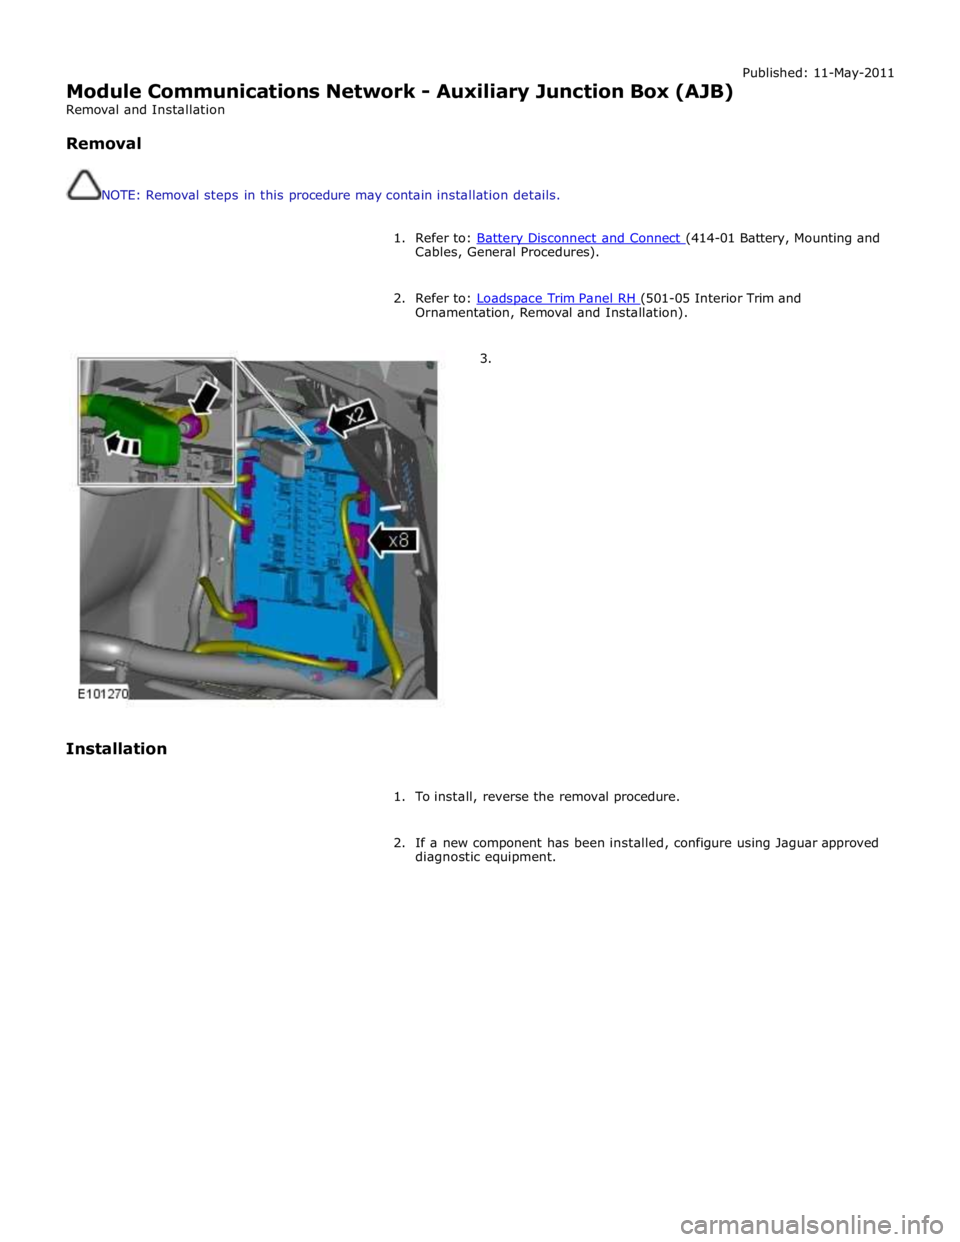
1. Refer to: Battery Disconnect and Connect (414-01 Battery, Mounting and Cables, General Procedures).
2. Refer to: Loadspace Trim Panel RH (501-05 Interior Trim and Ornamentation, Removal and Installation).
3.
Installation
1. To install, reverse the removal procedure.
2. If a new component has been installed, configure using Jaguar approved
diagnostic equipment.
Page 2102 of 3039

Module Communications Network - Central Junction Box (CJB)
Removal and Installation
Removal
NOTE: Removal steps in this procedure may contain installation details.
All vehicles Published: 11-May-2011
1. Refer to: Battery Disconnect and Connect (414-01 Battery, Mounting and Cables, General Procedures).
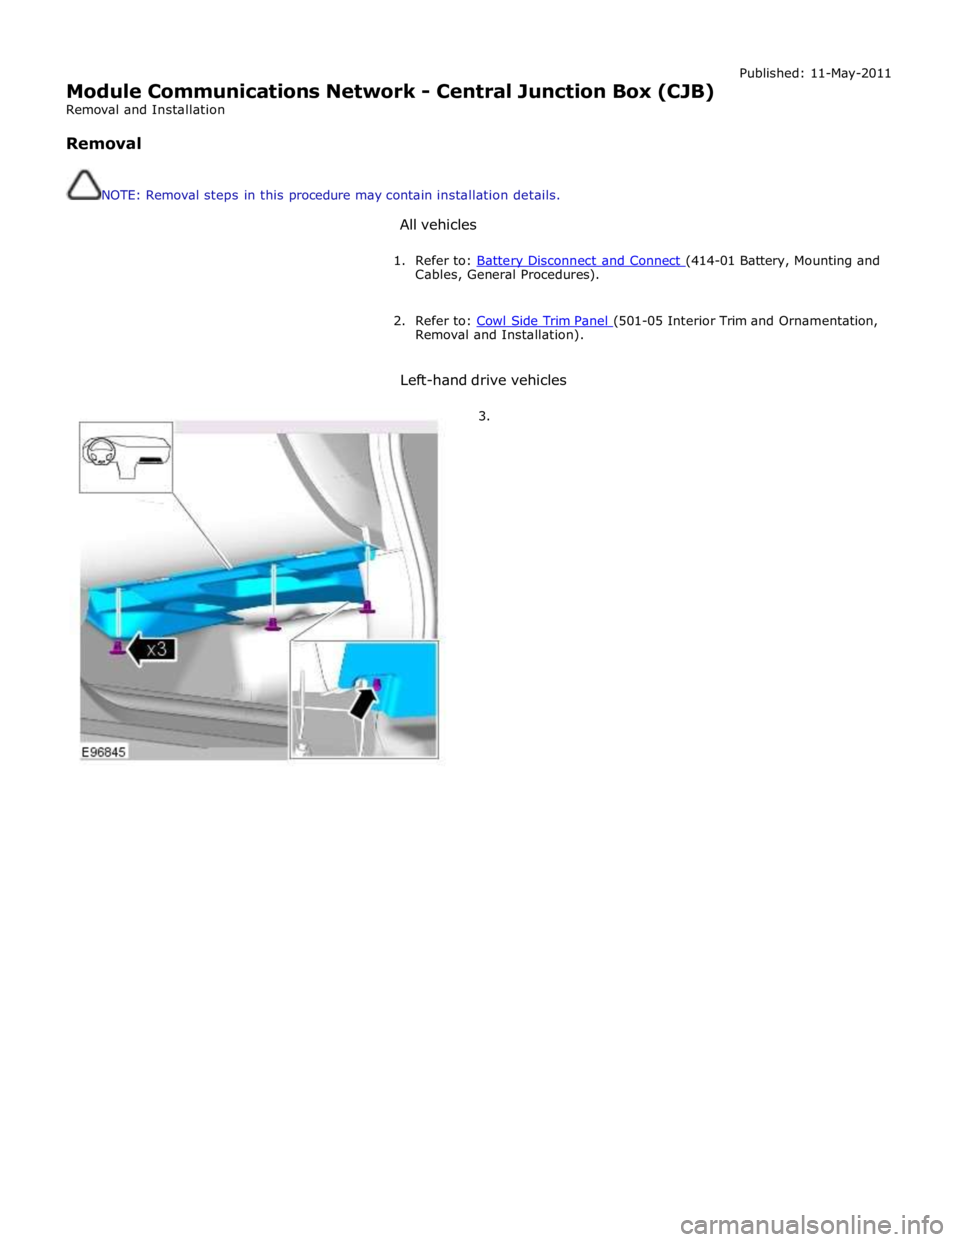
2. Refer to: Cowl Side Trim Panel (501-05 Interior Trim and Ornamentation, Removal and Installation).
Left-hand drive vehicles
3.
Page 2121 of 3039

Anti-Theft - Active - Anti-Theft - Active - Overview
Description and Operation
Overview Published: 11-May-2011
The active anti-theft system is available with three different levels of vehicle protection depending on market specification:
Hinged panel sensing
Hinged panel and intrusion sensing
Hinged panel, intrusion and inclination sensing.
The CJB (central junction box) automatically arms and disarms the active anti-theft system when it functions the central
locking system.
Refer to: Handles, Locks, Latches and Entry Systems (501-14 Handles, Locks, Latches and Entry Systems, Description and Operation).
Depending on market specification two modes of protection are used: perimeter mode and volumetric mode.
Perimeter mode
Perimeter mode, monitors the security of the hinged panels, which include:
all doors,
luggage compartment lid, and
engine compartment lid.
When perimeter mode is active, the CJB monitors the panel ajar switches in the latch mechanisms of the hinged panels.
Volumetric mode
In volumetric mode the CJB monitors the interior of the vehicle for movement using an ultrasonic sound wave sensor.
If the battery backed sounder incorporates an inclination sensor the vehicle will also be monitored for unauthorised tilting; for
example towing or jacking.
Page 2123 of 3039

7 Central locking - Radio Frequency (RF) receiver 8 Engine compartment lid - latch mechanism 9 Passive sounder 10 Battery backed sounder 11 Alarm indicator 12 Instrument cluster 13 Start control unit 14 Luggage compartment lid - latch mechanism 15 Door latch mechanism - LH (left-hand) rear 16 Door latch mechanism - RH (right-hand) rear 17 Door latch mechanism - RH front 18 Door latch mechanism - LH front 19 Door module - LH rear 20 Door module - RH rear 21 Door module - RH front 22 Door module - LH front 23 Intrusion detection module
Anti-Theft - Active System Operation
The active anti-theft system is available with three different levels of vehicle protection depending on market specification:
Hinged panel sensing
Hinged panel and intrusion sensing
Hinged panel, intrusion and inclination sensing.
The system is controlled by software in the CJB and RJB and indicates a trigger condition: Visually, using the direction indicators, and
Audibly, using the vehicle horn and either a passive or active sounder to indicate a trigger condition.
The passive sounder takes the form of an anti-theft disc horn located at the rear of the engine compartment on the LH side. The active sounder takes the form of a battery backed sounder located in the same position.
Depending on market specification, the battery backed sounder may be fitted with an inclination sensor. Both types of battery
backed sounder are visually identical and can only be identified by their part number. Both are also intelligent units, and
communicate to the CJB over a LIN (local interconnect network) bus connection.
Monitoring of the hinged panels is carried out using switches located in each door latch assembly, the engine-compartment-lid
latch assembly, and the luggage-compartment-lid latch assembly. The condition of the switches is monitored by the CJB.
Monitoring of front door lock status is carried out using switches located in the door latch mechanisms. The condition of the
switches is monitored by the front door modules and transmitted to the CJB over the medium speed CAN (controller area
network) bus.
Monitoring of the cabin interior is carried out using an intrusion detection module mounted behind the roof console. The
intrusion detection module comprises an ultrasonic sound wave sensor to determine if there is movement within the cabin.
Information from the intrusion detection module is communicated to the CJB over a LIN bus connection.
CAUTIONS:
The intrusion detection module electrical connections, particularly those to the sensors mounted in the roof console, are
very delicate and must be handled with care.
The intrusion detection module is an electro-statically sensitive part and should only be handled in an electro-statically
controlled environment.
When armed, the active anti-theft system can be triggered in one of the following ways:
A door ajar switch indicates a door has been opened.
The engine compartment lid or luggage compartment lid ajar switches indicate that either has been opened.
Either front door latch mechanism indicates a door has been unlocked.
The emergency key blade is used to open either the LH front door or luggage compartment.
The CJB or RJB are disconnected (this may result in only a partial trigger).
An attempt is made to start the engine without a valid signal from the Smart Key.
Refer to: Anti-Theft - Passive (419-01B Anti-Theft - Passive, Description and Operation).
Page 2124 of 3039

The battery backed sounder is disconnected (partial trigger only).
The vehicle battery is disconnected on a vehicle fitted with a battery backed sounder (partial trigger only).
The inclination sensor detects a change in vehicle attitude.
The intrusion detection module detects movement within the cabin.
Door Modules Component Description
The door modules provide the interface between the door latch-motors, the door latch-switches and the CJB. The door modules
provide door switch status information and enable the door latch-motors on request from the CJB or the keyless vehicle
module.
Keyless Vehicle Module
The keyless vehicle module interfaces with the Central locking, Radio Frequency (RF) receiver and collects RF signal information
which is transmitted from the Smart Key. This information is translated into commands which are passed on the medium speed
CAN bus to the:
CJB,
RJB,
door modules, and
instrument cluster.
The keyless vehicle module also monitors:
2 interior antennae,
1 luggage compartment antenna,
a rear bumper antenna, and
4 door handle antennae if the passive entry system is fitted.
On vehicles with passive entry, the additional fast latch motors are controlled via the keyless vehicle module and the locking
status is passed to the CJB on the medium speed CAN bus.
Instrument Cluster
The instrument cluster controls the alarm indicator, and in conjunction with the ECM (engine control module), the engine
immobilization. The ECM controls the engine crank and fuel functions and the instrument cluster processes the valid
transponder information.
Alarm Indicator
The alarm indicator is a LED (light emitting diode) located in the body of the sunload/light sensor. When the ignition is off the
indicator gives a visual indication of the active anti-theft system to show if the alarm system is active or not active. Operation
of the alarm indicator is controlled by the instrument cluster which varies the flash rate of the LED to indicate the system
status of the alarm and the immobilization systems.
When the ignition is on, the indicator provides a visual indication of the status of the passive anti-theft (engine
immobilization) system. If the immobilization system is operating correctly, the LED will be illuminated for 3 seconds at
ignition on and then extinguish. If a fault exists in the immobilization system, the LED will be either permanently illuminated
or flashing for 60 seconds. This indicates that a fault exists and fault code has been recorded. After the 60 second period the
LED will flash at different frequencies which indicate the nature of the fault.
Refer to: Anti-Theft - Passive (419-01B Anti-Theft - Passive, Description and Operation).
Passive Anti-Theft Horn
The passive anti-theft horn is hardwired to the CJB which activates the horn when the alarm is triggered.
Battery Backed Sounder
Operation of the battery backed sounder is controlled by the CJB on the LIN bus. The sounder is also connected with a
permanent battery supply via the CJB. An integral, rechargeable battery powers the sounder if the battery power supply from
the CJB is interrupted.
Dependant on vehicle, a incitation sensor is incorporated into the battery backed sounder, to monitor vehicle attitude, see
Inclination Sensor.
Inclination Sensor
The CJB monitors the inclination sensor and will activate the alarm system if the vehicle is being raised.
Intrusion Detection Module
The intrusion detection module comprises an ultrasonic sound wave sensor which monitors the vehicle's interior.
The intrusion detection module is activated with volumetric mode which in turn is enabled when the vehicle is double locked.
The vehicle can be locked and alarmed with the module de-activated if a pet is to be left in the vehicle for example by single-
Page 2145 of 3039

Anti-Theft - Passive (Description and Operation), Anti-Theft - Passive (Description and Operation).
Inspection and Verification
Anti-theft - Passive
The best method to confirm the correct operation of the Passive Anti-Theft System (PATS) is to check the LED (located in the
center of the instrument panel). The LED should illuminate solid for 3 seconds, when the ignition status is set to ON, and then
extinguish. This validates all PATS functions (i.e. the key transponder matches a stored key code, the challenge/response
sequence between the respective modules was successful resulting in the EMS being enabled).
Ignition fails to operate
Check that the smart key is located within the vehicle interior, and that it is the correct one for the vehicle.
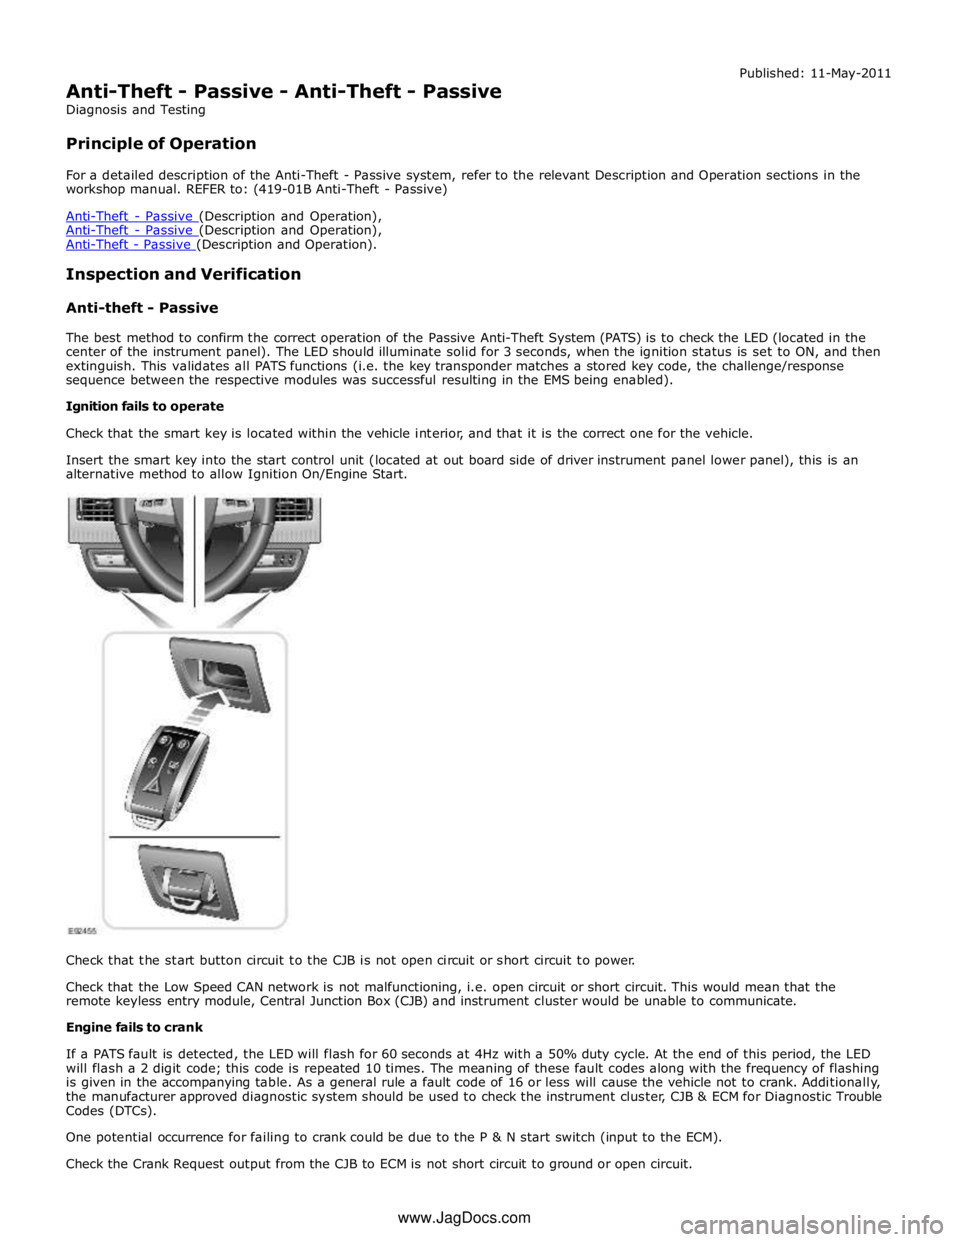
Insert the smart key into the start control unit (located at out board side of driver instrument panel lower panel), this is an
alternative method to allow Ignition On/Engine Start.
Check that the start button circuit to the CJB is not open circuit or short circuit to power.
Check that the Low Speed CAN network is not malfunctioning, i.e. open circuit or short circuit. This would mean that the
remote keyless entry module, Central Junction Box (CJB) and instrument cluster would be unable to communicate.
Engine fails to crank
If a PATS fault is detected, the LED will flash for 60 seconds at 4Hz with a 50% duty cycle. At the end of this period, the LED
will flash a 2 digit code; this code is repeated 10 times. The meaning of these fault codes along with the frequency of flashing
is given in the accompanying table. As a general rule a fault code of 16 or less will cause the vehicle not to crank. Additionally,
the manufacturer approved diagnostic system should be used to check the instrument cluster, CJB & ECM for Diagnostic Trouble
Codes (DTCs).
One potential occurrence for failing to crank could be due to the P & N start switch (input to the ECM).
Check the Crank Request output from the CJB to ECM is not short circuit to ground or open circuit. www.JagDocs.com
Page 2157 of 3039

(414-01 Battery, Mounting and Cables, General Procedures).
2. Remove the LH luggage compartment side trim panel.
For additional information, refer to: Loadspace Trim Panel LH (501-05 Interior Trim and Ornamentation, Removal and Installation).
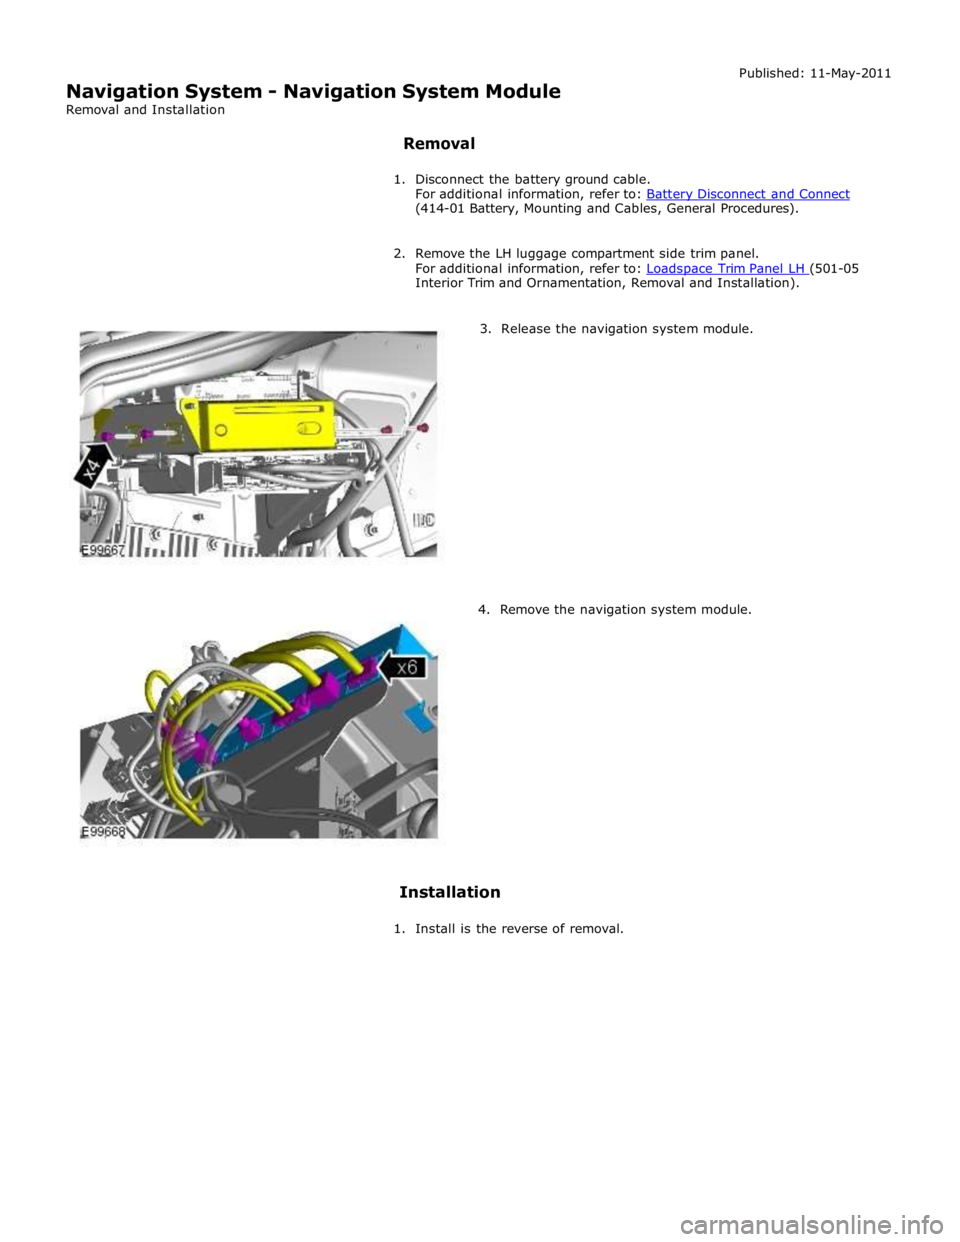
3. Release the navigation system module.
4. Remove the navigation system module.
Installation
1. Install is the reverse of removal.