Page 49 of 184

Press button Hto increase or to decrease
the fan speed and therefore the amount
of air admitted into the passenger com-
partment,
although keeping the required
temper")
Fan speed adjusting buttons (H)
Press button Hto increase or to decrease
the fan speed and therefore the amount
of air admitted into the passenger com-
partment,
although keeping the required
temperature set.
The fan speed is shown by the lit bars on
the display:
max fan speed = all bars lit;
min fan speed = one bar lit.
The fan can be cut off only if the climate
control compressor has been
switched
off pressing button F-fig. 34.
IMPORTANT To restore automatic fan
speed control after a manual adjustment,
press button AUTO.
IMPORTANT At high speeds, the dynamic
effect may increase the flow of air into the
passenger compartment which in this case
will not directly correspond to the fan
speed bar display.AUTO (A) (automatic operation)
Press AUTO to make the system auto-
matically adjust the quantity and distribu-
tion of the air introduced into the pas-
senger compartment. All previous manu-
al settings will be cancelled.
The message FULL AUTOwill appear
on the front display in this condition.
By manually intervening on at least of the
functions automatically managed by the
system (air recirculatio n, fan speed or
compressor on/off), the word FULL will
disappear from the display indicating that
the system is no longer automatically con-
trolling all the functions (the temperature
will still be controlled automatically by the
system).
IMPORTANT Sho uld the system (aft er
manual setting s) be no lon ger able to
guarantee the required temperature set
in the passen ger compartment, the set
temperature value will start flashing to in-
dicate this condition, after one minute the
AUTOmessage will turn off.
To restore system automatic control at
any time, after one or more manual ad-
justments, press button AUTO.Air recirculation on/off button (G)
Air recirculation works according to the
following operating logics:
override on (inside air recirculation
always on),
indicated by the the LED
on button Gand symbol on
the display;
override off (air recirculation always
off and introduction of external air),
indicated by the fact that the LED on
the button is off is on the display.
These operating conditions are obtained
by pressing Gin sequence.
IMPORTANT The inside air recircula-
tion system makes it possible to reach
the required heating or cooling condi-
tions faster.
It is however inadvisable to use it on
rainy/cold days as it would considerably
increase the possibility of the windows
misting inside, especially if the climate
control compressor is off.
Recirculation is forced off
(i.e. air is
introduced from the outside) when the
the outside temperature is cold to pre-
vent misting up.
It is advisable not to use the air recircu-
lation function when the outside tem-
perature is low to prevent the windows
from rapidly misting up.
�
��
�
48
SAFETY
DEVICES
CORRECT USE
OF THE
CAR
WARNING
LIGHTS AND
MESSAGES
IN AN
EMERGENCY
CAR
MAINTENANCE
TECHNICAL
SPECIFICATIONS
INDEX
DASHBOARD
AND CONTROLS
LINEA Owner HAND BOOK RHD.pdf 48LINEA Owner HAND BOOK RHD.pdf 488/21/09 2:16:05 PM8/21/09 2:16:05 PM
Page 50 of 184

Press to switch the clim ate control
compressor off (if on). The icon on the
display will go out.
Press the button when the LED is off to
res tore aut")
Climate control compressor
enabling button (F)
Press to switch the clim ate control
compressor off (if on). The icon on the
display will go out.
Press the button when the LED is off to
res tore aut oma tically system
control
and use of the com pressor.
The icon
will light up on the display in this case.
The system will switch recirculation off
when the compressor is switched off to
prevent misting up.
Although the system
is capable of maintaining the required tem-
perature, the word FULLwill disappear
from the display.
If on the other hand the
system cannot maintain the required tem-
perature, the digits will blink and the word
AUTOwill disappear.IMPORTANT With the compressor off,
it is not possible to introduce air cooler
than ambient temperature into the pas-
senger compartm ent. Furthermore,
in
certain condition s, the windows could
mist up rapidly because the air is not de-
humidified. The switching off of the climate
control compressor remains in storage
even when the engine has been stopped.
To restore automatic compressor control,
press again (in this case, the system will
only work as a heater) or press AUTO.
With climate control compressor off,
the
fan speed can be set to zero manually (no
bar shown).
With the compressor enabled and the en-
gine started, the fan speed may be reduced
to the minimum setting (only one bar
shown).Fast window demisting/defrosting
button (D)
Press this button: the climate control
sys-
tem will automatically switch on all the
functions required for fast windscreen de-misting/defrosting, that is:
switches on climate control compres-
sor when climatic conditions are suit-
able;
air recirculation off;
maximum air temperature HI on both
areas;
operates proper fan speed according
to engine coolant temperature to lim-
it the flow into the passenger
com-
partment of air not warm enough to
demist the windows;
directs air flow to windscreen
and
front side windows vents;
heated rear window on.
�
�
�
�
�
�
49
SAFETY
DEVICES CORRECT USE
OF THE
CAR
WARNING
LIGHTS AND
MESSAGES IN AN
EMERGENCY
CAR
MAINTENANCE
TECHNICAL
SPECIFICATIONS
INDEX
DASHBOARD
AND CONTROLS
LINEA Owner HAND BOOK RHD.pdf 49LINEA Owner HAND BOOK RHD.pdf 498/21/09 2:16:05 PM8/21/09 2:16:05 PM
Page 51 of 184

IMPORTANT The quick demisting/de-
frosting function will stay on for approxi-
mately 3 minutes after the engine coolant
temperature is warm enough to ensure
rapid window demisting.
When the function is on, the LED on the
rear window demister button will light up
and the message FULL AUTOwill go
out on the display.
You may only adjust the fan speed and
switch the rear window demister off man-
ually when this function is running.
To restore running operations before this
function was activated, press either but-
ton B, air recirculation button G, com -
pressor button For button AUTO A.Switching the system off (E)
Press Eto switch the climate control sys-
tem off. The display will go out as a con-
sequence.
The following climate control conditions
will be established when the system is off:
display off;
temperature not shown;
air recirculation on,
passenger com-
partm ent isolated from the outside
(recirculation LED on);
climate control compressor off;
fan off.Press AUTOto switch the automatic cli-
mate control system back on.
�
�
�
�
�
50
SAFETY
DEVICES
CORRECT USE
OF THE
CAR
WARNING
LIGHTS AND
MESSAGES
IN AN
EMERGENCY
CAR
MAINTENANCE
TECHNICAL
SPECIFICATIONS
INDEX
DASHBOARD
AND CONTROLS
LINEA Owner HAND BOOK RHD.pdf 50LINEA Owner HAND BOOK RHD.pdf 508/21/09 2:16:06 PM8/21/09 2:16:06 PM
Page 52 of 184

EXTERNAL LIGHTS
Th e left-hand stalk fig. 36operates
most of the external lights.
The external lights can only be switched
on when the ignition key is at MAR.
The instrument panel and the various
dashboard controls will come on with the
external lights.
LIGHTS OFF
Knurled ring turned to symbol O.
SIDELIGHTS - TAILLIGHTS
Turn the knurled ring to .
The warning light on the instrument
cluster will come on at the same time.
DIPPED BEAM HEADLIGHTS
Turn the knurled ring to .
The warning light on the instrument
cluster will come on at the same time.MAIN BEAM HEADLIGHTS
When the knurled ring is at , pull the
lever towards the steering wheel (2
ndun-
stable position).
The warning light 1on the instrument
cluster will come on at the same time.
To turn the main beams off,
pull again the
lever towards the steering wheel (dipped
beams will turn on again).FLASHING THE HEADLIGHTS
Pull the stalk towards the steering wheel
(1
stunstable position) regardless of the po-
sition of the knurled ring. The warning
light on the instrument cluster will
come on at the same time.
fig. 36F0R0037m
51
SAFETY
DEVICES CORRECT USE
OF THE
CAR
WARNING
LIGHTS AND
MESSAGES IN AN
EMERGENCY
CAR
MAINTENANCE
TECHNICAL
SPECIFICATIONS
INDEX
DASHBOARD
AND CONTROLS
LINEA Owner HAND BOOK RHD.pdf 51LINEA Owner HAND BOOK RHD.pdf 518/21/09 2:16:06 PM8/21/09 2:16:06 PM
Page 53 of 184
 position:
up (position 1): right-hand indicator;
down (position 2): left-hand indicator;
Warning light or will blink on the in-
strument panel")
DIRECTION INDICATORS fig. 37
Push the stalk to (stable) position:
up (position 1): right-hand indicator;
down (position 2): left-hand indicator;
Warning light or will blink on the in-
strument panel.
Indicators are switched off automatically
when the steering wheel is straightened.
If you want the indicator to flash briefly to
show that you are about to change lane,
move the stalk up or down without click-
ing into position (unstable position). When
released the stalk will return to its home
position.“FOLLOW ME HOME” DEVICE
This function allows the illumination of the
space in front of the car for a preset pe-
riod of time.
Activation
With the ignition key at STOPor re-
moved, pull the left-hand stalk towards the
steering wheel within 2 minutes from
when the engine is turned off.
At each single movement of the stalk, the
lights will remain on for an extra 30 sec-
onds up to a maximum of 210 seconds;
then the lights are switched off automati-
cally. Warning light on the instrument pan-
el will light up and the corresponding mes-
sage will appear on the display
(see
“Warning lights and messages”) as long as
the function is on.
The warning light will
go out when the lever is operate and stay
on until the function is automatically de-
activated. Time for which the lights stay
on can only be increased by operating the
lever.
Deactivation
Keep the stalk pulled towards the steer-
ing wheel for more than 2 seconds.
fig. 37F0R0038m
�
�
52
SAFETY
DEVICES
CORRECT USE
OF THE
CAR
WARNING
LIGHTS AND
MESSAGES
IN AN
EMERGENCY
CAR
MAINTENANCE
TECHNICAL
SPECIFICATIONS
INDEX
DASHBOARD
AND CONTROLS
LINEA Owner HAND BOOK RHD.pdf 52LINEA Owner HAND BOOK RHD.pdf 528/21/09 2:16:06 PM8/21/09 2:16:06 PM
Page 54 of 184

WINDSCREEN WASHING
The right stalk fig. 38controls front wind-
screen wiper/washer operation.
WINDSCREEN WASHER/
WIPER
The device can only work when the igni-
tion key is at MAR.
The stalk ring nut can be moved to four
different positions:
Owindscreen wiper off;
intermittent;
continuous slow;
continuous fast.
Move the lever to position A(unstable)
to limit operation for the time for which
the lever is held in this position. The lever
will return to position and the wiper will
be automatically stopped when released.Do not use the windscreen
wiper to remove layers of
snow or ice from the wind-
screen. In such conditions, the
windscreen wiper may be subjected to
excessive stress and the motor protec-
tion which prevents operation for a few
seconds may trip. If operation is not re-
stored, even after turning the key and
restarting the engine, go to a Fiat
Dealership.
With the ring in position the wind-
screen wiper will automatically adapt to
the speed of the car.
IMPORTANT Replace wiper blades as
specified in section “Car maintenance”.
fig. 38F0R0039m
“Smart washing” function
Pull the stalk towards the steering wheel
(unstable position) to operate the wind-
screen washer.
Keeping the stalk pulled for more than half
a second, with just one movement it is
possible to operate the washer jet and the
wiper at the same time.
The wiper stops working three strokes af-
ter releasing the stalk.
A further stroke after 6 seconds
com-
pletes the wiping operation.
53
SAFETY
DEVICES CORRECT USE
OF THE
CAR
WARNING
LIGHTS AND
MESSAGES IN AN
EMERGENCY
CAR
MAINTENANCE
TECHNICAL
SPECIFICATIONS
INDEX
DASHBOARD
AND CONTROLS
LINEA Owner HAND BOOK RHD.pdf 53LINEA Owner HAND BOOK RHD.pdf 538/21/09 2:16:06 PM8/21/09 2:16:06 PM
Page 55 of 184
 fig.39/b
Switch Aturn on/off these lights.
With switch Ain central position, lights
Cand Dwil")
54
CEILING LIGHTS
FRONT CEILING WITH SPOT
LIGHTS fig.39/a AND WITH
DIFFUSED LIGHTIING LED
(where provided) fig.39/b
Switch Aturn on/off these lights.
With switch Ain central position, lights
Cand Dwill turn on/off when opening/
closing the front doors.
With switch Apressed on the left side,
lights Cand Dwill always stay off. With
switch Apressed on the right side, lights
Cand Dwill always stay on.
Light turning on/off is gradual.
Switch Bperforms the spot function; with
light off, it will turn on:
light Cif pressed on the left side;
light Dif pressed on the right side.
IMPORTANT Before getting out of the
car, make sure the switch is at central po-
sition: lights off with doors closed in or-
der to avoid draining the battery.
In any case, if the switch is left inadver-
tently to the on position, the lights will
turn off automatically 15 minutes after
turning the engine off.
fig. 39/aF0R0043m
REAR CEILING LIGHT WITH
MOVABLE LENS
The light will turn on/off by pressing the
movable lens rightwards or leftwards as
shown in fig. 40.
fig. 39/bF0R0240m
fig. 40F0R0042m
SAFETY
DEVICES
CORRECT USE
OF THE
CAR
WARNING
LIGHTS AND
MESSAGES
IN AN
EMERGENCY
CAR
MAINTENANCE
TECHNICAL
SPECIFICATIONS
INDEX
DASHBOARD
AND CONTROLS
�
�
LINEA Owner HAND BOOK RHD.pdf 54LINEA Owner HAND BOOK RHD.pdf 548/21/09 2:16:06 PM8/21/09 2:16:06 PM
Page 56 of 184

55
Ceiling light timing
On certain versions to facilitate getting
in/out of the car at night or with poor
lighting, 2 different timed switching
on
modes have been provided.
LIGHT TIMING WHEN GETTING INTO THE CAR
Lights will turn on as follows:
for about 10 seconds when
opening
front doors;
for about 3 minutes when opening one
of the side doors;
for about 10 seconds when closing the
doors.
Timing will stop when turning the ignition
key to MAR.
LIGHT TIMING WHEN GETTING OUT
OF THE CAR
After removing the key from the ignition
switch, the ceiling lights will turn on as fol-
lows:
within 2 minutes from turning the en-
gine off for about 10 seconds;
when opening one of the side doors for
about 3 minutes;
when closing one of the doors
for
about 10 seconds.
Timing will stop automatically when lock-
ing the doors.
SAFETY
DEVICES CORRECT USE
OF THE
CAR
WARNING
LIGHTS AND
MESSAGES IN AN
EMERGENCY
CAR
MAINTENANCE
TECHNICAL
SPECIFICATIONS
INDEX
DASHBOARD
AND CONTROLS�
�
��
�
�
LINEA Owner HAND BOOK RHD.pdf 55LINEA Owner HAND BOOK RHD.pdf 558/21/09 2:16:06 PM8/21/09 2:16:06 PM
 1
1 2
2 3
3 4
4 5
5 6
6 7
7 8
8 9
9 10
10 11
11 12
12 13
13 14
14 15
15 16
16 17
17 18
18 19
19 20
20 21
21 22
22 23
23 24
24 25
25 26
26 27
27 28
28 29
29 30
30 31
31 32
32 33
33 34
34 35
35 36
36 37
37 38
38 39
39 40
40 41
41 42
42 43
43 44
44 45
45 46
46 47
47 48
48 49
49 50
50 51
51 52
52 53
53 54
54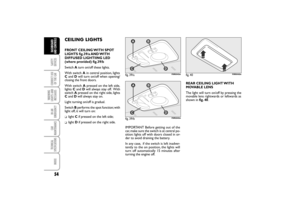 55
55 56
56 57
57 58
58 59
59 60
60 61
61 62
62 63
63 64
64 65
65 66
66 67
67 68
68 69
69 70
70 71
71 72
72 73
73 74
74 75
75 76
76 77
77 78
78 79
79 80
80 81
81 82
82 83
83 84
84 85
85 86
86 87
87 88
88 89
89 90
90 91
91 92
92 93
93 94
94 95
95 96
96 97
97 98
98 99
99 100
100 101
101 102
102 103
103 104
104 105
105 106
106 107
107 108
108 109
109 110
110 111
111 112
112 113
113 114
114 115
115 116
116 117
117 118
118 119
119 120
120 121
121 122
122 123
123 124
124 125
125 126
126 127
127 128
128 129
129 130
130 131
131 132
132 133
133 134
134 135
135 136
136 137
137 138
138 139
139 140
140 141
141 142
142 143
143 144
144 145
145 146
146 147
147 148
148 149
149 150
150 151
151 152
152 153
153 154
154 155
155 156
156 157
157 158
158 159
159 160
160 161
161 162
162 163
163 164
164 165
165 166
166 167
167 168
168 169
169 170
170 171
171 172
172 173
173 174
174 175
175 176
176 177
177 178
178 179
179 180
180 181
181 182
182 183
183