Page 25 of 184
 will flash on the dis-
play;
– briefly press button MENU ESCto go
back to the menu screen or press the but-
ton for long to go back to the standard
screen without sto")
24
– press button –: (Off) will flash on the dis-
play;
– briefly press button MENU ESCto go
back to the menu screen or press the but-
ton for long to go back to the standard
screen without storing settings. Speed limit (Speed Beep)
This function may be used to set the car
speed limit (km/h or mph); when this lim-
it is exceeded the driver is immediate ly
alerted (see section “Warning lights and
messages”).
To set the speed limit, proceed as follows:
– briefly press button MENU ESC, the
disp lay will show the wordin g (Sp eed
Buzz);
– press button +or –to select speed lim-
it activation (On) or deactivation (Off);
– if the function has been activated (On),
press buttons +or –to select the re-
quired speed limit and then press MENU
ESCto confirm.
NoteThe speed may be set in the range
from 30 to 250 km/h, or from 20 to 125 mph
according to the previously chosen unit (see
“Setting the distance unit”) described below.
The setting will increase/decrease by five
units each time button +/–is pressed. Hold
button +/–pressed to increase/decrease the
setting rapidly. Complete the setting by
briefly pressing the button when you ap-
proach the required setting.
– briefly press button MENU ESCto go
back to the menu screen or press the but-
ton for long to go back to the standard
screen without storing settings.
To cancel the setting, proceed as follows:
– briefly press button MENU ESC: (On)
will blink on the display;
SAFETY
DEVICES
CORRECT USE
OF THE
CAR
WARNING
LIGHTS AND
MESSAGES
IN AN
EMERGENCY
CAR
MAINTENANCE
TECHNICAL
SPECIFICATIONS
INDEX
DASHBOARD
AND CONTROLS
LINEA Owner HAND BOOK RHD.pdf 24LINEA Owner HAND BOOK RHD.pdf 248/21/09 2:16:01 PM8/21/09 2:16:01 PM
Page 26 of 184

Through this option it is possible to acti-
vate (On) or deactivate (Off) the Trip B
(partial trip).
For fur the r info rmation see “Trip com-
puter”.
Proceed as fol")
25
Trip B On/Off (tripB data)
Through this option it is possible to acti-
vate (On) or deactivate (Off) the Trip B
(partial trip).
For fur the r info rmation see “Trip com-
puter”.
Proceed as follows to switch the function
on and off:
– briefly press button MENU ESC: ( O n )
or (Off) will flash on the display (accord-
ing to previous setting);
– press button +or –for setting;
– briefly press button MENU ESCto go
back to the menu screen or press the but-
ton for long to go back to the standard
screen without storing settings.Setting the clock (Set time)
This function allows to set the clock through
two sub-menus: “Time” and “Mode”.
Proceed as follows:
– briefly press button MENU ESC, t h e
display will show the two sub-menus
“Time” and “Mode”;
– press button +or –to surf the two sub-
menus;
– select the required option and then
press button MENU ESCbriefly;
– when accessing the “Hour” submenu: –
briefly press button MENU ESC,
“hours” will flash on the display;
– press button +or –for setting;
– briefly press button MENU ESC, “ m i n -
utes” will flash on the display;
– press button +or –for setting;
– when accessing the “Format” submenu:
briefly press button MENU ESC : t h e
previously set display format will flash on
the display;
– press button +or –to select “24h” or
“12h”.
When you have made the required set-
tings, briefly press button MENU ESC
to go back to the menu screen or press
the button for long to go back to the stan-
dard screen without storing settings.
– hold MENU ESCpressed to go back
to the standard screen or main menu ac-
cording to the points of the menu where
you are at.Set date (Set Date)
This function may be used to update the
date (year - month - day).
To correct the date proceed as follows:
– briefly press button MENU ESC: “day”
will flash on the display;
– press button +or –for setting;
– briefly press button MENU ESC:
“month” will flash on the display;
– press button +or –for setting;
– briefly press button MENU ESC
:
“year” will flash on the display;
– press button +or –for setting.
NoteThe settin g will increase or de-
crease by one unit each time +or – is
pressed. Hold the button pressed to in-
crease/decrease the setting rapidly. Com-
plete the setting by briefly pressing the
button when you approach the required
setting.
– briefly press button MENU ESCto go
back to the menu screen or press the but-
ton for long to go back to the standard
screen without storing settings.
SAFETY
DEVICES CORRECT USE
OF THE
CAR
WARNING
LIGHTS AND
MESSAGES IN AN
EMERGENCY
CAR
MAINTENANCE
TECHNICAL
SPECIFICATIONS
INDEX
DASHBOARD
AND CONTROLS
LINEA Owner HAND BOOK RHD.pdf 25LINEA Owner HAND BOOK RHD.pdf 258/21/09 2:16:02 PM8/21/09 2:16:02 PM
Page 27 of 184

When activated (On), this function locks
automatically the doors when the car
speed exceeds 20 km/h.
This function is availab le on all versions")
26
Automatic door locking with car
running (Autoclose)
When activated (On), this function locks
automatically the doors when the car
speed exceeds 20 km/h.
This function is availab le on all versions
and may only be switch ed off by means
of the multifunctional display.
To activate (On) or to deactivate (Off) this
function proceed as follows:
– briefly press button MENU ESCto dis-
play the three sub-menus;
– briefly press button MENU ESC: (On)
or (Off) will flash on the display (accord-
ing to previous setting);
– press button +or –for setting;
– briefly press button MENU ESCto
go back to the menu screen or press the
button for long to go back to the stan-
dard screen without storing settings.
– hold MENU ESCpressed to go back
to the standard screen or main menu ac-
cording to the points of the menu where
you are at. Audio repetition (See radio)
With this function the display repeats in-
formation relevant to the sound system.
– Radio:
tuned radio station frequency or
RDS message, automatic tuning activation
or AutoSTore;
– CD audio, CD MP3: track number;
– CD Changer : CD number and track
number;
To activate (On) or to deactivate (Off)
sound system info displaying proceed as
follows:
– briefly press MENU ESC: ( O n ) o r ( O f f )
will flash on the display (according to pre-
vious setting);
– press button +or –for setting;
– briefly press button MENU ESCto go
back to the menu screen or press the but-
ton for lon g to go back to the stan dard
screen without storing settings.Set units (Unit of measure)
With this function it is possible to set the
units through three sub-menus:
“Distances”,
“Consumption” and “Temperature”.
Proceed as follows to set the required unit:
– briefly press button MENU ESCto dis-
play the three sub-menus;
– press button +or –to surf the three sub-
menus;
– select the required sub-menu and then
press briefly button MENU ESC;
– when accessing the “Distances”submenu:
briefly press MENU ESC: either “km” or
“mi” will appear on the display (according
to the previous setting);
– press + or –to make your choice;
SAFETY
DEVICES
CORRECT USE
OF THE
CAR
WARNING
LIGHTS AND
MESSAGES
IN AN
EMERGENCY
CAR
MAINTENANCE
TECHNICAL
SPECIFICATIONS
INDEX
DASHBOARD
AND CONTROLS
LINEA Owner HAND BOOK RHD.pdf 26LINEA Owner HAND BOOK RHD.pdf 268/21/09 2:16:02 PM8/21/09 2:16:02 PM
Page 28 of 184

The messages may be displayed in the fol-
lowing languages: Italian, Turkish, Dutch,
Portuguese, Polish, French, Spanish, Eng-
lish, German.
To set the required")
27
Selecting the language (Language)
The messages may be displayed in the fol-
lowing languages: Italian, Turkish, Dutch,
Portuguese, Polish, French, Spanish, Eng-
lish, German.
To set the required language proceed as
follows:
– briefly press button MENU ESC:
the
previously set “language” “ will flash on the
display;
– press button +or –for setting;
– briefly press button MENU ESCto go
back to the menu screen or press the but-
ton for long to go back to the standard
screen without storing settings. – when you are in the “Consumption”sub-
menu: briefly press MENU ESC: either
“km/l, Lit/100km” or “mpg” will appear on
the display (according to the previous setting);
If the distance unit set is “km” the fuel con-
sumption unit will be displayed in km.
If the distance unit set is “mi” the fuel con-
sumption unit will be displayed in “mpg”.
– press button +or –for setting;
– when accessing the “Temperature”sub-
menu: briefly press MENU ESC:
either
“°C” or “°F” will appear on the display (ac-
cording to the previous setting);
– press button +or –for setting;
When you have made the required set-
tings, briefly press button MENU ESCto
go back to the menu screen or press the
button for long to go back to the standard
screen without storing settings.
– hold MENU ESCpressed to go back
to the standard screen or main menu ac-
cording to the points of the menu where
you are at.Adjusting the failure/warning
buzzer volume (Buzzer Volume)
With this function the volume of the
buzzer accompanying any failure/warning
indication can be adjusted according to 8
levels.
To adjust the volume proceed as follows:
– briefly press button MENU ESC: t h e
previously set volume
“level” will flash on
the display;
– press button +or –for setting;
– briefly press button MENU ESCto go
back to the menu screen or press the but-
ton for long to go back to the standard
screen without storing settings.
SAFETY
DEVICES CORRECT USE
OF THE
CAR
WARNING
LIGHTS AND
MESSAGES IN AN
EMERGENCY
CAR
MAINTENANCE
TECHNICAL
SPECIFICATIONS
INDEX
DASHBOARD
AND CONTROLS
LINEA Owner HAND BOOK RHD.pdf 27LINEA Owner HAND BOOK RHD.pdf 278/21/09 2:16:02 PM8/21/09 2:16:02 PM
Page 29 of 184

Through this function it is possible to dis-
play information connected to proper car
servicing.
Proceed as follows:
– briefly press button MENU ESC: s e r-
vice in")
28
Scheduled Servicing (Service)
Through this function it is possible to dis-
play information connected to proper car
servicing.
Proceed as follows:
– briefly press button MENU ESC: s e r-
vice in km or mi, according to previous
settin g, will be displayed (see paragraph
“Units”);
– briefly press button MENU ESCto go
back to the menu screen or press the but-
ton for long to go back to the standard
screen.NoteThe “Service Schedule” requires the
car to be serviced every 20,000 km; this in-
dication will appear automatically with the
key at MAR when there are 2000 km left
(or 1240 mi) and will be presented auto-
mati cally ever y 200 km (or 124 mi). The
The indications will appear more frequ-
ently where there are 200 km left. The indi-
cation will appear in kilometers or miles
according to the settings. When the next
scheduled service operation is approaching,
the message “Service” will appear on the
display followed by the number of kilome-
ters or miles left when the key is turned
to MAR. Go to a Fi at Dea ler shi p
where the “Scheduled Service” operations
will be performed and the message will be
reset. Adjusting the button volume
(Button Vol.)
This function may be used to adjust the
volume of the beep accompanying the ac-
tivation of buttons MENU ESC, +and
–can be adjusted according to 8 levels.
To adjust the volume proceed as follows:
– briefly press button MENU ESC: t h e
previously set volume “level” will flash on
the display;
– press button +or –for setting;
– briefly press button MENU ESCto go
back to the menu screen or press the but-
ton for long to go back to the standard
screen without storing settings.
SAFETY
DEVICES
CORRECT USE
OF THE
CAR
WARNING
LIGHTS AND
MESSAGES
IN AN
EMERGENCY
CAR
MAINTENANCE
TECHNICAL
SPECIFICATIONS
INDEX
DASHBOARD
AND CONTROLS
LINEA Owner HAND BOOK RHD.pdf 28LINEA Owner HAND BOOK RHD.pdf 288/21/09 2:16:02 PM8/21/09 2:16:02 PM
Page 30 of 184
 (passenger bag)
This function shall be used to activate/de-
activate the front passenger’s airbag.
Proceed as follows:
p")
29
Passenger front and side airbag
activation/deactivation
(where provided) (passenger bag)
This function shall be used to activate/de-
activate the front passenger’s airbag.
Proceed as follows:
press button MENU ESCand press
MENU ESCagain after the message
(Bag pass: Off) (to deactivate) or (Bag
pass: On) (to activate) is displayed by
pressing buttons +and –;
display will show the confirmation mes-
sage;
press buttons +or –to sel ect (Yes)
(confirming activation/deactivation) or
(No) (to abort);
briefly press button MENU ESC to
confirm settin g e to go back to the
menu screen or press the button for
long to go back to the standard screen
without storing settings.
MENU ESC
MENU ESC
MENU ESC
– +
– +
– +
– +
– +
– +
F0R1009g
F0R1011g F0R1010g F0R1013g
F0R1014g F0R1009g
F0R1009g
MENU ESC
F0R1015g
F0R1016g
Exit Menu
This is the last function that closes the cir-
cular setting cycle listed in the initial menu
screen.
Briefly press button MENU ESCto go
back to the standard screen without stor-
ing settings.
Press button –to return to the first menu
option (Speed Beep).
SAFETY
DEVICES CORRECT USE
OF THE
CAR
WARNING
LIGHTS AND
MESSAGES IN AN
EMERGENCY
CAR
MAINTENANCE
TECHNICAL
SPECIFICATIONS
INDEX
DASHBOARD
AND CONTROLS
�
�
�
�
LINEA Owner HAND BOOK RHD.pdf 29LINEA Owner HAND BOOK RHD.pdf 298/21/09 2:16:02 PM8/21/09 2:16:02 PM
Page 31 of 184

30
TRIP COMPUTER
General features
The “Trip computer” is used to display in-
formation on car operation when the key
is turned to MAR. This function allows to
define two separate trips called “Trip A”
and “Trip B” for monitoring the car’s
“complete mission” in a reciprocally in-
dependent manner.
Both functions are resettable (reset - start
of new mission).
“Trip A” may be used to display the fig-
ures relating to:
– Range
– Distance travelled
– Average consumption
– Instant consumption
– Average speed
– Travel time (driving time).“Trip B”, available on multifunctional dis-
play only, shall be used to display the fig-
ures relating to:
– Trip distance B
– Average consumption B
– Average speed B
– Travel time B (driving time).
Note“Trip B” functions may be exclud-
ed (see “Trip B on”). “Range” and “In-
stantaneous consumption” cannot be re-
set.Values displayed
Range
This indicates the distance which may be
travelled with the fuel in the tank
assuming that driving conditions will not
change. The message “——”
will appear
on the display in the following cases:
– range shorter than 50 km (or 30 mi)
– car left parked with engine running for
long.
Distance travelled
This indicates the distance covered from
the start of the new mission.SAFETY
DEVICES
CORRECT USE
OF THE
CAR
WARNING
LIGHTS AND
MESSAGES
IN AN
EMERGENCY
CAR
MAINTENANCE
TECHNICAL
SPECIFICATIONS
INDEX
DASHBOARD
AND CONTROLS
LINEA Owner HAND BOOK RHD.pdf 30LINEA Owner HAND BOOK RHD.pdf 308/21/09 2:16:02 PM8/21/09 2:16:02 PM
Page 32 of 184

31
Average consumption
This indicates the average consumption
from the start of the new mission.
Instant consumption
This indicates the fuel consumption. The
value is constantly updated. The message
“----”
will appear on the display
if the car is parked with the engine run-
ning.
Average speed
This shows the car average speed as a
function of the overall time elapsed since
the start of the new mission.
Travel time
This value shows the time elapsed since
the start of the new mission.
IMPORTANT If information is not avail-
able, the message “----” will appear instead
of the Trip Computer values. Displaying
of the values will be resumed when nor-
mal operation is restored without reset-
ting the values displayed before the prob-
lem nor starting a new mission. TRIP button fig. 21
Button TRIP, set on the top of the right
steering column stalk, shall be used (with
ignition key at MAR) to display and to re-
set the previously described values to start
a new mission:
– briefly press to display the different val-
ues
– hold pressed to reset and then start a
new mission.
New mission
Reset can be:
– “manual” resetting by the user, by press-
ing the relevant button;
– “automatic” resetting, when the “Trip dis-
tance” reaches 3999.9 km or 9999.9 km
(according to the type of display) or when
the “Travel time” reaches 99.59 (99 hours
and 59 minutes);
– after disconnecting/reconnecting the
battery.IMPORTANT The reset operation in the
presence of the screens concerning the
“Trip A” makes it possible to reset only
the information associated with this func-
tion.
IMPORTANT The reset operation in the
presence of the screens concerning the
“Trip B” makes it possible to reset only
the information associated with this func-
tion.
Start of journey procedure
With ignition key at MAR, press and keep
button TRIPpressed for over 2 seconds
to reset.
Exit Trip
To exit the Trip function: hold MENU
ESCpressed for longer than 2 seconds.
fig. 21F0R0020m
SAFETY
DEVICES CORRECT USE
OF THE
CAR
WARNING
LIGHTS AND
MESSAGES IN AN
EMERGENCY
CAR
MAINTENANCE
TECHNICAL
SPECIFICATIONS
INDEX
DASHBOARD
AND CONTROLS
LINEA Owner HAND BOOK RHD.pdf 31LINEA Owner HAND BOOK RHD.pdf 318/21/09 2:16:03 PM8/21/09 2:16:03 PM
 1
1 2
2 3
3 4
4 5
5 6
6 7
7 8
8 9
9 10
10 11
11 12
12 13
13 14
14 15
15 16
16 17
17 18
18 19
19 20
20 21
21 22
22 23
23 24
24 25
25 26
26 27
27 28
28 29
29 30
30 31
31 32
32 33
33 34
34 35
35 36
36 37
37 38
38 39
39 40
40 41
41 42
42 43
43 44
44 45
45 46
46 47
47 48
48 49
49 50
50 51
51 52
52 53
53 54
54 55
55 56
56 57
57 58
58 59
59 60
60 61
61 62
62 63
63 64
64 65
65 66
66 67
67 68
68 69
69 70
70 71
71 72
72 73
73 74
74 75
75 76
76 77
77 78
78 79
79 80
80 81
81 82
82 83
83 84
84 85
85 86
86 87
87 88
88 89
89 90
90 91
91 92
92 93
93 94
94 95
95 96
96 97
97 98
98 99
99 100
100 101
101 102
102 103
103 104
104 105
105 106
106 107
107 108
108 109
109 110
110 111
111 112
112 113
113 114
114 115
115 116
116 117
117 118
118 119
119 120
120 121
121 122
122 123
123 124
124 125
125 126
126 127
127 128
128 129
129 130
130 131
131 132
132 133
133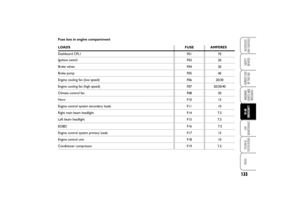 134
134 135
135 136
136 137
137 138
138 139
139 140
140 141
141 142
142 143
143 144
144 145
145 146
146 147
147 148
148 149
149 150
150 151
151 152
152 153
153 154
154 155
155 156
156 157
157 158
158 159
159 160
160 161
161 162
162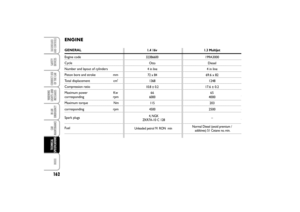 163
163 164
164 165
165 166
166 167
167 168
168 169
169 170
170 171
171 172
172 173
173 174
174 175
175 176
176 177
177 178
178 179
179 180
180 181
181 182
182 183
183