Page 17 of 184
.
BClock (always displayed, even with ig")
16
DIGITAL DISPLAY
STANDARD SCREEN fig. 15
The standard screen shows the following
indications:
AHeadlight aiming position (only with
dipped beam headlights on).
BClock (always displayed, even with ig-
nition key removed and front doors
closed).
COdometer (distance covered in kilo-
metres or miles) and TRIP data.
NoteWith key removed (when opening
one of the front doors) the display will
turn on and show for a few seconds the
km or mi covered.CONTROL BUTTONS fig. 16
+To scroll the displayed menu and the
relate d options upwards or to in-
crease the value displayed.
MENU
ESCPress briefly to access the menu
and/or go to next screen or to
confirm the required menu op-
tion.
Hold pressed to go back to the
standard screen.
–To scroll the displayed menu and the
related options downwards or to de-
crease the displayed value. NoteButtons +and –activate different
functions according to the following situ-
ations:
To adjust display brightness inside the
passenger compartment
– standard screen, to adjust instrument
panel brightness, sound system, and auto-
matic climate control system.
Setup menu
– to scroll the menu options upwards and
downwards;
– to increase or decrease values during set-
tings.
fig. 15F0R0016mfig. 16F0R0017m
SAFETY
DEVICES
CORRECT USE
OF THE
CAR
WARNING
LIGHTS AND
MESSAGES
IN AN
EMERGENCY
CAR
MAINTENANCE
TECHNICAL
SPECIFICATIONS
INDEX
DASHBOARD
AND CONTROLS
LINEA Owner HAND BOOK RHD.pdf 16LINEA Owner HAND BOOK RHD.pdf 168/21/09 2:16:00 PM8/21/09 2:16:00 PM
Page 18 of 184
 give")
17
SETUP MENU fig. 17
The menu comprises a series of functions
arranged in a cycle which can be selected
through buttons +and –to access the dif-
ferent select operations and settings (set-
up) given in the following paragraphs.
The setup menu can be activated by press-
ing briefly button MENU ESC.
Single presses on buttons +and –will
scroll the setup menu options.
Handling modes differ with each other ac-
cording to the characteristic of the option
selected.Selecting a menu option
– press briefly button MENU ESCto se-
lect the menu option to set;
– press buttons +and –(by single press-
es) to select the new setting;
– press briefly button MENU ESCto
store the new setting and to go back to
the previously selected menu option.
Selecting “Set Clock”
– briefly press button MENU ESCto se-
lect the first value to change (hours);
– press buttons +and –(by single press-
es) to select the new setting;
– briefly press button MENU ESCto
store the new setting and to go
to the
next setup menu option (minutes);
– after setting the values with the same
procedure, the system will go back to the
menu option previously selected.Hold button MENU ESC pressed
– to quit the set up menu if you are in the
menu;
– to quit the displayed menu if you are set-
ting an option;
– to save only the settings stored yet (and
confirmed by pressing button MENU
ESC).
The setup menu displaying is timed; when
quitting the menu due to timing expiry, on-
ly settings stored yet by the user (and con-
firmed by pressing briefly button MENU
ESC).
SAFETY
DEVICES CORRECT USE
OF THE
CAR
WARNING
LIGHTS AND
MESSAGES IN AN
EMERGENCY
CAR
MAINTENANCE
TECHNICAL
SPECIFICATIONS
INDEX
DASHBOARD
AND CONTROLS
LINEA Owner HAND BOOK RHD.pdf 17LINEA Owner HAND BOOK RHD.pdf 178/21/09 2:16:00 PM8/21/09 2:16:00 PM
Page 19 of 184
18
Briefly press button MENU ESCto start browsing
from the standard screen. Press +or –to browse with-
in the menu.
NoteOnly the short menu may be accessed for rea-
sons of safety while the car is moving (“SPEEd” setting).
Stop the car to access the full menu.
fig. 17
F0R2003g
+ –
+
–
+
–+
– +–
SAFETY
DEVICES
CORRECT USE
OF THE
CAR
WARNING
LIGHTS AND
MESSAGES
IN AN
EMERGENCY
CAR
MAINTENANCE
TECHNICAL
SPECIFICATIONS
INDEX
DASHBOARD
AND CONTROLS
(where provided)
LINEA Owner HAND BOOK RHD.pdf 18LINEA Owner HAND BOOK RHD.pdf 188/21/09 2:16:00 PM8/21/09 2:16:00 PM
Page 20 of 184

This function may be used to set the car
speed limit (km/h or mph), when this lim-
it is exceeded the driver is immediately
alerted (see section “Warning lights an")
19
Setting the speed limit (SPEEd)
This function may be used to set the car
speed limit (km/h or mph), when this lim-
it is exceeded the driver is immediately
alerted (see section “Warning lights and
messages”).
To set the speed limit, proceed as follows:
– briefly press button MENU ESC, the
message (SPEEd) and the previously set
unit (km/h) or (mph) will appear on the
display;
– press button+or –to activate (on) or
deactivate (OFF) the speed limit function;
– if the function is on, press buttons +or
–to select the required speed limit and
then press MENU ESCto confirm;
NoteThe speed may be set in the range
from 30 to 200 km/h, or from 20 to 125
mph according to the previously chosen
unit (see “Setting the distance unit”) de-
scribed below. The settin g will in-
crease/decrease by five units each time
button +/–is pressed. Hold button +/–
pressed to increase/decrease the setting
rapidly. Complete the setting by briefly
pressing the button when you approach
the required setting.– briefly press button MENU ESCto go
back to the menu screen or press the but-
ton for long to go back to the standard
screen without storing settings.To cancel
the setting, proceed as follows:
– briefly press button MENU ESC: (On)
will blink on the display;
– press button –: (Off) will blin k on the
display;
– briefly press button MENU ESCto go
back to the menu screen or press the but-
ton for long to go back to the standard
screen without storing settings.
Setting the clock (Hour)
This function is used to set the clock.
Proceed as follows:
– briefly press button MENU ESC,
“hours” will flash on the display;
– press button +or –for setting;
– briefly press button MENU ESC, “ m i n -
utes” will flash on the display;
– press button +or –for setting;
– briefly press button MENU ESCto go
back to the menu screen or press the but-
ton for long to go back to the standard
screen without storing settings.Adjusting the buzzer volume
(bUZZ)
This function is used to adjust the buzzer
volume used for failure/warning indica-
tions and when MENU ESC,
+and –
buttons are pressed.
To adjust the volume proceed as follows:
– briefly press button MENU ESC, t h e
display will show the wording (bUZZ);
– press button +or –to select the re-
quired volume (volume can be adjusted ac-
cording to 8 levels).
– briefly press button MENU ESCto go
back to the menu screen or press the but-
ton for long to go back to the standard
screen without storing settings.
SAFETY
DEVICES CORRECT USE
OF THE
CAR
WARNING
LIGHTS AND
MESSAGES IN AN
EMERGENCY
CAR
MAINTENANCE
TECHNICAL
SPECIFICATIONS
INDEX
DASHBOARD
AND CONTROLS
LINEA Owner HAND BOOK RHD.pdf 19LINEA Owner HAND BOOK RHD.pdf 198/21/09 2:16:01 PM8/21/09 2:16:01 PM
Page 21 of 184
 (BAG P)
This function is used to activate/deactivate
the front passenger’s airbag.
Proceed as follows:
press but")
20
Front passenger’s airbag
and side bag
activation/deactivation
(where provided) (BAG P)
This function is used to activate/deactivate
the front passenger’s airbag.
Proceed as follows:
press button MENU ESCand after
the message (BAG P OFF) (to deacti-
vate) or (BAG P On) (to activate) is dis-
played by pressing buttons +or –, press
again button MENU ESC;
the confirmation request message will
be displayed;
press buttons +or –to select (YES)
(confirming activation/deactivation) or
(no) (to abort);
briefly press button MENU ESC to
confirm setting
to go back to the
menu screen or press the button for
long to go back to the standard screen
without storing settings.
MENU ESC
MENU ESC
MENU ESC
– +
– +
– +
– +
F0R1003gF0R1001g F0R1002g F0R1005i
F0R1006g F0R1002g
F0R1003g
Setting the distance unit (Unit)
With this function it is possible to set the
unit.
To set the required unit proceed as fol-
lows:
– briefly press button MENU ESC, the
display will show the message (Unit) and
the previously set unit (km) or (mi);
– press button +or –to select the re-
quired distance unit.
– briefly press button MENU ESCto go
back to the menu screen or press the but-
ton for long to go back to the standard
screen without storing settings.
SAFETY
DEVICES
CORRECT USE
OF THE
CAR
WARNING
LIGHTS AND
MESSAGES
IN AN
EMERGENCY
CAR
MAINTENANCE
TECHNICAL
SPECIFICATIONS
INDEX
DASHBOARD
AND CONTROLS
�
�
�
�
LINEA Owner HAND BOOK RHD.pdf 20LINEA Owner HAND BOOK RHD.pdf 208/21/09 2:16:01 PM8/21/09 2:16:01 PM
Page 22 of 184

21
CONTROL BUTTONS fig. 19
+To scroll the displayed menu and the
related options upwards or to in-
crease the value displayed.
MENU
ESCPress briefly to access the menu
and/or go to next screen or to
confirm the required menu op-
tion.
Hold pressed to go back to the
standard screen.
–To scroll the displayed menu and the
related options downwards or to de-
crease the value displayed.
MULTIFUNCTION
DISPLAY
(where provided)
The car can be equipped with the multi-
functional display that, according to the
settings made, will show useful informa-
tion necessary when driving.
“STANDARD” SCREEN fig. 18
The standard screen shows the following
information:
ADate.
BOdometer (covered km or miles).
CClock (always displayed, even with ig-
nition key removed and front doors
closed).
DExternal temperature.
EHeadlight aiming position (only with
dipped beam headlights on).
NoteWhen opening one of the front
doors, the display will turn on and show
for a few seconds the clock and the kilo-
metres or miles covered.
fig. 18F0R0018m
NoteButtons +and –activate different
functions according to the following situ-
ations:
To adjust light inside the passenger
compartment
– standard screen, to adjust instrument
panel brightness, sound system, and auto-
matic climate control system.
Setup menu
– to scroll the menu options upwards and
downwards;
– to increase or decrease values during set-
tings.
fig. 19F0R0019m
SAFETY
DEVICES CORRECT USE
OF THE
CAR
WARNING
LIGHTS AND
MESSAGES IN AN
EMERGENCY
CAR
MAINTENANCE
TECHNICAL
SPECIFICATIONS
INDEX
DASHBOARD
AND CONTROLS
LINEA Owner HAND BOOK RHD.pdf 21LINEA Owner HAND BOOK RHD.pdf 218/21/09 2:16:01 PM8/21/09 2:16:01 PM
Page 23 of 184
 give")
22
SETUP MENU fig. 20
The menu comprises a series of functions
arranged in a cycle which can be selected
through buttons +and –to access the dif-
ferent select operations and settings (set-
up) given in the following paragraphs. A
submenu is provided for some
items
(Clock and Unit setting).
The setup menu can be activated by press-
ing briefly button MENU ESC.
Single presses on buttons +or –will scroll
the setup menu options.
Handling modes differ with each other ac-
cording to the characteristic of the option
selected.
Selecting an option of the main menu with-
out submenu
– press briefly button MENU ESCto se-
lect the main menu option to set;
– press buttons +or –(by single press-
es) to select the new setting;
– press briefly button MENU ESCto
store the new setting and
to go back to
the main menu option previously select-
ed.Selecting “Set Date” and
“Set time”:
– briefly press button MENU ESCto se-
lect the first value to change (e.g . hours
/minutes or year / month / day);
– press buttons +or –(by single press-
es) to select the new setting;
– briefly press button MENU ESCto store
the new setting and to go to the next set-
up menu option, if this is the last one you
will go back to the previously selected op-
tion of the main menu.
Hold button MENU ESC pressed:
– to quit the set-up menu if you are in the
main menu;
– to quit the main menu if you are at an-
other point of the menu (e.g.: at submenu
option setting level, at submenu level or
at main menu option setting level);
– to save only the settings stored yet (and
confirmed by pressing button MENU
ESC).
The setup menu environment is timed.
Only the changes saved by the user b
briefly pressing MENU ESC will be saved
when the menu is automatically closed. Selecting an option of the main menu with
submenu:
– briefly press button MENU ESCto dis-
play the first submenu option;
– press buttons +or –(by single press-
es) to scroll all the submenu options;
– press briefly button MENU ESCto se-
lect the displayed submenu option and to
open the relevant setup menu;
– press buttons +or –(by single press-
es) to select the new setting for this sub-
menu option;
– briefly press button MENU ESC to
store the new setting and to go back to
the previously selected submenu option.
SAFETY
DEVICES
CORRECT USE
OF THE
CAR
WARNING
LIGHTS AND
MESSAGES
IN AN
EMERGENCY
CAR
MAINTENANCE
TECHNICAL
SPECIFICATIONS
INDEX
DASHBOARD
AND CONTROLS
LINEA Owner HAND BOOK RHD.pdf 22LINEA Owner HAND BOOK RHD.pdf 228/21/09 2:16:01 PM8/21/09 2:16:01 PM
Page 24 of 184

23
Day
Ye a rMonth
TürkNederlands
Español
Português
Français
Italiano
DeutschPolski
English Example:
fig. 20 Example:
Briefly press MENU ESCon the standard screen to
browse. Press +or –to browse within the menu.
NoteOnly the short menu may be accessed for rea-
sons of safety while the car is moving (“Speed Beep”
setting). Stop the car to access the full menu.
F0R2004g
ESC
MENU
briefly press
(*) This function may only be displayed after the SBR system is deactivated by a Fiat Dealership.
ESC
MENU
briefly press
SAFETY
DEVICES CORRECT USE
OF THE
CAR
WARNING
LIGHTS AND
MESSAGES IN AN
EMERGENCY
CAR
MAINTENANCE
TECHNICAL
SPECIFICATIONS
INDEX
DASHBOARD
AND CONTROLS
+
EXIT MENUSPEED BEEP
(where provided )
SET TIME
SET DATE
SEE RADIO
AUTOCLOSE
UNITS LANGUAGE BUZZER VOLUME BUTTON VOLUME BELT BUZZER (
*) SERVICEPASSENGER BAG
TRIP B DATA
+ –+ –+ –+ –+
– +
– +
–
–
+
–
+
–
+
–
+–
+
+ –
–
LINEA Owner HAND BOOK RHD.pdf 23LINEA Owner HAND BOOK RHD.pdf 238/21/09 2:16:01 PM8/21/09 2:16:01 PM
 1
1 2
2 3
3 4
4 5
5 6
6 7
7 8
8 9
9 10
10 11
11 12
12 13
13 14
14 15
15 16
16 17
17 18
18 19
19 20
20 21
21 22
22 23
23 24
24 25
25 26
26 27
27 28
28 29
29 30
30 31
31 32
32 33
33 34
34 35
35 36
36 37
37 38
38 39
39 40
40 41
41 42
42 43
43 44
44 45
45 46
46 47
47 48
48 49
49 50
50 51
51 52
52 53
53 54
54 55
55 56
56 57
57 58
58 59
59 60
60 61
61 62
62 63
63 64
64 65
65 66
66 67
67 68
68 69
69 70
70 71
71 72
72 73
73 74
74 75
75 76
76 77
77 78
78 79
79 80
80 81
81 82
82 83
83 84
84 85
85 86
86 87
87 88
88 89
89 90
90 91
91 92
92 93
93 94
94 95
95 96
96 97
97 98
98 99
99 100
100 101
101 102
102 103
103 104
104 105
105 106
106 107
107 108
108 109
109 110
110 111
111 112
112 113
113 114
114 115
115 116
116 117
117 118
118 119
119 120
120 121
121 122
122 123
123 124
124 125
125 126
126 127
127 128
128 129
129 130
130 131
131 132
132 133
133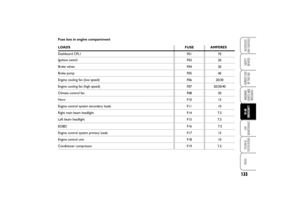 134
134 135
135 136
136 137
137 138
138 139
139 140
140 141
141 142
142 143
143 144
144 145
145 146
146 147
147 148
148 149
149 150
150 151
151 152
152 153
153 154
154 155
155 156
156 157
157 158
158 159
159 160
160 161
161 162
162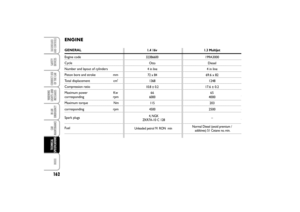 163
163 164
164 165
165 166
166 167
167 168
168 169
169 170
170 171
171 172
172 173
173 174
174 175
175 176
176 177
177 178
178 179
179 180
180 181
181 182
182 183
183