2009 SUBARU TRIBECA connector
[x] Cancel search: connectorPage 965 of 2453

TPM(diag)-15
Subaru Select Monitor
TIRE PRESSURE MONITORING SYSTEM (DIAGNOSTICS)
Step Check Yes No
1DATA CHECK SUBARU SELECT MONITOR.
1) Select {Current Data Display & Save} in
Subaru Select Monitor.
2) Read the data of the “Tire pressure warning
light”.
Is “ON” displayed? Replace the tire
pressure monitor-
ing control module.
MONITORING
CONTROL MOD-
ULE, REMOVAL,
Tire Pressure
Monitoring Sys-
tem.>
Go to step 2.
2CHECK WIRING HARNESS.
Measure the resistance between tire pressure
monitoring control module and combination
meter connector.
Connector & terminal
(i10) No. 10 — (R211) No. 2:
Is the resistance less than 0.5
Ω?
Go to step 3.Repair the har-
ness and connec-
tor between tire
pressure monitor-
ing control module
and combination
meter.
3CHECK POOR CONTACT OF CONNECTOR.Is there poor contact in the tire
pressure monitoring control
module connector and combi-
nation meter connector?
Repair the con-
nector.
Check the combi-
nation meter.
Page 971 of 2453

TPM(diag)-21
Tire Pressure Warning Light/Trouble Indicator Light Illumination Pattern (DTC)
TIRE PRESSURE MONITORING SYSTEM (DIAGNOSTICS)
Step Check Yes No
1CHECK DIAGNOSTIC TROUBLE CODE
(DTC)
Connect Subaru Select Monitor, read Diagnos-
tic Trouble Code.
OPERATION, Subaru Select Monitor.>
Is diagnostics code (DTC) dis-
played?
Pe r for m t h e d ia g -
nosis according to
DTC.
of Diagnostic Trou-
ble Code (DTC).>
Go to step 2.
2CHECK DATA OUTPUT.
1) Select data display of the tire pressure
monitoring.
2) Check that the warning light output is ON
for approximately 2 seconds immediately after
turning the ignition switch to ON.
Is the warning light output ON
for approximately 2 seconds?
Go to step 3.Replace the tire
pressure monitor-
ing control module.
MONITORING
CONTROL MOD-
ULE, REMOVAL,
Tire Pressure
Monitoring Sys-
tem.>
3CHECK HARNESS.
1) Disconnect the tire pressure monitoring
control module connector.
2) Use a lead wire to short the terminal No. 2
of the tire pressure monitoring control module
harness connector (R211) with the chassis
ground, and turn the ignition switch to ON.
Is the tire pressure warning
light lit?
Go to step 4.Replace the tire
pressure monitor-
ing control module.
MONITORING
CONTROL MOD-
ULE, REMOVAL,
Tire Pressure
Monitoring Sys-
tem.>
4CHECK HARNESS.
1) Connect the tester to the terminal No. 2 of
the tire pressure monitoring control module
connector (R211)
2) Turn the ignition switch to ON and measure
the voltage between the tire pressure monitor-
ing control module connector and chassis
ground.
Connector & terminal
(R211) No. 2 (+) — Chassis ground (–):
Is the voltage more than 10 V? Go to step 5.Replace the com-
bination meter.
bination Meter.>
5CHECK COMBINATION METER.
1) Short between the combination meter con-
nector (i10) No. 10 and the chassis ground.
2) Turn the ignition switch to ON.
Is the tire pressure warning
light lit?
Go to step 6.Repair or replace
the harness that is
open between the
combination meter
connector and the
tire pressure moni-
toring control mod-
ule harness.
6CHECK HARNESS.
1) Disconnect the combination meter connec-
tor (i10).
2) Measure the resistance between tire pres-
sure monitoring control module connector (i10)
and chassis ground.
Connector & terminal
(i10) No. 10 — Chassis ground:
Is the resistance less than 1
Ω?
Replace the com-
bination meter.
bination Meter.>
Repair or replace
the harness that is
open between the
combination meter
and the chassis
ground.
Page 973 of 2453

TPM(diag)-23
Tire Pressure Warning Light/Trouble Indicator Light Illumination Pattern (DTC)
TIRE PRESSURE MONITORING SYSTEM (DIAGNOSTICS)
2CHECK TRANSMITTER (ID)
Display the transmitter ID of the tire pressure
monitor system.
Is the transmitter ID regis-
tered?
Go to step 3.Register the trans-
mitter ID.
REGISTER
TRANSMITTER
ID, OPERATION,
Subaru Select
Monitor.>
3CHECK TRANSMITTER DATA OUTPUT.
1) Select data display of the tire pressure
monitoring.
2) Start the engine and check the tire pres-
sure warning light output.
Is the warning light output ON? Replace the tire
pressure monitor-
ing control module.
MONITORING
CONTROL MOD-
ULE, REMOVAL,
Tire Pressure
Monitoring Sys-
tem.>
Go to step 4.
4CHECK HARNESS.
1) Disconnect the tire pressure monitoring
control module connector.
2) Connect the tester to the terminal No. 2 of
the tire pressure monitoring control module
connector (R211)
3) Turn the ignition switch to ON, and mea-
sure the voltage.
Connector & terminal
(R211) No. 2 (+) — Chassis ground (–):
Is the voltage more than 10 V? Go to step 5.Replace the com-
bination meter.
bination Meter.>
5CHECK COMBINATION METER.
1) Short between the combination meter con-
nector (i10) No. 10 and the chassis ground.
2) Turn the ignition switch to ON.
Is the tire pressure warning
light lit?
Go to step 6.Repair or replace
the harness that is
open between the
combination meter
connector and the
tire pressure moni-
toring control mod-
ule harness.
6CHECK HARNESS.
1) Disconnect the combination meter connec-
tor (i10).
2) Measure the resistance between tire pres-
sure monitoring control module connector
(R211) and chassis ground.
Connector & terminal
(R211) No. 2 — Chassis ground:
Is the resistance more than 1
MΩ?
Replace the com-
bination meter.
bination Meter.>
Repair or replace
the harness con-
nector short cir-
cuit between the
combination meter
connector and the
tire pressure moni-
toring control mod-
ule connector.
Step Check Yes No
Page 975 of 2453

TPM(diag)-25
Tire Pressure Warning Light/Trouble Indicator Light Illumination Pattern (DTC)
TIRE PRESSURE MONITORING SYSTEM (DIAGNOSTICS)
2CHECK HARNESS.
1) Disconnect the tire pressure monitoring
control module connector.
2) Short the terminal No. 2 of the tire pressure
monitoring control module harness connector
(R211) with the chassis ground, and turn the
ignition switch to ON.
Is the tire pressure warning
light lit?
Go to step 3.Replace the tire
pressure monitor-
ing control module.
3CHECK HARNESS.
1) Connect the tester to the terminal No. 2 of
the tire pressure monitoring control module
connector (R211).
2) Turn the ignition switch to ON, and mea-
sure the voltage.
Connector & terminal
(R211) No. 2 (+) — Chassis ground (–):
Is the voltage more than 10 V? Go to step 4.Replace the com-
bination meter.
bination Meter.>
4CHECK COMBINATION METER.
1) Short between the combination meter con-
nector (i10) No. 10 and the chassis ground.
2) Turn the ignition switch to ON.
Is the tire pressure warning
light lit?
Go to step 5.There is an open
circuit between the
combination meter
connector and the
tire pressure moni-
toring control mod-
ule harness.
Repair or replace
the harness.
5CHECK HARNESS.
1) Disconnect the combination meter connec-
tor (i10).
2) Measure the resistance between tire pres-
sure monitoring control module connector (i10)
and chassis ground.
Connector & terminal
(i10) No. 10 — Chassis ground:
Is the resistance more than 1
MΩ?
Replace the com-
bination meter.
bination Meter.>
Repair or replace
the harness con-
nector short cir-
cuit between the
combination meter
connector and the
tire pressure moni-
toring control mod-
ule connector.
Step Check Yes No
Page 985 of 2453

TPM(diag)-35
Diagnostic Procedure with Diagnostic Trouble Code (DTC)
TIRE PRESSURE MONITORING SYSTEM (DIAGNOSTICS)
Step Check Yes No
1CHECK TIRE PRESSURE MONITORING
CONTROL MODULE.
1) Connect an oscilloscope to the terminal No.
4 of the tire pressure monitoring control mod-
ule connector (R211)
2) Drive the vehicle at 40 km/h (25 MPH) for
20 seconds and check the vehicle speed signal
at that time.
Is the vehicle speed being
input?
Replace the tire
pressure monitor-
ing control module.
Pressure Monitor-
ing System.>
Go to step 2.
2CHECK HARNESS.
1) Disconnect the combination meter connec-
tor (i10).
2) Connect the tire pressure monitoring con-
trol module connector (R211) and combination
meter connector (i10) and measure the resis-
tance.
Is the resistance less than 0.5
Ω?
Check the combi-
nation meter.
bination Meter.>
Repair or replace
the open circuit of
the harness.
Page 994 of 2453

VDC(diag)-2
Basic Diagnostic Procedure
VEHICLE DYNAMICS CONTROL (VDC) (DIAGNOSTICS)
1. Basic Diagnostic Procedure
A: PROCEDURE
NOTE:
•To check the harness for broken wires or short circuits, shake problem spot or connector.
•Refer to “Check List for Interview”.
Step Check Yes No
1CHECK PRE-INSPECTION.
1) Ask the customer when and how the trou-
ble occurred using the interview checklist.
2) Before performing diagnostics, check the
component which might affect VDC problems.
Is the component that might
influence the VDC problem
normal?
Go to step 2.Repair or replace
each component.
2CHECK INDICATION OF DTC.
1) Turn the ignition switch to OFF.
2) Connect the Subaru Select Monitor to data
link connector.
3) Turn the ignition switch to ON, and the Sub-
aru Select Monitor power switch to ON.
4) Read the DTC.
(DTC).>
NOTE:If the communication function of the Subaru Se-
lect Monitor cannot be executed normally,
check the communication circuit.
TIALIZING IMPOSSIBLE, INSPECTION, Sub-
aru Select Monitor.>
5) Record all DTCs and freeze frame data.
Is DTC displayed? Go to step 4.Go to step 3.
3PERFORM GENERAL DIAGNOSTICS.
1) Inspect using “General Diagnostic Table”.
2) Perform the clear memory mode.
Mode.>
3) Perform the inspection mode.
Mode.>
4) Read the DTC.
(DTC).>
5) Check the DTC is not displayed.
Do the VDC warning light and
ABS warning light go off after
starting the engine?
Finish the diagno-
sis.
Check the combi-
nation meter cir-
cuit.
ABS WARNING
LIGHT DOES NOT
GO OFF, Warning
Light Illumination
Patter n.>
VDC WARNING
LIGHT, TCS OFF
INDICATOR
LIGHT AND VDC
INDICATOR
LIGHT DO NOT
COME ON, Warn-
ing Light Illumina-
tion Pattern.>
Page 1003 of 2453

VDC(diag)-11
Electrical Component Location
VEHICLE DYNAMICS CONTROL (VDC) (DIAGNOSTICS)
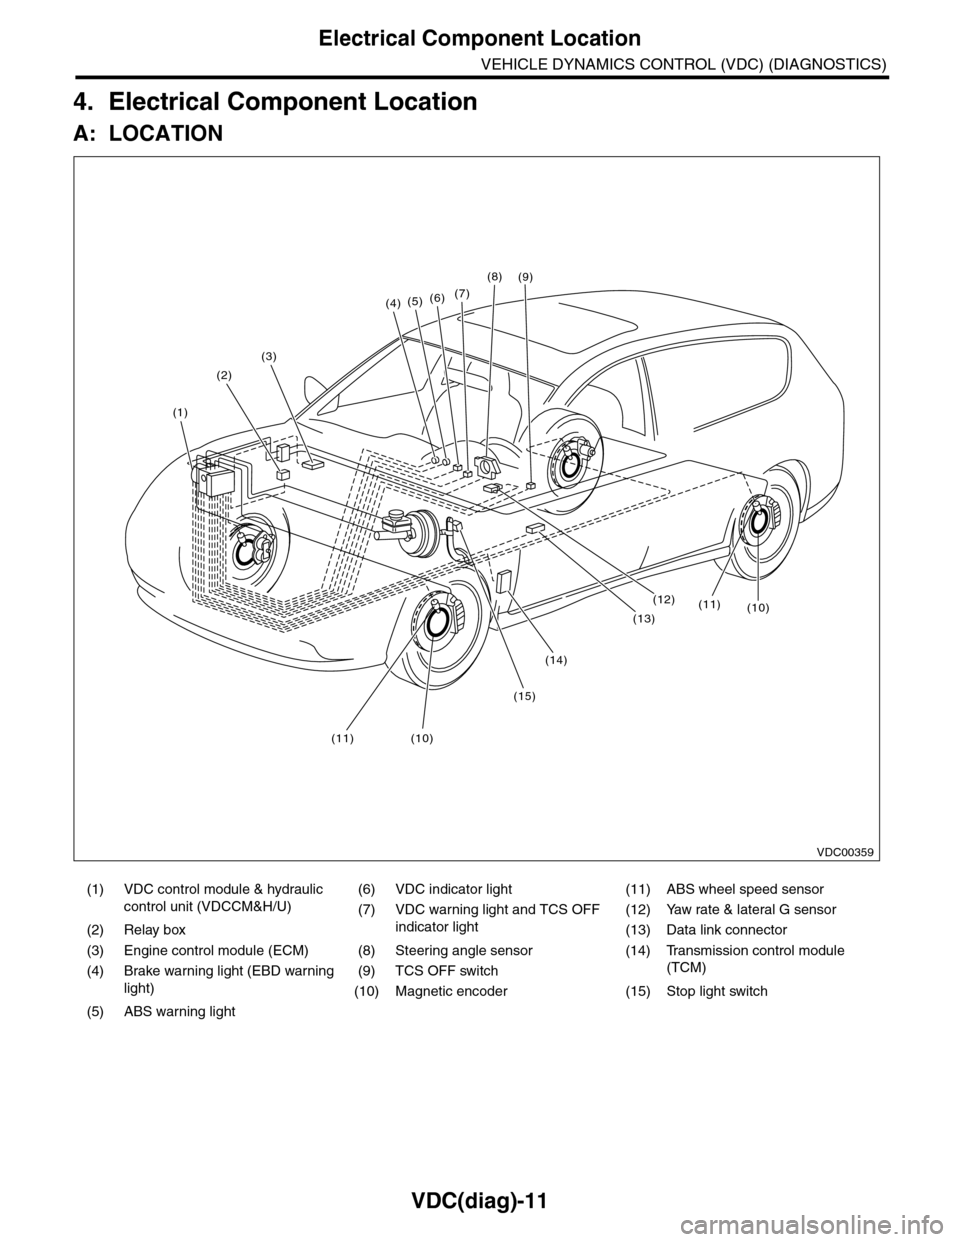
4. Electrical Component Location
A: LOCATION
(1) VDC control module & hydraulic
control unit (VDCCM&H/U)
(6) VDC indicator light (11) ABS wheel speed sensor
(7) VDC warning light and TCS OFF
indicator light
(12) Yaw rate & lateral G sensor
(2) Relay box (13) Data link connector
(3) Engine control module (ECM) (8) Steering angle sensor (14) Transmission control module
(TCM)(4) Brake warning light (EBD warning
light)
(9) TCS OFF switch
(10) Magnetic encoder (15) Stop light switch
(5) ABS warning light
(4)(5)(6)(7)
(8)
(1)
(2)
(3)
(15)
(14)
(12)
(13)
(11)(10)
(11)(10)
(9)
VDC00359
Page 1005 of 2453

VDC(diag)-13
Control Module I/O Signal
VEHICLE DYNAMICS CONTROL (VDC) (DIAGNOSTICS)
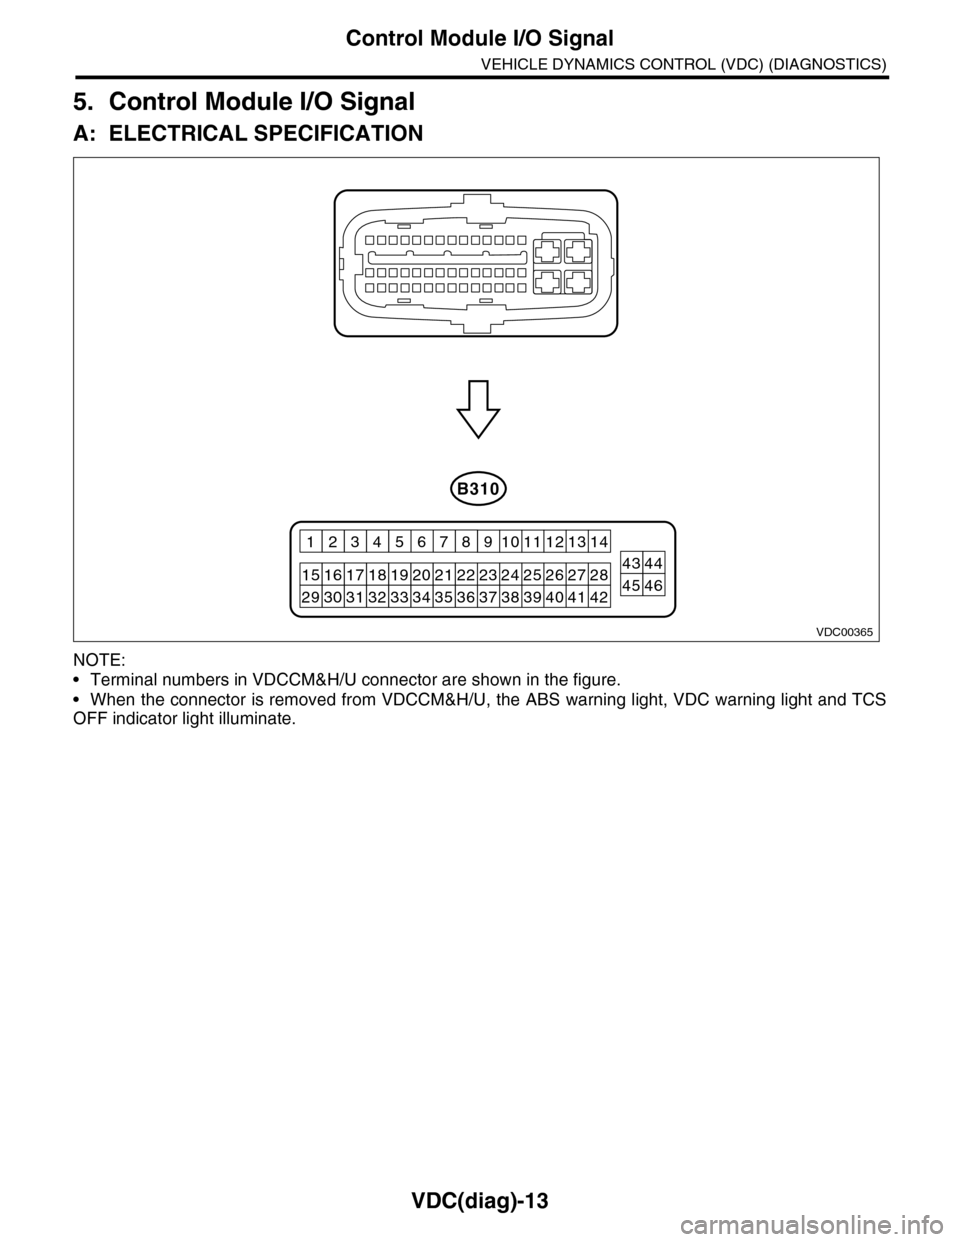
5. Control Module I/O Signal
A: ELECTRICAL SPECIFICATION
NOTE:
•Terminal numbers in VDCCM&H/U connector are shown in the figure.
•When the connector is removed from VDCCM&H/U, the ABS warning light, VDC warning light and TCS
OFF indicator light illuminate.
VDC00365
B310
2627284344252423
12131411109
201918171615
43218765
2122
40414245463938373433323130293536