Page 243 of 2453
EB-24
Rear Gate
EXTERIOR BODY PANELS
C: DISPOSAL
1. REAR GATE DAMPER STAY
CAUTION:
Gas is colorless, odorless, and harmless. How-
ever, gas pressure may spray cutting powder or
oil. Be sure to wear dust-resistant goggles.
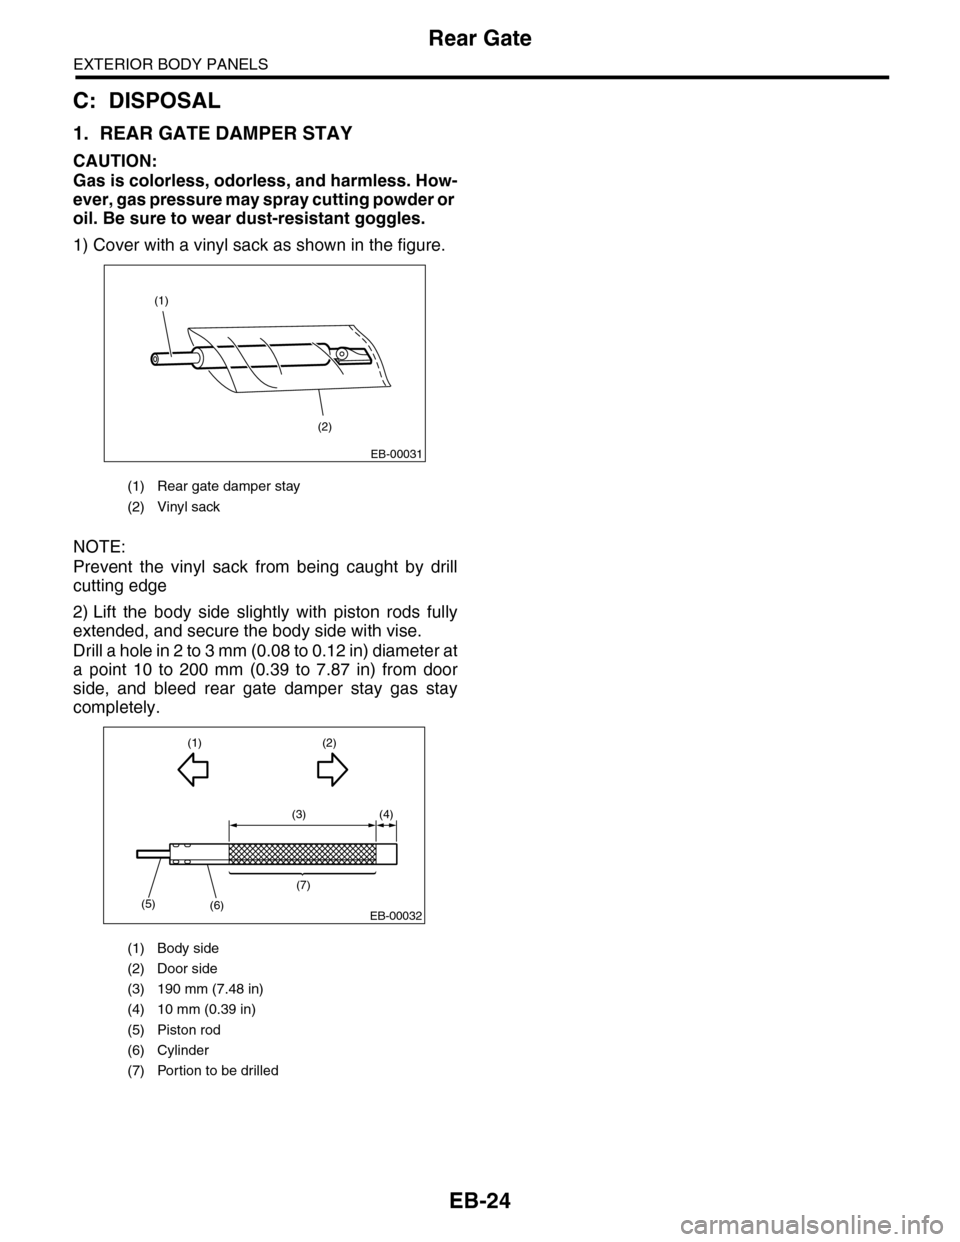
1) Cover with a vinyl sack as shown in the figure.
NOTE:
Prevent the vinyl sack from being caught by drill
cutting edge
2) Lift the body side slightly with piston rods fully
extended, and secure the body side with vise.
Drill a hole in 2 to 3 mm (0.08 to 0.12 in) diameter at
a point 10 to 200 mm (0.39 to 7.87 in) from door
side, and bleed rear gate damper stay gas stay
completely.
(1) Rear gate damper stay
(2) Vinyl sack
(1) Body side
(2) Door side
(3) 190 mm (7.48 in)
(4) 10 mm (0.39 in)
(5) Piston rod
(6) Cylinder
(7) Portion to be drilled
(1)
(2)
EB-00031
(3) (4)
(1)
(5)(6)
(7)
(2)
EB-00032
Page 251 of 2453
EI-9
General Description
EXTERIOR/INTERIOR TRIM
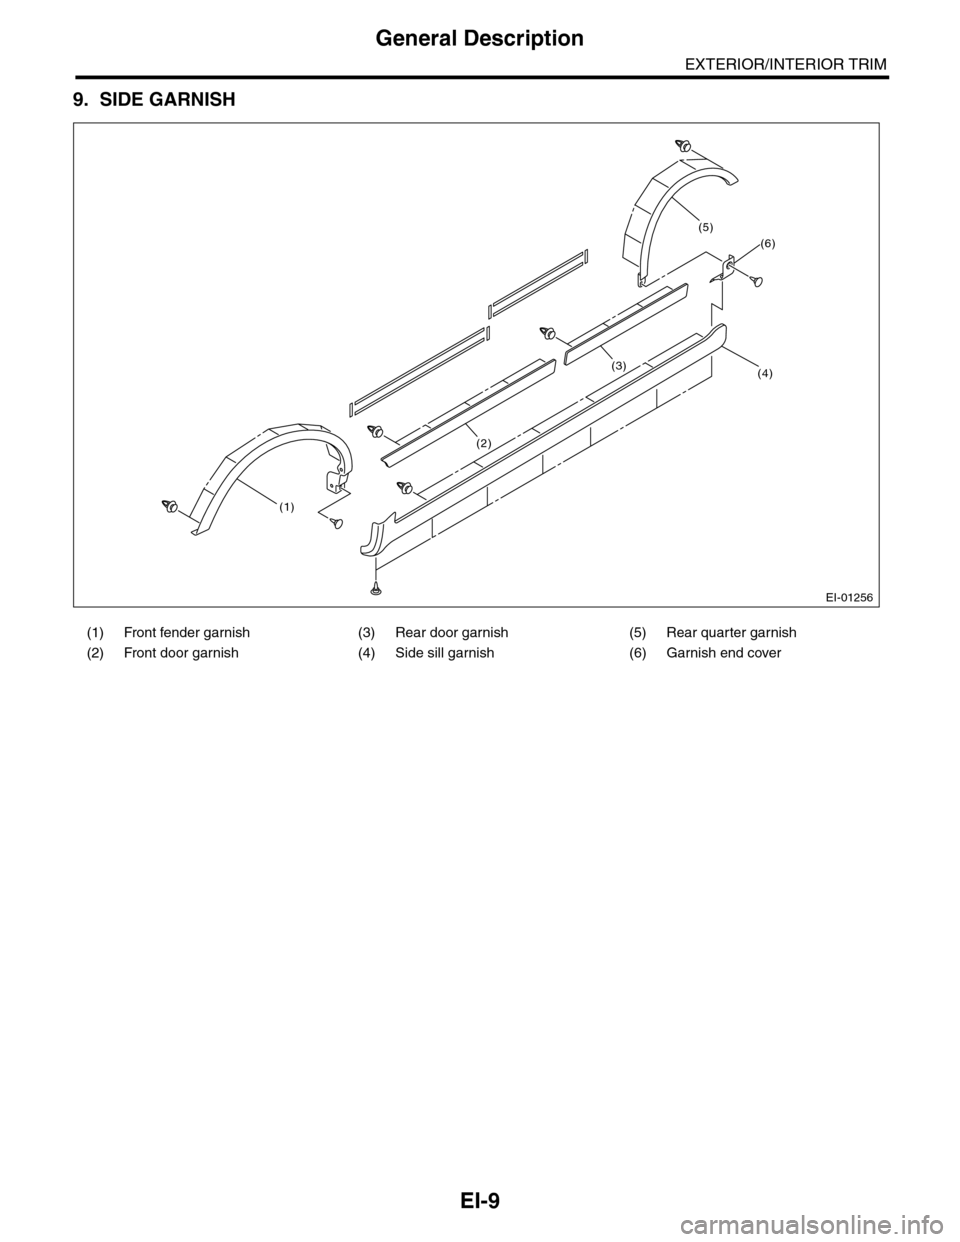
9. SIDE GARNISH
(1) Front fender garnish (3) Rear door garnish (5) Rear quarter garnish
(2) Front door garnish (4) Side sill garnish (6) Garnish end cover
EI-01256
(1)
(2)
(3)
(6)
(4)
(5)
Page 252 of 2453
EI-10
General Description
EXTERIOR/INTERIOR TRIM
10.DOOR TRIM
(1) Front door trim (3) Power window switch ASSY (4) Gusset cover
(2) Rear door trim
EI-01257
(1)
(2)
(4)
(3)
(3)
(4)
Page 255 of 2453
EI-13
General Description
EXTERIOR/INTERIOR TRIM
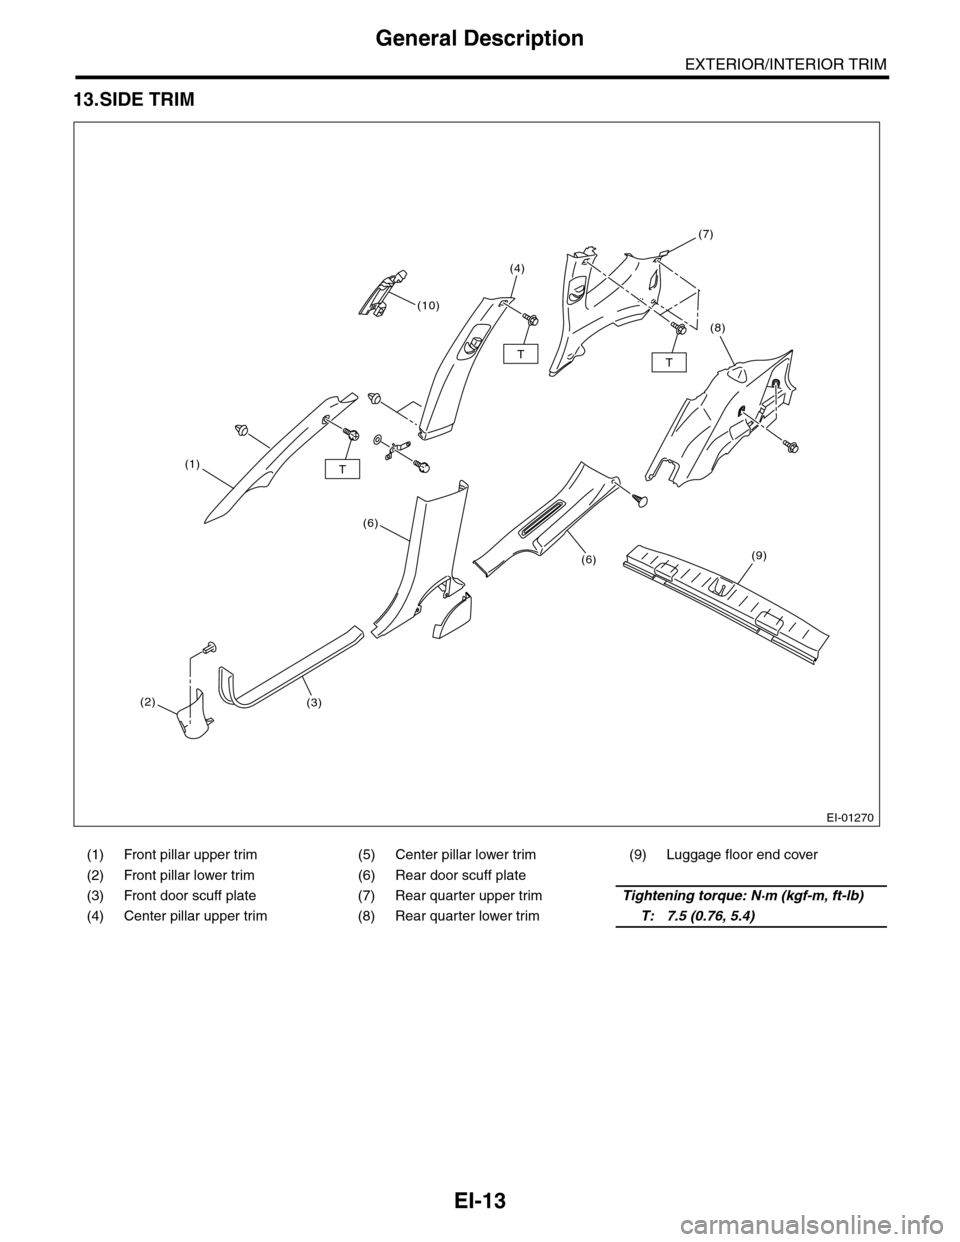
13.SIDE TRIM
(1) Front pillar upper trim (5) Center pillar lower trim (9) Luggage floor end cover
(2) Front pillar lower trim (6) Rear door scuff plate
(3) Front door scuff plate (7) Rear quarter upper trimTightening torque: N·m (kgf-m, ft-lb)
(4) Center pillar upper trim (8) Rear quarter lower trimT: 7.5 (0.76, 5.4)
EI-01270
(10)
(7)
(8)
(1)
(2)(3)
(6)
(4)
(6)(9)
TT
T
Page 274 of 2453

EI-32
Side Garnish
EXTERIOR/INTERIOR TRIM
10.Side Garnish
A: REMOVAL
1) Remove the clip on the bottom side of the vehi-
cle body, and the clip that is attached with the front
and rear mudguards.
2) Remove the double sided tape and the clip on
the vehicle side, and remove the side sill spoiler.
(1) Insert a thin piece of string (A) of 0.8 mm
(0.031 in) (fishing line, etc.) between the vehicle
body and the door garnish.
(2) Cut the double sided tape, and remove the
clip using a clip remover.
NOTE:
•To optimize the effect of solvent, slide the thread
along body without removing the double-sided tape
on the surface of body and spoiler.
•If it is difficult to remove the double-sided tape,
warm it up to approx. 40°C (104°F).
•If the double-sided tape remains thick on the sur-
face due to interfacial peeling, apply solvent after
slicing off the double-sided tape using a cutter.
(1) Front fender garnish (3) Rear door garnish (5) Rear quarter garnish
(2) Front door garnish (4) Side sill garnish (6) Garnish end cover
EI-01256
(1)
(2)
(3)
(6)
(4)
(5)
EI-00153
(A)
(A) Panel
(B) Door garnish
(C) Double-sided tape
EI-00478
(A) (B) (C)
Page 275 of 2453

EI-33
Side Garnish
EXTERIOR/INTERIOR TRIM
(3) Apply masking tape around the double-sid-
ed tape remaining on the surface of body or
spoiler.
(4) Apply solvent uniformly on the double-sided
tape using a brush.
CAUTION:
•Do not use solvent to the body which has
been repaired with lacquer paint.
•Wipe off immediately when the solvent is at-
tached on surface of the body or spoiler.
Solvent:
3M 8907 or equivalent
(5) Cover the area where solvent is applied us-
ing plastic wrap (A), and then heat the double-
sided tape for 5 to 10 minutes in 40 — 60°C
(104 — 140°F) using a heat lamp (B).
CAUTION:
Do not heat the double-sided tape until the sur-
face becomes white and excessively dried.
(6) Remove the double-sided tape using a plas-
tic spatula.
(7) After completely removing the double-sided
tape, detach the masking tape and clean the
surface using a cotton cloth damped with white
gasoline.
3) Remove the front fender garnish and rear quar-
ter garnish.
4) Remove the door garnish.
B: INSTALLATION
1) Apply primer to the door garnish surface where
the double-sided tape is to be adhered, and then
adhere the double-sided tape as shown in the fig-
ure.
Primer:
3M K-500 or equivalent
Double-sided tape:
3M 5531-5 or equivalent
2) Heat the adhering part using a heat lamp.
Body side: 40 — 60°C (104 — 140°F)
Door garnish side: 20 — 30°C (68 — 86°F)
3) Peel off the backing sheet of double-sided tape,
align the clip position, and then adhere the tape to
the body while taking care to avoid air entering.
CAUTION:
To keep the adhesion, do not wash the vehicle
within 24 hours from installation.
EI-00155
(A)
(B)
EI-00156
(A)
(B)
(1) Double-sided tape:
Thickness = 1.2 mm (0.047 in)
Width 5mm (0.197in)
EI-00536
(1)(1)
Page 277 of 2453
EI-35
Door Trim
EXTERIOR/INTERIOR TRIM
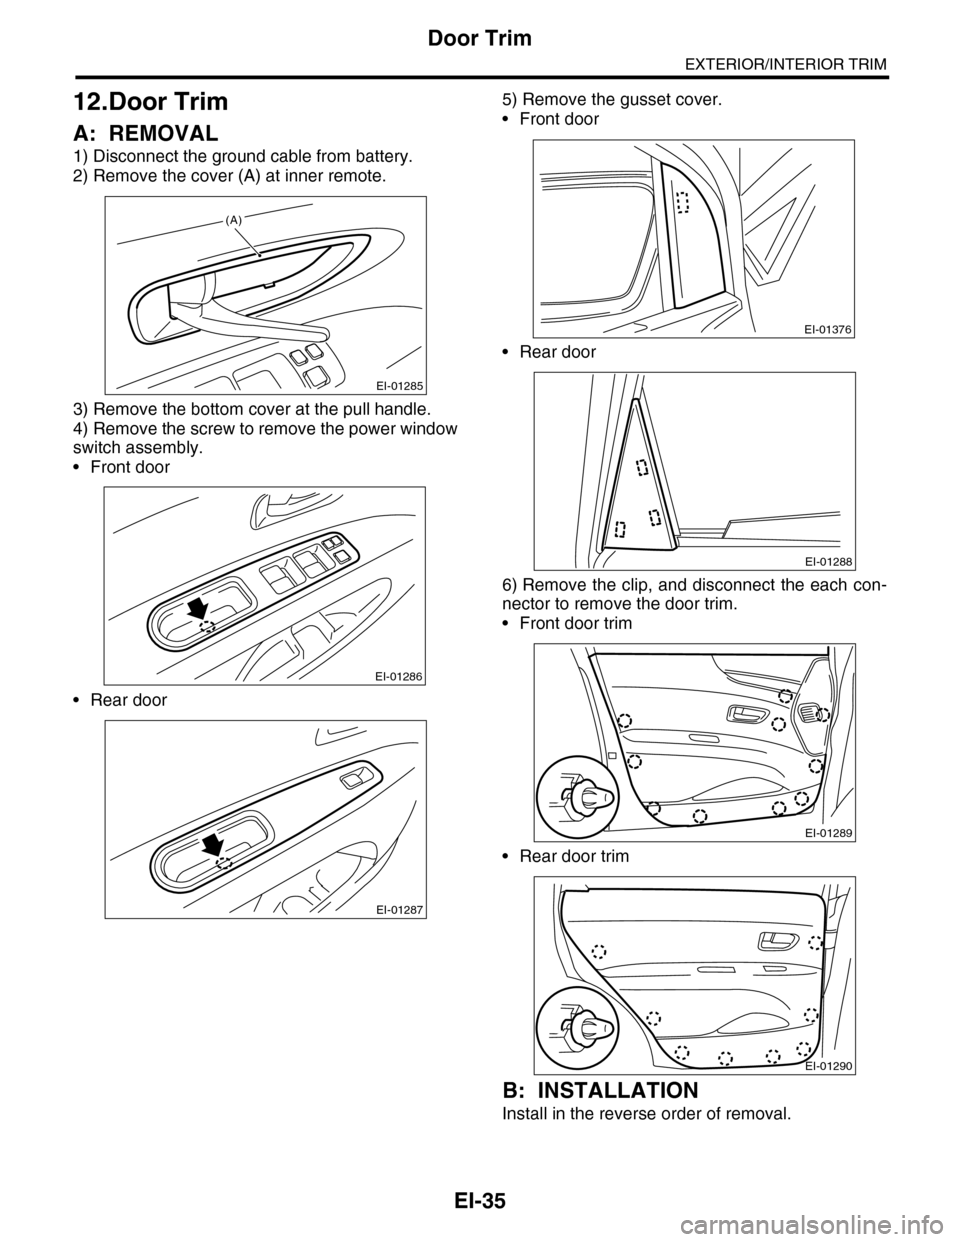
12.Door Trim
A: REMOVAL
1) Disconnect the ground cable from battery.
2) Remove the cover (A) at inner remote.
3) Remove the bottom cover at the pull handle.
4) Remove the screw to remove the power window
switch assembly.
•Front door
•Rear door
5) Remove the gusset cover.
•Front door
•Rear door
6) Remove the clip, and disconnect the each con-
nector to remove the door trim.
•Front door trim
•Rear door trim
B: INSTALLATION
Install in the reverse order of removal.
EI-01285
(A)
EI-01286
EI-01287
EI-01376
EI-01288
EI-01289
EI-01290
Page 278 of 2453
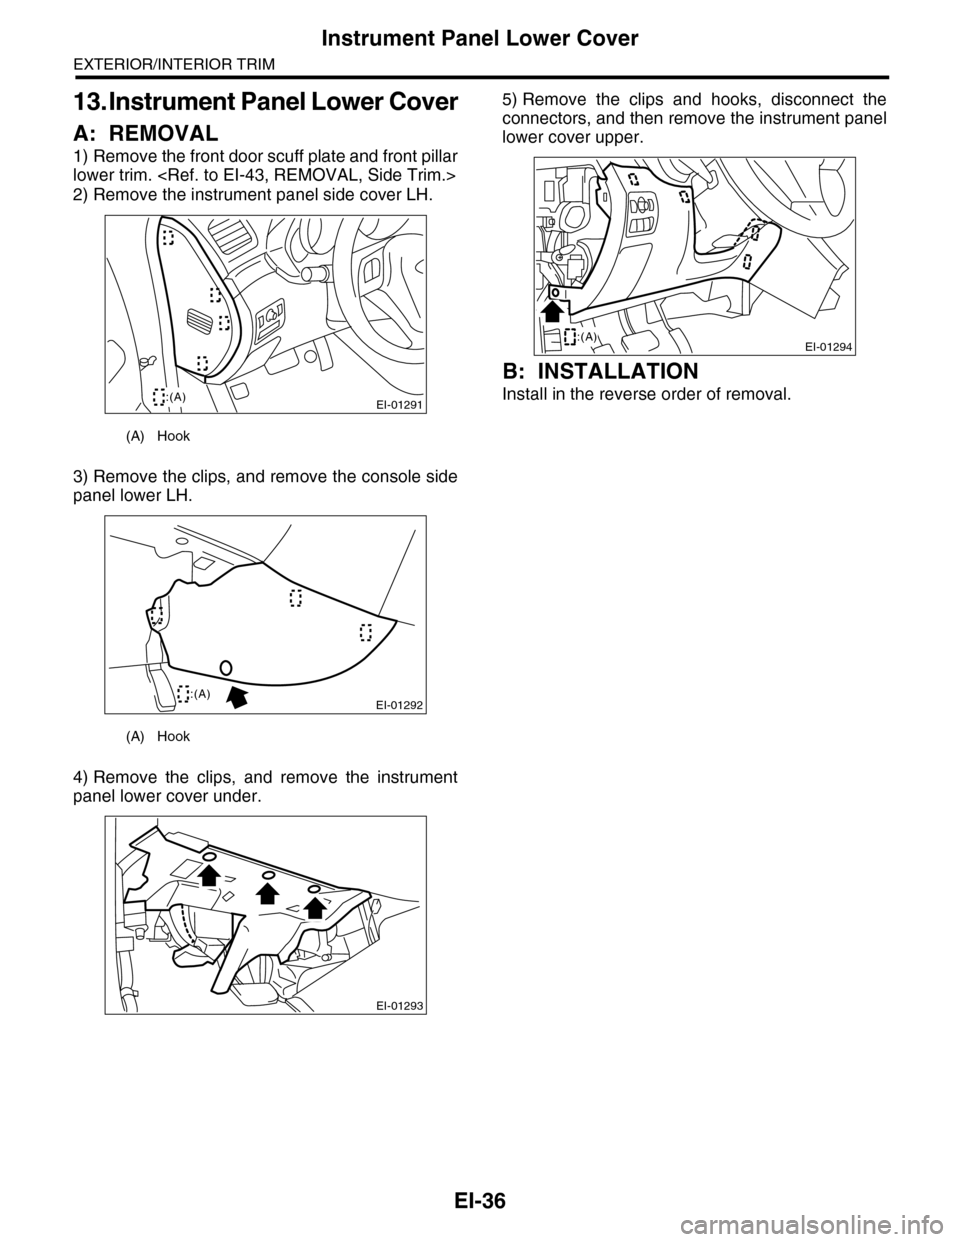
EI-36
Instrument Panel Lower Cover
EXTERIOR/INTERIOR TRIM
13. Instrument Panel Lower Cover
A: REMOVAL
1) Remove the front door scuff plate and front pillar
lower trim.
2) Remove the instrument panel side cover LH.
3) Remove the clips, and remove the console side
panel lower LH.
4) Remove the clips, and remove the instrument
panel lower cover under.
5) Remove the clips and hooks, disconnect the
connectors, and then remove the instrument panel
lower cover upper.
B: INSTALLATION
Install in the reverse order of removal.
(A) Hook
(A) Hook
EI-01291:(A)
EI-01292:(A)
EI-01293
EI-01294:(A)