2009 SUBARU TRIBECA Rear diff code
[x] Cancel search: Rear diff codePage 2160 of 2453
5AT(diag)-43
Diagnostic Procedure with Diagnostic Trouble Code (DTC)
AUTOMATIC TRANSMISSION (DIAGNOSTICS)
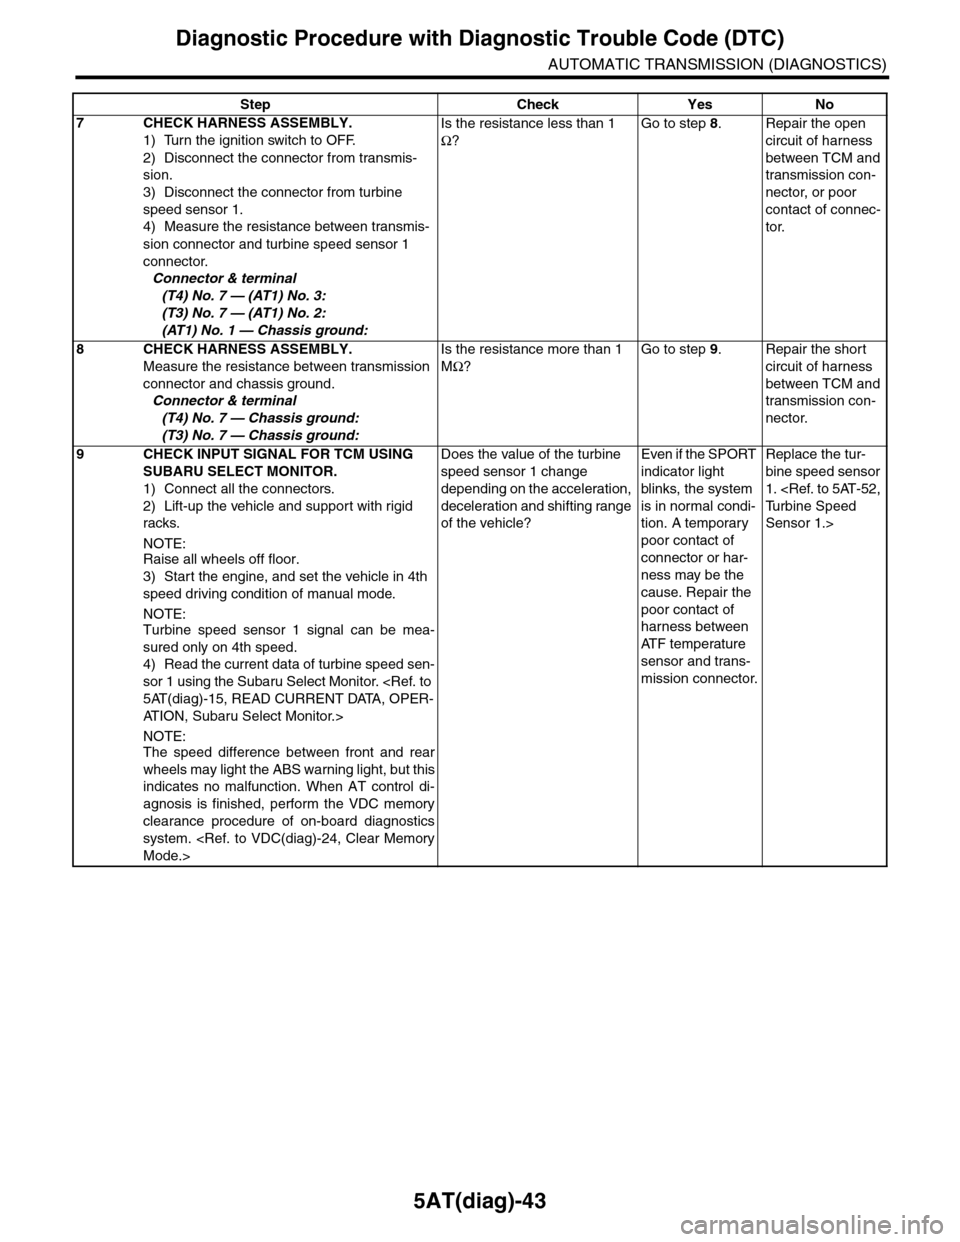
7CHECK HARNESS ASSEMBLY.
1) Turn the ignition switch to OFF.
2) Disconnect the connector from transmis-
sion.
3) Disconnect the connector from turbine
speed sensor 1.
4) Measure the resistance between transmis-
sion connector and turbine speed sensor 1
connector.
Connector & terminal
(T4) No. 7 — (AT1) No. 3:
(T3) No. 7 — (AT1) No. 2:
(AT1) No. 1 — Chassis ground:
Is the resistance less than 1
Ω?
Go to step 8.Repair the open
circuit of harness
between TCM and
transmission con-
nector, or poor
contact of connec-
tor.
8CHECK HARNESS ASSEMBLY.
Measure the resistance between transmission
connector and chassis ground.
Connector & terminal
(T4) No. 7 — Chassis ground:
(T3) No. 7 — Chassis ground:
Is the resistance more than 1
MΩ?
Go to step 9.Repair the short
circuit of harness
between TCM and
transmission con-
nector.
9CHECK INPUT SIGNAL FOR TCM USING
SUBARU SELECT MONITOR.
1) Connect all the connectors.
2) Lift-up the vehicle and support with rigid
racks.
NOTE:Raise all wheels off floor.
3) Start the engine, and set the vehicle in 4th
speed driving condition of manual mode.
NOTE:Turbine speed sensor 1 signal can be mea-
sured only on 4th speed.
4) Read the current data of turbine speed sen-
sor 1 using the Subaru Select Monitor.
AT I O N , S u b a r u S e l e c t M o n i t o r . >
NOTE:The speed difference between front and rear
wheels may light the ABS warning light, but this
indicates no malfunction. When AT control di-
agnosis is finished, perform the VDC memory
clearance procedure of on-board diagnostics
system.
Does the value of the turbine
speed sensor 1 change
depending on the acceleration,
deceleration and shifting range
of the vehicle?
Even if the SPORT
indicator light
blinks, the system
is in normal condi-
tion. A temporary
poor contact of
connector or har-
ness may be the
cause. Repair the
poor contact of
harness between
AT F t e m p e r a t u r e
sensor and trans-
mission connector.
Replace the tur-
bine speed sensor
1.
Sensor 1.>
Step Check Yes No
Page 2165 of 2453
5AT(diag)-48
Diagnostic Procedure with Diagnostic Trouble Code (DTC)
AUTOMATIC TRANSMISSION (DIAGNOSTICS)
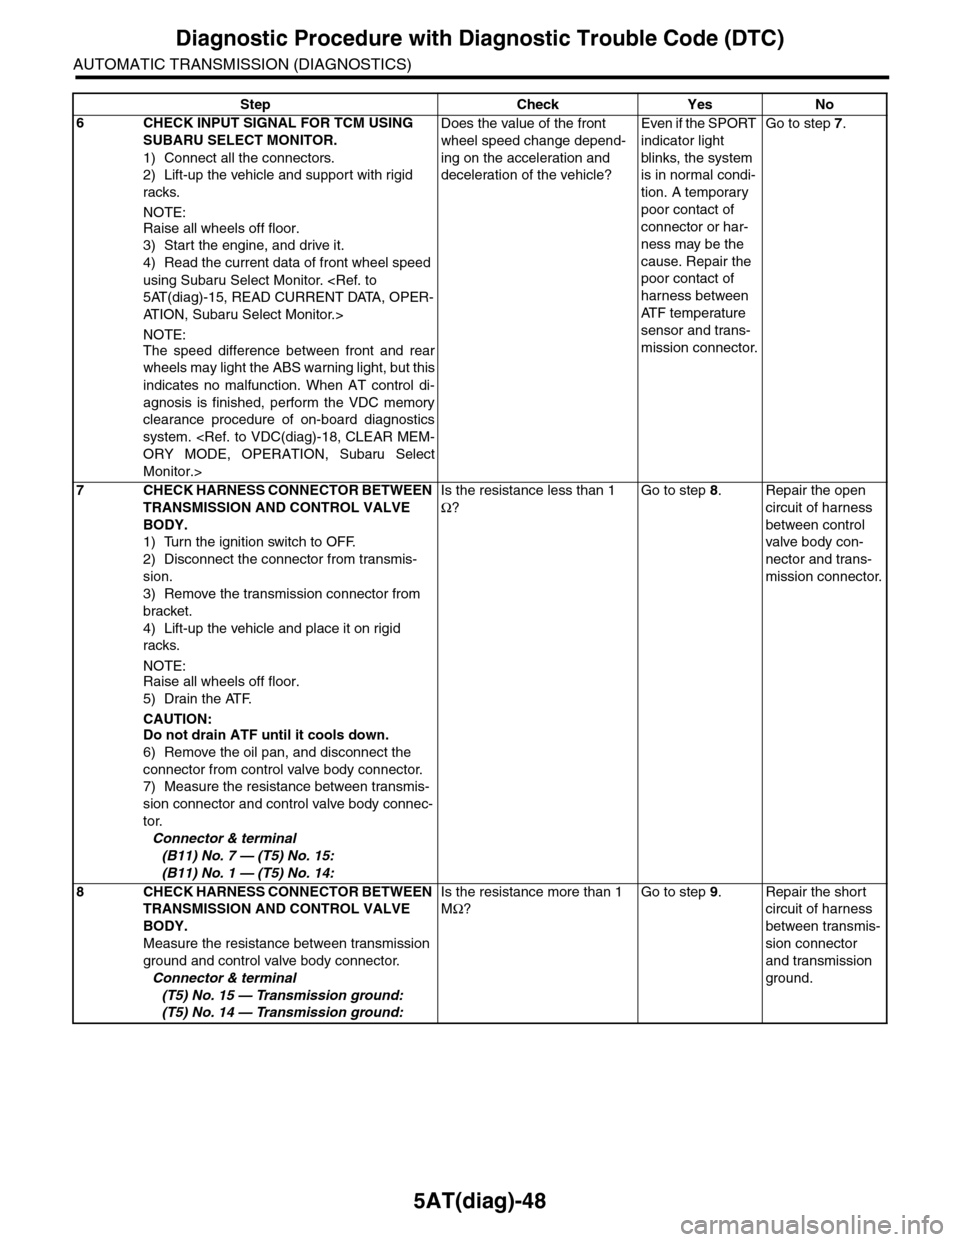
6CHECK INPUT SIGNAL FOR TCM USING
SUBARU SELECT MONITOR.
1) Connect all the connectors.
2) Lift-up the vehicle and support with rigid
racks.
NOTE:
Raise all wheels off floor.
3) Start the engine, and drive it.
4) Read the current data of front wheel speed
using Subaru Select Monitor.
AT I O N , S u b a r u S e l e c t M o n i t o r . >
NOTE:
The speed difference between front and rear
wheels may light the ABS warning light, but this
indicates no malfunction. When AT control di-
agnosis is finished, perform the VDC memory
clearance procedure of on-board diagnostics
system.
Monitor.>
Does the value of the front
wheel speed change depend-
ing on the acceleration and
deceleration of the vehicle?
Even if the SPORT
indicator light
blinks, the system
is in normal condi-
tion. A temporary
poor contact of
connector or har-
ness may be the
cause. Repair the
poor contact of
harness between
AT F t e m p e r a t u r e
sensor and trans-
mission connector.
Go to step 7.
7CHECK HARNESS CONNECTOR BETWEEN
TRANSMISSION AND CONTROL VALVE
BODY.
1) Turn the ignition switch to OFF.
2) Disconnect the connector from transmis-
sion.
3) Remove the transmission connector from
bracket.
4) Lift-up the vehicle and place it on rigid
racks.
NOTE:Raise all wheels off floor.
5) Drain the ATF.
CAUTION:Do not drain ATF until it cools down.
6) Remove the oil pan, and disconnect the
connector from control valve body connector.
7) Measure the resistance between transmis-
sion connector and control valve body connec-
tor.
Connector & terminal
(B11) No. 7 — (T5) No. 15:
(B11) No. 1 — (T5) No. 14:
Is the resistance less than 1
Ω?
Go to step 8.Repair the open
circuit of harness
between control
valve body con-
nector and trans-
mission connector.
8CHECK HARNESS CONNECTOR BETWEEN
TRANSMISSION AND CONTROL VALVE
BODY.
Measure the resistance between transmission
ground and control valve body connector.
Connector & terminal
(T5) No. 15 — Transmission ground:
(T5) No. 14 — Transmission ground:
Is the resistance more than 1
MΩ?
Go to step 9.Repair the short
circuit of harness
between transmis-
sion connector
and transmission
ground.
Step Check Yes No
Page 2170 of 2453
5AT(diag)-53
Diagnostic Procedure with Diagnostic Trouble Code (DTC)
AUTOMATIC TRANSMISSION (DIAGNOSTICS)
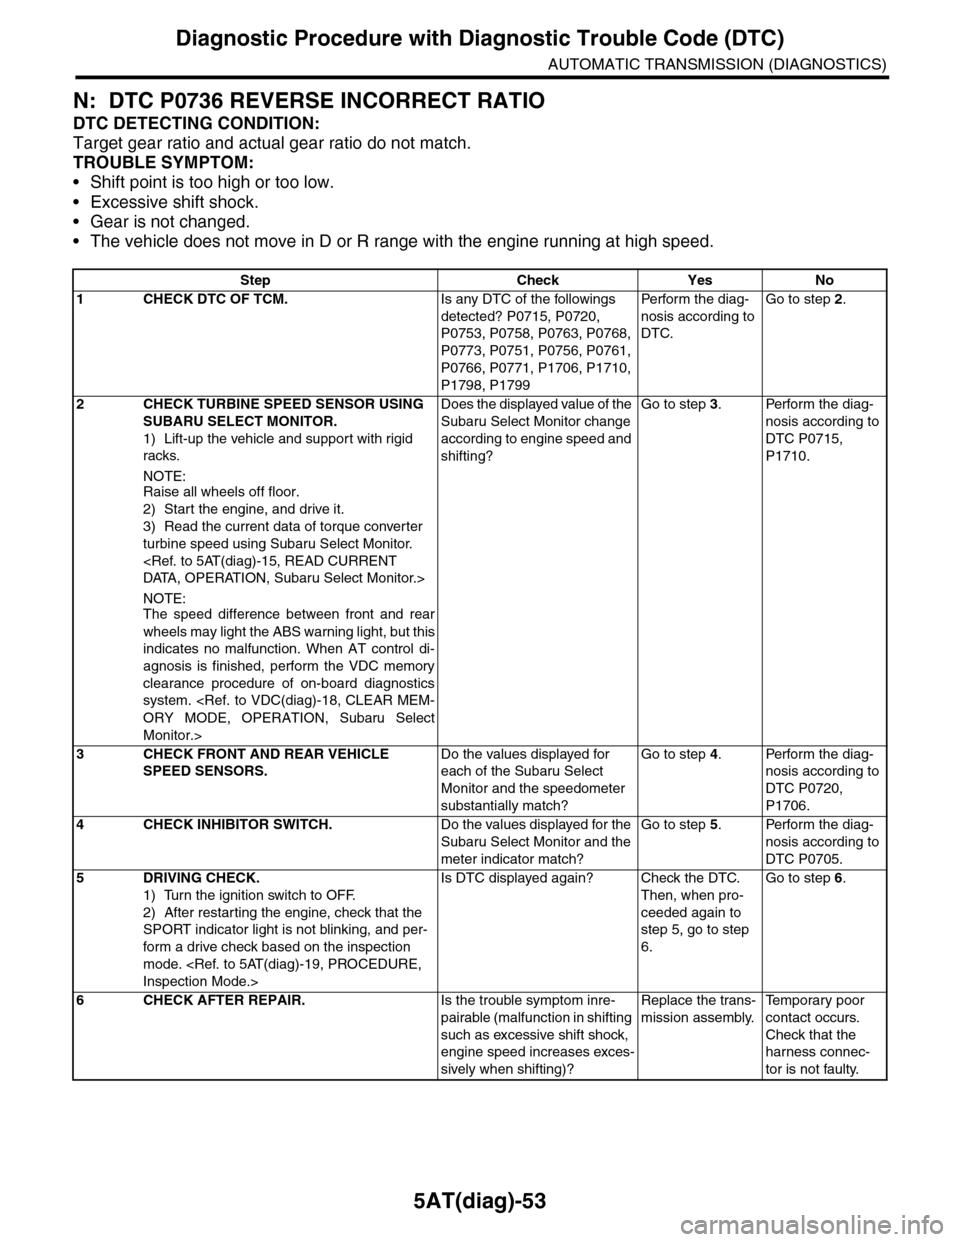
N: DTC P0736 REVERSE INCORRECT RATIO
DTC DETECTING CONDITION:
Target gear ratio and actual gear ratio do not match.
TROUBLE SYMPTOM:
•Shift point is too high or too low.
•Excessive shift shock.
•Gear is not changed.
•The vehicle does not move in D or R range with the engine running at high speed.
Step Check Yes No
1CHECK DTC OF TCM.Is any DTC of the followings
detected? P0715, P0720,
P0753, P0758, P0763, P0768,
P0773, P0751, P0756, P0761,
P0766, P0771, P1706, P1710,
P1798, P1799
Pe r for m t h e d ia g -
nosis according to
DTC.
Go to step 2.
2CHECK TURBINE SPEED SENSOR USING
SUBARU SELECT MONITOR.
1) Lift-up the vehicle and support with rigid
racks.
NOTE:Raise all wheels off floor.
2) Start the engine, and drive it.
3) Read the current data of torque converter
turbine speed using Subaru Select Monitor.
NOTE:The speed difference between front and rear
wheels may light the ABS warning light, but this
indicates no malfunction. When AT control di-
agnosis is finished, perform the VDC memory
clearance procedure of on-board diagnostics
system.
Monitor.>
Does the displayed value of the
Subaru Select Monitor change
according to engine speed and
shifting?
Go to step 3.Perform the diag-
nosis according to
DTC P0715,
P1710.
3CHECK FRONT AND REAR VEHICLE
SPEED SENSORS.
Do the values displayed for
each of the Subaru Select
Monitor and the speedometer
substantially match?
Go to step 4.Perform the diag-
nosis according to
DTC P0720,
P1706.
4CHECK INHIBITOR SWITCH.Do the values displayed for the
Subaru Select Monitor and the
meter indicator match?
Go to step 5.Perform the diag-
nosis according to
DTC P0705.
5DRIVING CHECK.
1) Turn the ignition switch to OFF.
2) After restarting the engine, check that the
SPORT indicator light is not blinking, and per-
form a drive check based on the inspection
mode.
Is DTC displayed again? Check the DTC.
Then, when pro-
ceeded again to
step 5, go to step
6.
Go to step 6.
6CHECK AFTER REPAIR.Is the trouble symptom inre-
pairable (malfunction in shifting
such as excessive shift shock,
engine speed increases exces-
sively when shifting)?
Replace the trans-
mission assembly.
Te m p o r a r y p o o r
contact occurs.
Check that the
harness connec-
tor is not faulty.
Page 2207 of 2453
5AT(diag)-90
Diagnostic Procedure with Diagnostic Trouble Code (DTC)
AUTOMATIC TRANSMISSION (DIAGNOSTICS)
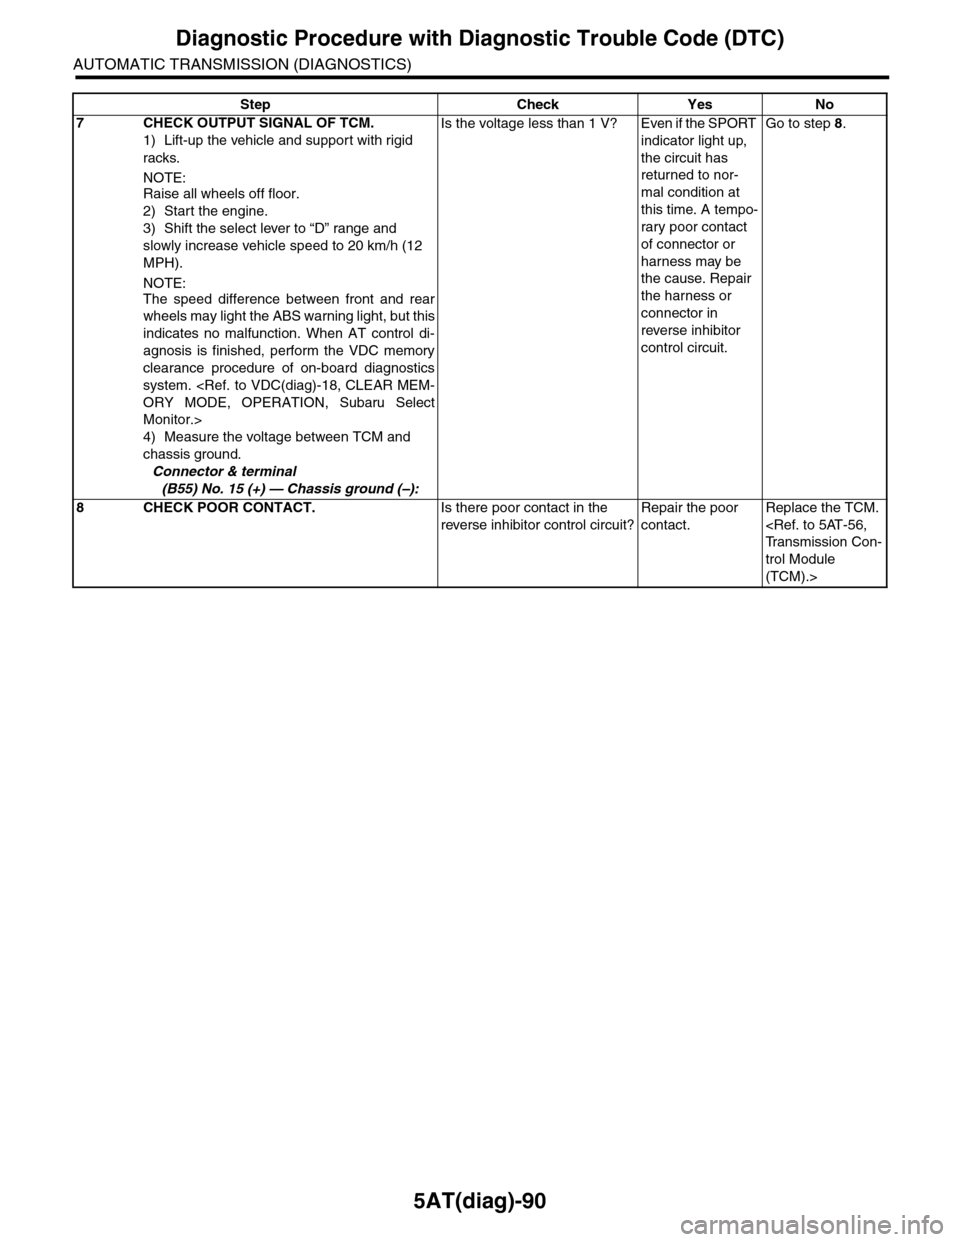
7CHECK OUTPUT SIGNAL OF TCM.
1) Lift-up the vehicle and support with rigid
racks.
NOTE:Raise all wheels off floor.
2) Start the engine.
3) Shift the select lever to “D” range and
slowly increase vehicle speed to 20 km/h (12
MPH).
NOTE:
The speed difference between front and rear
wheels may light the ABS warning light, but this
indicates no malfunction. When AT control di-
agnosis is finished, perform the VDC memory
clearance procedure of on-board diagnostics
system.
Monitor.>
4) Measure the voltage between TCM and
chassis ground.
Connector & terminal
(B55) No. 15 (+) — Chassis ground (–):
Is the voltage less than 1 V? Even if the SPORT
indicator light up,
the circuit has
returned to nor-
mal condition at
this time. A tempo-
rary poor contact
of connector or
harness may be
the cause. Repair
the harness or
connector in
reverse inhibitor
control circuit.
Go to step 8.
8CHECK POOR CONTACT.Is there poor contact in the
reverse inhibitor control circuit?
Repair the poor
contact.
Replace the TCM.
trol Module
(TCM).>
Step Check Yes No
Page 2220 of 2453
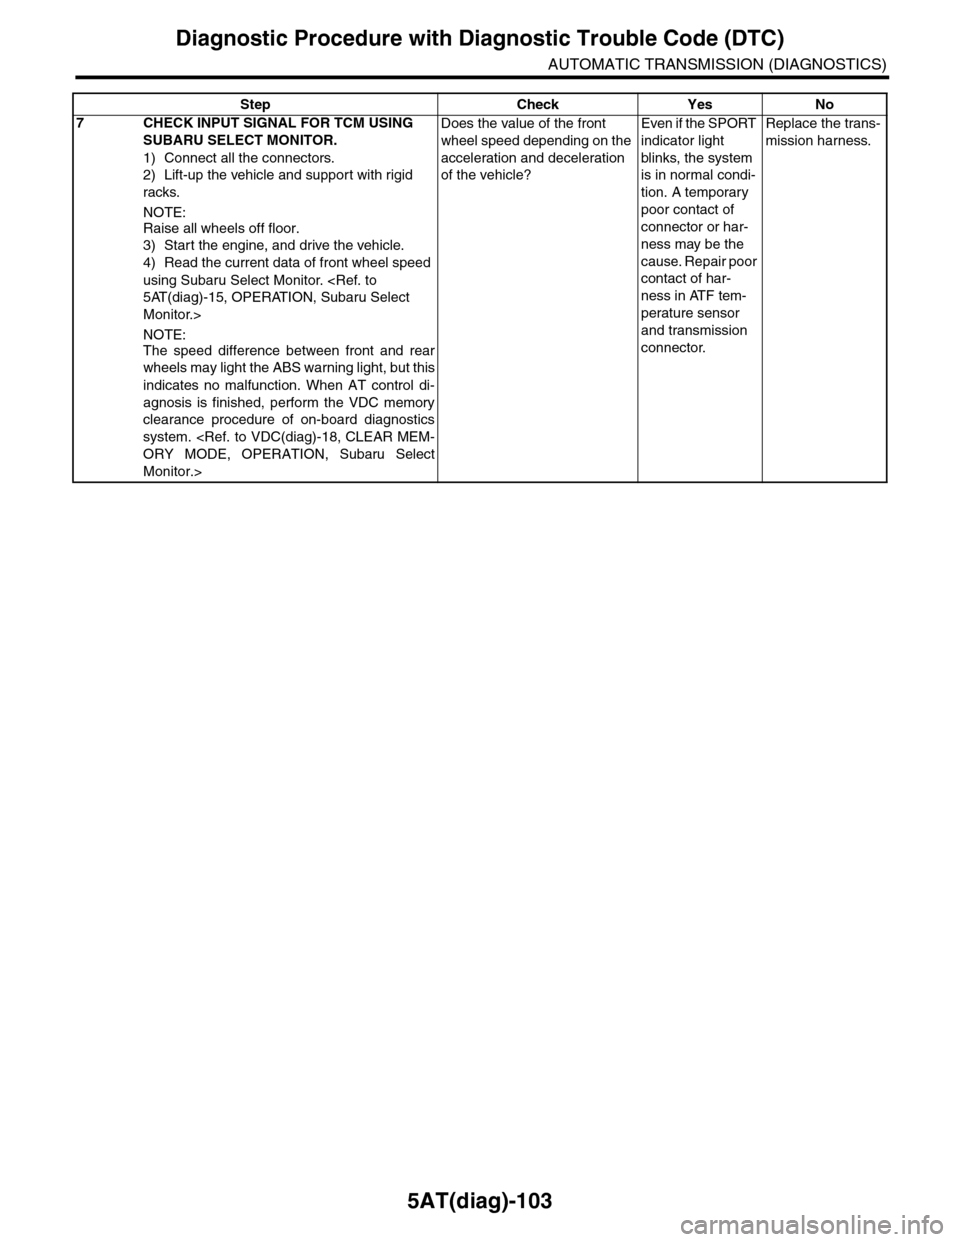
5AT(diag)-103
Diagnostic Procedure with Diagnostic Trouble Code (DTC)
AUTOMATIC TRANSMISSION (DIAGNOSTICS)
7CHECK INPUT SIGNAL FOR TCM USING
SUBARU SELECT MONITOR.
1) Connect all the connectors.
2) Lift-up the vehicle and support with rigid
racks.
NOTE:
Raise all wheels off floor.
3) Start the engine, and drive the vehicle.
4) Read the current data of front wheel speed
using Subaru Select Monitor.
Monitor.>
NOTE:
The speed difference between front and rear
wheels may light the ABS warning light, but this
indicates no malfunction. When AT control di-
agnosis is finished, perform the VDC memory
clearance procedure of on-board diagnostics
system.
Monitor.>
Does the value of the front
wheel speed depending on the
acceleration and deceleration
of the vehicle?
Even if the SPORT
indicator light
blinks, the system
is in normal condi-
tion. A temporary
poor contact of
connector or har-
ness may be the
cause. Repair poor
contact of har-
ness in ATF tem-
perature sensor
and transmission
connector.
Replace the trans-
mission harness.
Step Check Yes No
Page 2226 of 2453
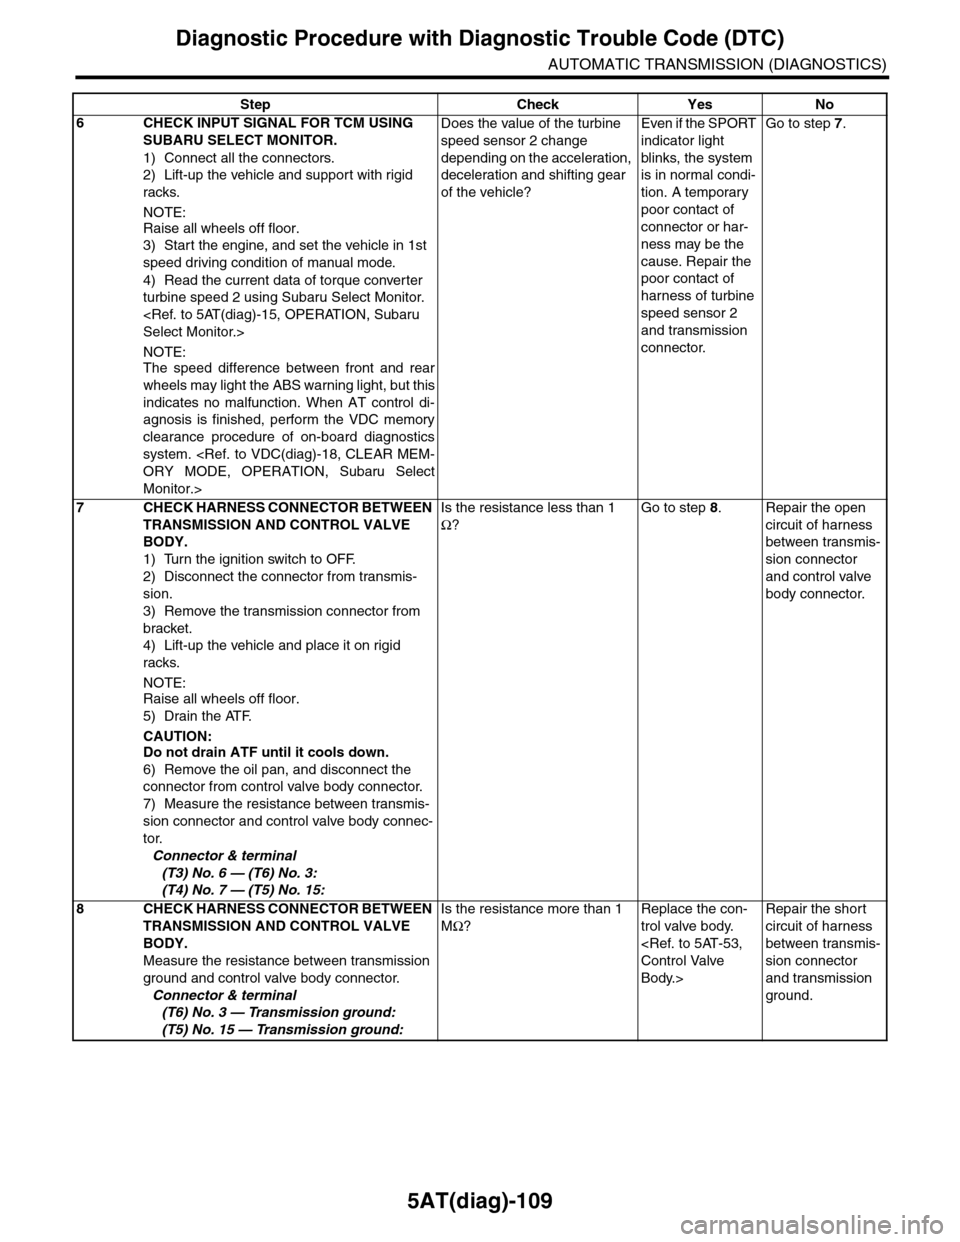
5AT(diag)-109
Diagnostic Procedure with Diagnostic Trouble Code (DTC)
AUTOMATIC TRANSMISSION (DIAGNOSTICS)
6CHECK INPUT SIGNAL FOR TCM USING
SUBARU SELECT MONITOR.
1) Connect all the connectors.
2) Lift-up the vehicle and support with rigid
racks.
NOTE:
Raise all wheels off floor.
3) Start the engine, and set the vehicle in 1st
speed driving condition of manual mode.
4) Read the current data of torque converter
turbine speed 2 using Subaru Select Monitor.
NOTE:The speed difference between front and rear
wheels may light the ABS warning light, but this
indicates no malfunction. When AT control di-
agnosis is finished, perform the VDC memory
clearance procedure of on-board diagnostics
system.
Monitor.>
Does the value of the turbine
speed sensor 2 change
depending on the acceleration,
deceleration and shifting gear
of the vehicle?
Even if the SPORT
indicator light
blinks, the system
is in normal condi-
tion. A temporary
poor contact of
connector or har-
ness may be the
cause. Repair the
poor contact of
harness of turbine
speed sensor 2
and transmission
connector.
Go to step 7.
7CHECK HARNESS CONNECTOR BETWEEN
TRANSMISSION AND CONTROL VALVE
BODY.
1) Turn the ignition switch to OFF.
2) Disconnect the connector from transmis-
sion.
3) Remove the transmission connector from
bracket.
4) Lift-up the vehicle and place it on rigid
racks.
NOTE:
Raise all wheels off floor.
5) Drain the ATF.
CAUTION:Do not drain ATF until it cools down.
6) Remove the oil pan, and disconnect the
connector from control valve body connector.
7) Measure the resistance between transmis-
sion connector and control valve body connec-
tor.
Connector & terminal
(T3) No. 6 — (T6) No. 3:
(T4) No. 7 — (T5) No. 15:
Is the resistance less than 1
Ω?
Go to step 8.Repair the open
circuit of harness
between transmis-
sion connector
and control valve
body connector.
8CHECK HARNESS CONNECTOR BETWEEN
TRANSMISSION AND CONTROL VALVE
BODY.
Measure the resistance between transmission
ground and control valve body connector.
Connector & terminal
(T6) No. 3 — Transmission ground:
(T5) No. 15 — Transmission ground:
Is the resistance more than 1
MΩ?
Replace the con-
trol valve body.
Body.>
Repair the short
circuit of harness
between transmis-
sion connector
and transmission
ground.
Step Check Yes No
Page 2291 of 2453
WI-7
Basic Diagnostic Procedure
WIRING SYSTEM
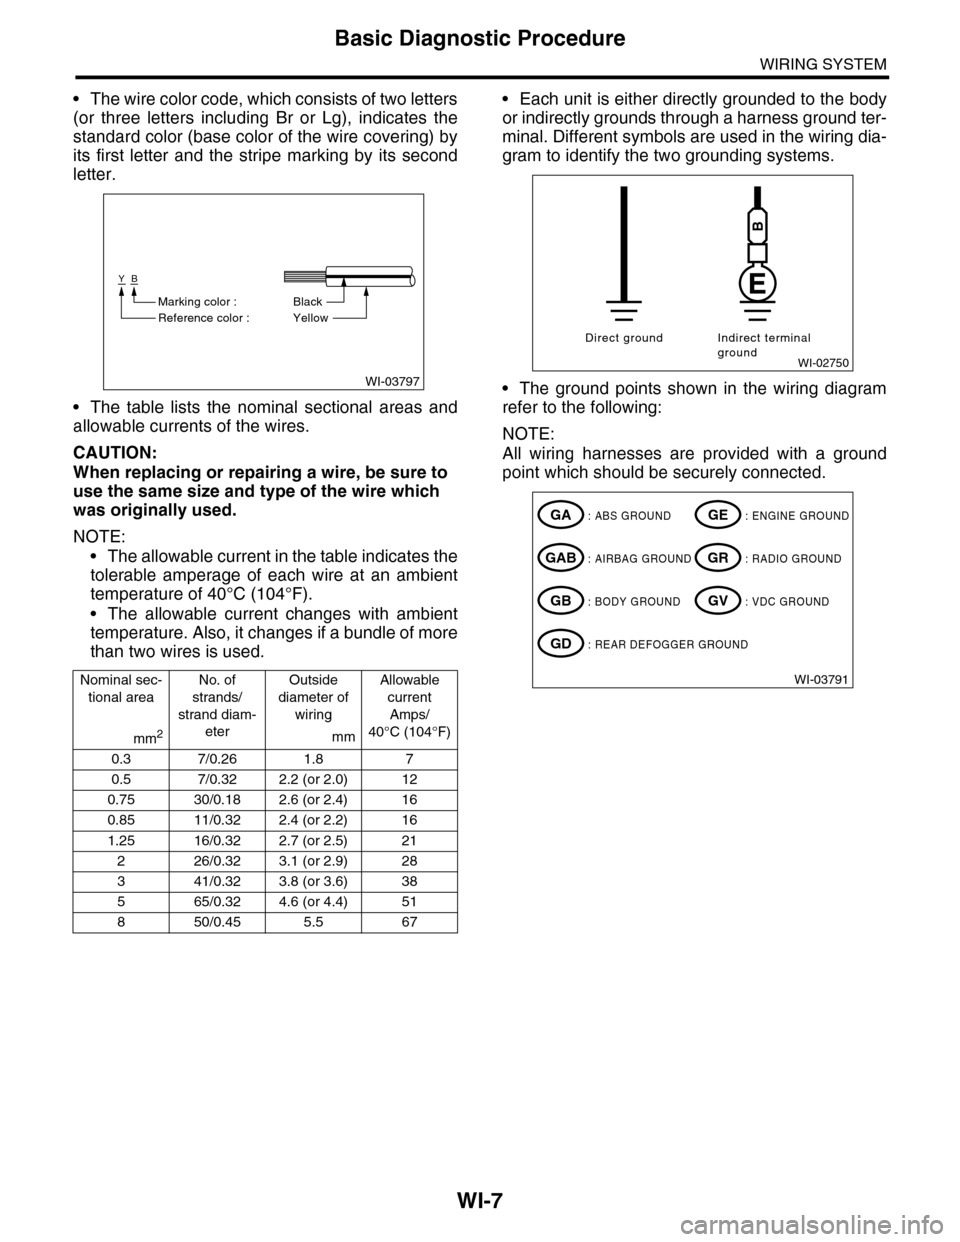
•The wire color code, which consists of two letters
(or three letters including Br or Lg), indicates the
standard color (base color of the wire covering) by
its first letter and the stripe marking by its second
letter.
•The table lists the nominal sectional areas and
allowable currents of the wires.
CAUTION:
When replacing or repairing a wire, be sure to
use the same size and type of the wire which
was originally used.
NOTE:
•The allowable current in the table indicates the
tolerable amperage of each wire at an ambient
temperature of 40°C (104°F).
•The allowable current changes with ambient
temperature. Also, it changes if a bundle of more
than two wires is used.
•Each unit is either directly grounded to the body
or indirectly grounds through a harness ground ter-
minal. Different symbols are used in the wiring dia-
gram to identify the two grounding systems.
•The ground points shown in the wiring diagram
refer to the following:
NOTE:
All wiring harnesses are provided with a ground
point which should be securely connected.
Nominal sec-
tional area
No. of
strands/
strand diam-
eter
Outside
diameter of
wiring
Allowable
current
Amps/
40°C (104°F)mm2mm
0.3 7/0.26 1.8 7
0.5 7/0.32 2.2 (or 2.0) 12
0.75 30/0.18 2.6 (or 2.4) 16
0.85 11/0.32 2.4 (or 2.2) 16
1.25 16/0.32 2.7 (or 2.5) 21
226/0.323.1 (or 2.9)28
341/0.323.8 (or 3.6)38
565/0.324.6 (or 4.4)51
850/0.455.5 67
WI-03797
YB
BlackMarking color :
Reference color : Yellow
WI-02750
Direct ground Indirect terminalground
B
WI-03791
: ABS GROUNDGA
: AIRBAG GROUNDGAB
: BODY GROUNDGB
: ENGINE GROUNDGE
: RADIO GROUNDGR
: VDC GROUNDGV
: REAR DEFOGGER GROUNDGD