Page 544 of 2453

LI-11
Headlight Assembly
LIGHTING SYSTEM
10.Headlight Assembly
A: REMOVAL
1) Disconnect the ground cable from battery.
2) Remove the air intake duct.
3) Remove the engine front cover.
4) Disengage the three clips, and then turn over the
mud guard.
5) Remove the three bolts securing the headlight
assembly from the lower side of vehicle.
6) Remove the two bolts and then remove the
headlight assembly.
7) Disconnect the connector and then detach the
rear headlight assembly.
B: INSTALLATION
Install in the reverse order of removal.
C: ADJUSTMENT
1. HEADLIGHT AIMING
NOTE:
Aiming of this headlight can be adjusted only in the
vertical direction. It cannot be adjusted in the hori-
zontal direction.
CAUTION:
Turn off the light before adjusting the headlight
beam level. If it is necessary to inspect the
beam level, do not turn on the lamp for more
than two minutes.
NOTE:
Before checking the headlight beam level, be sure
of the following:
•Check the area around the headlight for any
scratches, damage or other type of deformation.
•Make sure that the vehicle is parked on a level
surface.
•Make sure that the inflation pressure of tires are
correct.
•Check that the vehicle fuel tank is full.
1) Bounce the vehicle several times to normalize
the suspension.
2) Make certain that someone is seated in the driv-
er's seat.
IN-02134
CO-02176
LI-00503
LI-00504
Page 749 of 2453

BR-35
Brake Pipe
BRAKE
13.Brake Pipe
A: REMOVAL
NOTE:
The airbag system wiring harness is routed near
the center brake pipe.
CAUTION:
•All airbag system wiring harness and con-
nectors are colored yellow. Do not use electri-
cal test equipment on these circuits.
•Be careful not to damage the airbag system
wiring harness when servicing the center brake
pipe.
•When removing the brake pipe, do not bend.
B: INSTALLATION
NOTE:
The airbag system wiring harness is routed near
the center brake pipe.
CAUTION:
•All airbag system wiring harness and con-
nectors are colored yellow. Do not use electri-
cal test equipment on these circuits.
•Be careful not to damage the airbag system
wiring harness when servicing the center brake
pipe.
•When installing the brake pipe, do not bend.
•After installing the brake pipe and hose, per-
form air bleed.
•After installing the brake hoses, make sure
that they do not contact the tires or suspension
assembly, etc.
Brake pipe tightening torque:
15 N·m (1.5 kgf-m, 10.8 ft-lb)
C: INSPECTION
Make sure there are no cracks, breakage or dam-
age on hoses. Check the joint for fluid leakage. If
any cracks, breakage, damage or fluid leakage is
found, repair or replace the pipes.
NOTE:
Use a mirror when inspecting back sides and other
locations which are hard to see.
Page 850 of 2453

FS-2
General Description
FRONT SUSPENSION
1. General Description
A: SPECIFICATION
NOTE:
•Front and rear toe–in and front camber can be adjusted. Adjust if the toe–in or camber tolerance exceeds
specifications.
•Other items indicated in the specifications table cannot be adjusted. If other items exceed specifications,
check the suspension parts and connections for deformation, and replace with new ones as required.
Fr o nt
Wheel arch height
442 (17.4)[Tolerance: +12 mm –24 mm
( +0.47 in –0.94 in)]
mm (in)
Camber (Tolerance: Differences between RH
and LH: 45′ or less)0°00′
Caster (Referential Value) 4°04′
Steering angle (Tolerance: ±1.5°)Inner wheel 37.0°
Outer wheel 32.0°
To e – i n m m ( i n ) 0±3 (0±0.12) Toe angle (sum of both wheels): 0°±0°14′
Kingpin angle (Referential Value) 12°12′
Diameter of stabilizer mm (in) 25 (0.98)
Rear
Wheel arch height
439 (17.3)[Tolerance: +12 mm – 24 mm
( +0.47 in – 0.94 in)]
mm (in)
Camber (Tolerance: Differences between RH
and LH: 45′ or less)–0°31′
To e – i n m m ( i n ) 2±2 (0.08±0.08) Toe angle (sum of both wheels): 0°±0°14′
Thrust angle (Tolerance: ±0°30′)0°
Diameter of stabilizer mm (in) 16 (0.63)
(1) Front
A – B = Positive: Toe-in, Negative: Toe–out
α = Individual toe angles
FS-00001
B
A
(1)
Page 851 of 2453

FS-3
General Description
FRONT SUSPENSION
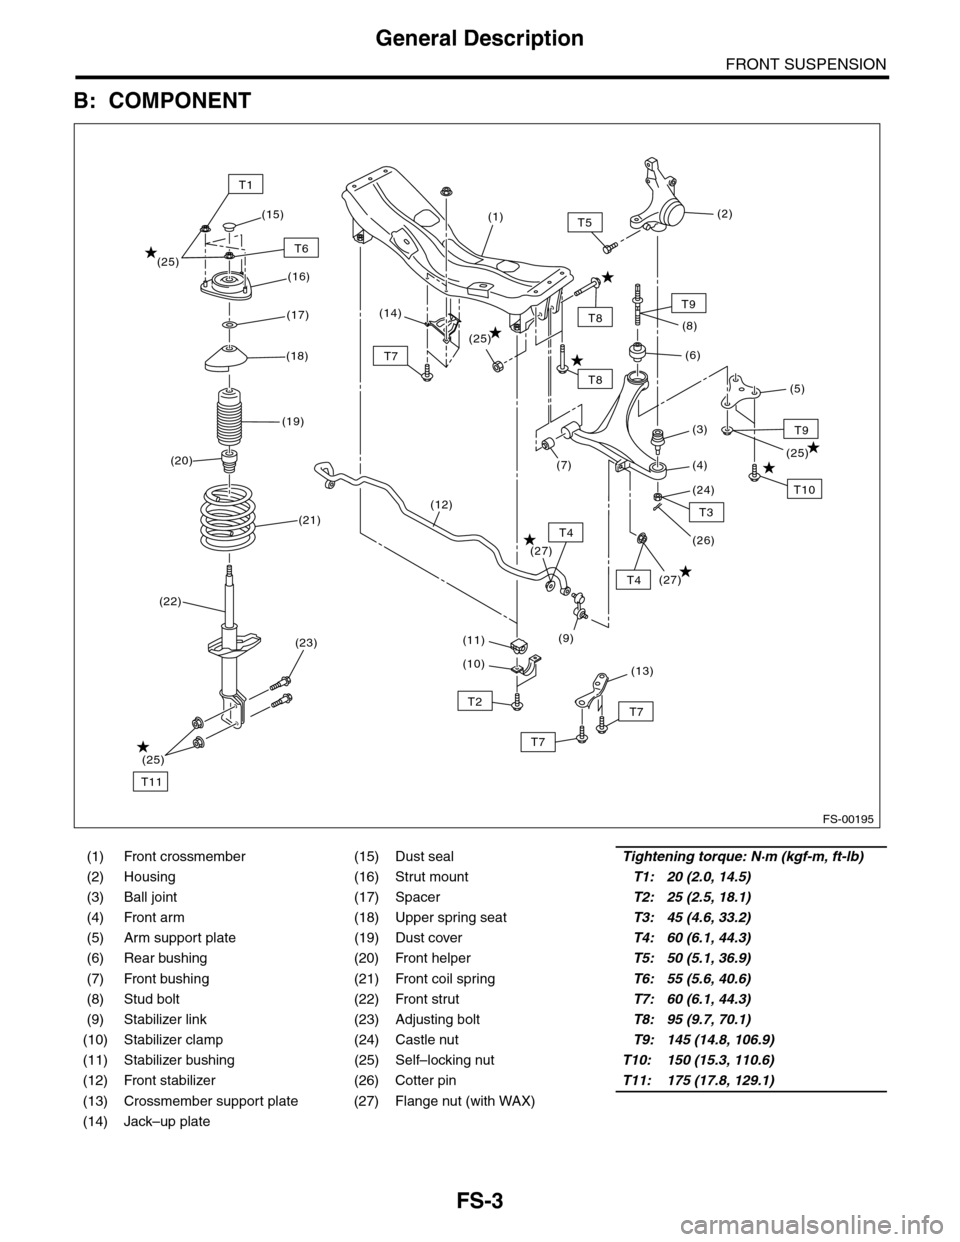
B: COMPONENT
(1) Front crossmember (15) Dust sealTightening torque: N·m (kgf-m, ft-lb)
(2) Housing (16) Strut mountT1: 20 (2.0, 14.5)
(3) Ball joint (17) SpacerT2: 25 (2.5, 18.1)
(4) Front arm (18) Upper spring seatT3: 45 (4.6, 33.2)
(5) Arm support plate (19) Dust coverT4: 60 (6.1, 44.3)
(6) Rear bushing (20) Front helperT5: 50 (5.1, 36.9)
(7) Front bushing (21) Front coil springT6: 55 (5.6, 40.6)
(8) Stud bolt (22) Front strutT7: 60 (6.1, 44.3)
(9) Stabilizer link (23) Adjusting boltT8: 95 (9.7, 70.1)
(10) Stabilizer clamp (24) Castle nutT9: 145 (14.8, 106.9)
(11) Stabilizer bushing (25) Self–locking nutT10: 150 (15.3, 110.6)
(12) Front stabilizer (26) Cotter pinT11: 175 (17.8, 129.1)
(13) Crossmember support plate (27) Flange nut (with WAX)
(14) Jack–up plate
FS-00195
T1
T11
T6
T8
T8
T5
T9
T10
T9
T4
T2
T7
T4
(15)
(25)(16)
(18)
(19)
(1)
(20)
(21)
(22)
(23)
(25)
(9)
(10)
(11)
(12)
(14)
(27)
(27)
(25)
T7
(13)
(25)
T7
(2)
(5)
(8)
(7)
T3
(3)
(4)
(24)
(26)
(6)
(17)
Page 852 of 2453

FS-4
General Description
FRONT SUSPENSION
C: CAUTION
Please understand and adhere to the following general precautions. They must be strictly followed to avoid
any injury to the person performing the work or persons in the area.
1. OPERATION
•Wear work clothing, including a cap, protective goggles and protective shoes during operation.
•Before removal, installation or disassembly, be sure to clarify the failure. Avoid unnecessary removal, in-
stallation, disassembly and replacement.
•Use SUBARU genuine grease etc. or equivalent. Do not mix grease etc. with that of another grade or from
other manufacturers.
•Before securing a part on a vise, place cushioning material such as wood blocks, aluminum plate, or cloth
between the part and the vise.
•Be sure to tighten fasteners including bolts and nuts to the specified torque.
•Place shop jacks or rigid racks at the specified points.
2. OIL
When handling oil, follow the rules below to prevent unexpected accidents.
•Prepare container and waste cloths when performing work which oil could possibly spill. If oil spills, wipe
it off immediately to prevent from penetrating into floor or flowing outside, for environmental protection.
•Follow all government and local regulations concerning waste disposal.
D: PREPARATION TOOL
1. SPECIAL TOOL
ILLUSTRATION TOOL NUMBER DESCRIPTION REMARKS
927680000 INSTALLER &
REMOVER SET
Used for replacing front arm front bushing.
20299AG000 REMOVER Used for replacing front arm rear bushing.
Used with BASE (20999AG010).
ST-927680000
ST20299AG000
Page 853 of 2453
FS-5
General Description
FRONT SUSPENSION
2. GENERAL TOOL
20299AG010 BASE Used for replacing front arm rear bushing.
Used with REMOVER (20999AG000).
20299AG020 STUD BOLT
SOCKET
Used for removing and installing the stud bolt for
front arm installing portion.
20399AG000 STRUT MOUNT
SOCKET
Used for disassembling and assembling strut
mount.
TOOL NAME REMARKS
Alignment gauge Used for measuring wheel alignment.
Alignment gauge adapter Used for measuring wheel alignment.
Tu r n i n g r a d i u s g a u g e U s e d f o r m e a s u r i n g w h e e l a l i g n m e n t .
To e – i n g a u g e U s e d f o r t o e – i n m e a s u r e m e n t .
Dial gauge Used for damper strut measurement.
Coil spring compressor Used for strut assembly/disassembly.
ILLUSTRATION TOOL NUMBER DESCRIPTION REMARKS
ST20299AG010
ST20299AG020
ST20399AG000
Page 854 of 2453
FS-6
Wheel Alignment
FRONT SUSPENSION
2. Wheel Alignment
A: INSPECTION
Check the following items before performing the wheel alignment measurement.
Check items before measuring wheel alignment:
•Tire inflation pressure
•Uneven wear of RH and LH tires, or difference of sizes
•Tire runout
•Excessive play and wear of ball joint
•Excessive play and wear of tie rod end
•Excessive play of wheel bearing
•Right and left wheel base imbalance
•Deformation and excessive play of steering link
•Deformation and excessive play of suspension parts
Check, adjust and measure the wheel alignment in accordance with the procedures indicated in the figure.
Wheel arch height (front and rear wheels)
↓
Camber (front and rear wheels)
↓
Caster (front wheel)
↓
Steering angle
↓
Fr o nt wh ee l to e –i n
↓
Rear wheel toe–in
↓
Thrust angle
Page 855 of 2453
FS-7
Wheel Alignment
FRONT SUSPENSION
1. WHEEL ARCH HEIGHT
1) Park the vehicle on a level surface.
2) Empty the vehicle so that it is at “curb weight”. (Empty the luggage compartment, load the spare tire, jack
and service tools, and fill up the fuel tank.)
3) Set the steering wheel in a straight–ahead position, and stabilize the suspension by moving the vehicle in
a straight line for more than 5 m (16 ft).
4) Suspend a thread from the wheel arch (point “A” in the figure below) and affix at a position directly above
the center of wheel.
5) Measure the distance between the point “A” and the center of wheel.
(1) Wheel arch height (4) Front wheel arch height (7) Point of measurement
(2) Front fender (5) Rear wheel arch height (8) Tip end of spindle
(3) Rear quarter (6) Flange bend line
Wheel arch height specification mm (in) (Tolerance: +12 mm –24 mm ( +0.47 in –0.94 in))
Front 442 (17.4)
Rear 439 (17.3)
A
A
A
(4)
(1)
(2)
(3)
(1)
(5)(1)
(7)
(6)
(8)
FS-00210