2009 SUBARU TRIBECA engine
[x] Cancel search: enginePage 1080 of 2453
VDC(diag)-88
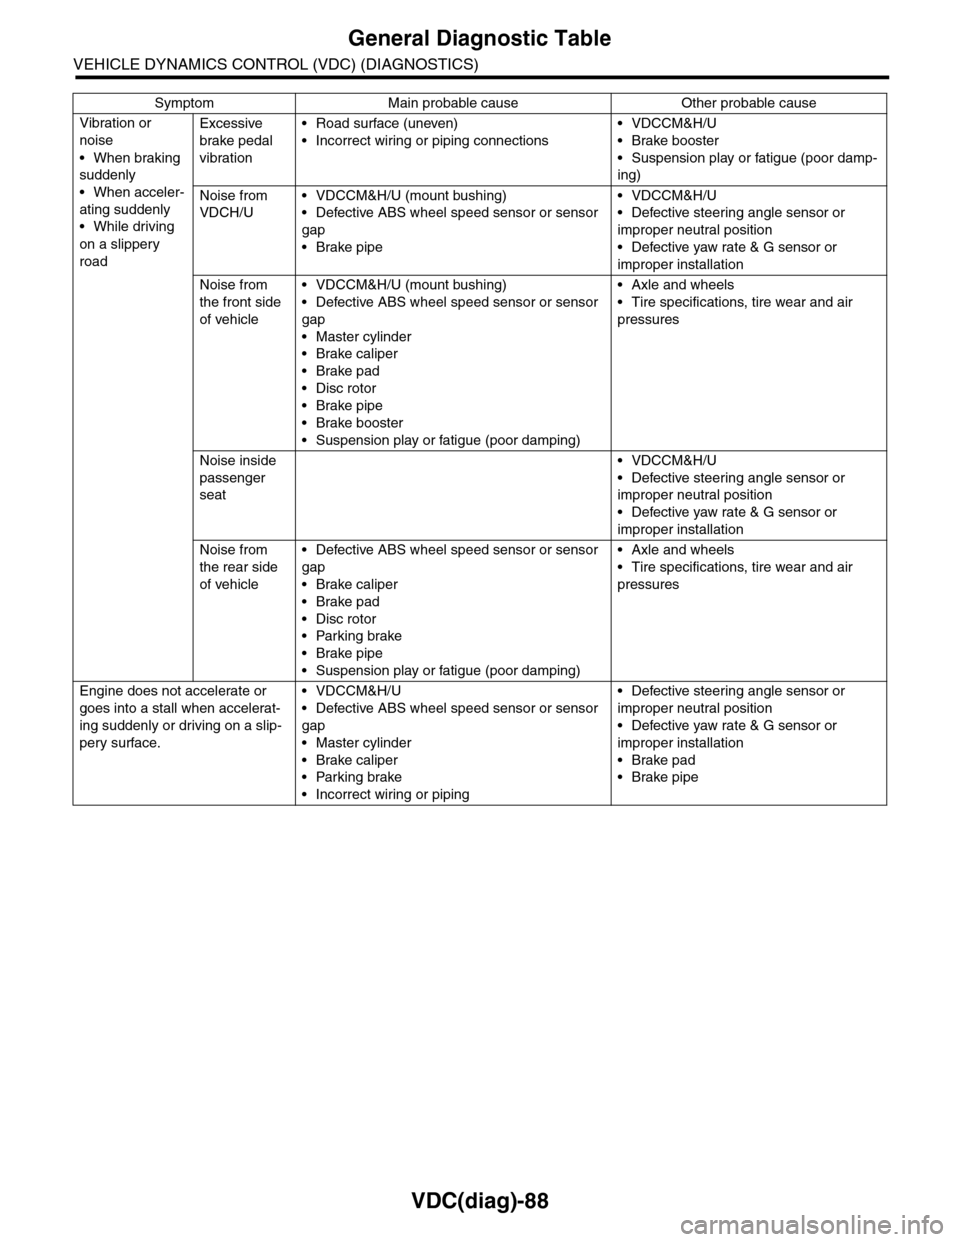
General Diagnostic Table
VEHICLE DYNAMICS CONTROL (VDC) (DIAGNOSTICS)
Vibration or
noise
•When braking
suddenly
•When acceler-
ating suddenly
•While driving
on a slippery
road
Excessive
brake pedal
vibration
•Road surface (uneven)
•Incorrect wiring or piping connections
•VDCCM&H/U
•Brake booster
•Suspension play or fatigue (poor damp-
ing)
Noise from
VDCH/U
•VDCCM&H/U (mount bushing)
•Defective ABS wheel speed sensor or sensor
gap
•Brake pipe
•VDCCM&H/U
•Defective steering angle sensor or
improper neutral position
•Defective yaw rate & G sensor or
improper installation
Noise from
the front side
of vehicle
•VDCCM&H/U (mount bushing)
•Defective ABS wheel speed sensor or sensor
gap
•Master cylinder
•Brake caliper
•Brake pad
•Disc rotor
•Brake pipe
•Brake booster
•Suspension play or fatigue (poor damping)
•Axle and wheels
•Tire specifications, tire wear and air
pressures
Noise inside
passenger
seat
•VDCCM&H/U
•Defective steering angle sensor or
improper neutral position
•Defective yaw rate & G sensor or
improper installation
Noise from
the rear side
of vehicle
•Defective ABS wheel speed sensor or sensor
gap
•Brake caliper
•Brake pad
•Disc rotor
•Parking brake
•Brake pipe
•Suspension play or fatigue (poor damping)
•Axle and wheels
•Tire specifications, tire wear and air
pressures
Engine does not accelerate or
goes into a stall when accelerat-
ing suddenly or driving on a slip-
pery surface.
•VDCCM&H/U
•Defective ABS wheel speed sensor or sensor
gap
•Master cylinder
•Brake caliper
•Parking brake
•Incorrect wiring or piping
•Defective steering angle sensor or
improper neutral position
•Defective yaw rate & G sensor or
improper installation
•Brake pad
•Brake pipe
Symptom Main probable cause Other probable cause
Page 1102 of 2453
VDC-21
Front ABS Wheel Speed Sensor
VEHICLE DYNAMICS CONTROL (VDC)
7. Front ABS Wheel Speed Sen-
sor
A: REMOVAL
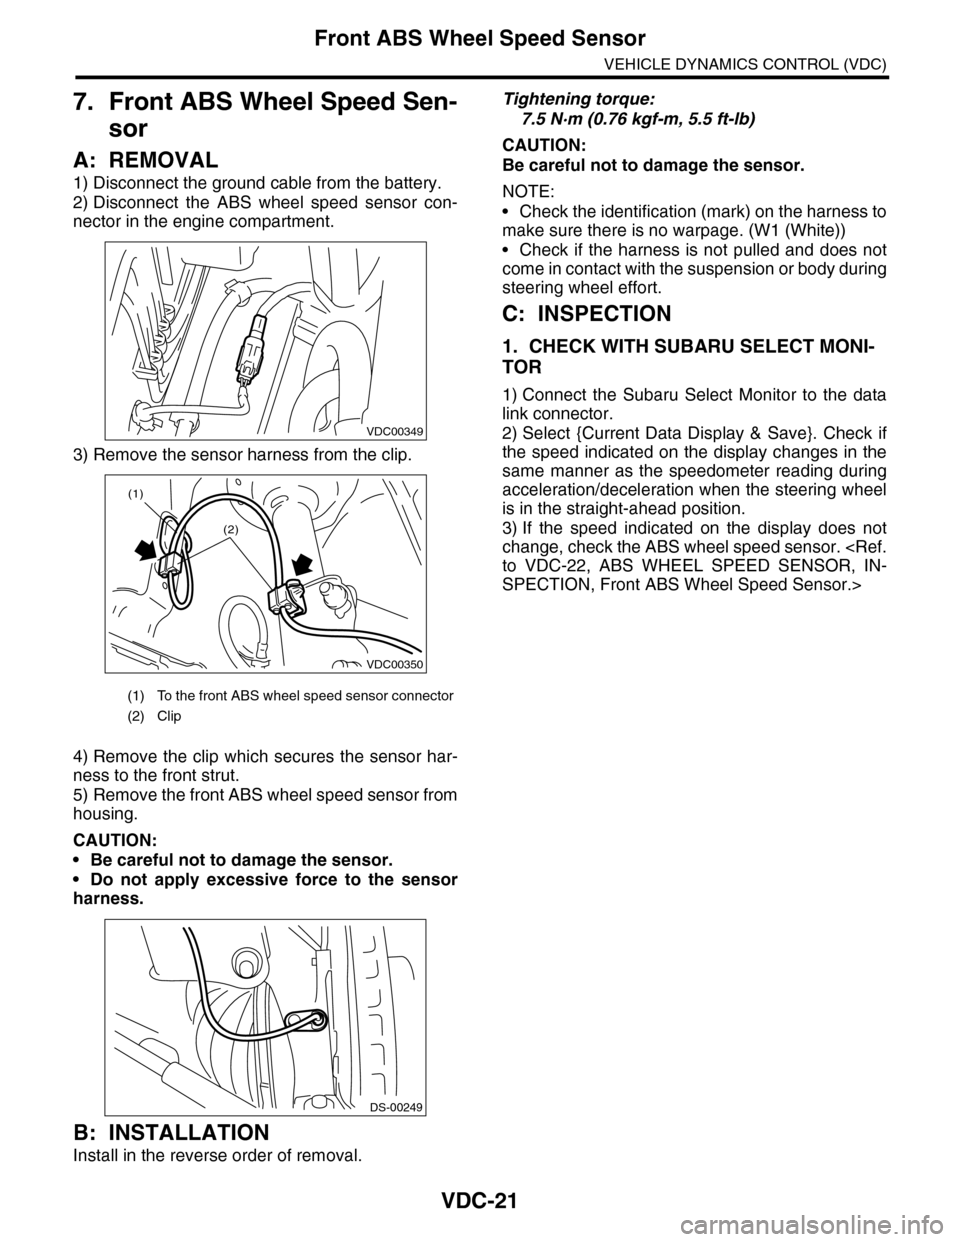
1) Disconnect the ground cable from the battery.
2) Disconnect the ABS wheel speed sensor con-
nector in the engine compartment.
3) Remove the sensor harness from the clip.
4) Remove the clip which secures the sensor har-
ness to the front strut.
5) Remove the front ABS wheel speed sensor from
housing.
CAUTION:
•Be careful not to damage the sensor.
•Do not apply excessive force to the sensor
harness.
B: INSTALLATION
Install in the reverse order of removal.
Tightening torque:
7.5 N·m (0.76 kgf-m, 5.5 ft-lb)
CAUTION:
Be careful not to damage the sensor.
NOTE:
•Check the identification (mark) on the harness to
make sure there is no warpage. (W1 (White))
•Check if the harness is not pulled and does not
come in contact with the suspension or body during
steering wheel effort.
C: INSPECTION
1. CHECK WITH SUBARU SELECT MONI-
TOR
1) Connect the Subaru Select Monitor to the data
link connector.
2) Select {Current Data Display & Save}. Check if
the speed indicated on the display changes in the
same manner as the speedometer reading during
acceleration/deceleration when the steering wheel
is in the straight-ahead position.
3) If the speed indicated on the display does not
change, check the ABS wheel speed sensor.
SPECTION, Front ABS Wheel Speed Sensor.>
(1) To the front ABS wheel speed sensor connector
(2) Clip
VDC00349
VDC00350
(1)
(2)
DS-00249
Page 1121 of 2453
CO(H6DO)-2
General Description
COOLING
1. General Description
A: SPECIFICATION
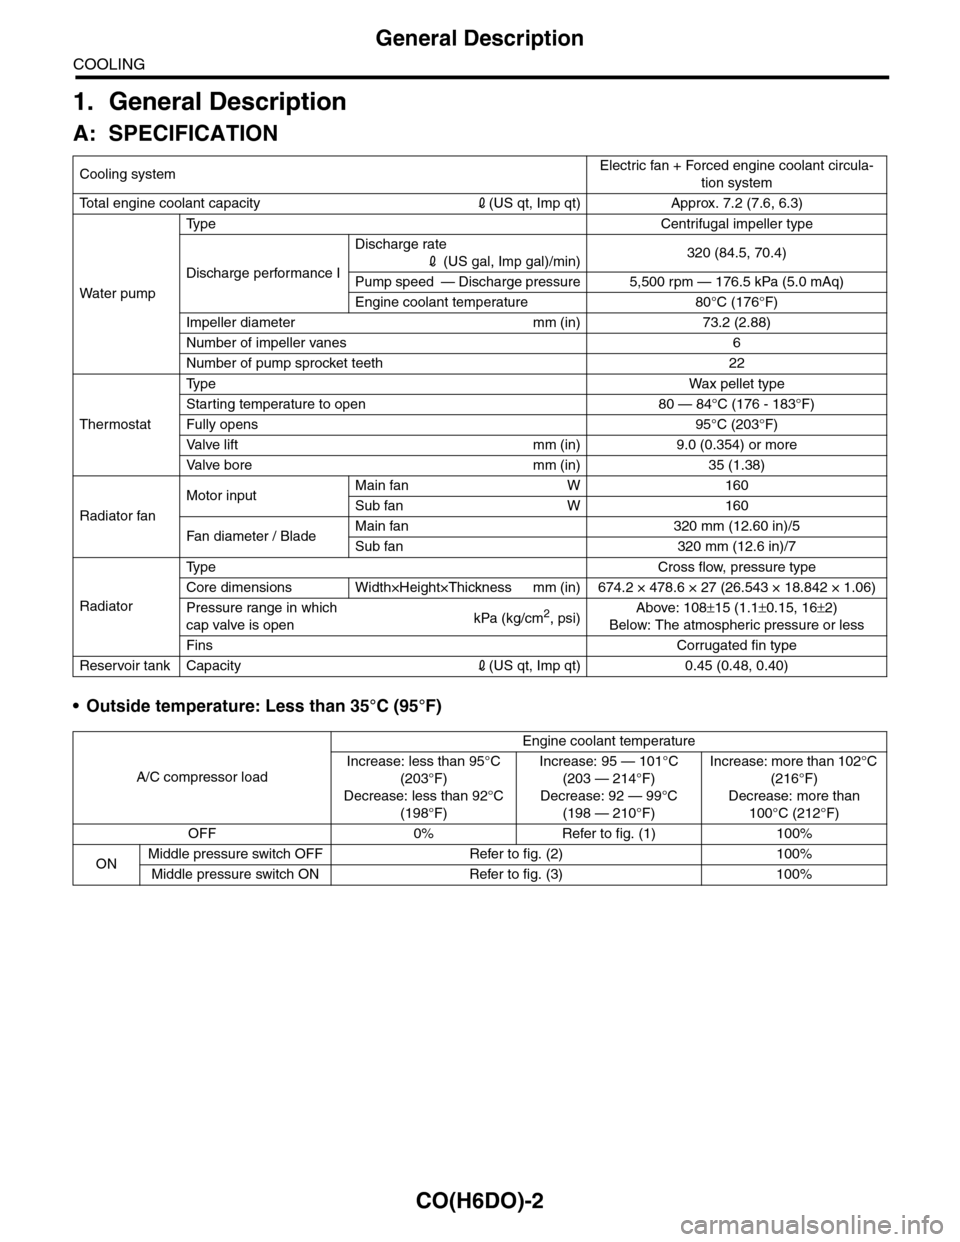
•Outside temperature: Less than 35°C (95°F)
Cooling systemElectric fan + Forced engine coolant circula-
tion system
To t a l e n g i n e c o o l a n t c a p a c i t y2(US qt, Imp qt) Approx. 7.2 (7.6, 6.3)
Wa t er p u mp
Ty p e C e n t r i f u g a l i m p e l l e r t y p e
Discharge performance I
Discharge rate
2 (US gal, Imp gal)/min)320 (84.5, 70.4)
Pump speed — Discharge pressure 5,500 rpm — 176.5 kPa (5.0 mAq)
Engine coolant temperature 80°C (176°F)
Impeller diameter mm (in) 73.2 (2.88)
Number of impeller vanes 6
Number of pump sprocket teeth 22
Thermostat
Ty p eWa x p el l et t yp e
Starting temperature to open 80 — 84°C (176 - 183°F)
Fully opens 95°C (203°F)
Va l ve l i f t m m ( i n ) 9 . 0 ( 0 . 3 5 4 ) o r m o r e
Va l ve b o r e m m ( i n ) 3 5 ( 1 . 3 8 )
Radiator fan
Motor inputMain fan W 160
Sub fan W 160
Fan di a me t er / B la deMain fan 320 mm (12.60 in)/5
Sub fan 320 mm (12.6 in)/7
Radiator
Ty p e C r o s s f l o w , p r e s s u r e t y p e
Core dimensions Width×Height×Thickness mm (in) 674.2 × 478.6 × 27 (26.543 × 18.842 × 1.06)
Pressure range in which
cap valve is openkPa (kg/cm2, psi)Above: 108±15 (1.1±0.15, 16±2)
Below: The atmospheric pressure or less
FinsCorrugated fin type
Reservoir tank Capacity2(US qt, Imp qt) 0.45 (0.48, 0.40)
A/C compressor load
Engine coolant temperature
Increase: less than 95°C
(203°F)
Decrease: less than 92°C
(198°F)
Increase: 95 — 101°C
(203 — 214°F)
Decrease: 92 — 99°C
(198 — 210°F)
Increase: more than 102°C
(216°F)
Decrease: more than
100°C (212°F)
OFF 0% Refer to fig. (1) 100%
ONMiddle pressure switch OFF Refer to fig. (2) 100%
Middle pressure switch ON Refer to fig. (3) 100%
Page 1122 of 2453
CO(H6DO)-3
General Description
COOLING
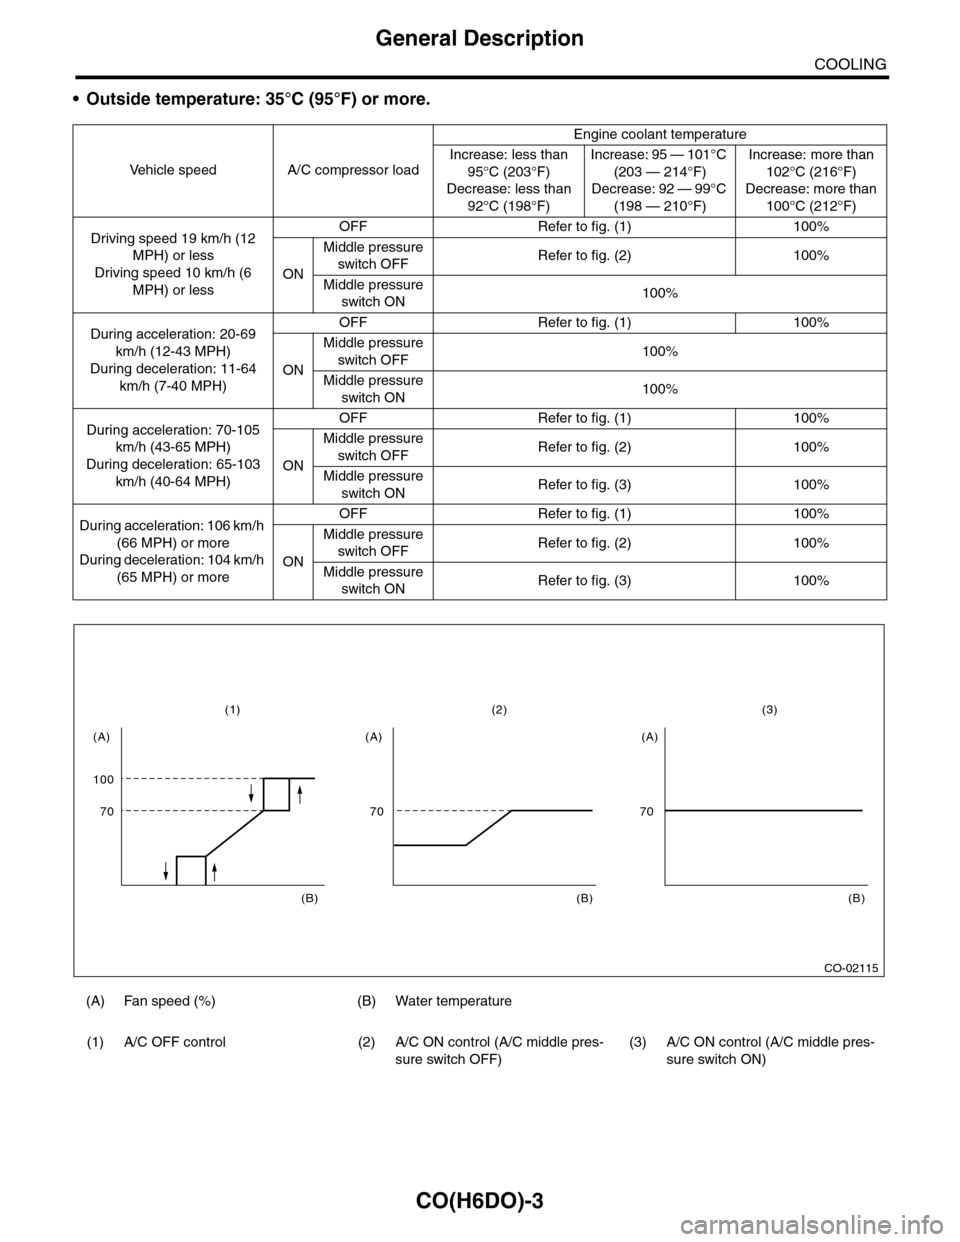
•Outside temperature: 35°C (95°F) or more.
Ve h i c l e s p e e d A / C c o m p r e s s o r l o a d
Engine coolant temperature
Increase: less than
95°C (203°F)
Decrease: less than
92°C (198°F)
Increase: 95 — 101°C
(203 — 214°F)
Decrease: 92 — 99°C
(198 — 210°F)
Increase: more than
102°C (216°F)
Decrease: more than
100°C (212°F)
Driving speed 19 km/h (12
MPH) or less
Driving speed 10 km/h (6
MPH) or less
OFF Refer to fig. (1) 100%
ON
Middle pressure
switch OFFRefer to fig. (2) 100%
Middle pressure
switch ON100%
During acceleration: 20-69
km/h (12-43 MPH)
During deceleration: 11-64
km/h (7-40 MPH)
OFF Refer to fig. (1) 100%
ON
Middle pressure
switch OFF100%
Middle pressure
switch ON100%
During acceleration: 70-105
km/h (43-65 MPH)
During deceleration: 65-103
km/h (40-64 MPH)
OFF Refer to fig. (1) 100%
ON
Middle pressure
switch OFFRefer to fig. (2) 100%
Middle pressure
switch ONRefer to fig. (3) 100%
During acceleration: 106 km/h
(66 MPH) or more
During deceleration: 104 km/h
(65 MPH) or more
OFF Refer to fig. (1) 100%
ON
Middle pressure
switch OFFRefer to fig. (2) 100%
Middle pressure
switch ONRefer to fig. (3) 100%
(A) Fan speed (%) (B) Water temperature
(1) A/C OFF control (2) A/C ON control (A/C middle pres-
sure switch OFF)
(3) A/C ON control (A/C middle pres-
sure switch ON)
CO-02115
100
(1)
70
(A)
(B)
(2)
70
(A)
(B)
(3)
70
(A)
(B)
Page 1124 of 2453
CO(H6DO)-5
General Description
COOLING
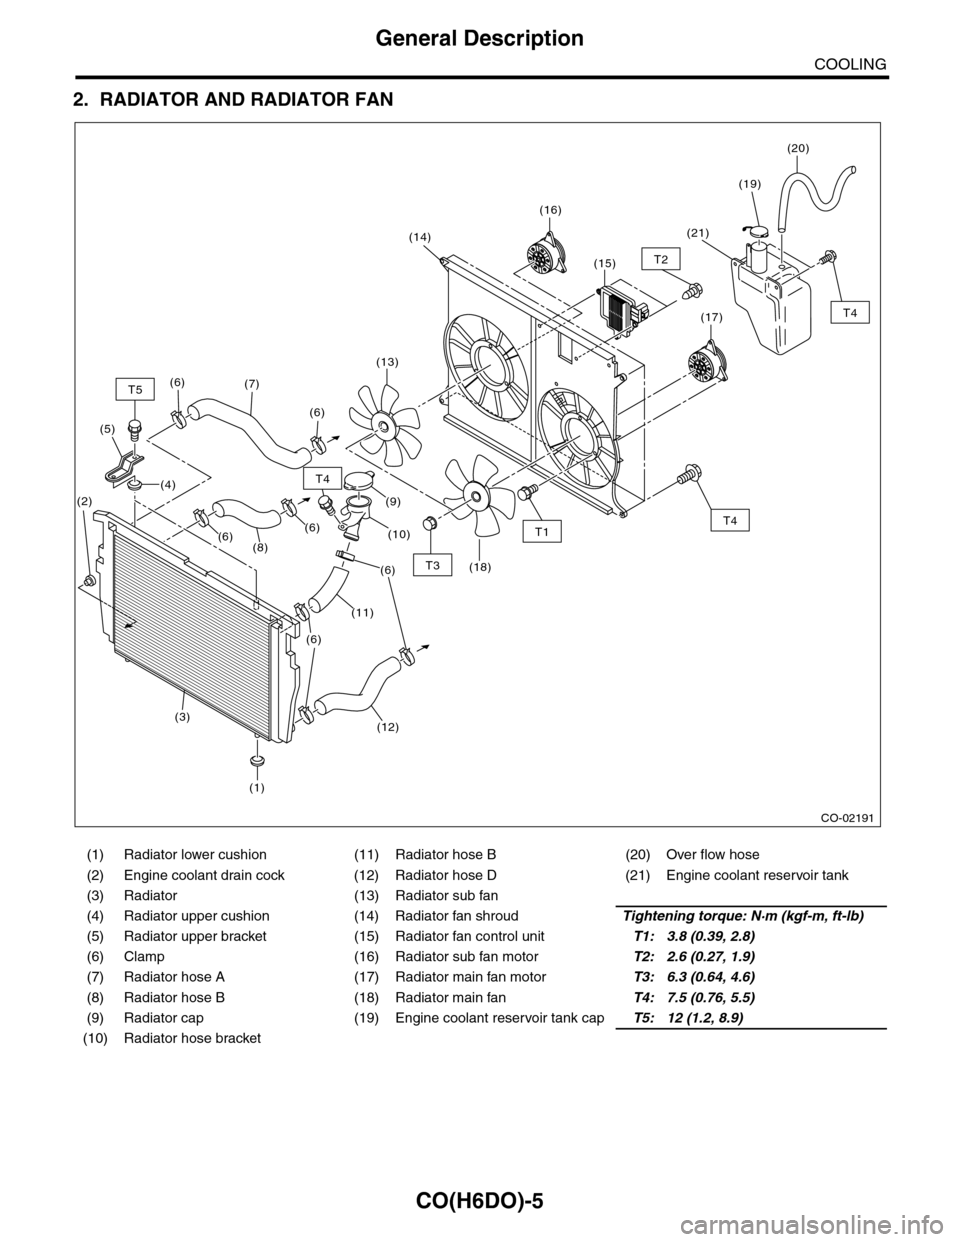
2. RADIATOR AND RADIATOR FAN
(1) Radiator lower cushion (11) Radiator hose B (20) Over flow hose
(2) Engine coolant drain cock (12) Radiator hose D (21) Engine coolant reservoir tank
(3) Radiator (13) Radiator sub fan
(4) Radiator upper cushion (14) Radiator fan shroudTightening torque: N·m (kgf-m, ft-lb)
(5) Radiator upper bracket (15) Radiator fan control unitT1: 3.8 (0.39, 2.8)
(6) Clamp (16) Radiator sub fan motorT2: 2.6 (0.27, 1.9)
(7) Radiator hose A (17) Radiator main fan motorT3: 6.3 (0.64, 4.6)
(8) Radiator hose B (18) Radiator main fanT4: 7.5 (0.76, 5.5)
(9) Radiator cap (19) Engine coolant reservoir tank capT5: 12 (1.2, 8.9)
(10) Radiator hose bracket
CO-02191
T4
T4
T4
T2
T1
T3
T5(7)
(6)
(13)
(18)
(14)
(16)
(17)
(15)
(21)
(19)
(20)
(9)
(10)
(6)
(11)
(6)
(1)
(3)
(2)
(12)
(6)
(8)
(4)
(5)
(6)(6)
Page 1127 of 2453
CO(H6DO)-8
Radiator Fan System
COOLING
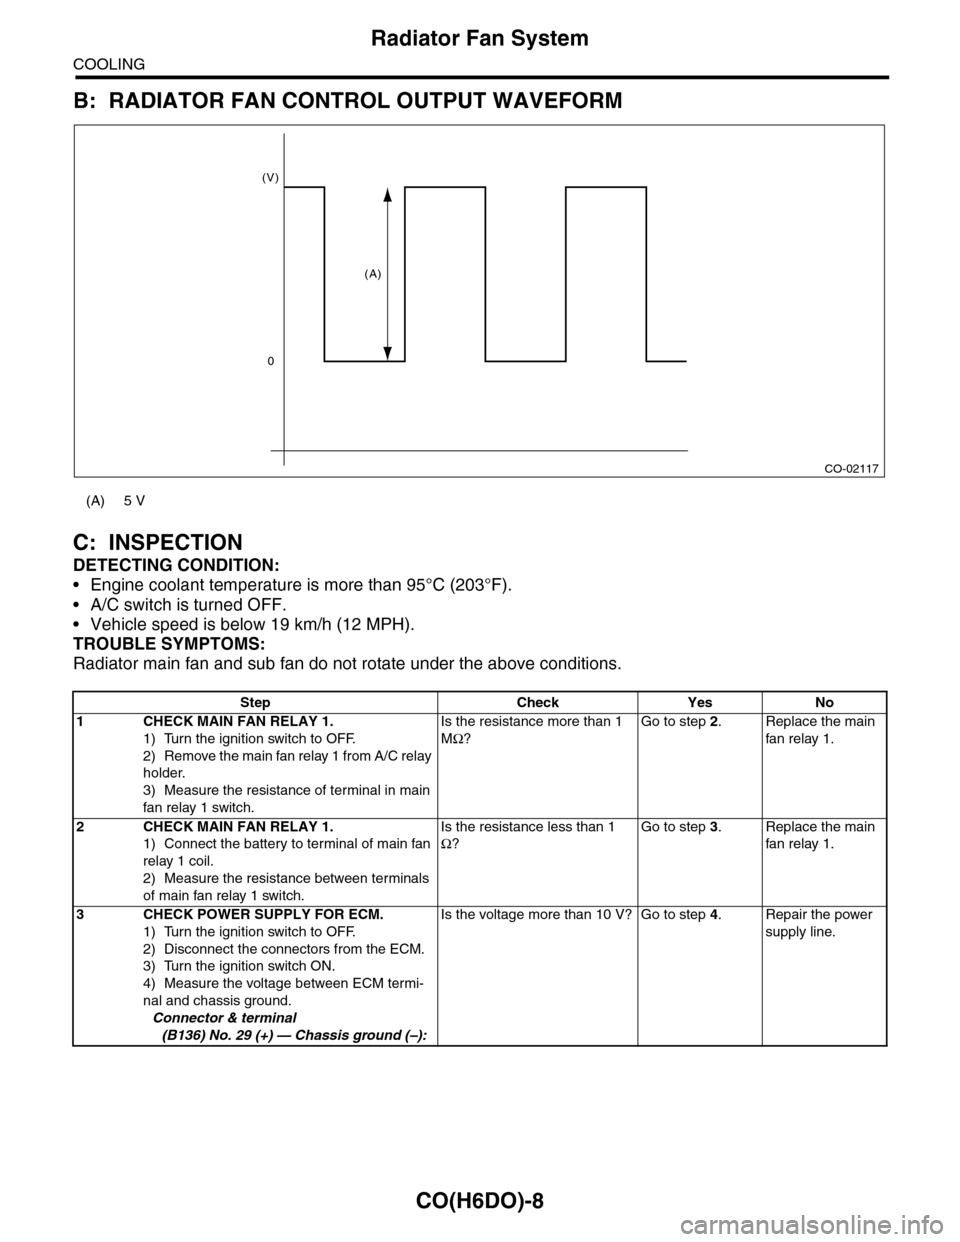
B: RADIATOR FAN CONTROL OUTPUT WAVEFORM
C: INSPECTION
DETECTING CONDITION:
•Engine coolant temperature is more than 95°C (203°F).
•A/C switch is turned OFF.
•Vehicle speed is below 19 km/h (12 MPH).
TROUBLE SYMPTOMS:
Radiator main fan and sub fan do not rotate under the above conditions.
(A) 5 V
Step Check Yes No
1CHECK MAIN FAN RELAY 1.
1) Turn the ignition switch to OFF.
2) Remove the main fan relay 1 from A/C relay
holder.
3) Measure the resistance of terminal in main
fan relay 1 switch.
Is the resistance more than 1
MΩ?
Go to step 2.Replace the main
fan relay 1.
2CHECK MAIN FAN RELAY 1.
1) Connect the battery to terminal of main fan
relay 1 coil.
2) Measure the resistance between terminals
of main fan relay 1 switch.
Is the resistance less than 1
Ω?
Go to step 3.Replace the main
fan relay 1.
3CHECK POWER SUPPLY FOR ECM.
1) Turn the ignition switch to OFF.
2) Disconnect the connectors from the ECM.
3) Turn the ignition switch ON.
4) Measure the voltage between ECM termi-
nal and chassis ground.
Connector & terminal
(B136) No. 29 (+) — Chassis ground (–):
Is the voltage more than 10 V? Go to step 4.Repair the power
supply line.
CO-02117
(V)
0
(A)
Page 1128 of 2453
CO(H6DO)-9
Radiator Fan System
COOLING
4CHECK POWER SUPPLY FOR RADIATOR
FAN CONTROL UNIT.
1) Turn the ignition switch to OFF.
2) Connect the connector to ECM.
3) Disconnect the connector from radiator fan
control unit.
4) Turn the ignition switch ON.
5) Measure the voltage between radiator fan
control unit terminal and chassis ground.
Connector & terminal
(F106) No. 3 (+) — Chassis ground (–):
Is the voltage more than 10 V? Go to step 5.Repair the power
supply line.
5CHECK HARNESS BETWEEN ECM AND RA-
DIATOR FAN CONTROL UNIT.
1) Turn the ignition switch to OFF.
2) Disconnect the connectors from the ECM.
3) Measure the resistance between radiator
fan control unit and ECM connector.
Connector & terminal
(B136) No. 18 — (F106) No. 2:
Is the resistance less than 1
Ω?
Go to step 6.Repair the open
circuit of harness
between ECM and
radiator fan con-
trol unit.
6CHECK RADIATOR FAN CONTROL UNIT
AND GROUND CIRCUIT.
1) Connect the connector to ECM and radiator
fan control unit.
2) Measure the resistance between radiator
fan control unit connector and chassis ground.
Connector & terminal
(F106) No. 1 — Chassis ground:
Is the resistance less than 5
Ω?
Go to step 7.Repair the open
circuit of harness
between radiator
fan control unit
connector and
chassis ground.
7CHECK MAIN FAN MOTOR.
1) Disconnect the connector from radiator fan
control unit.
2) Connect the battery positive (+) terminal to
terminal No. 1 of the main fan motor, and the
ground (–) terminal to terminal No. 2.
Does the main fan motor
rotate?
Go to step 8.Replace the main
fan motor.
8CHECK SUB FAN MOTOR.
1) Disconnect the connector from radiator fan
control unit.
2) Connect the battery positive (+) terminal to
terminal No. 1 of the sub fan motor, and the
ground (–) terminal to terminal No. 2.
Does the sub fan motor rotate? Go to step 9.Replace the sub
fan motor.
9CHECK OUTPUT SIGNAL FROM ECM.
1) Turn the ignition switch to OFF.
2) Connect the test mode connector.
3) Turn the ignition switch ON.
4) Check the output waveform using oscillo-
scope.
Fa n S y st e m. >
Connector & terminal
(B134) No. 18 (+) — Chassis ground (–):
Is waveform being output? Replace the radia-
tor fan control unit.
Radiator Fan Con-
trol Unit.>
Replace the ECM.
Engine Control
Module (ECM).>
Step Check Yes No
Page 1129 of 2453
CO(H6DO)-10
Engine Coolant
COOLING
3. Engine Coolant
A: REPLACEMENT
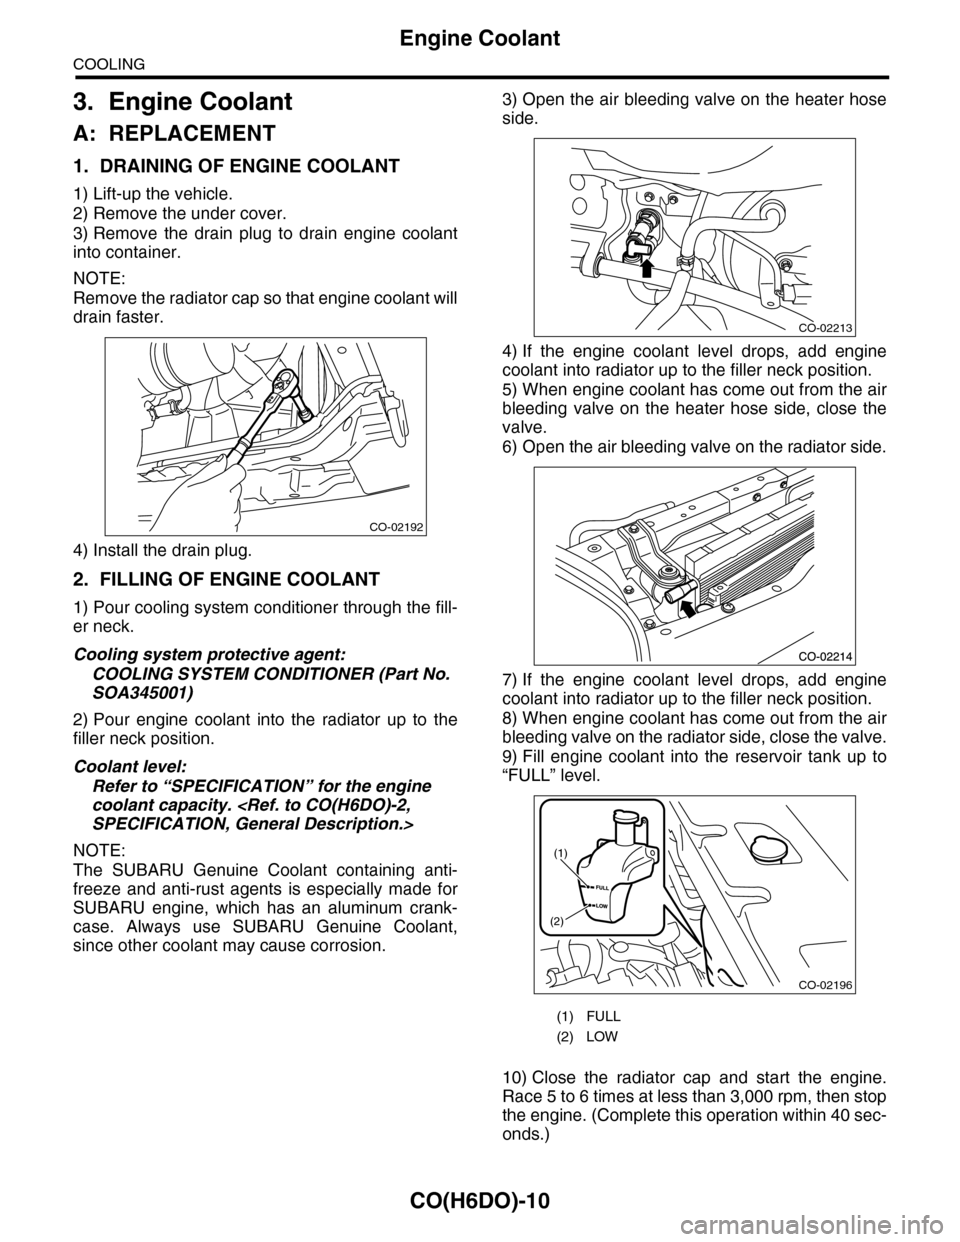
1. DRAINING OF ENGINE COOLANT
1) Lift-up the vehicle.
2) Remove the under cover.
3) Remove the drain plug to drain engine coolant
into container.
NOTE:
Remove the radiator cap so that engine coolant will
drain faster.
4) Install the drain plug.
2. FILLING OF ENGINE COOLANT
1) Pour cooling system conditioner through the fill-
er neck.
Cooling system protective agent:
COOLING SYSTEM CONDITIONER (Part No.
SOA345001)
2) Pour engine coolant into the radiator up to the
filler neck position.
Coolant level:
Refer to “SPECIFICATION” for the engine
coolant capacity.
NOTE:
The SUBARU Genuine Coolant containing anti-
freeze and anti-rust agents is especially made for
SUBARU engine, which has an aluminum crank-
case. Always use SUBARU Genuine Coolant,
since other coolant may cause corrosion.
3) Open the air bleeding valve on the heater hose
side.
4) If the engine coolant level drops, add engine
coolant into radiator up to the filler neck position.
5) When engine coolant has come out from the air
bleeding valve on the heater hose side, close the
valve.
6) Open the air bleeding valve on the radiator side.
7) If the engine coolant level drops, add engine
coolant into radiator up to the filler neck position.
8) When engine coolant has come out from the air
bleeding valve on the radiator side, close the valve.
9) Fill engine coolant into the reservoir tank up to
“FULL” level.
10) Close the radiator cap and start the engine.
Race 5 to 6 times at less than 3,000 rpm, then stop
the engine. (Complete this operation within 40 sec-
onds.)
CO-02192
(1) FULL
(2) LOW
CO-02213
CO-02196
(1)
(2)