Page 2110 of 2453
5AT-94
AT Main Case
AUTOMATIC TRANSMISSION
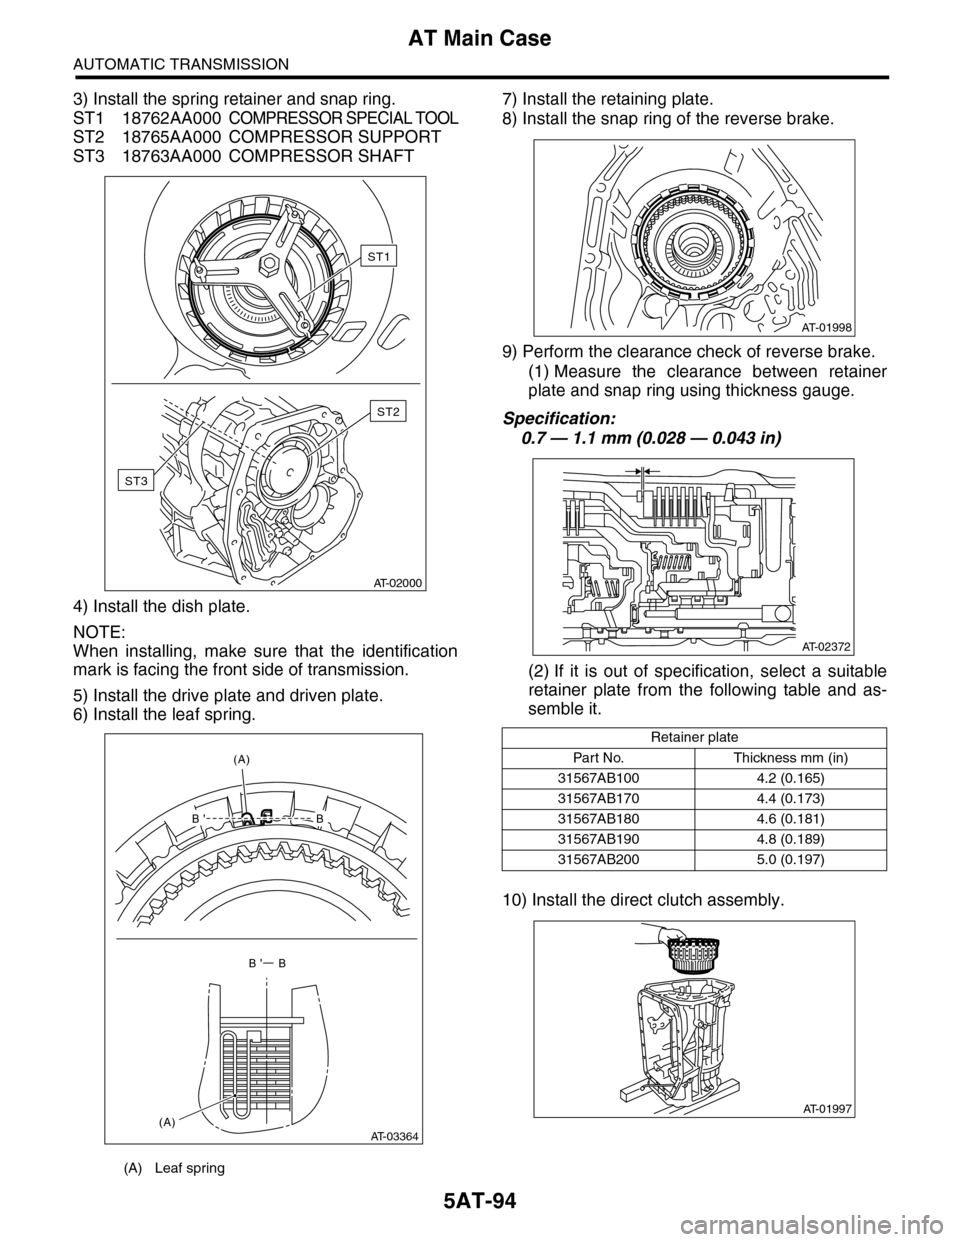
3) Install the spring retainer and snap ring.
ST1 18762AA000COMPRESSOR SPECIAL TOOL
ST2 18765AA000 COMPRESSOR SUPPORT
ST3 18763AA000 COMPRESSOR SHAFT
4) Install the dish plate.
NOTE:
When installing, make sure that the identification
mark is facing the front side of transmission.
5) Install the drive plate and driven plate.
6) Install the leaf spring.
7) Install the retaining plate.
8) Install the snap ring of the reverse brake.
9) Perform the clearance check of reverse brake.
(1) Measure the clearance between retainer
plate and snap ring using thickness gauge.
Specification:
0.7 — 1.1 mm (0.028 — 0.043 in)
(2) If it is out of specification, select a suitable
retainer plate from the following table and as-
semble it.
10) Install the direct clutch assembly.
(A) Leaf spring
AT-02000
ST3
ST2
ST1
B'B
B' B
(A)
(A)AT-03364
Retainer plate
Par t N o. Thickness mm (in)
31567AB100 4.2 (0.165)
31567AB170 4.4 (0.173)
31567AB180 4.6 (0.181)
31567AB190 4.8 (0.189)
31567AB200 5.0 (0.197)
AT-01998
AT-02372
AT-01997
Page 2111 of 2453
5AT-95
AT Main Case
AUTOMATIC TRANSMISSION
11) Install the high & low reverse clutch assembly.
12) Install the thrust needle bearing of the high &
low reverse clutch.
13) Install the middle & rear sun gear assembly.
14) Install the rear carrier assembly.
15) Install the middle carrier assembly.
AT-01996
AT-01995
AT-01994
AT-01993
AT-01992
Page 2112 of 2453
5AT-96
AT Main Case
AUTOMATIC TRANSMISSION
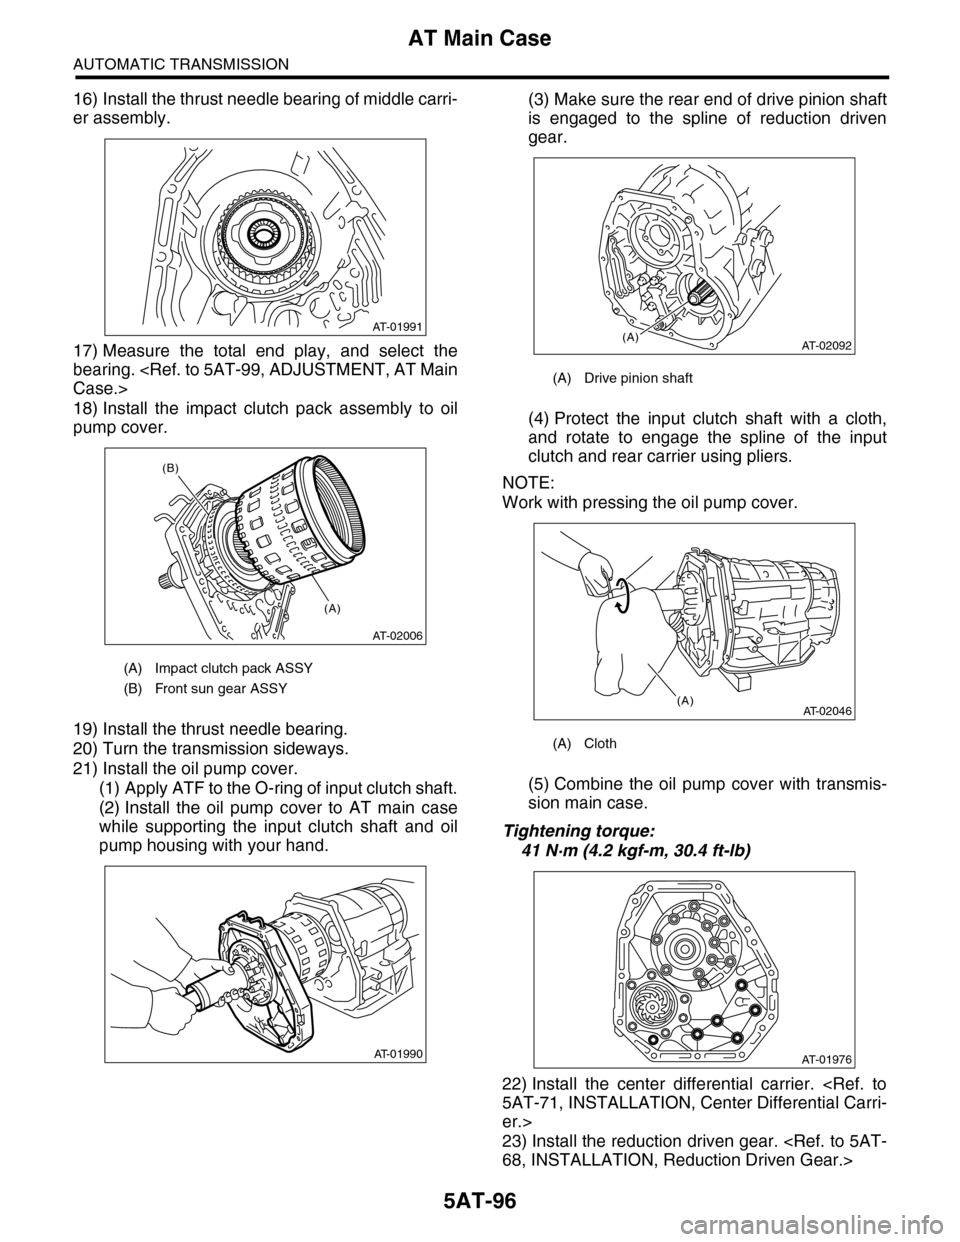
16) Install the thrust needle bearing of middle carri-
er assembly.
17) Measure the total end play, and select the
bearing.
Case.>
18) Install the impact clutch pack assembly to oil
pump cover.
19) Install the thrust needle bearing.
20) Turn the transmission sideways.
21) Install the oil pump cover.
(1) Apply ATF to the O-ring of input clutch shaft.
(2) Install the oil pump cover to AT main case
while supporting the input clutch shaft and oil
pump housing with your hand.
(3) Make sure the rear end of drive pinion shaft
is engaged to the spline of reduction driven
gear.
(4) Protect the input clutch shaft with a cloth,
and rotate to engage the spline of the input
clutch and rear carrier using pliers.
NOTE:
Work with pressing the oil pump cover.
(5) Combine the oil pump cover with transmis-
sion main case.
Tightening torque:
41 N·m (4.2 kgf-m, 30.4 ft-lb)
22) Install the center differential carrier.
5AT-71, INSTALLATION, Center Differential Carri-
er.>
23) Install the reduction driven gear.
68, INSTALLATION, Reduction Driven Gear.>
(A) Impact clutch pack ASSY
(B) Front sun gear ASSY
AT-01991
AT-02006
(A)
(B)
AT-01990
(A) Drive pinion shaft
(A) Cloth
AT-02092(A)
AT-02046(A)
AT-01976
Page 2113 of 2453
5AT-97
AT Main Case
AUTOMATIC TRANSMISSION
24) Install the extension case.
STALLATION, Extension Case.>
25) Install the control valve body.
INSTALLATION, Control Valve Body.>
26) Install the converter case assembly to the
transmission case assembly.
STALLATION, Converter Case.>
27) Install the air breather hose.
INSTALLATION, Air Breather Hose.>
28) Install the ATF filter pipe.
STALLATION, ATF Cooler Pipe & Hose.>
29) Install the oil charge pipe together with an O-
ring.
Pipe.>
30) Install the torque converter assembly.
5AT-62, INSTALLATION, Torque Converter As-
sembly.>
31) Install the transmission assembly to the vehi-
cle.
Transmission Assembly.>
32) Perform Clear Memory 2 operation.
5AT(diag)-17, CLEAR MEMORY MODE, OPERA-
TION, Subaru Select Monitor.>
33) Perform the inspection with driving the vehicle
at the end of repair work, and make sure there is no
faulty as below;
•Excessive shift shock
•Oil leakage from the transmission body, etc.
•Occurrence of noise caused by interference etc.
NOTE:
If excessive shift shock is felt, execute advance op-
eration of learning control.
PROCEDURE, Learning Control.>
C: DISASSEMBLY
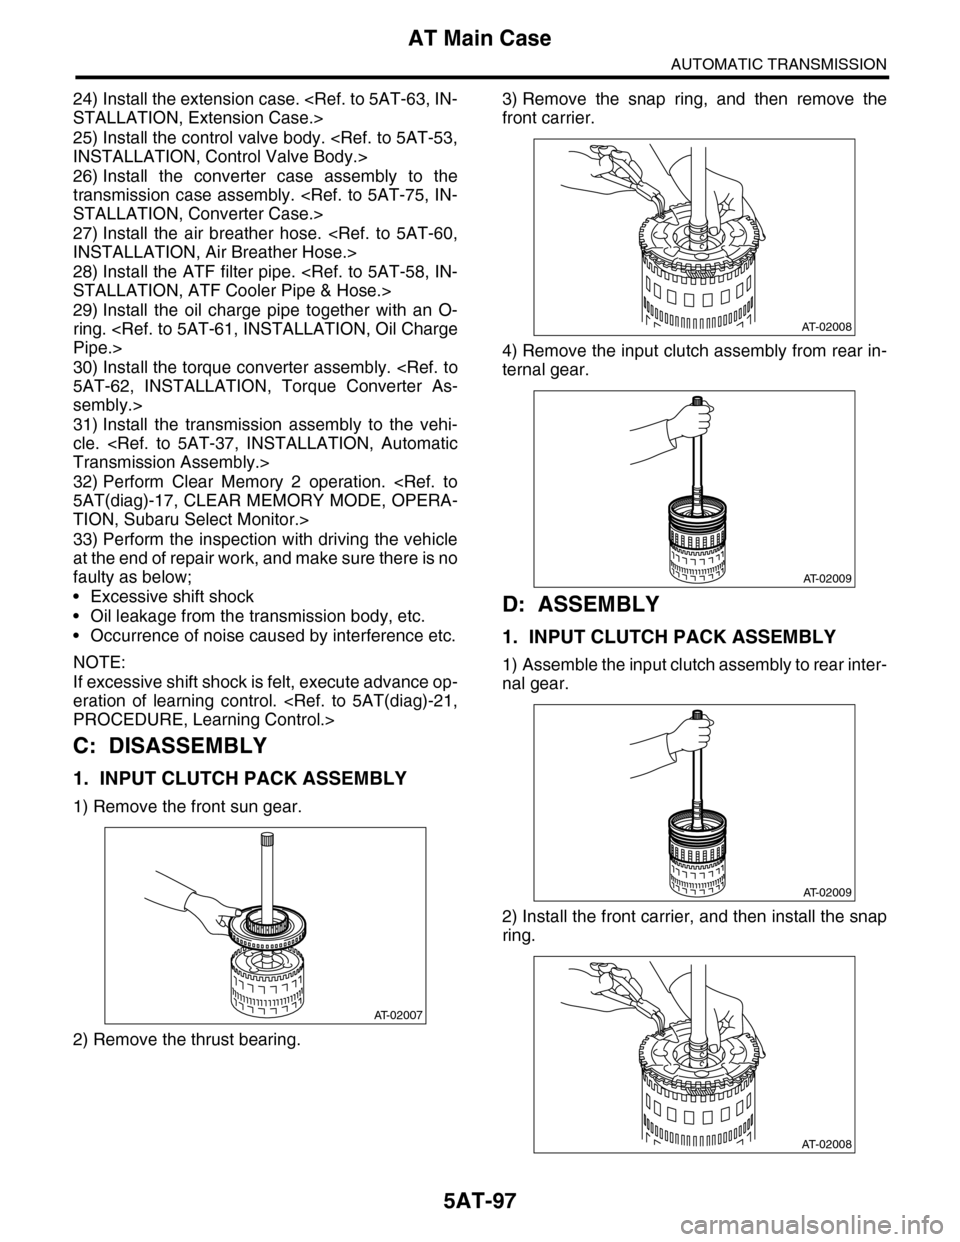
1. INPUT CLUTCH PACK ASSEMBLY
1) Remove the front sun gear.
2) Remove the thrust bearing.
3) Remove the snap ring, and then remove the
front carrier.
4) Remove the input clutch assembly from rear in-
ternal gear.
D: ASSEMBLY
1. INPUT CLUTCH PACK ASSEMBLY
1) Assemble the input clutch assembly to rear inter-
nal gear.
2) Install the front carrier, and then install the snap
ring.
AT-02007
AT-02008
AT-02009
AT-02009
AT-02008
Page 2114 of 2453
5AT-98
AT Main Case
AUTOMATIC TRANSMISSION
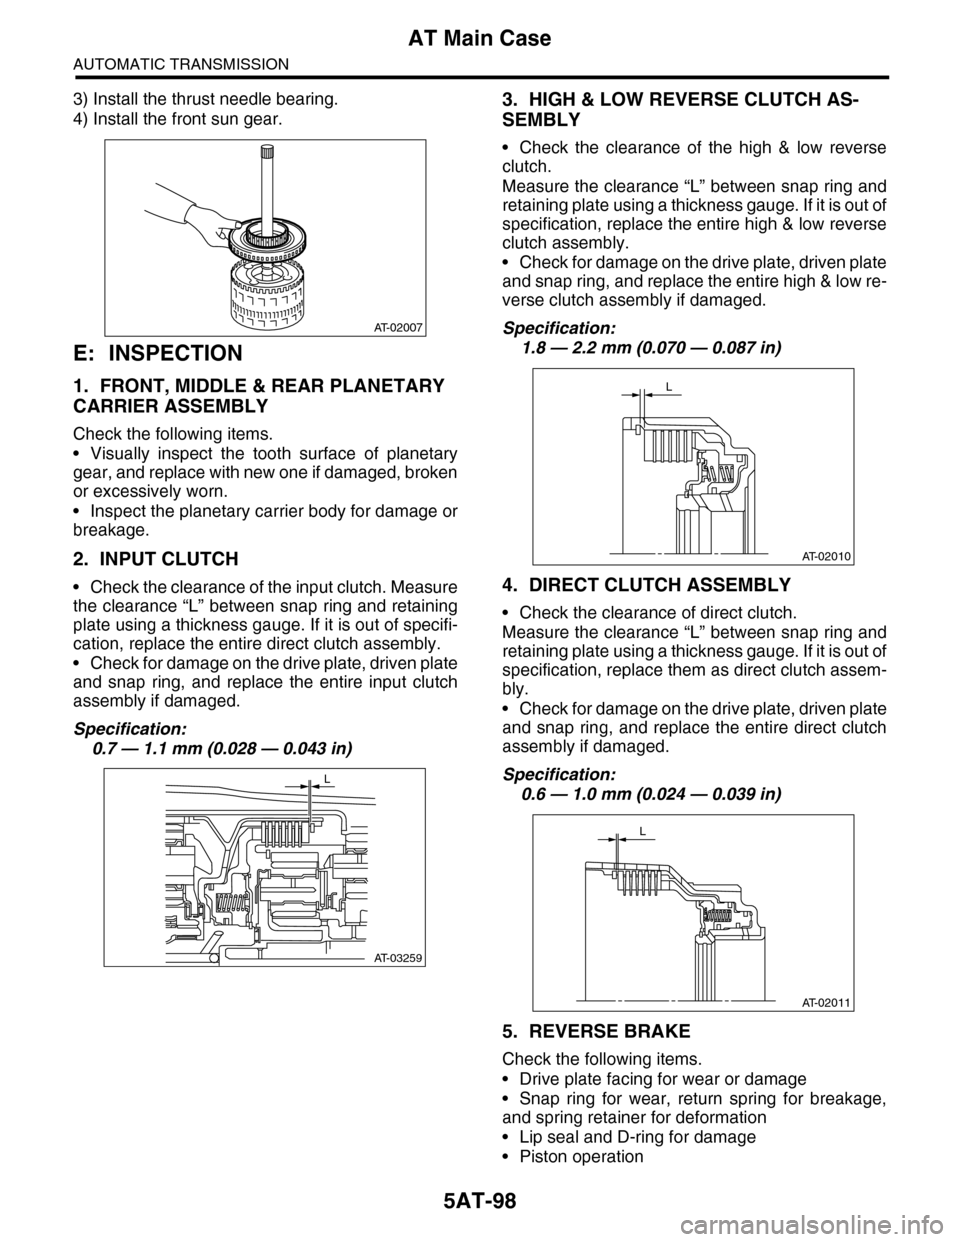
3) Install the thrust needle bearing.
4) Install the front sun gear.
E: INSPECTION
1. FRONT, MIDDLE & REAR PLANETARY
CARRIER ASSEMBLY
Check the following items.
•Visually inspect the tooth surface of planetary
gear, and replace with new one if damaged, broken
or excessively worn.
•Inspect the planetary carrier body for damage or
breakage.
2. INPUT CLUTCH
•Check the clearance of the input clutch. Measure
the clearance “L” between snap ring and retaining
plate using a thickness gauge. If it is out of specifi-
cation, replace the entire direct clutch assembly.
•Check for damage on the drive plate, driven plate
and snap ring, and replace the entire input clutch
assembly if damaged.
Specification:
0.7 — 1.1 mm (0.028 — 0.043 in)
3. HIGH & LOW REVERSE CLUTCH AS-
SEMBLY
•Check the clearance of the high & low reverse
clutch.
Measure the clearance “L” between snap ring and
retaining plate using a thickness gauge. If it is out of
specification, replace the entire high & low reverse
clutch assembly.
•Check for damage on the drive plate, driven plate
and snap ring, and replace the entire high & low re-
verse clutch assembly if damaged.
Specification:
1.8 — 2.2 mm (0.070 — 0.087 in)
4. DIRECT CLUTCH ASSEMBLY
•Check the clearance of direct clutch.
Measure the clearance “L” between snap ring and
retaining plate using a thickness gauge. If it is out of
specification, replace them as direct clutch assem-
bly.
•Check for damage on the drive plate, driven plate
and snap ring, and replace the entire direct clutch
assembly if damaged.
Specification:
0.6 — 1.0 mm (0.024 — 0.039 in)
5. REVERSE BRAKE
Check the following items.
•Drive plate facing for wear or damage
•Snap ring for wear, return spring for breakage,
and spring retainer for deformation
•Lip seal and D-ring for damage
•Piston operation
AT-02007
AT-03259
L
AT-02010
L
AT-02011
L
Page 2115 of 2453
5AT-99
AT Main Case
AUTOMATIC TRANSMISSION
F: ADJUSTMENT
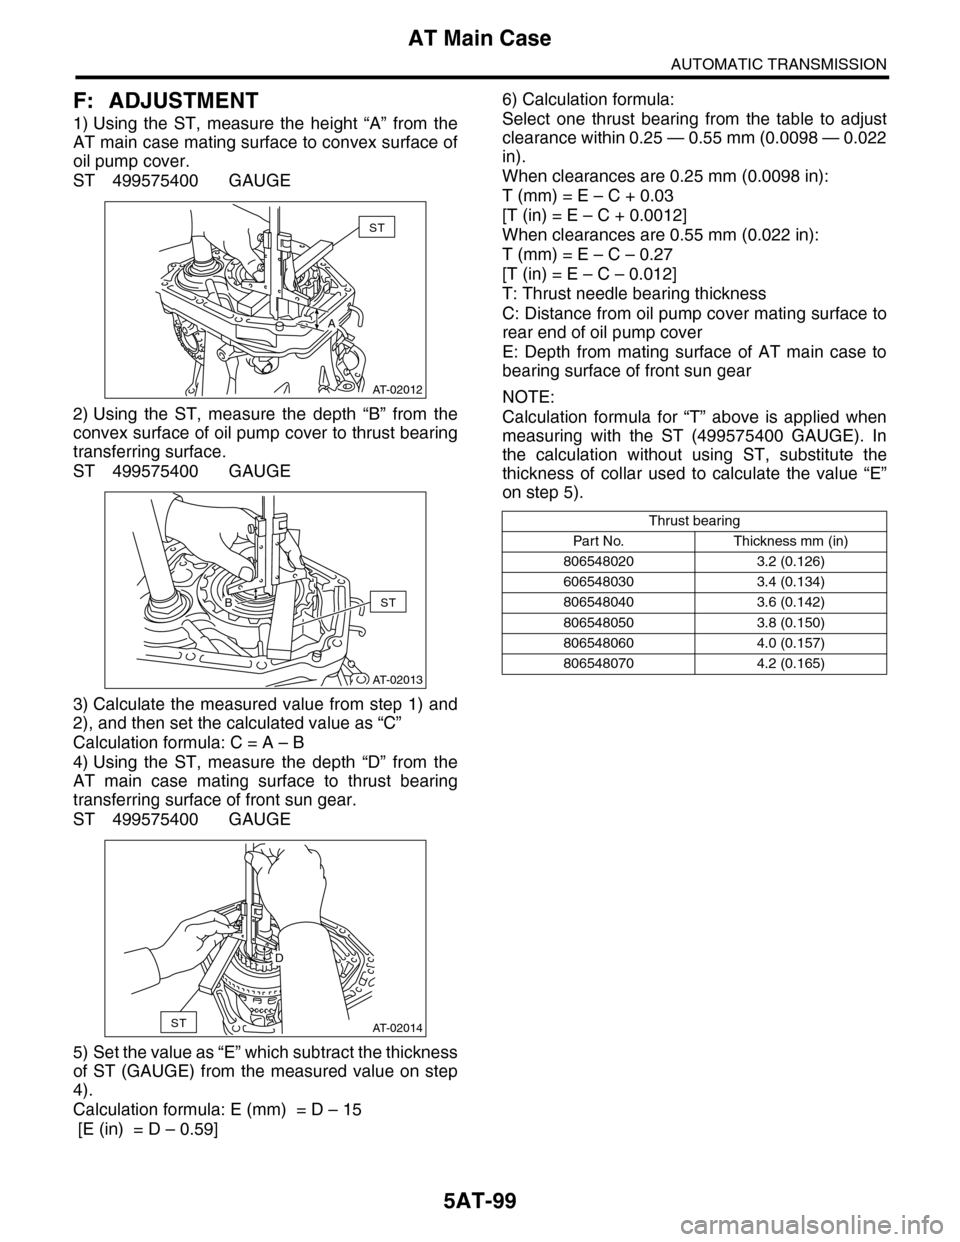
1) Using the ST, measure the height “A” from the
AT main case mating surface to convex surface of
oil pump cover.
ST 499575400 GAUGE
2) Using the ST, measure the depth “B” from the
convex surface of oil pump cover to thrust bearing
transferring surface.
ST 499575400 GAUGE
3) Calculate the measured value from step 1) and
2), and then set the calculated value as “C”
Calculation formula: C = A – B
4) Using the ST, measure the depth “D” from the
AT main case mating surface to thrust bearing
transferring surface of front sun gear.
ST 499575400 GAUGE
5) Set the value as “E” which subtract the thickness
of ST (GAUGE) from the measured value on step
4).
Calculation formula: E (mm) = D – 15
[E (in) = D – 0.59]
6) Calculation formula:
Select one thrust bearing from the table to adjust
clearance within 0.25 — 0.55 mm (0.0098 — 0.022
in).
When clearances are 0.25 mm (0.0098 in):
T (mm) = E – C + 0.03
[T (in) = E – C + 0.0012]
When clearances are 0.55 mm (0.022 in):
T (mm) = E – C – 0.27
[T (in) = E – C – 0.012]
T: Thrust needle bearing thickness
C: Distance from oil pump cover mating surface to
rear end of oil pump cover
E: Depth from mating surface of AT main case to
bearing surface of front sun gear
NOTE:
Calculation formula for “T” above is applied when
measuring with the ST (499575400 GAUGE). In
the calculation without using ST, substitute the
thickness of collar used to calculate the value “E”
on step 5).
AT-02012
ST
A
AT-02013
STB
AT-02014ST
D
Thrust bearing
Par t N o. Thickness mm (in)
806548020 3.2 (0.126)
606548030 3.4 (0.134)
806548040 3.6 (0.142)
806548050 3.8 (0.150)
806548060 4.0 (0.157)
806548070 4.2 (0.165)
Page 2116 of 2453
5AT-100
Transmission Control Device
AUTOMATIC TRANSMISSION
35.Transmission Control Device
A: REMOVAL
1) Remove the transmission assembly from vehicle
body.
Transmission Assembly.>
2) Pull out the torque converter assembly.
5AT-62, REMOVAL, Torque Converter Assembly.>
3) Lift-up the lever on the rear side of transmission
harness connector, and then disconnect it from the
stay.
4) Disconnect the air breather hose.
60, REMOVAL, Air Breather Hose.>
5) Wrap vinyl tape around the nipple attached to
the air breather hose.
6) Remove the pitching stopper bracket.
7) Remove the control valve body assembly.
to 5AT-53, REMOVAL, Control Valve Body.>
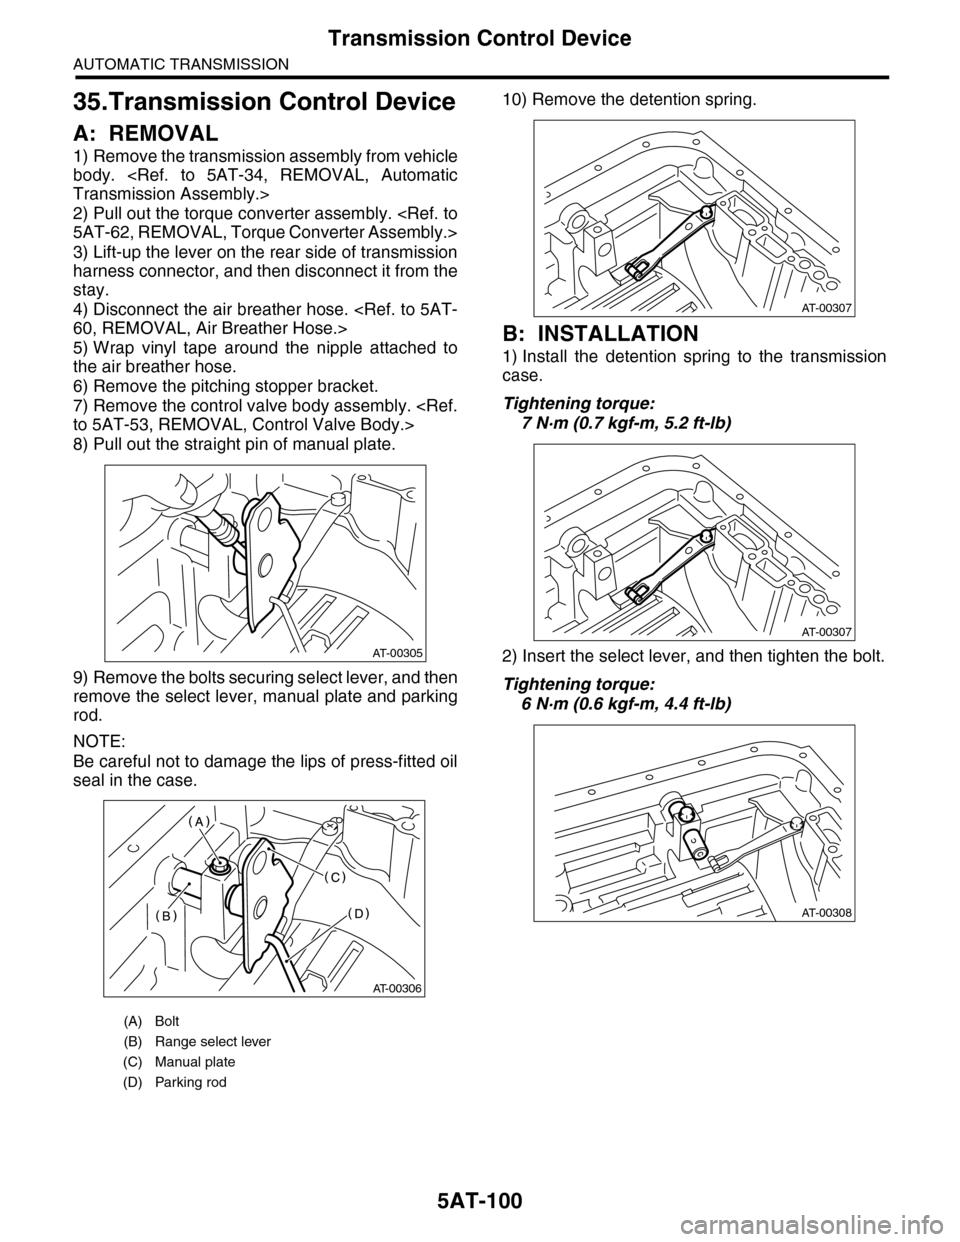
8) Pull out the straight pin of manual plate.
9) Remove the bolts securing select lever, and then
remove the select lever, manual plate and parking
rod.
NOTE:
Be careful not to damage the lips of press-fitted oil
seal in the case.
10) Remove the detention spring.
B: INSTALLATION
1) Install the detention spring to the transmission
case.
Tightening torque:
7 N·m (0.7 kgf-m, 5.2 ft-lb)
2) Insert the select lever, and then tighten the bolt.
Tightening torque:
6 N·m (0.6 kgf-m, 4.4 ft-lb)
(A) Bolt
(B) Range select lever
(C) Manual plate
(D) Parking rod
AT-00305
AT-00306
AT-00307
AT-00307
AT-00308
Page 2117 of 2453
5AT-101
Transmission Control Device
AUTOMATIC TRANSMISSION
3) Insert the manual plate and parking rod.
4) Insert the spring pin to the manual plate.
5) Install the oil pan and the control valve assem-
bly.
Valve Body.>
6) Install the pitching stopper bracket.
Tightening torque:
41 N·m (4.2 kgf-m, 30.4 ft-lb)
7) Insert the transmission connector to the stay.
8) Install the air breather hose.
STALLATION, Air Breather Hose.>
9) Install the torque converter assembly.
5AT-62, INSTALLATION, Torque Converter As-
sembly.>
10) Install the transmission assembly to the vehi-
cle.
Transmission Assembly.>
C: INSPECTION
Make sure the manual lever and detention spring
are not worn or otherwise damaged.
(A) Bolt
(B) Range select lever
(C) Manual plate
(D) Parking rod
AT-00306
AT-00305