Page 1844 of 4331
Camshaft position sensor (PHASE) circuit 3 2
EC-268Vehicle speed signal circuit 2 3 3 3
EC-347ECM 2 2 3 3 3 3 3 3 3 3 3
EC-353 EC-355
Intake valve timing control solenoid valve cir-
cuit 3 2 1 3 2 2 3 3
EC-144PNP switch circuit 3 3 3 3 3
EC-362Refrigerant pressure sensor circuit 2 3 3 4
EC-457Electrical load signal circuit 3
EC-428Air conditioner circuit 2 2 3 3 3 3 3 3 3 3 2
MTC-22ABS actuator and electric unit (control unit) 4
BRC-8SYMPTOM
Reference
pageHARD/NO START/RESTART (EXCP. HA)
ENGINE STALL
HESITATION/SURGING/FLAT SPOT
SPARK KNOCK/DETONATION
LACK OF POWER/POOR ACCELERATION
HIGH IDLE/LOW IDLE
ROUGH IDLE/HUNTING
IDLING VIBRATION
SLOW/NO RETURN TO IDLE
OVERHEATS/WATER TEMPERATURE HIGH
EXCESSIVE FUEL CONSUMPTION
EXCESSIVE OIL CONSUMPTION
BATTERY DEAD (UNDER CHARGE)
Warranty symptom code AA AB AC AD AE AF AG AH AJ AK AL AM HA
Page 1845 of 4331

EC
NP
O
SYMPTOM
Reference pageHARD/NO START/RESTART (EXCP. HA)
ENGINE STALL
HESITATION/SURGING/FLAT SPOT
SPARK KNOCK/DETONATION
LACK OF POWER/POOR ACCELERATION
HIGH IDLE/LOW IDLE
ROUGH IDLE/HUNTING
IDLING VIBRATION
SLOW/NO RETURN TO IDLE
OVERHEATS/WATER TEMPERATURE HIGH
EXCESSIVE FUEL CONSUMPTION
EXCESSIVE OIL CONSUMPTION
BATTERY DEAD (UNDER CHARGE)
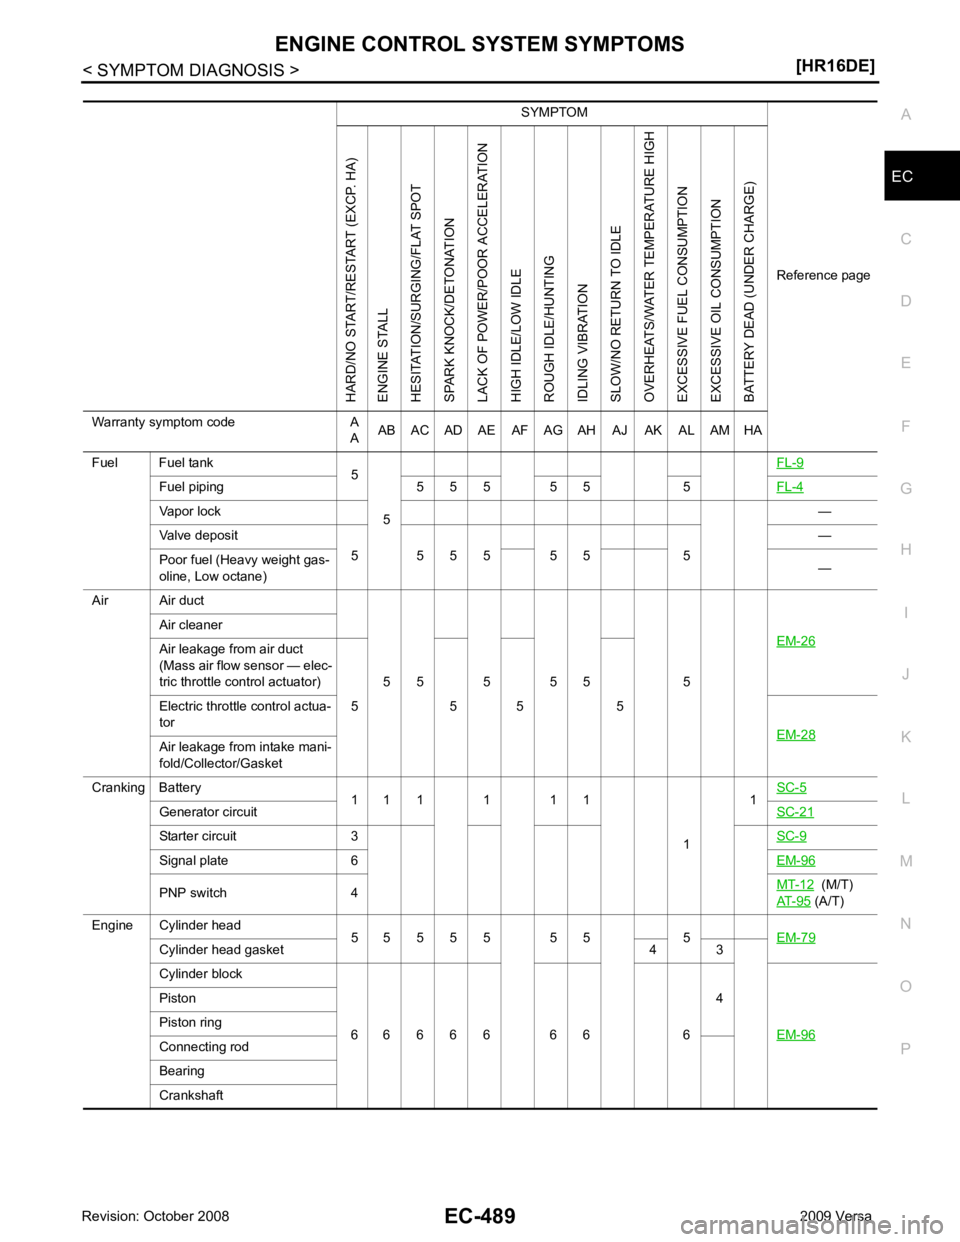
Warranty symptom code A AAB AC AD AE AF AG AH AJ AK AL AM HA
Fuel Fuel tank 5
5 FL-9Fuel piping 5 5 5 5 5 5
FL-4Vapor lock
—
Valve deposit 5 5 5 5 5 5 5 —
Poor fuel (Heavy weight gas-
oline, Low octane) —
Air Air duct
5 5 5 5 5 5 EM-26Air cleaner
Air leakage from air duct
(Mass air flow sensor — elec-
tric throttle control actuator)
5 5 5 5
Electric throttle control actua-
tor EM-28Air leakage from intake mani-
fold/Collector/Gasket
Cranking Battery 1 1 1 1 1 1
11
SC-5 Generator circuit
SC-21Starter circuit 3
SC-9Signal plate 6
EM-96PNP switch 4
MT-12 (M/T)
AT-95 (A/T)
Engine Cylinder head 5 5 5 5 5 5 5 5 EM-79Cylinder head gasket 4 3
Cylinder block
6 6 6 6 6 6 6 6 4
EM-96 Piston
Piston ring
Connecting rod
Bearing
Crankshaft
Page 1846 of 4331
Camshaft
EM-58Intake valve timing control
EM-49Intake valve
3EM-82 Exhaust valve
Exhaust Exhaust manifold/Tube/Muf- fler/Gasket 5 5 5 5 5 5 5 5 EM-31 EX-4
Three way catalyst
Lubrica-
tion Oil pan/Oil strainer/Oil pump/ Oil filter/Oil gallery/Oil cooler 5 5 5 5 5 5 5 5 EM-39 EM-42
LU-7
LU-9
Oil level (Low)/Filthy oil
LU-7Cooling Radiator/Hose/Radiator filler
cap
5 5 5 5 5 5 5 4 5 CO-14 CO-14
Thermostat 5
CO-23Water pump
CO-21Water gallery
CO-9Cooling fan
5CO-19Coolant level (Low)/Contami-
nated coolant CO-9NVIS (NISSAN Vehicle Immobilizer Sys-
tem — NATS) 1 1
BL-257 SYMPTOM
Reference pageHARD/NO START/RESTART (EXCP. HA)
ENGINE STALL
HESITATION/SURGING/FLAT SPOT
SPARK KNOCK/DETONATION
LACK OF POWER/POOR ACCELERATION
HIGH IDLE/LOW IDLE
ROUGH IDLE/HUNTING
IDLING VIBRATION
SLOW/NO RETURN TO IDLE
OVERHEATS/WATER TEMPERATURE HIGH
EXCESSIVE FUEL CONSUMPTION
EXCESSIVE OIL CONSUMPTION
BATTERY DEAD (UNDER CHARGE)
Warranty symptom code A AAB AC AD AE AF AG AH AJ AK AL AM HA
Page 1847 of 4331
EC
NP
O
NORMAL OPERATING CONDITION
Description INFOID:0000000004780391
FUEL CUT CONTROL (AT NO LOAD AND HIGH ENGINE SPEED) If the engine speed is above 2,500 rpm under no load (for ex ample, the selector lever position is neutral and
engine speed is over 2,500 rpm) fuel will be cut off after some time. The exact time when the fuel is cut off var-
ies based on engine speed.
Fuel cut will be operated until the engine speed reaches 2,000 rpm, then fuel cut will be cancelled.
NOTE:
This function is different from deceleration contro l listed under Multiport Fuel Injection (MFI) System, EC-42," System Description " .
Page 1849 of 4331
![NISSAN TIIDA 2009 Service Repair Manual PRECAUTIONS
EC-493
< PRECAUTION >
[HR16DE] C
D E
F
G H
I
J
K L
M A EC
NP
O
• Be sure to route and secure the harnesses properly
after work. The interference of the harness with
a bracket, etc. may NISSAN TIIDA 2009 Service Repair Manual PRECAUTIONS
EC-493
< PRECAUTION >
[HR16DE] C
D E
F
G H
I
J
K L
M A EC
NP
O
• Be sure to route and secure the harnesses properly
after work. The interference of the harness with
a bracket, etc. may](/manual-img/5/57398/w960_57398-1848.png)
PRECAUTIONS
EC-493
< PRECAUTION >
[HR16DE] C
D E
F
G H
I
J
K L
M A EC
NP
O
• Be sure to route and secure the harnesses properly
after work. The interference of the harness with
a bracket, etc. may cause the MIL to li ght up due to the short circuit.
• Be sure to connect rubber tubes properly afte r work. A misconnected or disconnected rubber tube
may cause the MIL to light up due to the malfuncti on of the EVAP system or fuel injection system,
etc.
• Be sure to erase the unnecessary malfunction informa tion (repairs completed) from the ECM and
TCM (Transmission control module) before returning the vehicle to the customer.
General Precautions INFOID:0000000004780395
• Always use a 12 volt battery as power source.
• Do not attempt to disconnect battery cables while engine is
running.
• Before connecting or disc onnecting the ECM harness con-
nector, turn ignition switch OFF and disconnect negative bat-
tery cable. Failure to do so may damage the ECM because
battery voltage is applied to ECM even if ignition switch is
turned OFF.
• Before removing parts, turn ig nition switch OFF and then dis-
connect negative battery cable.
• Do not disassemble ECM.
• If a battery cable is disconnect ed, the memory will return to
the ECM value.
The ECM will now start to self-control at its initial value. Thus,
engine operation can vary slight ly in this case. However, this
is not an indication of a malf unction. Do not replace parts
because of a slight variation.
• If the battery is disconnected, the following emission-related
diagnostic information will be cleared within 24 hours.
- Diagnostic trouble codes
- 1st trip diagnostic trouble codes
- Freeze frame data
- 1st trip freeze frame data
- System readiness test (SRT) codes
- Test values
• When connecting ECM harness c onnector (1), fasten (B) it
securely with a lever as far as it will go as shown in the figure.
• When connecting or disconnect ing pin connectors into or
from ECM, take care not to damage pin terminals (bend or
break).
Make sure that there are not any bends or breaks on ECM pin
terminal, when connecting pin connectors.
• Securely connect ECM harness connectors.
A poor connection can cause an extremely high (surge) volt-
age to develop in coil and cond enser, thus resulting in dam-
age to ICs.
• Keep engine control system harness at least 10 cm (4 in) away
from adjacent harness, to prevent engine control system mal- SEF289H
2. ECM
A. Loosen PBIA9222J
PBIB2947E
PBIB0090E
Page 1850 of 4331

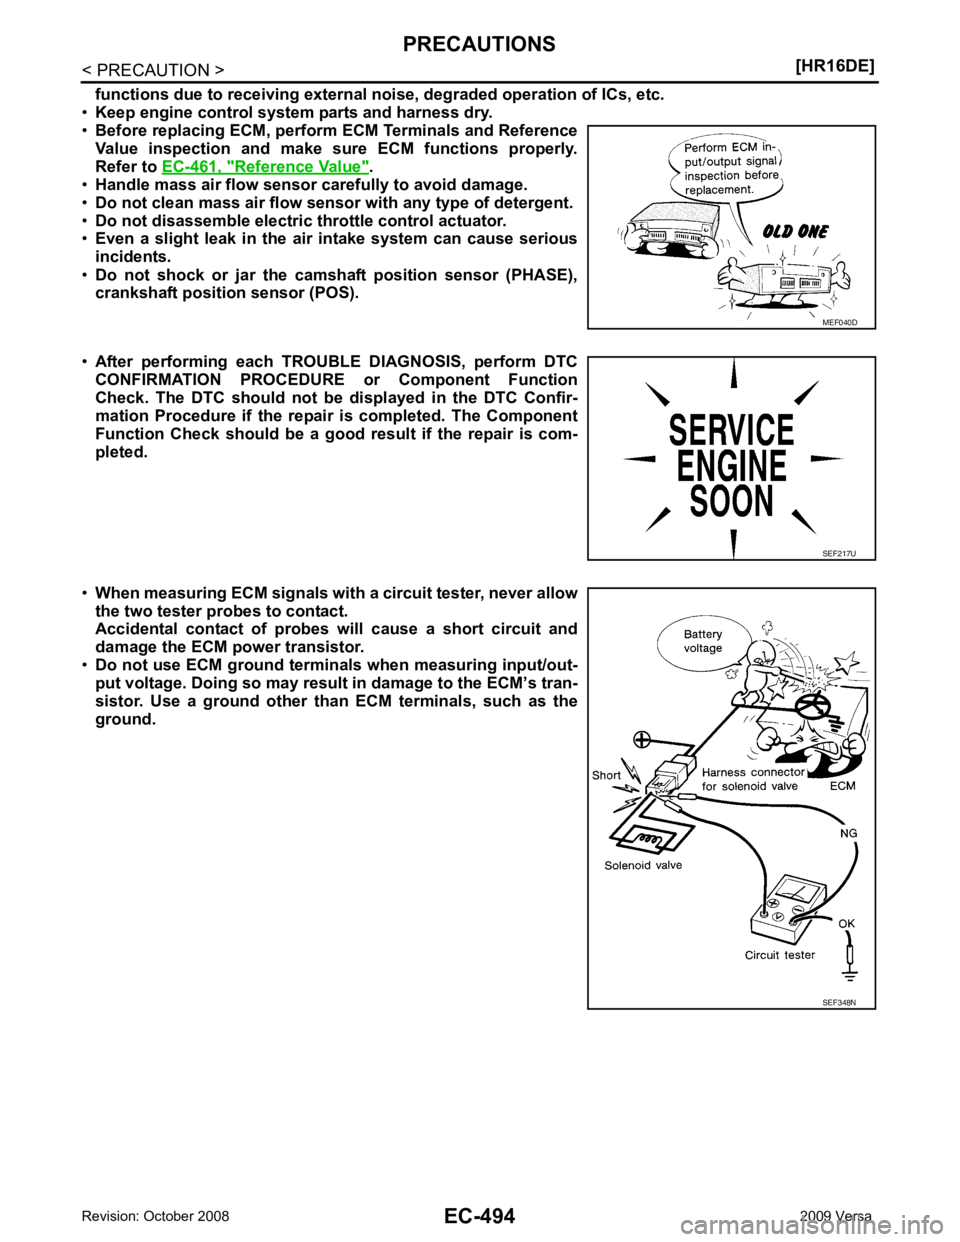
Reference Value " .
• Handle mass air flow sensor carefully to avoid damage.
• Do not clean mass air flow senso r with any type of detergent.
• Do not disassemble electric throttle control actuator.
• Even a slight leak in the ai r intake system can cause serious
incidents.
• Do not shock or jar the camshaft position sensor (PHASE),
crankshaft position sensor (POS).
• After performing each TROUBLE DIAGNOSIS, perform DTC
CONFIRMATION PROCEDURE or Component Function
Check. The DTC should not be displayed in the DTC Confir-
mation Procedure if the repair is completed. The Component
Function Check should be a good result if the repair is com-
pleted.
• When measuring ECM signals with a circuit tester, never allow
the two tester probes to contact.
Accidental contact of probes will cause a short circuit and
damage the ECM power transistor.
• Do not use ECM ground termina ls when measuring input/out-
put voltage. Doing so may result in damage to the ECM’s tran-
sistor. Use a ground other than ECM terminals, such as the
ground. SEF217U
SEF348N
Page 1851 of 4331
EC
NP
O
•
Do not operate fuel pump when there is no fuel in lines.
• Tighten fuel hose clamps to the specified torque.
- Fuel level sensor unit and fuel pump (1)
- Fuel pressure regulator (2)
- Fuel level sensor (3)
- Fuel tank temperature sensor (4)
• Do not depress accelerator pedal when starting.
• Immediately after starting, do not rev up engine unnecessar-
ily.
• Do not rev up engine ju st prior to shutdown.
• When installing C.B. ham radio or a mobile phone, be sure to
observe the following as it may adversely affect electronic
control systems depending on installation location.
- Keep the antenna as far as possible from the electronic con-
trol units.
- Keep the antenna feeder line more than 20 cm (8 in) away
from the harness of electronic controls.
Do not let them run para llel for a long distance.
- Adjust the antenna and feeder line so that the standing-wave
ratio can be kept smaller.
- Be sure to ground the radio to vehicle body.
Page 1856 of 4331
System Description " .
WITHOUT CONSULT-III
1. Install EVAP service port adapter [commercial service tool: (J- 41413-OBD)] and pressure pump to EVAP service port.
2. Apply battery voltage between the terminals of EVAP canister vent control valve to ma ke a closed EVAP system.
3. To locate the leak, deliver positive pressure to the EVAP system until pressure gauge points reach 1.38 to 2.76 kPa (0.014 to
0.028 kg/cm 2
, 0.2 to 0.4 psi).
4. Remove EVAP service port adapter [commercial service tool: (J- 41413-OBD)] and hose with pressure pump. SEF200U
SEF462UA