2009 NISSAN LATIO service
[x] Cancel search: servicePage 801 of 4331
BR
N
O P
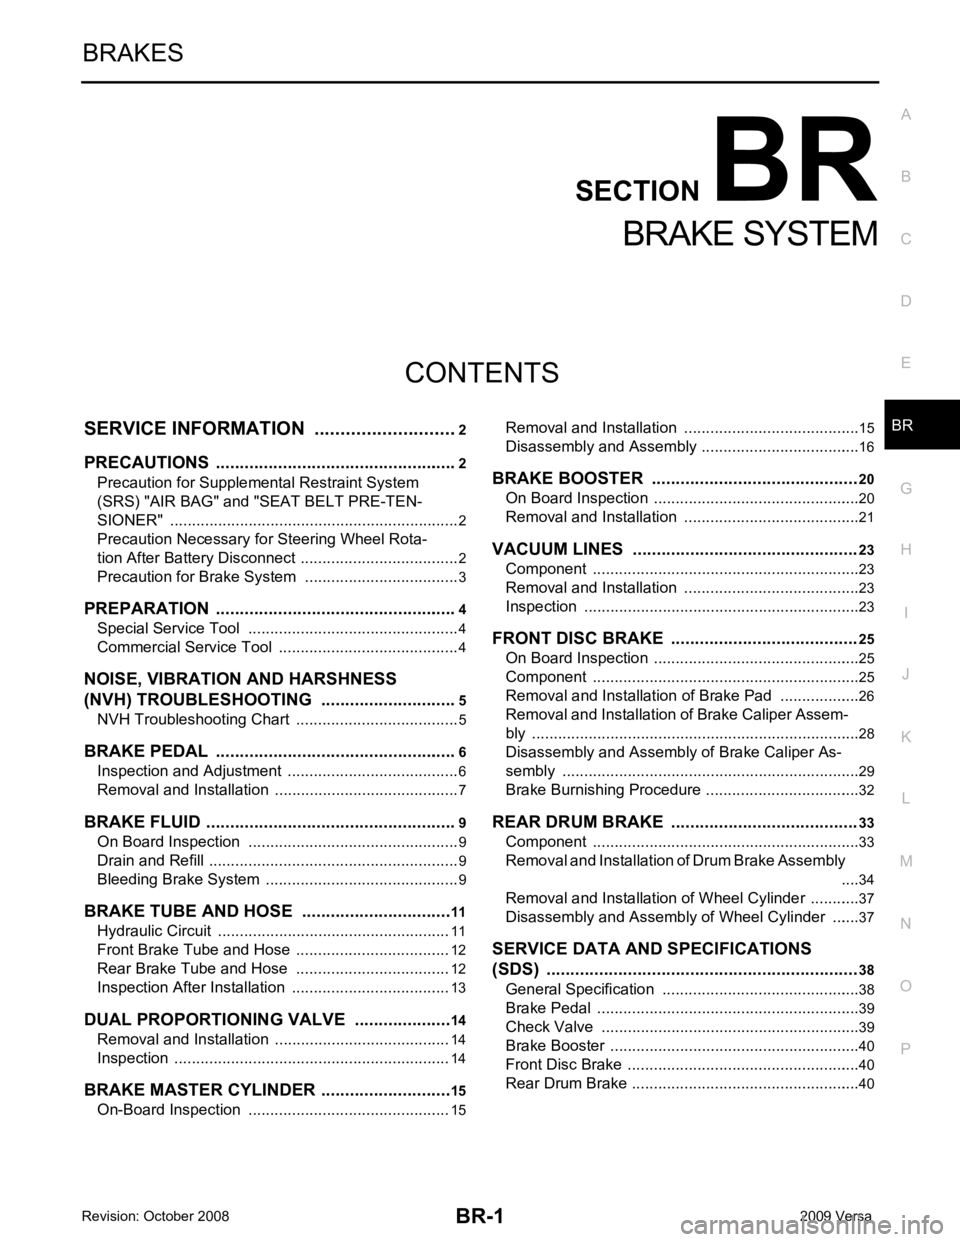
CONTENTS
BRAKE SYSTEM
SERVICE INFORMATION .. ..........................2
PRECAUTIONS .............................................. .....2
Precaution for Supplemental Restraint System
(SRS) "AIR BAG" and "SEAT BELT PRE-TEN-
SIONER" ............................................................. ......
2
Precaution Necessary fo r Steering Wheel Rota-
tion After Battery Disconnect ............................... ......
2
Precaution for Brake System .............................. ......3
PREPARATION .............................................. .....4
Special Service Tool ........................................... ......4
Commercial Service Tool .................................... ......4
NOISE, VIBRATION AND HARSHNESS
(NVH) TROUBLESHOOTING ........................ .....5
NVH Troubleshooting Chart ................................ ......5
BRAKE PEDAL .............................................. .....6
Inspection and Adjustment .................................. ......6
Removal and Installation ...........................................7
BRAKE FLUID .....................................................9
On Board Inspection ........................................... ......9
Drain and Refill .................................................... ......9
Bleeding Brake System ....................................... ......9
BRAKE TUBE AND HOSE ............................ ....11
Hydraulic Circuit .................................................. ....11
Front Brake Tube and Hose ................................ ....12
Rear Brake Tube and Hose ................................ ....12
Inspection After Installation ................................. ....13
DUAL PROPORTIONING VALVE ................. ....14
Removal and Installation .........................................14
Inspection ............................................................ ....14
BRAKE MASTER CY LINDER ........................ ....15
On-Board Inspection ........................................... ....15 Removal and Installation .....................................
....15
Disassembly and Assembly ................................. ....16
BRAKE BOOSTER ........................................... 20
On Board Inspection ............................................ ....20
Removal and Installation ..................................... ....21
VACUUM LINES ............................................... 23
Component .......................................................... ....23
Removal and Installation ..................................... ....23
Inspection ............................................................ ....23
FRONT DISC BRAKE ....................................... 25
On Board Inspection ............................................ ....25
Component .......................................................... ....25
Removal and Installation of Brake Pad ...................26
Removal and Installation of Brake Caliper Assem-
bly ........................................................................ ....
28
Disassembly and Assembly of Brake Caliper As-
sembly ................................................................. ....
29
Brake Burnishing Procedure ................................ ....32
REAR DRUM B RAKE ....................................... 33
Component .......................................................... ....33
Removal and Installation of Drum Brake Assembly ....34
Removal and Installation of Wheel Cylinder ........ ....37
Disassembly and Assembly of Wheel Cylinder ... ....37
SERVICE DATA AND SPECIFICATIONS
(SDS) ................................................................. 38
General Specification .......................................... ....38
Brake Pedal ......................................................... ....39
Check Valve ........................................................ ....39
Brake Booster ...................................................... ....40
Front Disc Brake .................................................. ....40
Rear Drum Brake ................................................. ....40
Page 819 of 4331
BR
N
O P
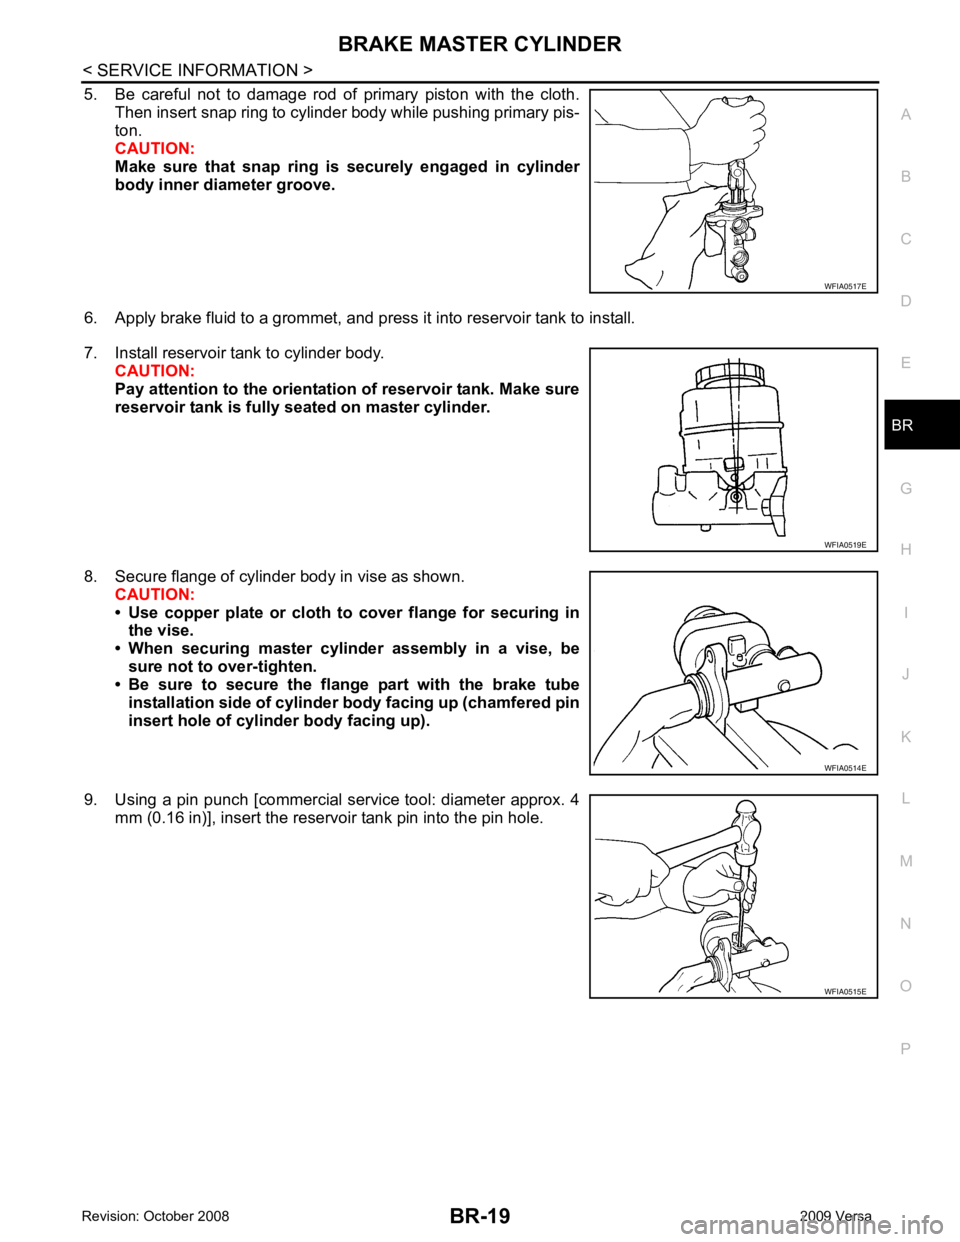
5. Be careful not to damage rod of primary piston with the cloth.
Then insert snap ring to cylinder body while pushing primary pis-
ton.
CAUTION:
Make sure that snap ring is securely engaged in cylinder
body inner diameter groove.
6. Apply brake fluid to a grommet, and press it into reservoir tank to install.
7. Install reservoir tank to cylinder body. CAUTION:
Pay attention to the orientatio n of reservoir tank. Make sure
reservoir tank is fully seated on master cylinder.
8. Secure flange of cylinder body in vise as shown. CAUTION:
• Use copper plate or cloth to cover flange for securing in
the vise.
• When securing master cylinder assembly in a vise, be sure not to over-tighten.
• Be sure to secure the flange part with the brake tube
installation side of cylinder body facing up (chamfered pin
insert hole of cylinder body facing up).
9. Using a pin punch [commercial service tool: diameter approx. 4 mm (0.16 in)], insert the reservoir tank pin into the pin hole. WFIA0515E
Page 821 of 4331
BRAKE BOOSTER
BR-21
< SERVICE INFORMATION >
C
D E
G H
I
J
K L
M A
B BR
N
O P
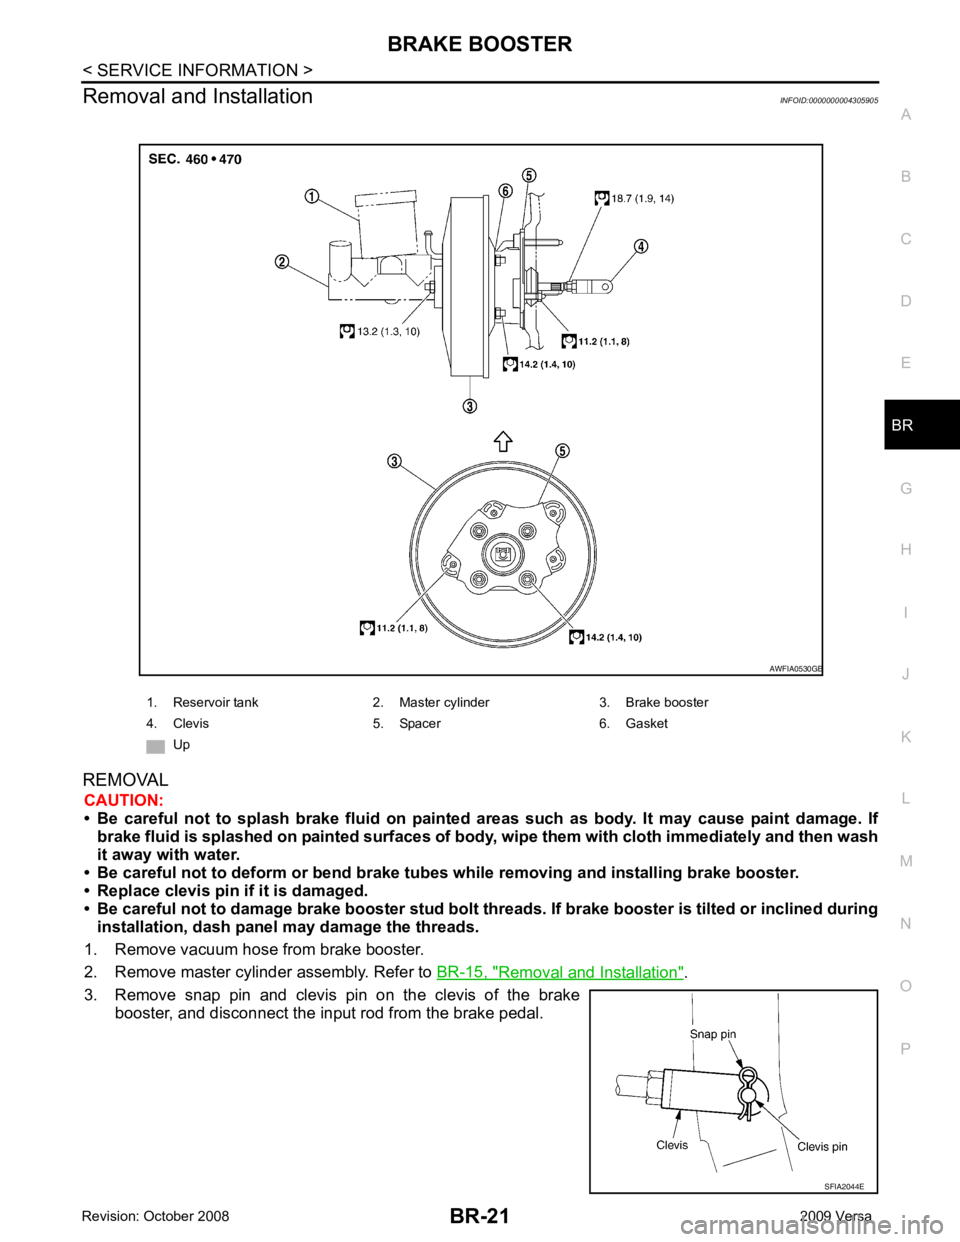
Removal and Installation
INFOID:0000000004305905
REMOVAL CAUTION:
• Be careful not to splash brake fluid on painte d areas such as body. It may cause paint damage. If
brake fluid is splashed on painte d surfaces of body, wipe them with cloth immediately and then wash
it away with water.
• Be careful not to deform or bend brake tub es while removing and installing brake booster.
• Replace clevis pin if it is damaged.
• Be careful not to damage brake booster stud bolt thr eads. If brake booster is tilted or inclined during
installation, dash panel may damage the threads.
1. Remove vacuum hose from brake booster.
2. Remove master cylinder assembly. Refer to BR-15, " Removal and Installation " .
3. Remove snap pin and clevis pin on the clevis of the brake booster, and disconnect the input rod from the brake pedal. 1. Reservoir tank 2. Master cylinder 3. Brake booster
4. Clevis 5. Spacer 6. Gasket Up AWFIA0530GB
SFIA2044E
Page 830 of 4331
BR-30< SERVICE INFORMATION >
FRONT DISC BRAKE
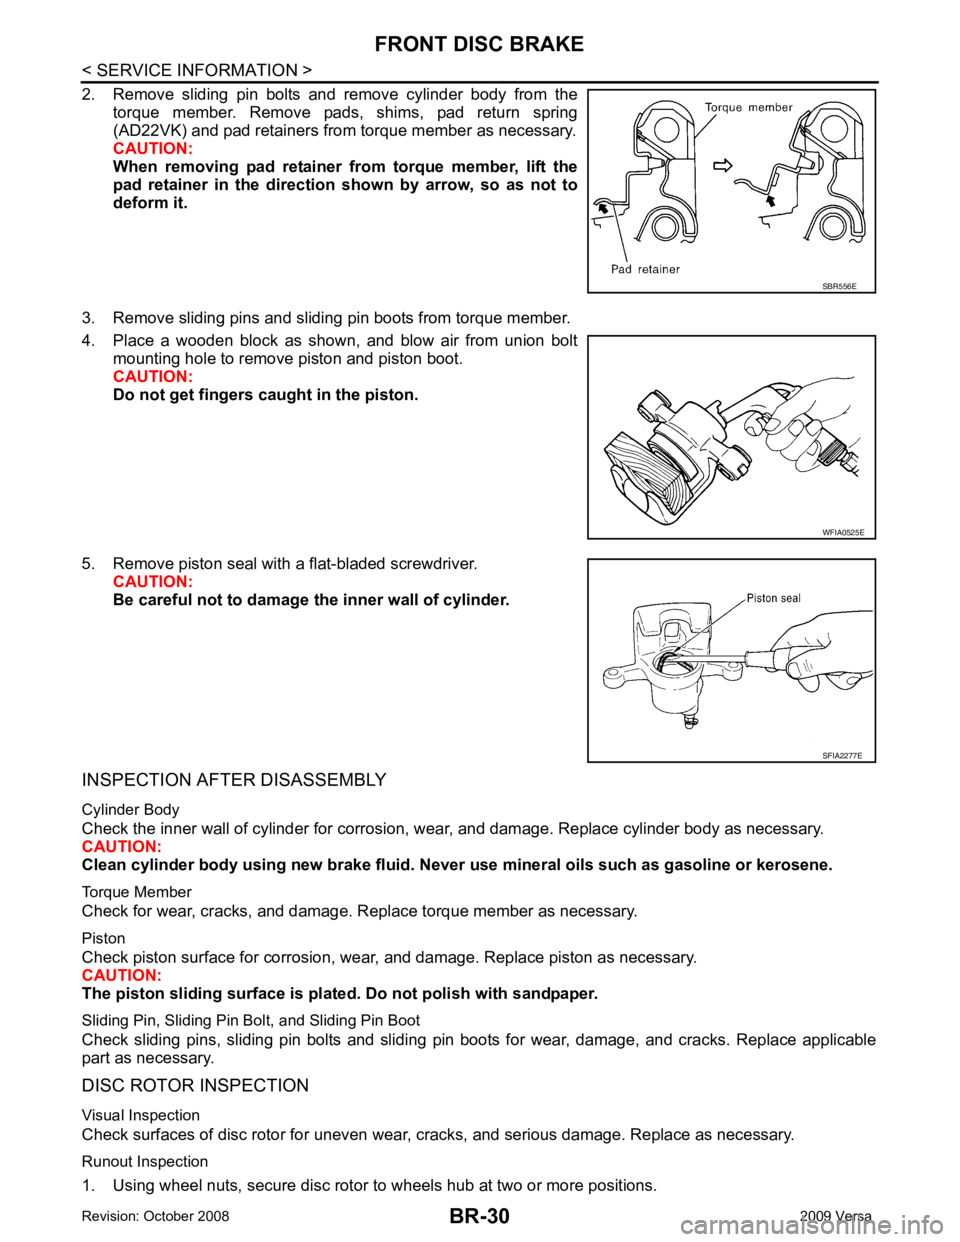
2. Remove sliding pin bolts and remove cylinder body from the torque member. Remove pads, shims, pad return spring
(AD22VK) and pad retainers from torque member as necessary.
CAUTION:
When removing pad retainer fr om torque member, lift the
pad retainer in the direction shown by arrow, so as not to
deform it.
3. Remove sliding pins and sliding pin boots from torque member.
4. Place a wooden block as shown, and blow air from union bolt mounting hole to remove piston and piston boot.
CAUTION:
Do not get fingers caught in the piston.
5. Remove piston seal with a flat-bladed screwdriver. CAUTION:
Be careful not to damage the inner wall of cylinder.
INSPECTION AFTER DISASSEMBLY
Cylinder Body
Check the inner wall of cylinder for corrosion, w ear, and damage. Replace cylinder body as necessary.
CAUTION:
Clean cylinder body using new brake fluid. Never use mineral oils such as gasoline or kerosene.
Torque Member
Check for wear, cracks, and damage. R eplace torque member as necessary.
Piston
Check piston surface for corrosion, wear, and damage. Replace piston as necessary.
CAUTION:
The piston sliding surface is plated . Do not polish with sandpaper.
Sliding Pin, Sliding Pin Bolt, and Sliding Pin Boot
Check sliding pins, sliding pin bolts and sliding pin boots for wear, damage, and cracks. Replace applicable
part as necessary.
DISC ROTOR INSPECTION
Visual Inspection
Check surfaces of disc rotor for uneven wear, cr acks, and serious damage. Replace as necessary.
Runout Inspection
1. Using wheel nuts, secure disc rotor to wheels hub at two or more positions. SBR556E
WFIA0525E
SFIA2277E
Page 831 of 4331
BR
N
O P
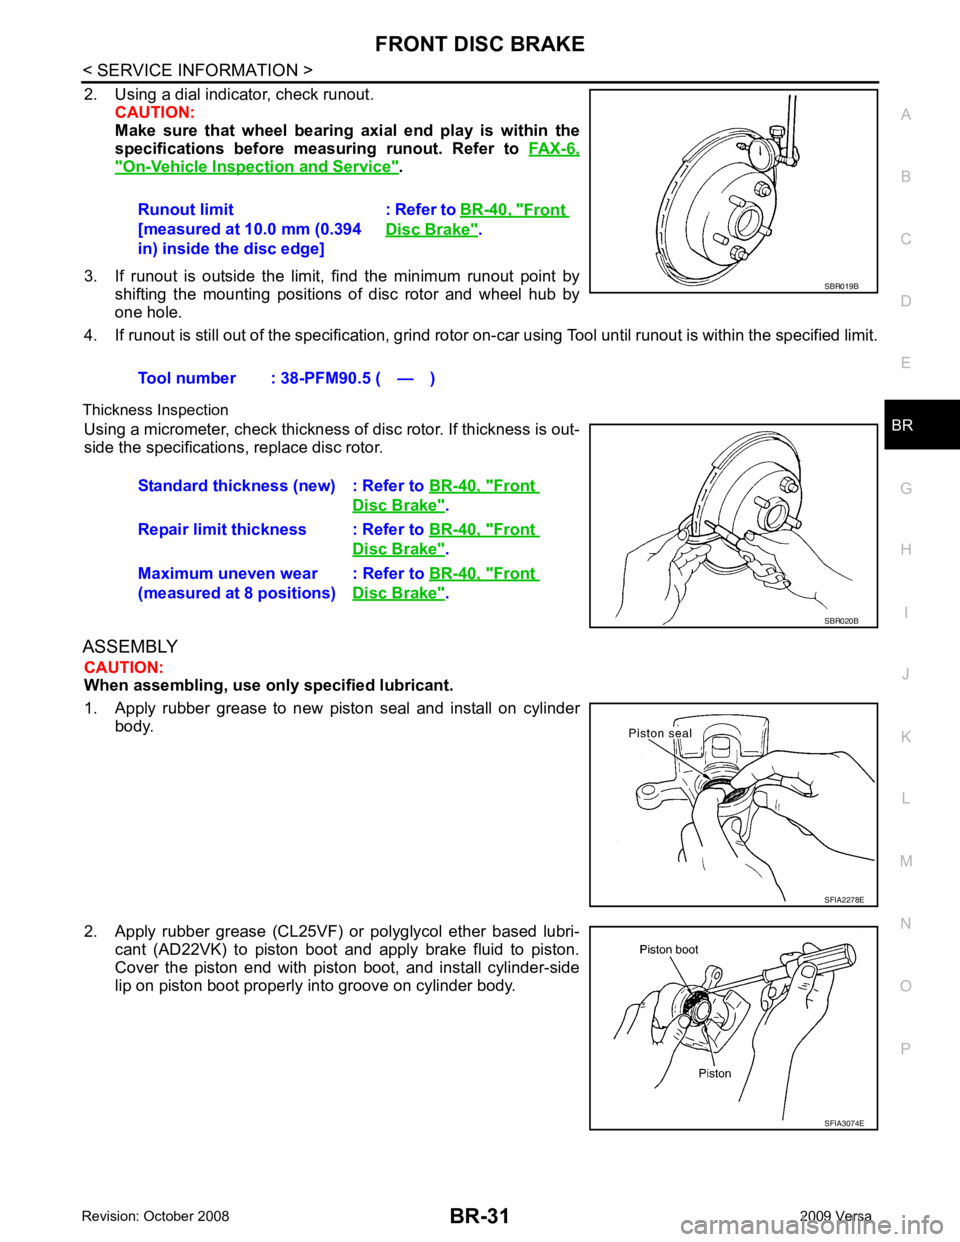
2. Using a dial indicator, check runout.
CAUTION:
Make sure that wheel bearing axi al end play is within the
specifications before measuring runout. Refer to FAX-6," On-Vehicle Inspection and Service " .
3. If runout is outside the limit, find the minimum runout point by shifting the mounting positions of disc rotor and wheel hub by
one hole.
4. If runout is still out of the specific ation, grind rotor on-car using Tool until runout is within the specified limit.
Thickness Inspection Using a micrometer, check thickness of disc rotor. If thickness is out-
side the specifications, replace disc rotor.
ASSEMBLY CAUTION:
When assembling, use only specified lubricant.
1. Apply rubber grease to new piston seal and install on cylinder body.
2. Apply rubber grease (CL25VF) or polyglycol ether based lubri- cant (AD22VK) to piston boot and apply brake fluid to piston.
Cover the piston end with piston boot, and install cylinder-side
lip on piston boot properly into groove on cylinder body. Runout limit
[measured at 10.0 mm (0.394
in) inside the disc edge] : Refer to
BR-40, " Front
Disc Brake " .
Tool number : 38-PFM90.5 ( — ) Front
Disc Brake " .
Repair limit thickness : Refer to BR-40, " Front
Disc Brake " .
Maximum uneven wear
(measured at 8 positions) : Refer to
BR-40, " Front
Disc Brake " .
Page 837 of 4331
BR
N
O P
5. Connect the parking brake rear cable to the operating lever.
6. Install the shoe assembly. After assembly, be sure that each part is installed properly. CAUTION:
Do not damage the wheel cylinder piston boot.
7. Install the brake drum.
8. Depress brake pedal for several times (approximately 2 or 3 times).
9. Adjust clearance of brake shoe. Refer to PB-5, " On-Vehicle Service " .
10. Install rear wheel and tire. Refer to WT-7, " Rotation " .
Removal and Installati on of Wheel Cylinder INFOID:0000000004305917
REMOVAL 1. Drain the brake fluid. Refer to BR-9, " Drain and Refill " .
2. Remove the rear brake shoe assembly. Refer to BR-34, " Removal and Installation of Drum Brake Assem-
bly " .
3. Remove the bleed valve.
4. Disconnect the brake tube from the wheel cylinder.
5. Remove the wheel cylinder bolts and then remo ve the wheel cylinder from the back plate.
INSTALLATION Installation is in the reverse order of removal.
• Tighten bolts and bleed valve to the specified torque. Refer to BR-33, " Component " .
• Refill with new brake fluid and bleed the air. Refer to BR-9, " Bleeding Brake System " .
Disassembly and Assemb ly of Wheel Cylinder INFOID:0000000004305918
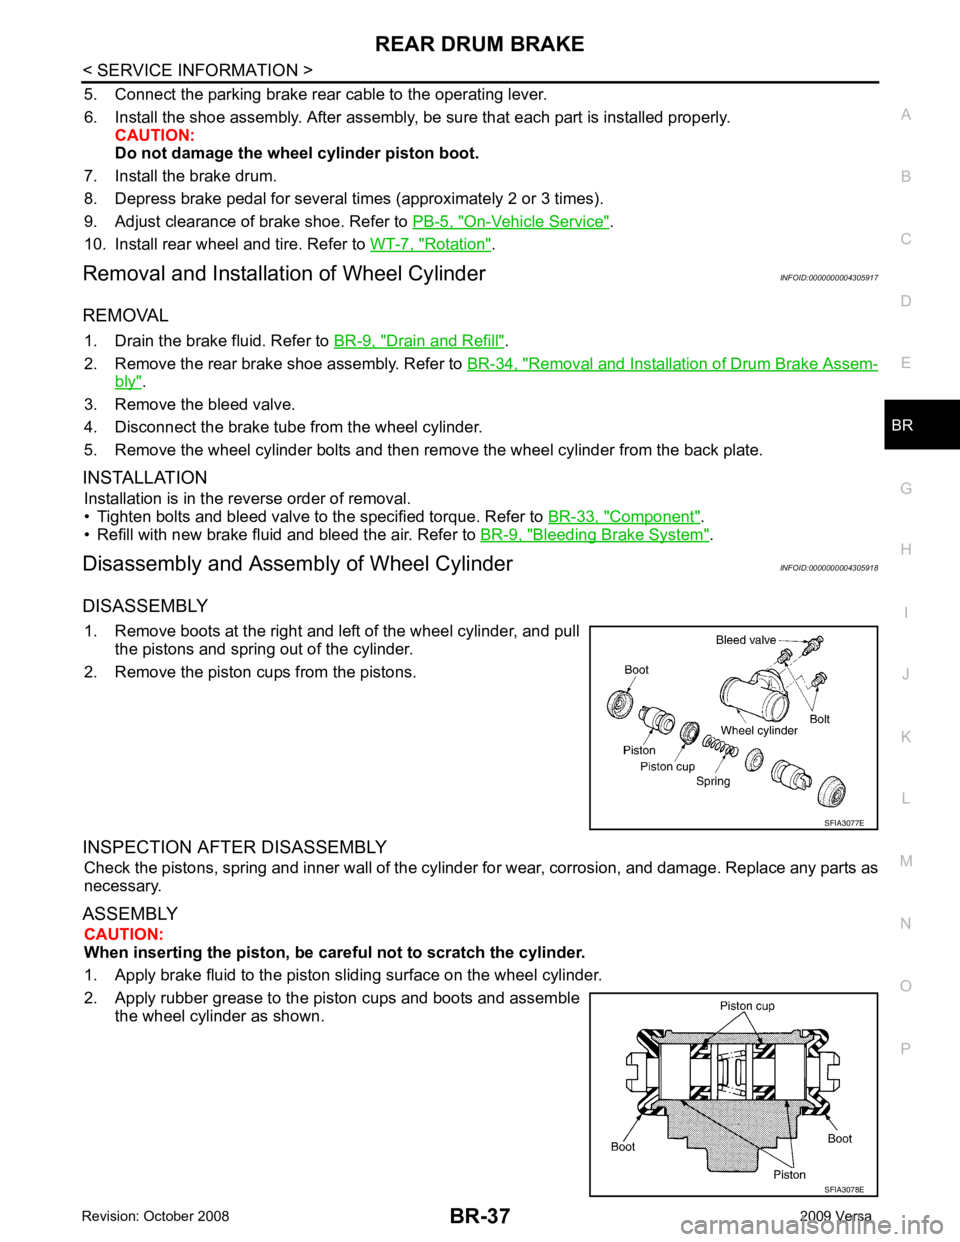
DISASSEMBLY 1. Remove boots at the right and left of the wheel cylinder, and pull the pistons and spring out of the cylinder.
2. Remove the piston cups from the pistons.
INSPECTION AFTER DISASSEMBLY Check the pistons, spring and inner wall of the cylinder for wear, corrosion, and damage. Replace any parts as
necessary.
ASSEMBLY CAUTION:
When inserting the piston, be caref ul not to scratch the cylinder.
1. Apply brake fluid to the piston sliding surface on the wheel cylinder.
2. Apply rubber grease to the piston cups and boots and assemble the wheel cylinder as shown.
Page 839 of 4331
SERVICE DATA AND SPECIFICATIONS (SDS)
BR-39
< SERVICE INFORMATION >
C
D E
G H
I
J
K L
M A
B BR
N
O P
Brake Pedal
INFOID:0000000004305920
Unit: mm (in)
Check Valve INFOID:0000000004305921
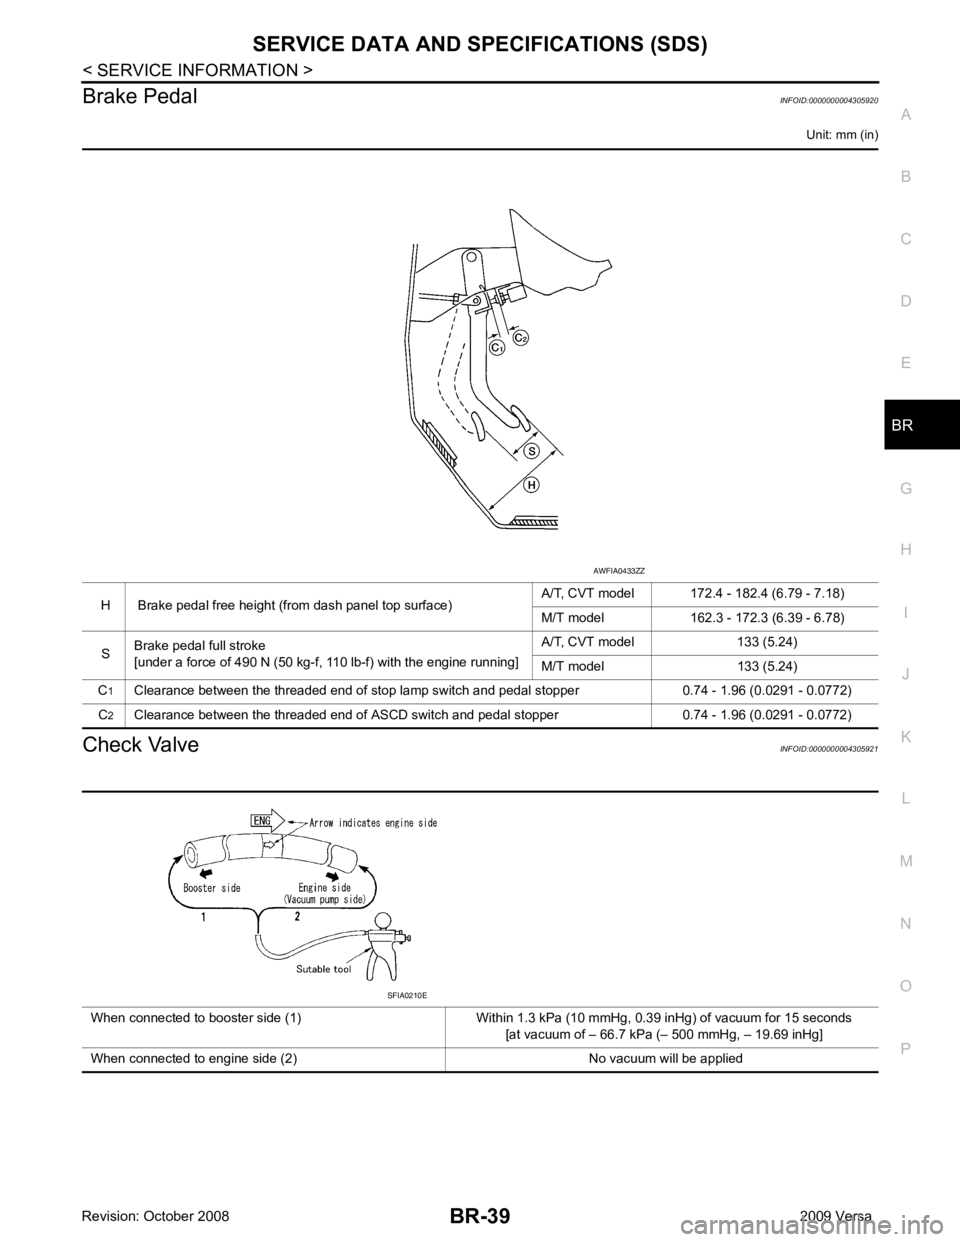
H Brake pedal free height (from dash panel top surface)
A/T, CVT model 172.4 - 182.4 (6.79 - 7.18)
M/T model 162.3 - 172.3 (6.39 - 6.78)
S Brake pedal full stroke
[under a force of 490 N (50 kg-f, 110 lb-f) with the engine running] A/T, CVT model 133 (5.24)
M/T model 133 (5.24)
C 1
Clearance between the threaded end of stop lamp switch and pedal stopper 0.74 - 1.96 (0.0291 - 0.0772)
C 2
Clearance between the threaded end of ASCD switch and pedal stopper 0.74 - 1.96 (0.0291 - 0.0772) AWFIA0433ZZ
When connected to booster side (1) Within 1.3 kPa (10 mmHg, 0.39 inHg) of vacuum for 15 seconds [at vacuum of – 66.7 kPa (– 500 mmHg, – 19.69 inHg]
When connected to engine side (2) No vacuum will be applied SFIA0210E
Page 840 of 4331
BR-40< SERVICE INFORMATION >
SERVICE DATA AND SPECIFICATIONS (SDS)
Brake Booster INFOID:0000000004305922
Front Disc Brake INFOID:0000000004305923
Unit: mm (in)
Unit: mm (in)
Rear Drum Brake INFOID:0000000004305924
Unit: mm (in)
Unit: mm (in)
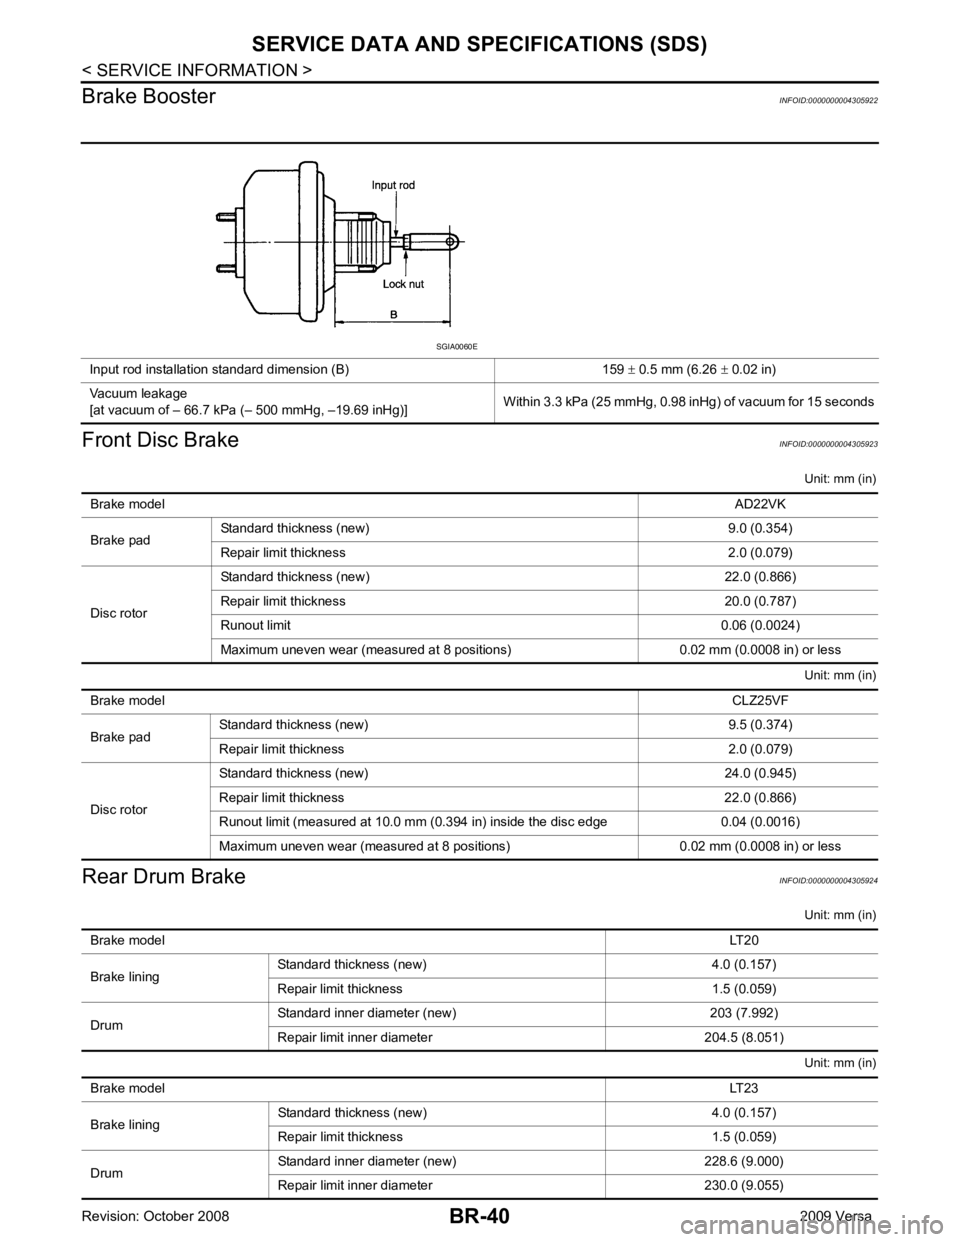
Input rod installation standard dimension (B) 159
± 0.5 mm (6.26 ± 0.02 in)
Vacuum leakage
[at vacuum of – 66.7 kPa (– 500 mmHg, –19.69 inHg)] Within 3.3 kPa (25 mmHg, 0.98 inHg) of vacuum for 15 seconds SGIA0060E
Brake model AD22VK
Brake pad Standard thickness (new) 9.0 (0.354)
Repair limit thickness 2.0 (0.079)
Disc rotor Standard thickness (new) 22.0 (0.866)
Repair limit thickness 20.0 (0.787)
Runout limit 0.06 (0.0024)
Maximum uneven wear (measured at 8 positions) 0.02 mm (0.0008 in) or less Brake model
CLZ25VF
Brake pad Standard thickness (new) 9.5 (0.374)
Repair limit thickness 2.0 (0.079)
Disc rotor Standard thickness (new) 24.0 (0.945)
Repair limit thickness 22.0 (0.866)
Runout limit (measured at 10.0 mm (0.394 in) inside the disc edge 0.04 (0.0016)
Maximum uneven wear (measured at 8 positions) 0.02 mm (0.0008 in) or less Brake model
LT20
Brake lining Standard thickness
(new) 4.0 (0.157)
Repair limit thickness 1.5 (0.059)
Drum Standard inner diameter (new) 203 (7.992)
Repair limit inner diameter 204.5 (8.051) Brake model
LT23
Brake lining Standard thickness (new) 4.0 (0.157)
Repair limit thickness 1.5 (0.059)
Drum Standard inner diameter (new) 228.6 (9.000)
Repair limit inner diameter 230.0 (9.055)