2009 NISSAN LATIO torque
[x] Cancel search: torquePage 3037 of 4331

" Removal and Installation " (ABS).
2. Remove brake caliper assembly with piping connected fr om steering knuckle. Temporarily secure it on the
vehicle side with a rope to avoid load on it. Refer to BR-25, " Component " .
3. Remove drive shafts (LH and RH) from steering knuckle. Refer to FAX-9, " Removal and Installation (Left
Side) " and
FAX-10, " Removal and Installation (Right Side) " .
4. Remove exhaust front tube. Refer to EX-5, " Component " .
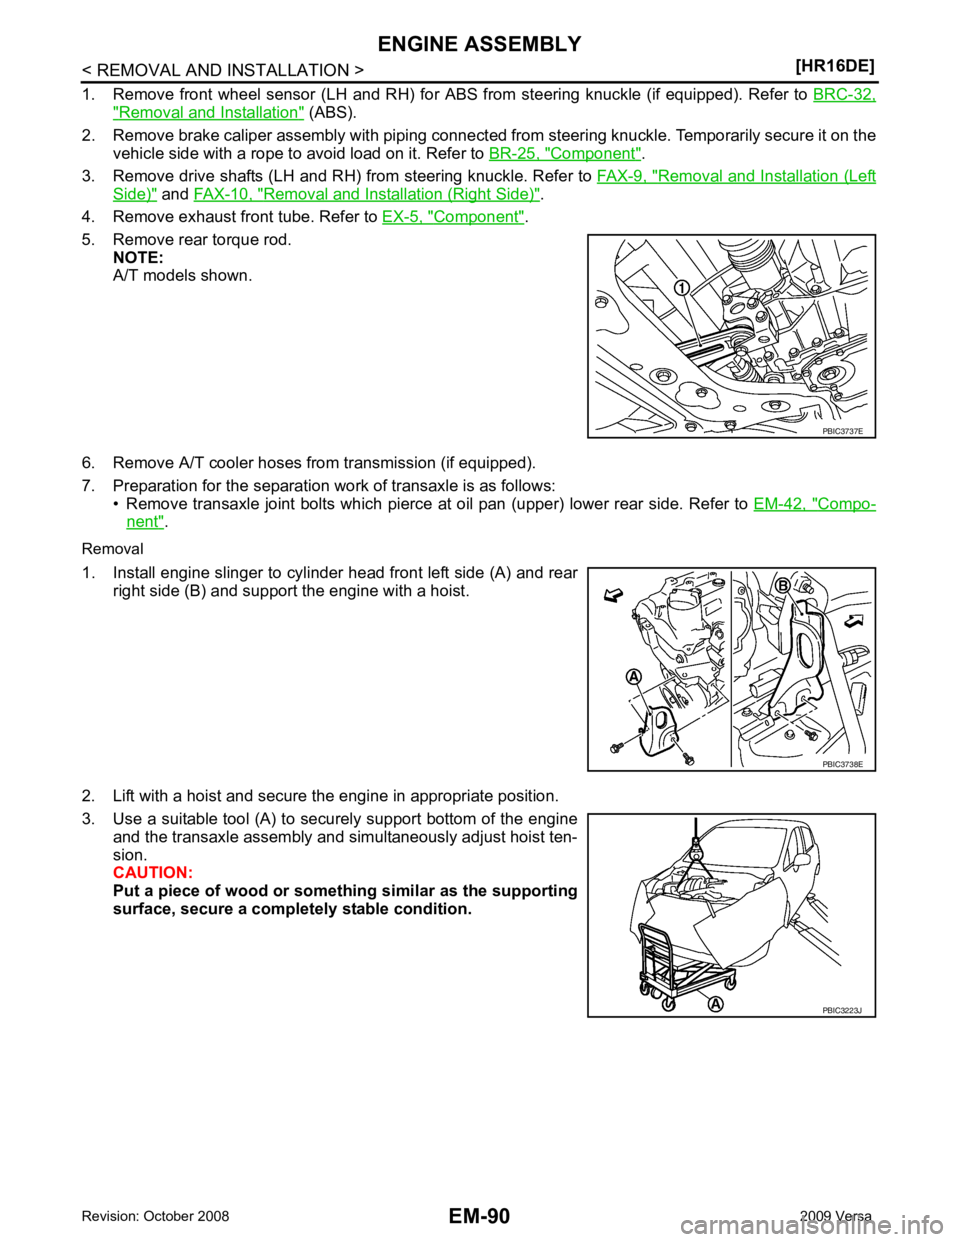
5. Remove rear torque rod. NOTE:
A/T models shown.
6. Remove A/T cooler hoses from transmission (if equipped).
7. Preparation for the separation work of transaxle is as follows: • Remove transaxle joint bolts which pierce at oil pan (upper) lower rear side. Refer to EM-42, " Compo-
nent " .
Removal
1. Install engine slinger to cylinder head front left side (A) and rear right side (B) and support the engine with a hoist.
2. Lift with a hoist and secure the engine in appropriate position.
3. Use a suitable tool (A) to securely support bottom of the engine and the transaxle assembly and simultaneously adjust hoist ten-
sion.
CAUTION:
Put a piece of wood or someth ing similar as the supporting
surface, secure a completely stable condition. PBIC3223J
Page 3052 of 4331

EM
NP
O
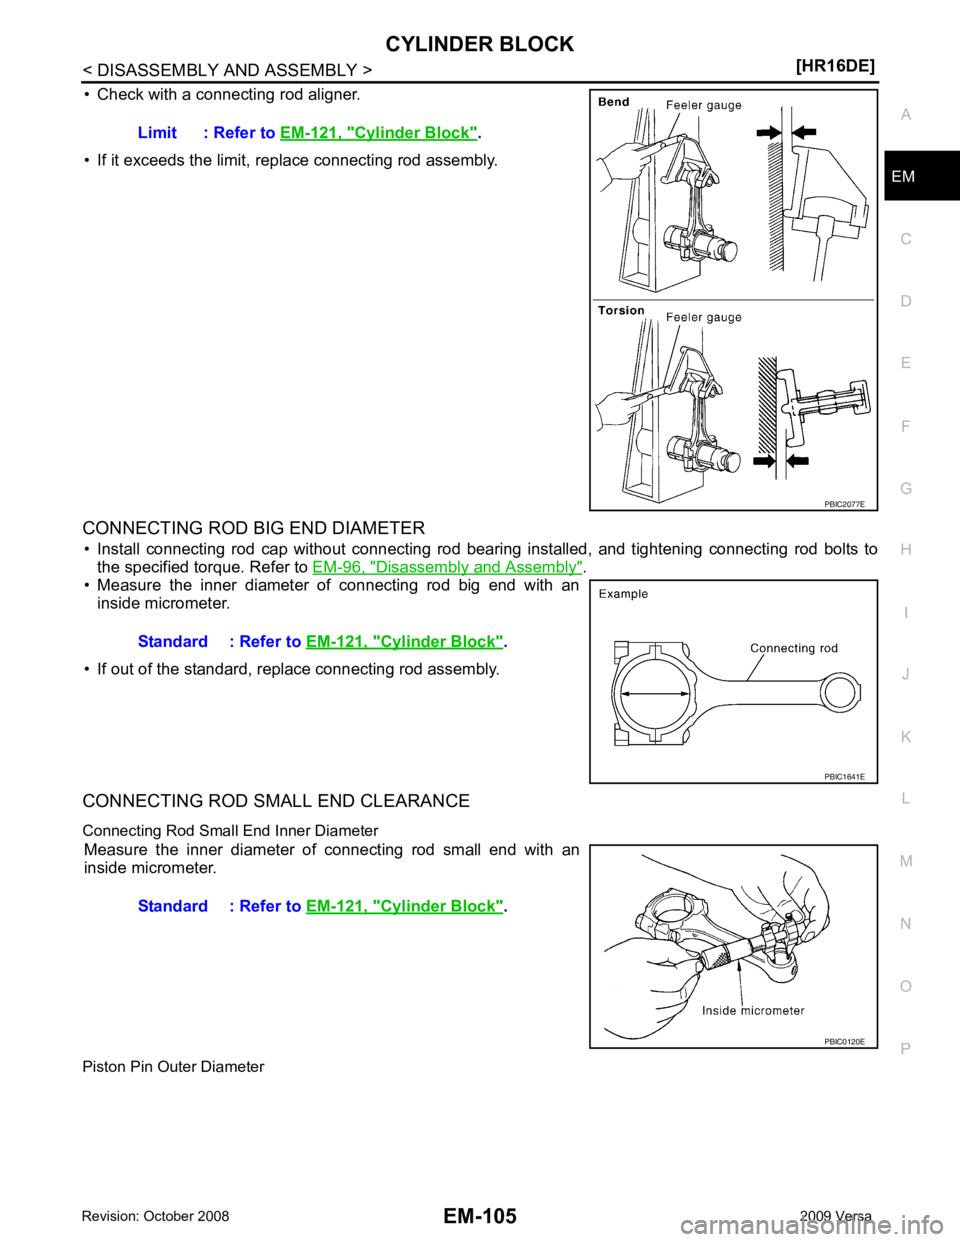
• Check with a connecting rod aligner.
• If it exceeds the limit, replace connecting rod assembly.
CONNECTING ROD BIG END DIAMETER • Install connecting rod cap without connecting rod bearing installed, and tightening connecting rod bolts to the specified torque. Refer to EM-96, " Disassembly and Assembly " .
• Measure the inner diameter of connecting rod big end with an
inside micrometer.
• If out of the standard, replace connecting rod assembly.
CONNECTING ROD SMALL END CLEARANCE
Connecting Rod Small End Inner Diameter Measure the inner diameter of connecting rod small end with an
inside micrometer.
Piston Pin Outer Diameter Limit : Refer to
EM-121, " Cylinder Block " .
Cylinder Block " .
Cylinder Block " .
Page 3055 of 4331

Disassembly and Assembly " .
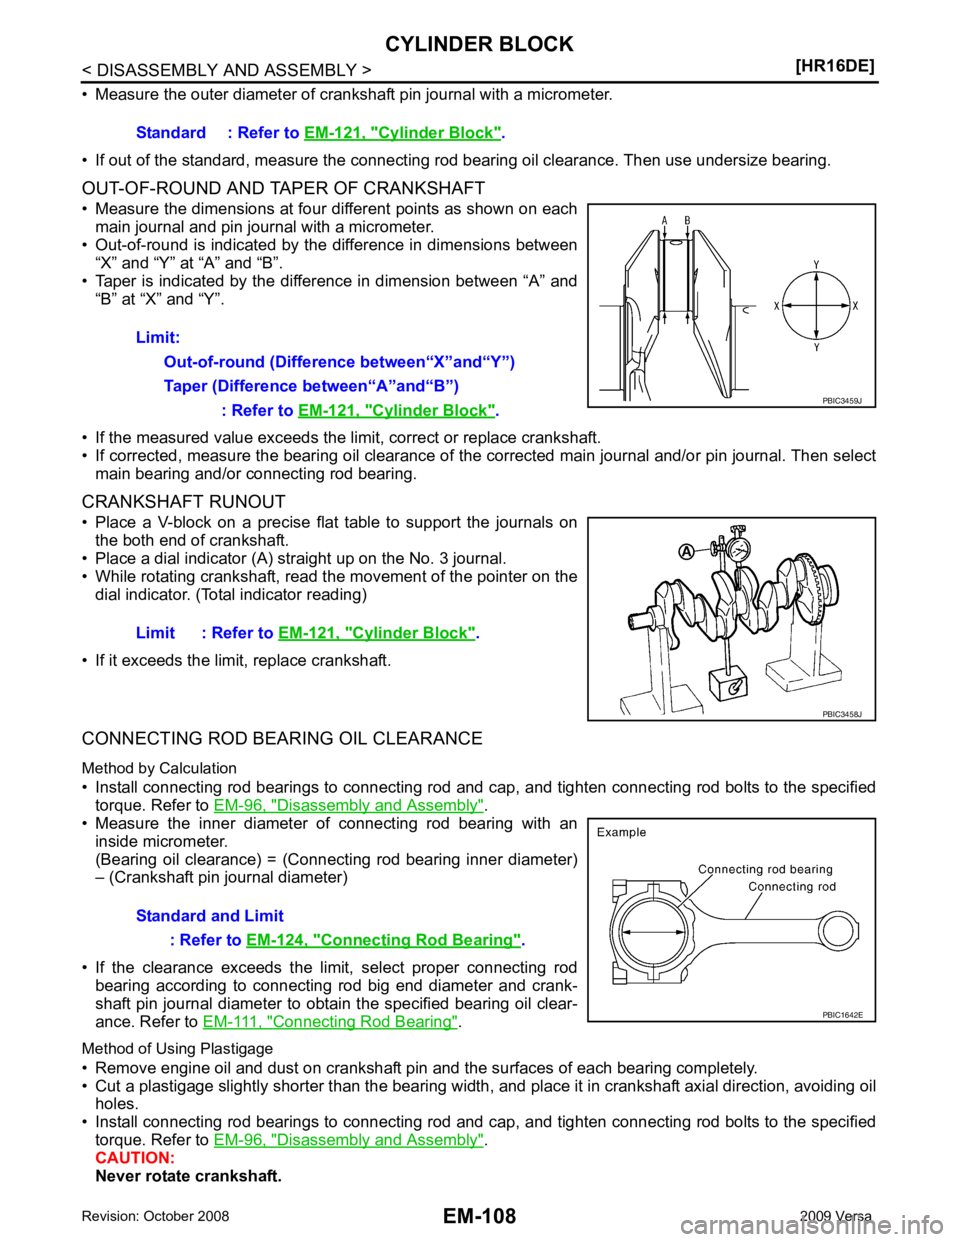
• Measure the inner diameter of connecting rod bearing with an
inside micrometer.
(Bearing oil clearance) = (Connecting rod bearing inner diameter)
– (Crankshaft pin journal diameter)
• If the clearance exceeds the limit, select proper connecting rod bearing according to connecting rod big end diameter and crank-
shaft pin journal diameter to obtain the specified bearing oil clear-
ance. Refer to EM-111, " Connecting Rod Bearing " .
Method of Using Plastigage
• Remove engine oil and dust on crankshaft pin and the surfaces of each bearing completely.
• Cut a plastigage slightly shorter than the bearing width, and place it in crankshaft axial direction, avoiding oil
holes.
• Install connecting rod bearings to connecting rod and c ap, and tighten connecting rod bolts to the specified
torque. Refer to EM-96, " Disassembly and Assembly " .
CAUTION:
Never rotate crankshaft. Standard : Refer to
EM-121, " Cylinder Block " .
Limit: Out-of-round (Difference between“X”and“Y”)
Taper (Difference between“A”and“B”) : Refer to EM-121, " Cylinder Block " .
Cylinder Block " .
Connecting Rod Bearing " .
Page 3056 of 4331

EM
NP
O
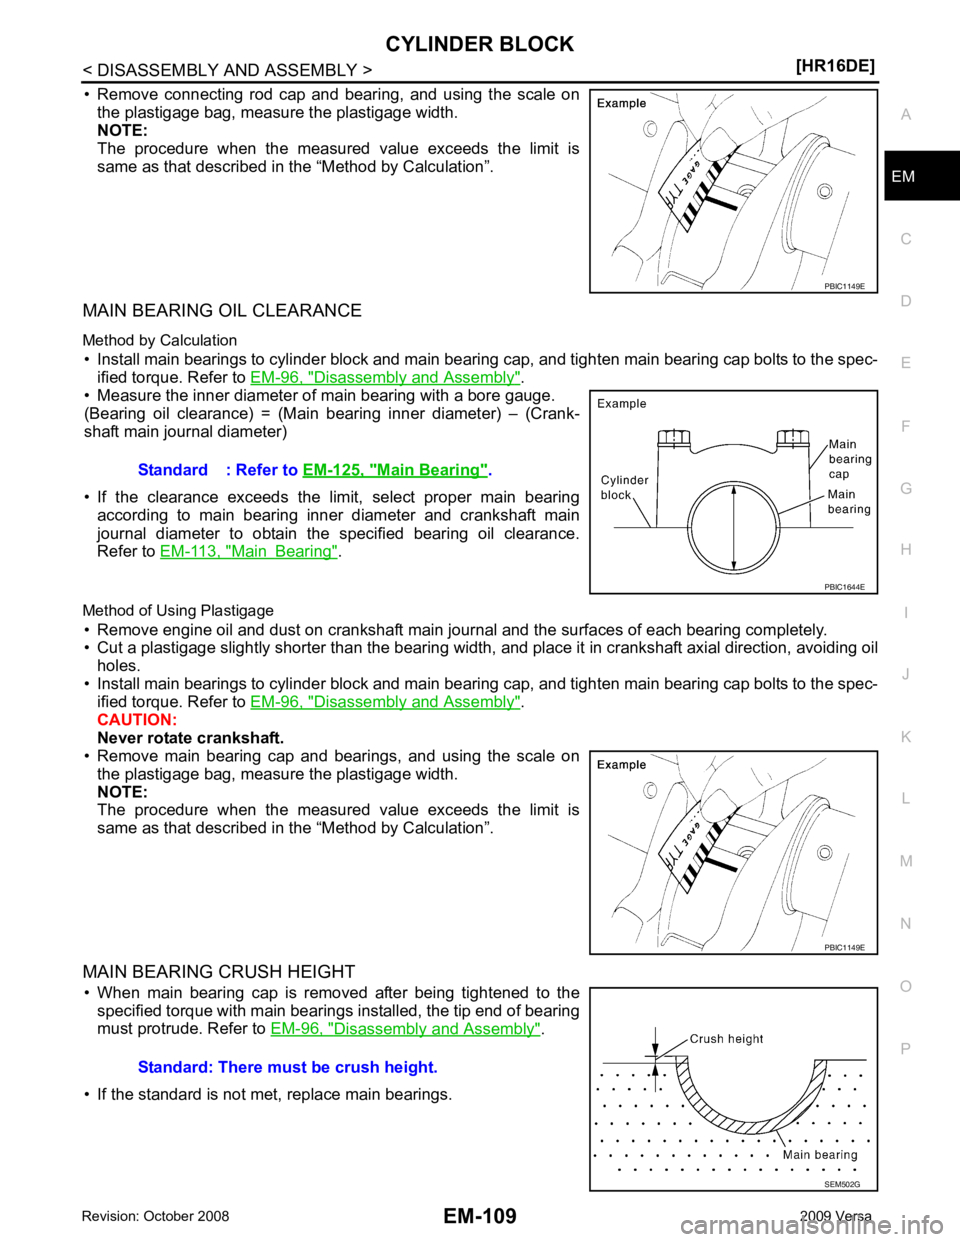
• Remove connecting rod cap and bearing, and using the scale on
the plastigage bag, measure the plastigage width.
NOTE:
The procedure when the measured value exceeds the limit is
same as that described in the “Method by Calculation”.
MAIN BEARING OIL CLEARANCE
Method by Calculation • Install main bearings to cylinder block and main bearing cap, and tighten main bearing cap bolts to the spec- ified torque. Refer to EM-96, " Disassembly and Assembly " .
• Measure the inner diameter of main bearing with a bore gauge.
(Bearing oil clearance) = (Main bearing inner diameter) – (Crank-
shaft main journal diameter)
• If the clearance exceeds the limit, select proper main bearing according to main bearing inner diameter and crankshaft main
journal diameter to obtain the specified bearing oil clearance.
Refer to EM-113, " Main Bearing " .
Method of Using Plastigage • Remove engine oil and dust on crankshaft main journal and the surfaces of each bearing completely.
• Cut a plastigage slightly shorter than the bearing width, and place it in crankshaft axial direction, avoiding oil
holes.
• Install main bearings to cylinder block and main bearing cap, and tighten main bearing cap bolts to the spec- ified torque. Refer to EM-96, " Disassembly and Assembly " .
CAUTION:
Never rotate crankshaft.
• Remove main bearing cap and bearings, and using the scale on
the plastigage bag, measure the plastigage width.
NOTE:
The procedure when the measured value exceeds the limit is
same as that described in the “Method by Calculation”.
MAIN BEARING CRUSH HEIGHT • When main bearing cap is removed after being tightened to the specified torque with main bearings installed, the tip end of bearing
must protrude. Refer to EM-96, " Disassembly and Assembly " .
• If the standard is not met, replace main bearings. Main Bearing " .
Page 3057 of 4331
![NISSAN LATIO 2009 Service Repair Manual EM-110< DISASSEMBLY AND ASSEMBLY >
[HR16DE]
CYLINDER BLOCK
CONNECTING ROD BEARING CRUSH HEIGHT
• When connecting rod bearing cap is removed after being tightened to the specified torque with co NISSAN LATIO 2009 Service Repair Manual EM-110< DISASSEMBLY AND ASSEMBLY >
[HR16DE]
CYLINDER BLOCK
CONNECTING ROD BEARING CRUSH HEIGHT
• When connecting rod bearing cap is removed after being tightened to the specified torque with co](/manual-img/5/57359/w960_57359-3056.png)
EM-110< DISASSEMBLY AND ASSEMBLY >
[HR16DE]
CYLINDER BLOCK
CONNECTING ROD BEARING CRUSH HEIGHT
• When connecting rod bearing cap is removed after being tightened to the specified torque with connecting rod bearings installed, the
tip end of bearing must protrude. Refer to EM-96, " Disassembly
and Assembly " .
• If the standard is not met, replace connecting rod bearings.
MAIN BEARING CAP BOLT OUTER DIAMETER
• Measure the outer diameters (“d 1”, “d 2”) at two positions as shown.
• If reduction appears in a position other than “d 2 ”, regard it as “d 2”.
• If it exceeds the limit (a large difference in dimensions), replace main bearing cap bolt with a new one.
CONNECTING ROD CAP BOLT OUTER DIAMETER
• Measure the outer diameter “d” at position as shown.
• If reduction appears in a position other than “d”, regard it as “d”.
• When “d” falls below the limit (when it becomes thinner), replace connecting rod cap bolt with a new one.
FLYWHEEL DEFLECTION
• Measure the deflection of flywheel contact surface to clutch with a
dial indicator.
• If measured value is out of the standard, replace flywheel. Standard: There must be crush height. PBIC1646E
Limit (“d
1”–“d 2”): 0.2 mm (0.008 in) PBIC3768E
Limit: 7.75 mm (0.3051 in)
PBIC3769E
Standard : 0.25 mm (0.0098 in) or less.
PBIC2646E
Page 3074 of 4331
![NISSAN LATIO 2009 Service Repair Manual PRECAUTIONS
EM-127
< SERVICE INFORMATION >
[MR18DE] C
D E
F
G H
I
J
K L
M A EM
NP
O
5. When the repair work is completed, return the ignition switch to the
″LOCK ″ position before c NISSAN LATIO 2009 Service Repair Manual PRECAUTIONS
EM-127
< SERVICE INFORMATION >
[MR18DE] C
D E
F
G H
I
J
K L
M A EM
NP
O
5. When the repair work is completed, return the ignition switch to the
″LOCK ″ position before c](/manual-img/5/57359/w960_57359-3073.png)
PRECAUTIONS
EM-127
< SERVICE INFORMATION >
[MR18DE] C
D E
F
G H
I
J
K L
M A EM
NP
O
5. When the repair work is completed, return the ignition switch to the
″LOCK ″ position before connecting
the battery cables. (At this time, the steering lock mechanism will engage.)
6. Perform a self-diagnosis check of al l control units using CONSULT-III.
Precaution for Procedur e without Cowl Top Cover INFOID:0000000004307110
When performing the procedure after removing cowl top cover, cover
the lower end of windshield.
Precaution for Drain Coolant INFOID:0000000004307112
• Drain coolant when engine is cooled.
Precaution for Disco nnecting Fuel Piping INFOID:0000000004307113
• Before starting work, make sure no fire or spark producing items are in the work area.
• Release fuel pressure before disassembly.
• After disconnecting pipes, plug openings to stop fuel leakage.
Precaution for Removal and Disassembly INFOID:0000000004307114
• When instructed to use special service tools, use the spec ified tools. Always be careful to work safely, avoid
forceful or uninstructed operations.
• Exercise maximum care to avoid damage to mating or sliding surfaces.
• Cover openings of engine system with tape or the equiva lent, if necessary, to seal out foreign materials.
• Mark and arrange disassembly parts in an organized way for easy troubleshooting and assembly.
• When loosening nuts and bolts, as a basic rule, start with the one furthest outside, then the one diagonally opposite, and so on. If the order of loosening is specif ied, do exactly as specified. Power tools may be used
where noted in the step.
Precaution for Inspection, Repair and Replacement INFOID:0000000004307115
• Before repairing or replacing, thoroughly inspect parts. Inspect new replacement parts in the same way, and
replace if necessary.
Precaution for Assembly and Installation INFOID:0000000004307116
• Use torque wrench to tighten bolts or nuts to specification.
• When tightening nuts and bolts, as a basic rule, equally tighten in several different steps starting with the ones in center, then ones on inside and outside diagonally in this order. If the order of tightening is specified,
do exactly as specified.
• Replace with new gasket, packing, oil seal or O-ring.
• Thoroughly wash, clean, and air-blow each part. Carefully check oil or coolant passages for any restriction
and blockage.
• Avoid damaging sliding or mating surfaces. Completely remove foreign materials such as cloth lint or dust. Before assembly, oil sliding surfaces well.
• Release air within route after draining coolant.
• Before starting engine, apply fuel pressure to fuel lines with turning ignition switch ON (with engine stopped). Then make sure that there are no leaks at fuel line connections.
• After repairing, start engine and increase engine speed to check coolant, fuel, oil, and exhaust systems for leakage. PIIB3706J
Page 3075 of 4331
![NISSAN LATIO 2009 Service Repair Manual EM-128< SERVICE INFORMATION >
[MR18DE]
PRECAUTIONS
Parts Requiring Angular Tightening INFOID:0000000004307117
• Use an angle wrench for the final tightening of the following engine parts:
- Cylinde NISSAN LATIO 2009 Service Repair Manual EM-128< SERVICE INFORMATION >
[MR18DE]
PRECAUTIONS
Parts Requiring Angular Tightening INFOID:0000000004307117
• Use an angle wrench for the final tightening of the following engine parts:
- Cylinde](/manual-img/5/57359/w960_57359-3074.png)
EM-128< SERVICE INFORMATION >
[MR18DE]
PRECAUTIONS
Parts Requiring Angular Tightening INFOID:0000000004307117
• Use an angle wrench for the final tightening of the following engine parts:
- Cylinder head bolts
- Camshaft sprocket (INT)
- Main bearing cap bolts
- Connecting rod cap nuts
- Crankshaft pulley bolt (No angle wrench is required as the bolt flange is provided with notches for angular
tightening)
• Do not use a torque value for final tightening.
• The torque value for these parts are for a preliminary step.
• Ensure thread and seat surfaces are clean and coated with engine oil.
Precaution for Liquid Gasket INFOID:0000000004307118
REMOVAL OF LIQUID GASKET SEALING
• After removing the bolts and nuts, separate the mating surface and remove the sealant using Tool.
CAUTION:
Be careful not to damage the mating surfaces.
• In areas where the cutter is difficult to use, use a plastic hammer to
lightly tap (1) the cutter where the RTV Silicone Sealant is applied.
Use a plastic hammer to slide the cutter (2) by tapping on the side.
CAUTION:
If for some unavoidable reason a tool such as a flat-bladed
screwdriver is used, be careful not to damage the mating sur-
faces.
LIQUID GASKET APPLICATION PROCEDURE
1. Using a scraper, remove the old Silicone RTV Sealant adhering to the gasket application surface and the mating surface.
• Remove the sealant completely from the groove of the gasket application surface, bolts, and bolt holes.
2. Thoroughly clean the gasket application surface and the mating surface and remove adhering moisture, grease and foreign
materials.
3. Attach the sealant t ube to the tube presser.
Use Genuine Silicone RTV Seal ant or equivalent. Refer to
GI-42, " Recommended Chemical
Product and Sealant " .
4. Apply the sealant without breaks to the specified location using Tool.
• If there is a groove for the s ealant application, apply the seal-
ant to the groove.
• As for the bolt holes, normally apply the sealant inside the holes. If specified, it should be applied outside the holes. Make
sure to read the text of this manual.
• Within five minutes of the seal ant application, install the mat-
ing component.
• If the sealant protrudes, wipe it off immediately.
• Do not retighten after the installation. Tool number : KV10112100 (BT-8653-A)
Tool number : KV10111100 (J-37228) WBIA0566E
PBIC0003E
Tool number WS39930000 ( – )
WBIA0567E
Page 3116 of 4331
![NISSAN LATIO 2009 Service Repair Manual TIMING CHAIN
EM-169
< SERVICE INFORMATION >
[MR18DE] C
D E
F
G H
I
J
K L
M A EM
NP
O
15. Install front cover, and tighten bolts in two stages to specified
torque in numerical order as shown. NISSAN LATIO 2009 Service Repair Manual TIMING CHAIN
EM-169
< SERVICE INFORMATION >
[MR18DE] C
D E
F
G H
I
J
K L
M A EM
NP
O
15. Install front cover, and tighten bolts in two stages to specified
torque in numerical order as shown.](/manual-img/5/57359/w960_57359-3115.png)
TIMING CHAIN
EM-169
< SERVICE INFORMATION >
[MR18DE] C
D E
F
G H
I
J
K L
M A EM
NP
O
15. Install front cover, and tighten bolts in two stages to specified
torque in numerical order as shown.
CAUTION:
• Attaching should be done wi thin 5 minutes after liquid
gasket application.
• Be sure to wipe off any excessive liquid gasket leaking.
NOTE:
Installation position of bolts is as shown.
16. Install crankshaft pulley using the following procedure.
a. Install crankshaft pulley. CAUTION:
• Never damage front oil seal lip section.
• If needed use a plastic hammer, tap on its cente r portion (not circumference) to seat crankshaft
pulley.
b. Apply new engine oil to thread and seat surfaces of crankshaft pulley bolt.
c. Secure crankshaft pulley (1) using Tool (A).
d. Tighten crankshaft pulley bolt in two steps.
• For angle tightening, put a paint mark (B) on crankshaft pulley(2), matching with any one of six easy to recognize angle
marks (A) on crankshaft pulley bolt flange (1).
• Turn 60 degrees clockwise (angle tightening).
• Check the tightening angle with movement of one angle mark.
e. Make sure that crankshaft rotates clockwise smoothly.
17. Installation of the remaining components is in the reverse order of removal. M6 bolts : No. 1
M10 bolts : No. 6, 7, 10, 11, 14
M12 bolts : No. 2, 4, 8, 12
M8 bolts : Except the above PBIC3164J
Tool Number : KV10109300 ( — )
Step 1 : 29.4 N·m (3.0 kg-m, 22 ft-lb)
Step 2 : 60 ° clockwise PBIC3961E
PBIC3963E