2009 MERCEDES-BENZ GL SUV ECU
[x] Cancel search: ECUPage 50 of 309
Weight categories and ages Group I: 9 to 18 kg
between approx-
imately 8 months and
4 years Group II/III: 15 to
36 kg;
between approx-
imately 3½ and
12 years
Daimler order number
A 000 970 16 00 A 000 970 17 00
Automatic child seat recognition
No
10 No
10 Child seat lock*
Depending on the vehicle's equipment, the
seat belts on the rear bench seats may be fit-
ted with a child seat lock.
X Insert the seat belt tongue into the buckle.
X Pull the belt out completely and let it be
reeled back in by the inertia reel.
The child seat lock ensures that the belt
does not slacken once the child seat is
secured.
X To release the child seat lock: roll up the
belt completely after removing the child
seat.
ISOFIX child seat securing system in
the rear compartment ISOFIX is a standardised securing system for
specially-designed child restraint systems on
the rear seats. Securing rings for two child
restraint systems are fitted on the left and
right of the rear seat backrests.
On vehicles with a third row of seats*, the
third row of seats is also fitted with securing
rings. G
Risk of injury
A child restraint system secured by the ISOFIX
child seat securing system does not provide
sufficient protection for children weighing
more than 22 kg. For this reason, do not
secure children weighing more than 22 kg in
a child restraint system secured by the ISOFIX
child seat securing system. If the child weighs more than 22 kg, secure the child restraint
system using a lap-shoulder belt.
G
Risk of injury
The child restraint system cannot perform its
protective function if it is not correctly fitted
to a suitable vehicle seat. The child cannot be
restrained in the event of a sudden change of
direction, heavy braking or an accident. This
may lead to serious or even fatal injuries. For
this reason, when fitting a child restraint sys-
tem, observe the manufacturer's installation
instructions and the correct use of the child
restraint system.
On the rear seats, only use child restraint sys-
tems with an ISOFIX child seat securing sys-
tem which have been recommended for use
in Mercedes-Benz vehicles.
An incorrectly fitted child restraint system
could come loose and seriously or even fatally
injure the child or other vehicle occupants.
When fitting the child restraint system, make
sure that it is engaged in the securing rings
on both sides. G
Risk of injury
Please note that if child restraint systems, or
their retaining systems, are damaged or sub-
jected to a load in an accident, they may not
be able to provide their protective function.
This could result in serious or even fatal inju-
ries to the secured child in the event of an
accident, heavy braking or a sudden change
in direction.
10 For child restraint systems without automatic child seat recognition, move the front-passenger seat to the
rearmost position. Occupant safety
47Safety
* optional
X164_AKB; 2; 3, en-GB
wobuchh,
Version: 2.11.8.1 2009-03-31T14:14:58+02:00 - Seite 47 Z
Dateiname: 6515431202_buchblock.pdf; erzeugt am 01. Apr 2009 00:16:46; WK
Page 51 of 309
For this reason, have child restraint systems
and their anchorages which have been dam-
aged or subjected to a load in an accident
checked immediately at a qualified specialist
workshop.
! When fitting the child restraint system,
make sure that the seat belt for the centre
seat does not become trapped. Otherwise,
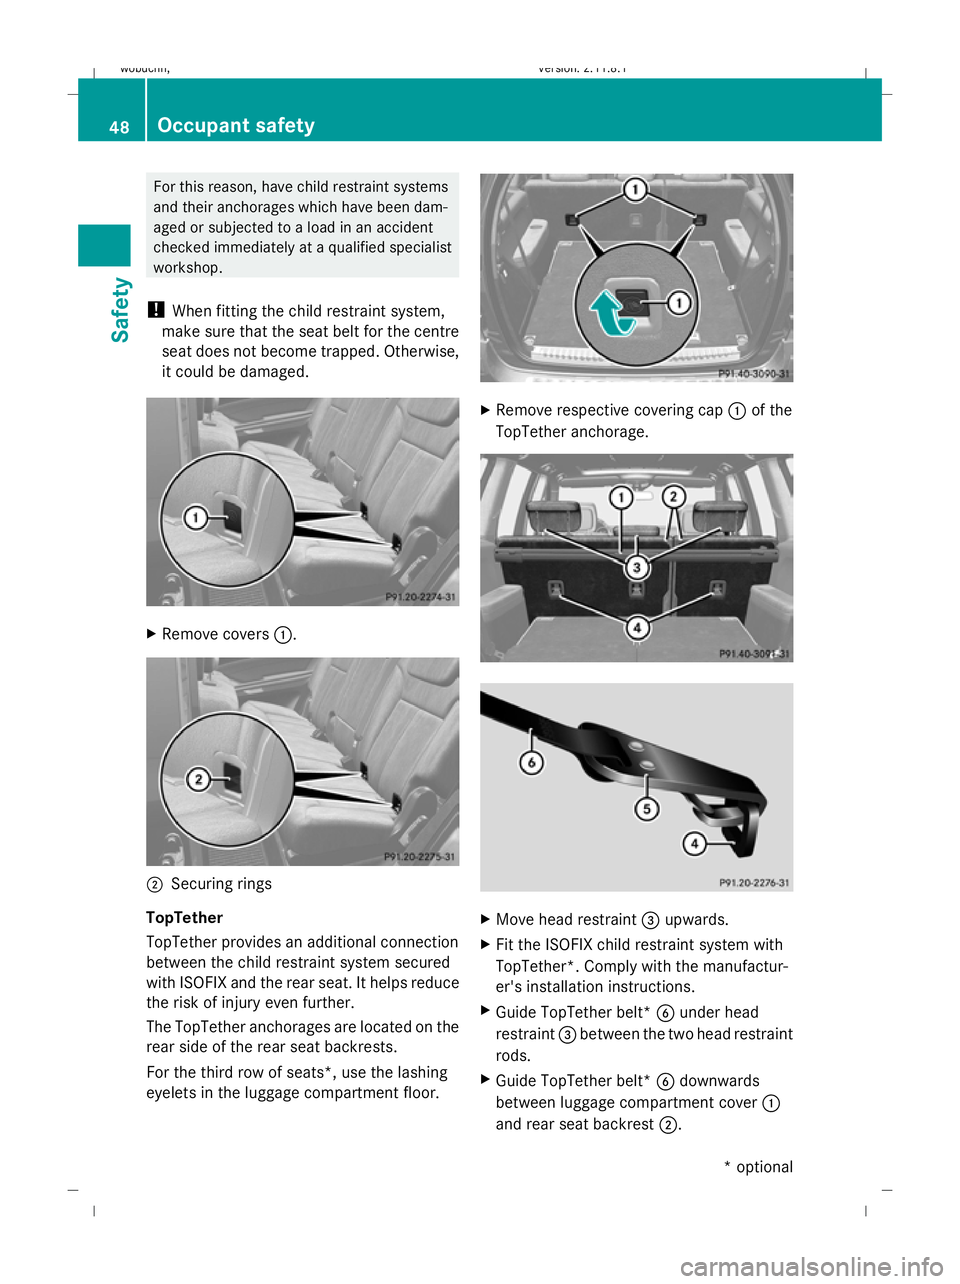
it could be damaged. X
Remove covers :. ;
Securing rings
TopTether
TopTether provides an additional connection
between the child restraint system secured
with ISOFIX and the rear seat. It helps reduce
the risk of injury even further.
The TopTether anchorages are located on the
rear side of the rear seat backrests.
For the third row of seats*, use the lashing
eyelets in the luggage compartment floor. X
Remove respective covering cap :of the
TopTether anchorage. X
Move head restraint =upwards.
X Fit the ISOFIX child restraint system with
TopTether*. Comply with the manufactur-
er's installation instructions.
X Guide TopTether belt* Bunder head
restraint =between the two head restraint
rods.
X Guide TopTether belt* Bdownwards
between luggage compartment cover :
and rear seat backrest ;.48
Occupant safetySafety
* optional
X164_AKB; 2; 3, en-GB
wobuchh
,V ersion: 2.11.8.1
2009-03-31T14:14:58+02:00 - Seite 48
Dateiname: 6515431202_buchblock.pdf; erzeugt am 01. Apr 2009 00:16:48; WK
Page 52 of 309
X
Hook TopTether hook* Ainto TopTether
anchorage ?.
X Tighten TopTether belt* B. Comply with
the manufacturer's installation instruc-
tions.
X Move head restraint =back down again
slightly if necessary (Y page 68). Make
sure that you do not interfere with the cor-
rect routing of TopTether belt* B.
Child-proof locks If children are travelling in the vehicle, you can
activate the child-proof locks for the rear
doors.
Child-proof locks for the rear doors
The child-proof locks on the rear doors enable
you to secure each door individually. A locked
door cannot be opened from the inside. The
door can be opened from the outside if the
vehicle is unlocked.
G
Risk of accident and injury
Activate the child-proof locks for the rear
doors and the override switch for the rear
windows if children are travelling in the vehi-
cle. Otherwise, the children could open doors
or windows while the vehicle is in motion and
injure themselves or others. X
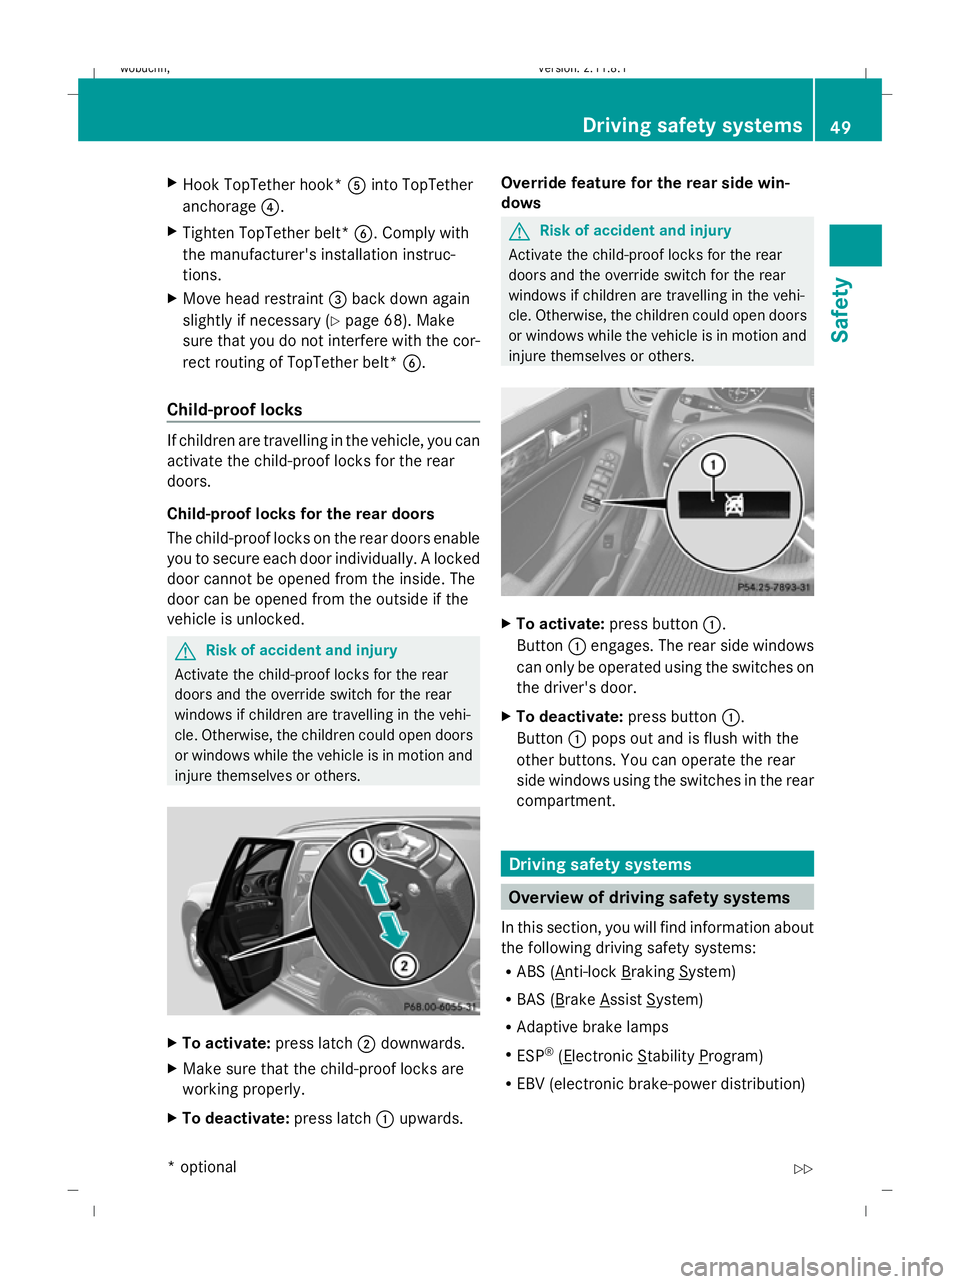
To activate: press latch;downwards.
X Make sure that the child-proof locks are
working properly.
X To deactivate: press latch:upwards. Override feature for the rear side win-
dows G
Risk of accident and injury
Activate the child-proof locks for the rear
doors and the override switch for the rear
windows if children are travelling in the vehi-
cle. Otherwise, the children could open doors
or windows while the vehicle is in motion and
injure themselves or others. X
To activate: press button :.
Button :engages. The rear side windows
can only be operated using the switches on
the driver's door.
X To deactivate: press button:.
Button :pops out and is flush with the
other buttons. You can operate the rear
side windows using the switches in the rear
compartment. Driving safety systems
Overview of driving safety systems
In this section, you will find information about
the following driving safety systems:
R ABS ( Anti-lock Braking System)
R BAS ( Brake Assist System)
R Adaptive brake lamps
R ESP ®
( Electronic Stability Program)
R EBV (electronic brake-power distribution) Driving safety systems
49Safety
* optional
X164_AKB; 2; 3, en-GB
wobuchh
,V ersion: 2.11.8.1
2009-03-31T14:14:58+02:00 - Seite 49 Z
Dateiname: 6515431202_buchblock.pdf; erzeugt am 01. Apr 2009 00:16:48; WK
Page 63 of 309

X
To unlock: press button :.
X To lock: press button ;.
Automatic locking The vehicle will lock automatically once you
have pulled away.
You can switch the automatic locking func-
tion on and off using the on-board computer
(Y page 107).
i The vehicle is locked automatically when
the ignition is switched on and the wheels
begin to turn. There is a risk of being locked
out when the vehicle is being pushed or
tested on a dynamometer. Tailgate
Points to remember
G
Risk of poisoning
Exhaust fumes could enter the vehicle interior
if the engine is running and the tailgate is
open. This could poison you. Therefore, you
should make sure that the tailgate is always
closed when the engine is running.
! The tailgate swings up and to the rear
when opened. Therefore, make sure that
there is sufficient clearance above and
behind the tailgate.
Do not leave the key in the luggage compart-
ment. Otherwise, you could lock yourself out.
On vehicles with a spare wheel bracket*, you
can only open the tailgate after first opening
the spare wheel bracket* completely.
i You will find details of the tailgate opening
dimensions in the Technical data section
(Y page 295). The tailgate can be:
R
opened and closed manually
(Y page 61)
R opened and closed* automatically from
outside (Y page 62)
R opened and closed* automatically from
inside (Y page 62) Spare wheel bracket*
G
Risk of accident
While the spare wheel bracket is folded to the
side, the tail lamps may be blocked from view.
Other road users may then fail to see you and
crash into your vehicle. Additionally, secure
your vehicle using a warning lamp or a warn-
ing triangle.
Do not drive with the spare wheel bracket fol-
ded out.
Make sure that the spare wheel bracket is
closed correctly.
Otherwise, the freely moving spare wheel
bracket could injure people or cause an acci-
dent.
! Do not wash vehicles equipped with a
spare wheel bracket in an automatic car
wash.
Opening the spare wheel bracket 60
TailgateControls
* optional
X164_AKB; 2; 3, en-GB
wobuchh
,V ersion: 2.11.8.1
2009-03-31T14:14:58+02:00 - Seite 60
Dateiname: 6515431202_buchblock.pdf; erzeugt am 01. Apr 2009 00:16:52; WK
Page 68 of 309
Secure children as recommended; see "Chil-
dren in the vehicle" section.
G
Risk of injury
Make sure that the central area of the head
restraint supports the back of your head at
about eye level. You could seriously injure
your neck if your head is not correctly sup-
ported by the head restraint in the event of an
accident. Never travel without a correctly
adjusted and engaged head restraint.
! When you move the seats, make sure that
there are no objects in the footwell or
behind the seats. Otherwise, you could
damage the seats and the objects.
! When the rear bench seat is folded for-
wards, the front seats cannot be moved to
their rearmost position. Otherwise, you
could damage the seats and the rear bench
seat.
! Make sure that the sun visor is folded up
before setting the backrest angle and head
restraint height. Otherwise, the head
restraint and sun visor could collide when
the head restraint is fully extended.
i The rear-compartment head restraints
can be removed (Y page 69).
Please contact a Mercedes-Benz Service
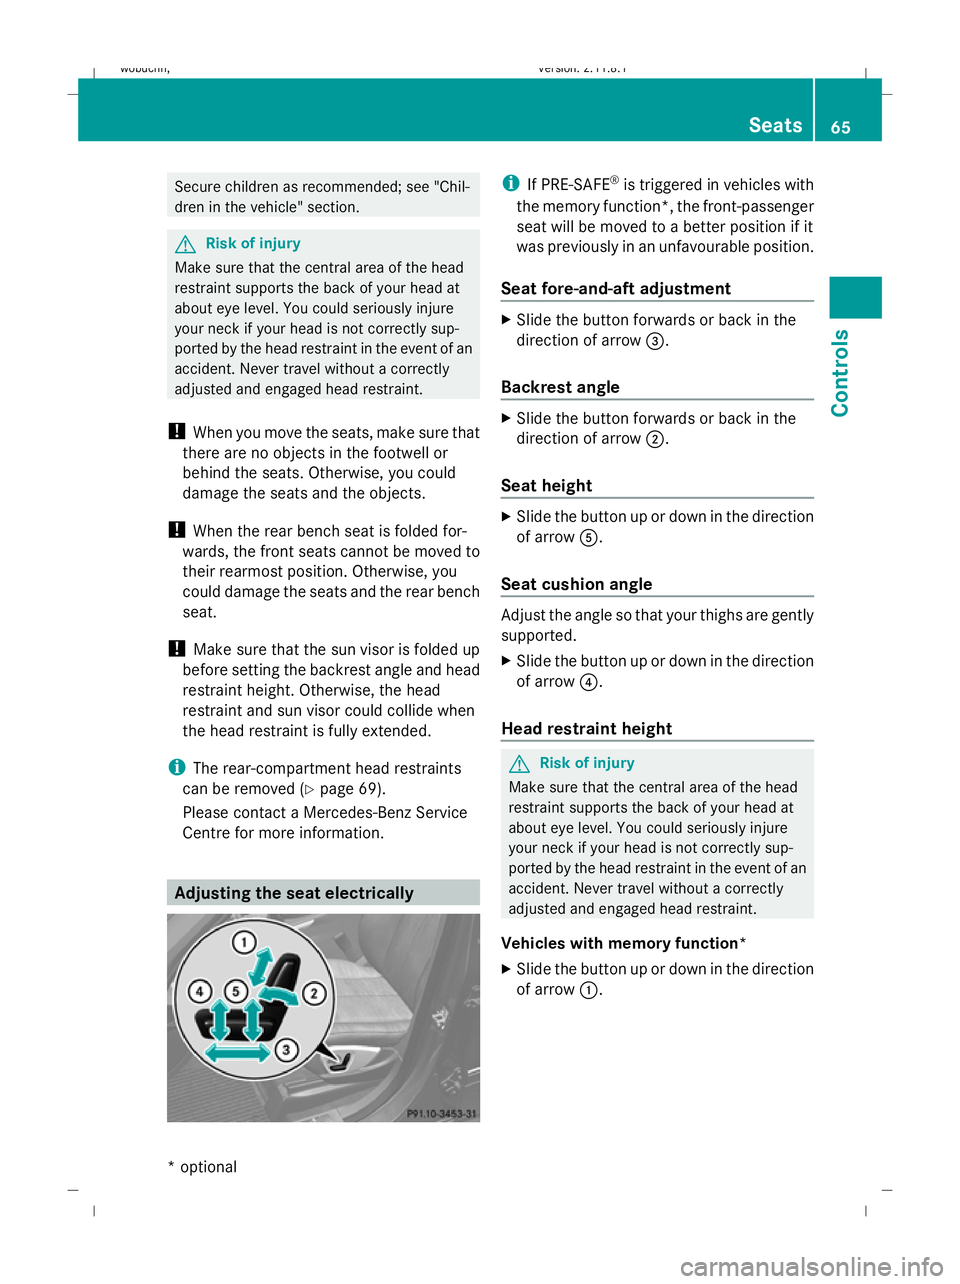
Centre for more information. Adjusting the seat electrically i
If PRE-SAFE ®
is triggered in vehicles with
the memory function*, the front-passenger
seat will be moved to a better position if it
was previously in an unfavourable position.
Seat fore-and-aft adjustment X
Slide the button forwards or back in the
direction of arrow =.
Backrest angle X
Slide the button forwards or back in the
direction of arrow ;.
Seat height X
Slide the button up or down in the direction
of arrow A.
Seat cushion angle Adjust the angle so that your thighs are gently
supported.
X
Slide the button up or down in the direction
of arrow ?.
Head restraint height G
Risk of injury
Make sure that the central area of the head
restraint supports the back of your head at
about eye level. You could seriously injure
your neck if your head is not correctly sup-
ported by the head restraint in the event of an
accident. Never travel without a correctly
adjusted and engaged head restraint.
Vehicles with memory function*
X Slide the button up or down in the direction
of arrow :. Seats
65Controls
* optional
X164_AKB; 2; 3, en-GB
wobuchh,
Version: 2.11.8.1 2009-03-31T14:14:58+02:00 - Seite 65 Z
Dateiname: 6515431202_buchblock.pdf; erzeugt am 01. Apr 2009 00:16:56; WK
Page 79 of 309
result in severe or even fatal injuries to the
child and other occupants.
R Persons less than 1.50 m tall cannot wear
the seat belts correctly. For this reason,
secure persons less than 1.50 m tall in spe-
cially designed, suitable restraint systems.
R Children less than 1.50 m tall or under
12 years of age cannot wear the seat belts
properly. Therefore, they always should be
secured in a suitable child restraint system
on a suitable vehicle seat. You can find
more information under "Children in the
vehicle" in the "Safety" section of the Own-
er's Manual. Follow the manufacturer's
installation instructions when fitting the
child restraint system.
R Do not secure any objects with a seat belt
if the seat belt is also being used by one of
the vehicle's occupants. G
Risk of injury
If the backrest is not almost vertical, the seat
belt does not offer the intended level of pro-
tection. Under certain circumstances, this
could cause severe or even fatal injuries.
Before starting a journey, make sure that the
seat is properly adjusted and that the back-
rest is almost vertical. G
Risk of injury
A dirty or damaged seat belt or a seat belt that
has been subjected to a load in an accident
or which has been modified no longer offers
the intended level of protection. Under certain
circumstances, this could cause severe or
even fatal injuries.
For this reason, check regularly that the seat
belts are not damaged or dirty.
Always have damaged seat belts or seat belts
that have been subjected to a load in an acci-
dent replaced at a qualified specialist work-
shop. Consult a qualified specialist workshop
which has the necessary specialist knowledge
and tools to carry out the work required.
Mercedes-Benz recommends that you use a Mercedes-Benz Service Centre for this pur-
pose.
For safety reasons, Mercedes-Benz recom-
mends that you only use seat belts which have
been approved by Mercedes-Benz for your
vehicle. Fastening the belt
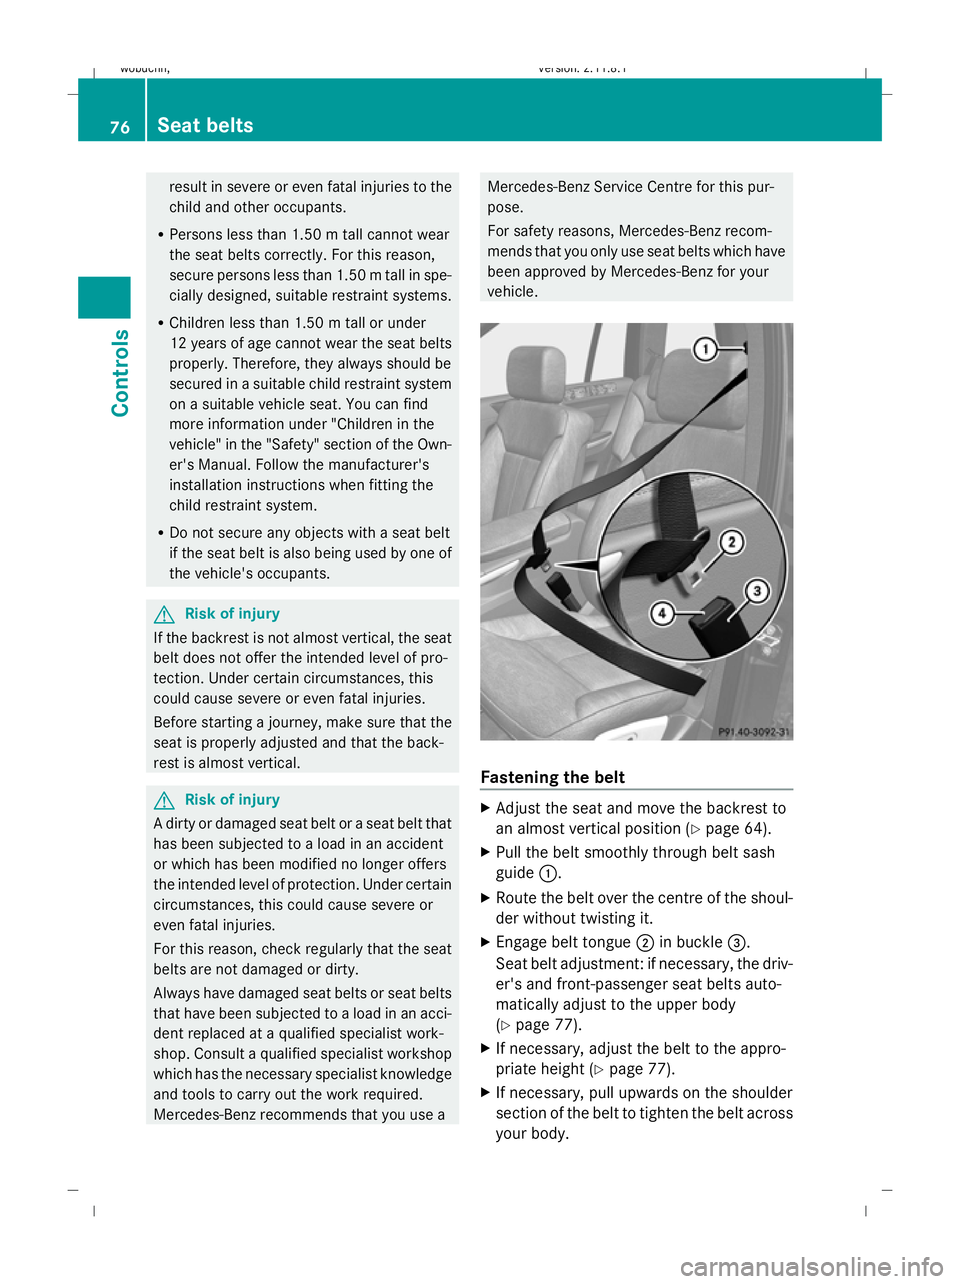
X
Adjust the seat and move the backrest to
an almost vertical position (Y page 64).
X Pull the belt smoothly through belt sash
guide :.
X Route the belt over the centre of the shoul-
der without twisting it.
X Engage belt tongue ;in buckle =.
Seat belt adjustment: if necessary, the driv-
er's and front-passenger seat belts auto-
matically adjust to the upper body
(Y page 77).
X If necessary, adjust the belt to the appro-
priate height (Y page 77).
X If necessary, pull upwards on the shoulder
section of the belt to tighten the belt across
your body. 76
Seat beltsControls
X164_AKB; 2; 3, en-GB
wobuchh,
Version: 2.11.8.1 2009-03-31T14:14:58+02:00 - Seite 76
Dateiname: 6515431202_buchblock.pdf; erzeugt am 01. Apr 2009 00:17:05; WK
Page 88 of 309
Rear window wiper
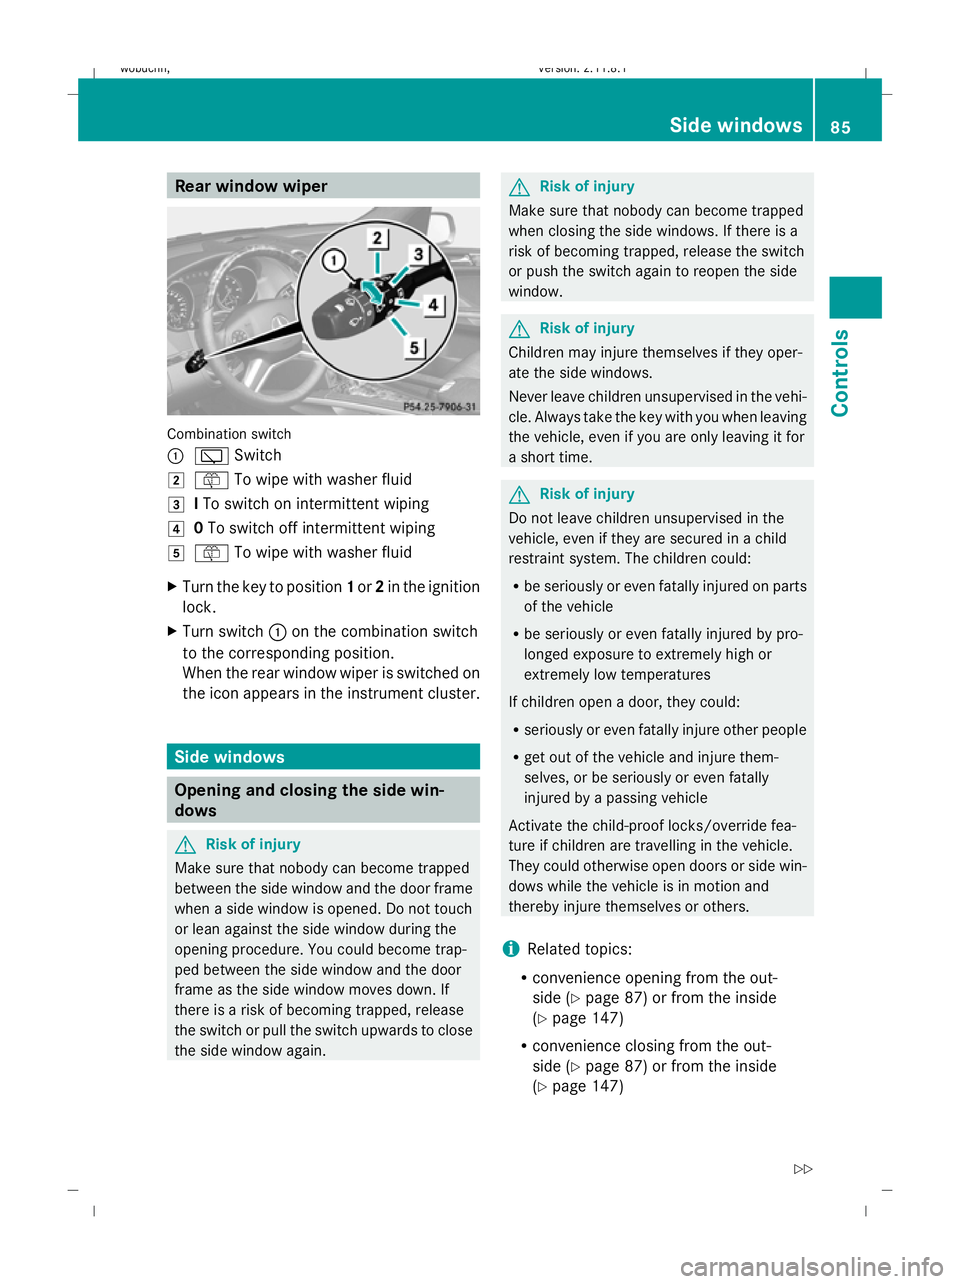
Combination switch
:
è Switch
2 ô To wipe with washer fluid
3 ITo switch on intermittent wiping
4 0To switch off intermittent wiping
5 ô To wipe with washer fluid
X Turn the key to position 1or 2in the ignition
lock.
X Turn switch :on the combination switch
to the corresponding position.
When the rear window wiper is switched on
the icon appears in the instrument cluster. Side windows
Opening and closing the side win-
dows G
Risk of injury
Make sure that nobody can become trapped
between the side window and the door frame
when a side window is opened. Do not touch
or lean against the side window during the
opening procedure. You could become trap-
ped between the side window and the door
frame as the side window moves down. If
there is a risk of becoming trapped, release
the switch or pull the switch upwards to close
the side window again. G
Risk of injury
Make sure that nobody can become trapped
when closing the side windows. If there is a
risk of becoming trapped, release the switch
or push the switch again to reopen the side
window. G
Risk of injury
Children may injure themselves if they oper-
ate the side windows.
Never leave children unsupervised in the vehi-
cle. Always take the key with you when leaving
the vehicle, even if you are only leaving it for
a short time. G
Risk of injury
Do not leave children unsupervised in the
vehicle, even if they are secured in a child
restraint system. The children could:
R be seriously or even fatally injured on parts
of the vehicle
R be seriously or even fatally injured by pro-
longed exposure to extremely high or
extremely low temperatures
If children open a door, they could:
R seriously or even fatally injure other people
R get out of the vehicle and injure them-
selves, or be seriously or even fatally
injured by a passing vehicle
Activate the child-proof locks/override fea-
ture if children are travelling in the vehicle.
They could otherwise open doors or side win-
dows while the vehicle is in motion and
thereby injure themselves or others.
i Related topics:
R convenience opening from the out-
side (Y page 87) or from the inside
(Y page 147)
R convenience closing from the out-
side (Y page 87) or from the inside
(Y page 147) Side windows
85Controls
X164_AKB; 2; 3, en-GB
wobuchh, Version: 2.11.8.1 2009-03-31T14:14:58+02:00 - Seite 85 Z
Dateiname: 6515431202_buchblock.pdf; erzeugt am 01. Apr 2009 00:17:09; WK
Page 91 of 309
With KEYLESS GO*:
R
release the locking button on the door han-
dle.
R pull the door handle immediately and hold
it.
The side windows and the sliding/tilting
sunroof* open.
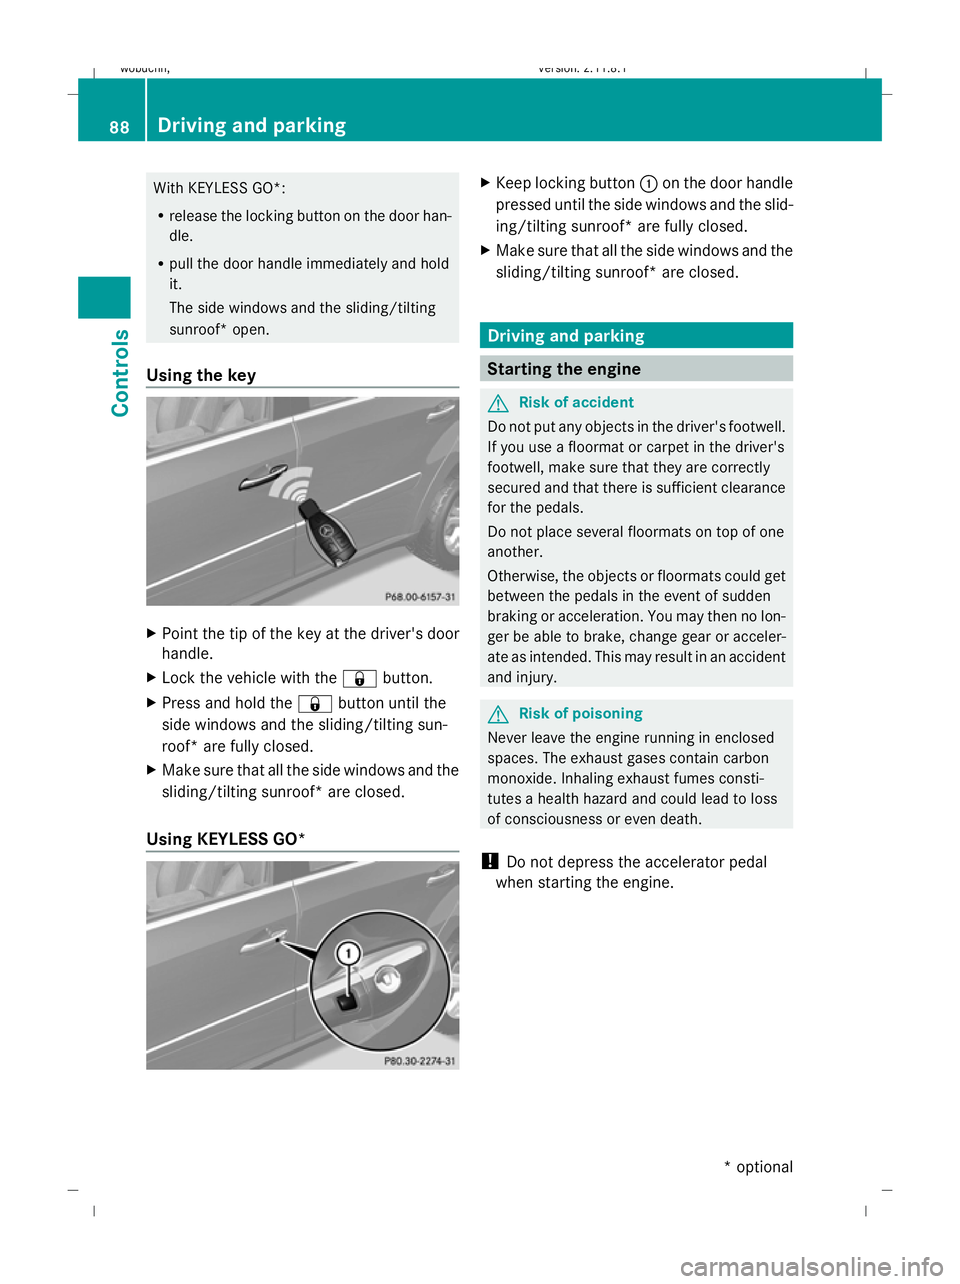
Using the key X
Point the tip of the key at the driver's door
handle.
X Lock the vehicle with the &button.
X Press and hold the &button until the
side windows and the sliding/tilting sun-
roof* are fully closed.
X Make sure that all the side windows and the
sliding/tilting sunroof* are closed.
Using KEYLESS GO* X
Keep locking button :on the door handle
pressed until the side windows and the slid-
ing/tilting sunroof* are fully closed.
X Make sure that all the side windows and the
sliding/tilting sunroof* are closed. Driving and parking
Starting the engine
G
Risk of accident
Do not put any objects in the driver's footwell.
If you use a floormat or carpet in the driver's
footwell, make sure that they are correctly
secured and that there is sufficient clearance
for the pedals.
Do not place several floormats on top of one
another.
Otherwise, the objects or floormats could get
between the pedals in the event of sudden
braking or acceleration. You may then no lon-
ger be able to brake, change gear or acceler-
ate as intended. This may result in an accident
and injury. G
Risk of poisoning
Never leave the engine running in enclosed
spaces. The exhaust gases contain carbon
monoxide. Inhaling exhaust fumes consti-
tutes a health hazard and could lead to loss
of consciousness or even death.
! Do not depress the accelerator pedal
when starting the engine. 88
Driving and parkingControls
* optional
X164_AKB; 2; 3, en-GB
wobuchh,
Version: 2.11.8.1 2009-03-31T14:14:58+02:00 - Seite 88
Dateiname: 6515431202_buchblock.pdf; erzeugt am 01. Apr 2009 00:17:10; WK