2009 MERCEDES-BENZ GL SUV fuse
[x] Cancel search: fusePage 12 of 309

Frequencies
Garage door opener .......................298
Telephone ...................................... 285
Front airbag ......................................... 38
Front-passenger airbag ....................... 38
Fuel ..................................................... 287
Diesel ............................................ 173
Loss ............................................... 241
Petrol ............................................. 173
Fuel consumption
Notes ............................................. 288
Fuel filler flap
Emergency release ........................251
Opening/closing ........................... 172
Fuel filter
Display message ............................ 221
Fuel gauge ............................................ 25
Fuel level Calling up the range (on-board
computer) ...................................... 111
Display ............................................. 25
Fuel line
Malfunction ................................... .241
Fuel tank
Defect ............................................ 241
Fuse allocation chart ........................280
Fuse box Dashboard ..................................... 281
Engine compartment .....................281
Luggage compartment ...................281
Fuses .................................................. 280G
Garage door Opening/closing (with the remote
control) .......................................... 166
Garage door opener ..........................165
Clearing the memory .....................166
Frequencies ................................... 298
Programming the remote control ...165
Gear indicator ...................................... 93
Genuine Mercedes-Benz parts .........284
Glove compartment ..........................152
Gradient-climbing capability (max-
imum) ................................................. 191 H
Handbrake Display message ............................ 221
Headlamp cleaning system ..............178
Headlamps Cleaning ......................................... 203
Cleaning system .............................. 83
Misting up ...................................... 245
Headlamps delayed switch-off
see Exterior lighting delayed switch-off
Head restraints
Adjusting (front) ............................... 65
Adjusting (rear) ................................ 68
Luxury .............................................. 66
NECK-PRO ....................................... 40
Removing (rear) ............................... 69
Resetting triggered NECK-PRO
head restraints .............................. 252
Resetting triggered NECK-PRO
luxury head restraints ....................252
Heating
see Air conditioning
High-pressure cleaners ....................202
Hill start assist .................................... 90
HomeLink ®
see Garage door opener I
Immobiliser .......................................... 54
Indicator and warning lamp Automatic child seat recognition
(malfunction) ................................. 234
Brakes (red) ........................... 235, 236
Engine diagnostics .........................237
ESP ®
.............................................. 235
PASSENGER AIRBAG OFF ........43, 234
Reserve fuel ................................... 239
Seat belt ........................................ 238
SRS .......................................... 35, 236
Thermotronic (malfunction) ...........234
Indicator and warning lamps ...........235
Indicator lamp see Indicator and warning lamp .....235
Instrument cluster .............................. 96
On-board computer .......................103 Index
9 X164_AKB; 2; 3, en-GB
wobuchh,
Version: 2.11.8.1
2009-03-31T14:14:58+02:00 - Seite 9Dateiname: 6515431202_buchblock.pdf; erzeugt am 01. Apr 2009 00:16:29; WK
Page 125 of 309
X
Briefly pull the cruise control lever towards
you ?or press it up :or down Ato the
pressure point.
Distronic is activated.
X Keep the cruise control lever pressed
up : or down Auntil the desired speed
is set.
X Remove your foot from the accelerator
pedal.
Your vehicle adapts its speed to that of the
vehicle in front, but only up to the stored
speed.
i You can use the cruise control lever to set
the stored speed and the thumbwheel on
the cruise control lever to set the specified
minimum distance (Y page 123).
i If you do not fully release the accelerator
pedal, the DISTRONIC Override message
appears in the multi-function display. The
distance to a slower-moving vehicle in front
will then not be governed. You will be driv-
ing at the speed you determine by the posi-
tion of the accelerator pedal.
Driving
If there is no vehicle in front, Distronic oper-
ates in the same way as cruise control.
If a slower-moving vehicle is detected in front,
Distronic causes your vehicle to brake and
maintain the preset distance to the vehicle in
front.
If Distronic detects a faster-moving vehicle in
front, it increases the driving speed, but only
as far as the stored speed. G
Risk of accident
If you depress the brake pedal, Distronic is
deactivated. Distronic will then no longer
brake your vehicle. The driver is fully respon-
sible for the vehicle's distance from other
vehicles, its speed and for braking in good
time. Stopping G
Risk of accident
The Distronic braking effect is cancelled and
the vehicle can start moving if:
R Distronic is deactivated using the cruise
control lever.
R you accelerate.
R the system or the power supply is disrup-
ted, e.g. due to battery failure.
R the electrical system in the engine com-
partment or the fuses have been tampered
with.
R the battery is disconnected. G
Risk of accident
Distronic must never be operated or deacti-
vated by a passenger or from outside the vehi-
cle.
If you wish to leave the vehicle or park it,
deactivate Distronic and secure the vehicle
against rolling away.
If Distronic detects that the vehicle in front is
stopping, it brakes your vehicle until it is sta-
tionary.
i Depending on the specified minimum dis-
tance, your vehicle will come to a standstill
about four metres behind the vehicle in
front. The specified minimum distance is
set using the thumbwheel on the cruise-
control lever.
Distronic is deactivated automatically when
stopping:
R on flat stretches of road or on downhill gra-
dients when the vehicle is stationary.
R while the vehicle is still moving on uphill
gradients, to prevent the vehicle from unex-
pectedly rolling back when Distronic is
deactivated.
If Distronic is deactivated, you will hear a
warning tone.
X Secure the vehicle against rolling away. 122
Driving systemsControls
X164_AKB; 2; 3, en-GB
wobuchh,
Version: 2.11.8.1 2009-03-31T14:14:58+02:00 - Seite 122
Dateiname: 6515431202_buchblock.pdf; erzeugt am 01. Apr 2009 00:17:21; WK
Page 166 of 309
X
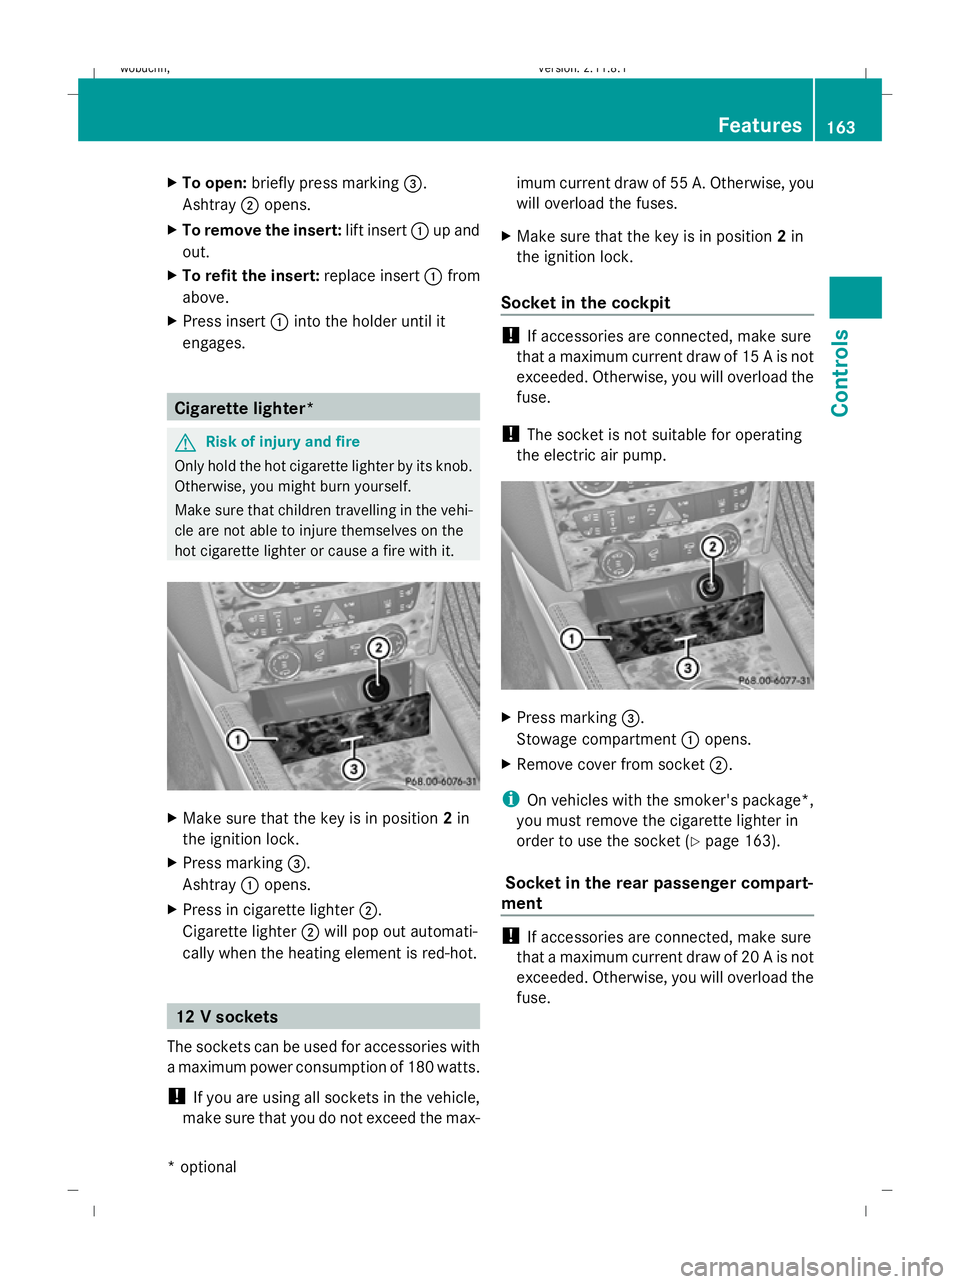
To open: briefly press marking =.
Ashtray ;opens.
X To remove the insert: lift insert:up and
out.
X To refit the insert: replace insert:from
above.
X Press insert :into the holder until it
engages. Cigarette lighter*
G
Risk of injury and fire
Only hold the hot cigarette lighter by its knob.
Otherwise, you might burn yourself.
Make sure that children travelling in the vehi-
cle are not able to injure themselves on the
hot cigarette lighter or cause a fire with it. X
Make sure that the key is in position 2in
the ignition lock.
X Press marking =.
Ashtray :opens.
X Press in cigarette lighter ;.
Cigarette lighter ;will pop out automati-
cally when the heating element is red-hot. 12 V sockets
The sockets can be used for accessories with
a maximum power consumption of 180 watts.
! If you are using all sockets in the vehicle,
make sure that you do not exceed the max- imum current draw of 55 A. Otherwise, you
will overload the fuses.
X Make sure that the key is in position 2in
the ignition lock.
Socket in the cockpit !
If accessories are connected, make sure
that a maximum current draw of 15 A is not
exceeded. Otherwise, you will overload the
fuse.
! The socket is not suitable for operating
the electric air pump. X
Press marking =.
Stowage compartment :opens.
X Remove cover from socket ;.
i On vehicles with the smoker's package*,
you must remove the cigarette lighter in
order to use the socket ( Ypage 163).
Socket in the rear passenger compart-
ment !
If accessories are connected, make sure
that a maximum current draw of 20 A is not
exceeded. Otherwise, you will overload the
fuse. Features
163Controls
* optional
X164_AKB; 2; 3, en-GB
wobuchh
,V ersion: 2.11.8.1
2009-03-31T14:14:58+02:00 - Seite 163 Z
Dateiname: 6515431202_buchblock.pdf; erzeugt am 01. Apr 2009 00:17:42; WK
Page 167 of 309
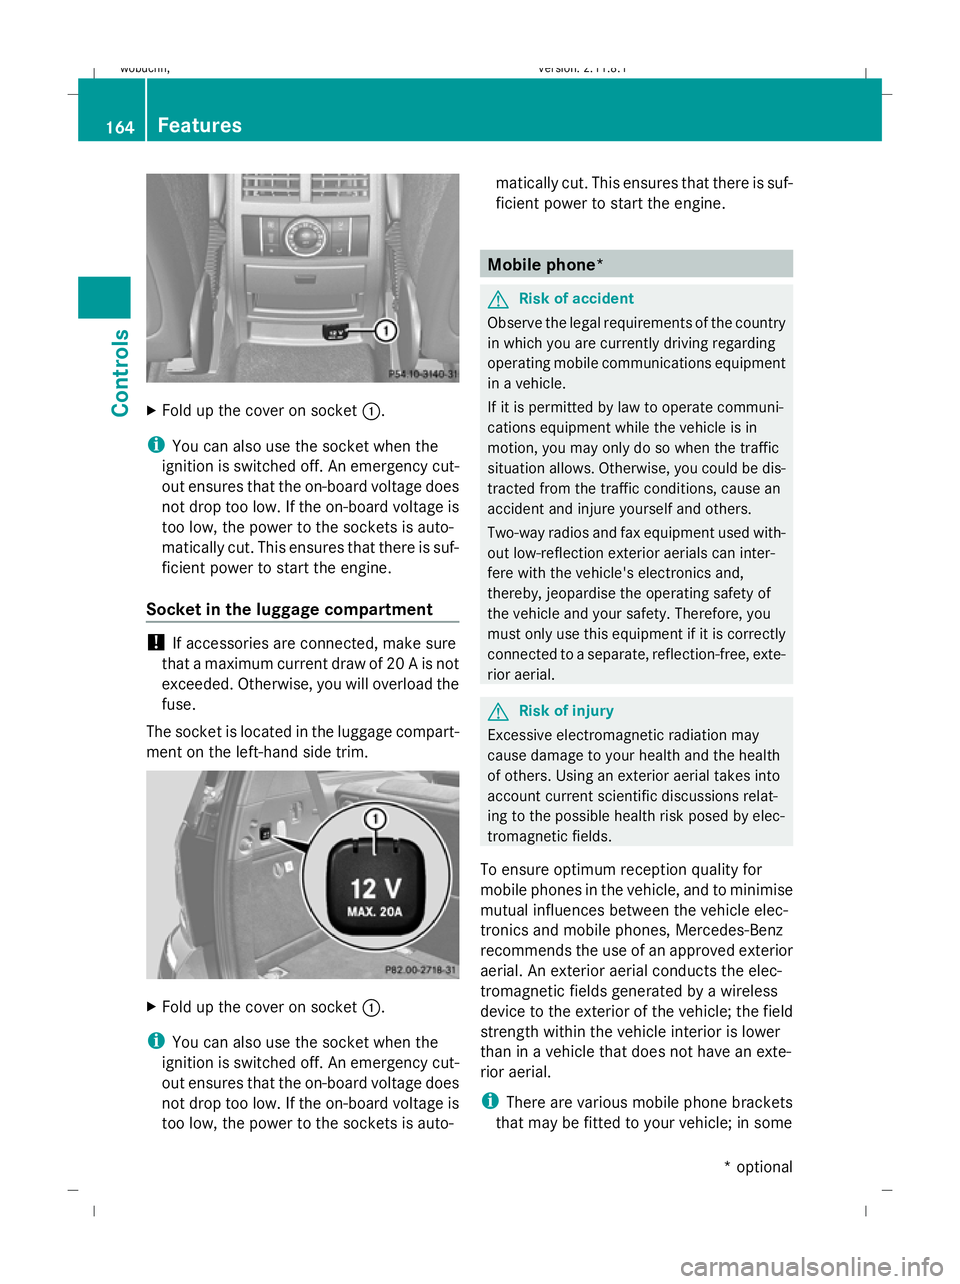
X
Fold up the cover on socket :.
i You can also use the socket when the
ignition is switched off. An emergency cut-
out ensures that the on-board voltage does
not drop too low. If the on-board voltage is
too low, the power to the sockets is auto-
matically cut. This ensures that there is suf-
ficient power to start the engine.
Socket in the luggage compartment !
If accessories are connected, make sure
that a maximum current draw of 20 A is not
exceeded. Otherwise, you will overload the
fuse.
The socket is located in the luggage compart-
ment on the left-hand side trim. X
Fold up the cover on socket :.
i You can also use the socket when the
ignition is switched off. An emergency cut-
out ensures that the on-board voltage does
not drop too low. If the on-board voltage is
too low, the power to the sockets is auto- matically cut. This ensures that there is suf-
ficient power to start the engine. Mobile phone*
G
Risk of accident
Observe the legal requirements of the country
in which you are currently driving regarding
operating mobile communications equipment
in a vehicle.
If it is permitted by law to operate communi-
cations equipment while the vehicle is in
motion, you may only do so when the traffic
situation allows. Otherwise, you could be dis-
tracted from the traffic conditions, cause an
accident and injure yourself and others.
Two-way radios and fax equipment used with-
out low-reflection exterior aerials can inter-
fere with the vehicle's electronics and,
thereby, jeopardise the operating safety of
the vehicle and your safety. Therefore, you
must only use this equipment if it is correctly
connected to a separate, reflection-free, exte-
rior aerial. G
Risk of injury
Excessive electromagnetic radiation may
cause damage to your health and the health
of others. Using an exterior aerial takes into
account current scientific discussions relat-
ing to the possible health risk posed by elec-
tromagnetic fields.
To ensure optimum reception quality for
mobile phones in the vehicle, and to minimise
mutual influences between the vehicle elec-
tronics and mobile phones, Mercedes-Benz
recommends the use of an approved exterior
aerial. An exterior aerial conducts the elec-
tromagnetic fields generated by a wireless
device to the exterior of the vehicle; the field
strength within the vehicle interior is lower
than in a vehicle that does not have an exte-
rior aerial.
i There are various mobile phone brackets
that may be fitted to your vehicle; in some 164
FeaturesControls
* optional
X164_AKB; 2; 3, en-GB
wobuchh
,V ersion: 2.11.8.1
2009-03-31T14:14:58+02:00 - Seite 164
Dateiname: 6515431202_buchblock.pdf; erzeugt am 01. Apr 2009 00:17:42; WK
Page 203 of 309
The letters displayed range from
Afor a short
service duration (approx. 1 hour) to Hfor a
long service duration (approx. 8 hours).
The ASSYST PLUS service interval display
does not take into account any periods of
time during which the battery is disconnec-
ted.
Maintaining the time-dependent service
schedule:
X Note down the service due date displayed
before disconnecting the battery.
or
X Subtract the battery disconnection periods
from the service date shown on the display
after reconnecting the battery.
Hiding a service message X
Press the .reset button on the instru-
ment cluster (Y page 25).
Service overdue A display message is shown in the multi-func-
tion display, for example:
Service A exceeded by .. days
Service A exceeded by .. km
You will also hear a warning tone.
i If you fail to have the service performed
by the specified date, you may be violating
applicable laws. Your warranty may be inva-
lidated and goodwill settlements may be
refused.
Calling up a service due date X
Switch on the ignition.
X Press VorU to select the standard
display menu on the steering wheel
(Y page 99).
X Press &or* to select the service
information.
The multi-function display shows the
¯ symbol and the service due date. AdBlue
®
service indicator
i For Blue-TEC vehicles only.
The BlueTEC exhaust gas aftertreatment
must be operated with a reducing agent
(AdBlue ®
) in order for it to function correctly.
AdBlue ®
is topped up as part of maintenance
work. Under normal operating conditions, a
full tank of AdBlue ®
should last until the next
service due date.
Depending on how and where the vehicle is
used, there may be an increase in the
AdBlue ®
consumption. If the AdBlue ®
supply
does not last until the next service, it will be
necessary to top it up sooner.
The following messages tell you about the
AdBlue ®
supply:
Refill AdBlue at workshop See Own‐
er's Manual
Refill AdBlue at workshop No start
in: ... km
Before taking a trip with your vehicle outside
Europe, have the AdBlue ®
supply checked
and, if necessary, topped up at a qualified
specialist workshop. Before using your vehi-
cle for an extended period in countries out-
side Europe, contact a qualified specialist
workshop.
! Have the AdBlue ®
tank topped up at a
qualified specialist workshop only. The
vehicle may otherwise be damaged or
soiled.
Damage or consequential damage is not
covered by the Mercedes-Benz implied
warranty.
You can obtain general information about
BlueTEC exhaust gas aftertreatment and
AdBlue ®
from any Mercedes-Benz Service
Centre.
Further information about AdBlue ®
(Y page 288). 200
ServiceOperation
X164_AKB; 2; 3, en-GB
wobuchh,
Version: 2.11.8.1 2009-03-31T14:14:58+02:00 - Seite 200
Dateiname: 6515431202_buchblock.pdf; erzeugt am 01. Apr 2009 00:17:53; WK
Page 210 of 309
Where will I find...?
...........................208
Display messages ............................. 211
Troubleshooting ................................ 233
Locking/unlocking in an emer-
gency ................................................. 250
Resetting triggered NECK-PRO
head restraints .................................. 252
Replacing batteries (key and
remote control) ................................. 253
Changing bulbs ................................. 254
Replacing the wiper blades ..............261
Flat tyre ............................................. 262
Battery ............................................... 272
Jump-starting .................................... 276
Towing and tow-starting ..................277
Fuses .................................................. 280 207Practical advice
X164_AKB; 2; 3, en-GB
wobuchh,
Version: 2.11.8.1 2009-03-31T14:14:58+02:00 - Seite 207
Dateiname: 6515431202_buchblock.pdf; erzeugt am 01. Apr 2009 00:17:55; WK
Page 212 of 309
Observe the legal requirements in all coun-
tries concerned.
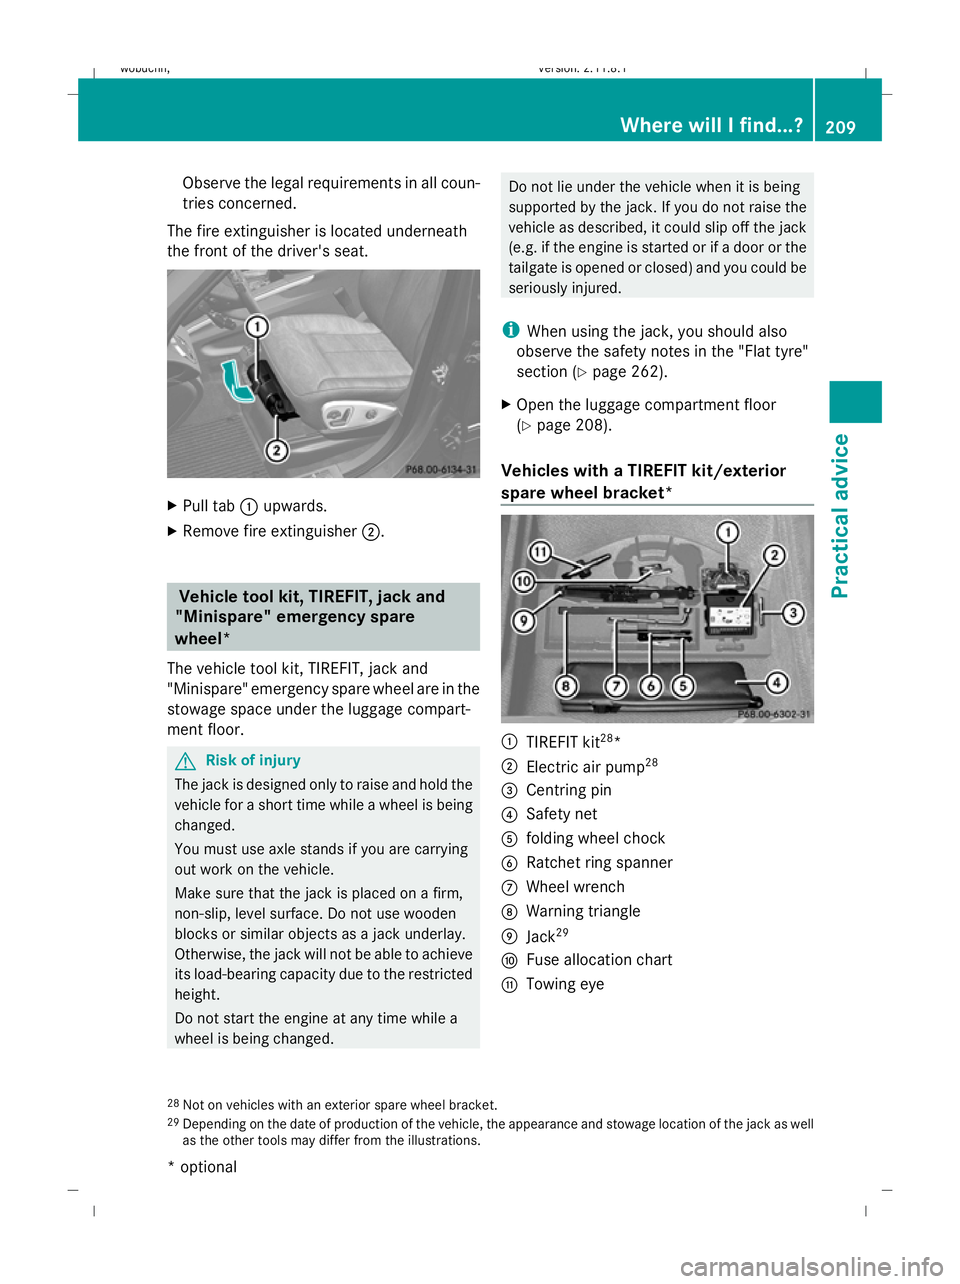
The fire extinguisher is located underneath
the front of the driver's seat. X
Pull tab :upwards.
X Remove fire extinguisher ;. Vehicle tool kit, TIREFIT, jack and
"Minispare" emergency spare
wheel*
The vehicle tool kit, TIREFIT, jack and
"Minispare" emergency spare wheel are in the
stowage space under the luggage compart-
ment floor. G
Risk of injury
The jack is designed only to raise and hold the
vehicle for a short time while a wheel is being
changed.
You must use axle stands if you are carrying
out work on the vehicle.
Make sure that the jack is placed on a firm,
non-slip, level surface. Do not use wooden
blocks or similar objects as a jack underlay.
Otherwise, the jack will not be able to achieve
its load-bearing capacity due to the restricted
height.
Do not start the engine at any time while a
wheel is being changed. Do not lie under the vehicle when it is being
supported by the jack. If you do not raise the
vehicle as described, it could slip off the jack
(e.g. if the engine is started or if a door or the
tailgate is opened or closed) and you could be
seriously injured.
i When using the jack, you should also
observe the safety notes in the "Flat tyre"
section (Y page 262).
X Open the luggage compartment floor
(Y page 208).
Vehicles with a TIREFIT kit/exterior
spare wheel bracket* :
TIREFIT kit 28
*
; Electric air pump 28
= Centring pin
? Safety net
A folding wheel chock
B Ratchet ring spanner
C Wheel wrench
D Warning triangle
E Jack 29
F Fuse allocation chart
G Towing eye
28 Not on vehicles with an exterior spare wheel bracket.
29 Depending on the date of production of the vehicle, the appearance and stowage location of the jack as well
as the other tools may differ from the illustrations. Where will I find...?
209Practical advice
* optional
X164_AKB; 2; 3, en-GB
wobuchh,
Version: 2.11.8.1 2009-03-31T14:14:58+02:00 - Seite 209 Z
Dateiname: 6515431202_buchblock.pdf; erzeugt am 01. Apr 2009 00:17:56; WK
Page 214 of 309
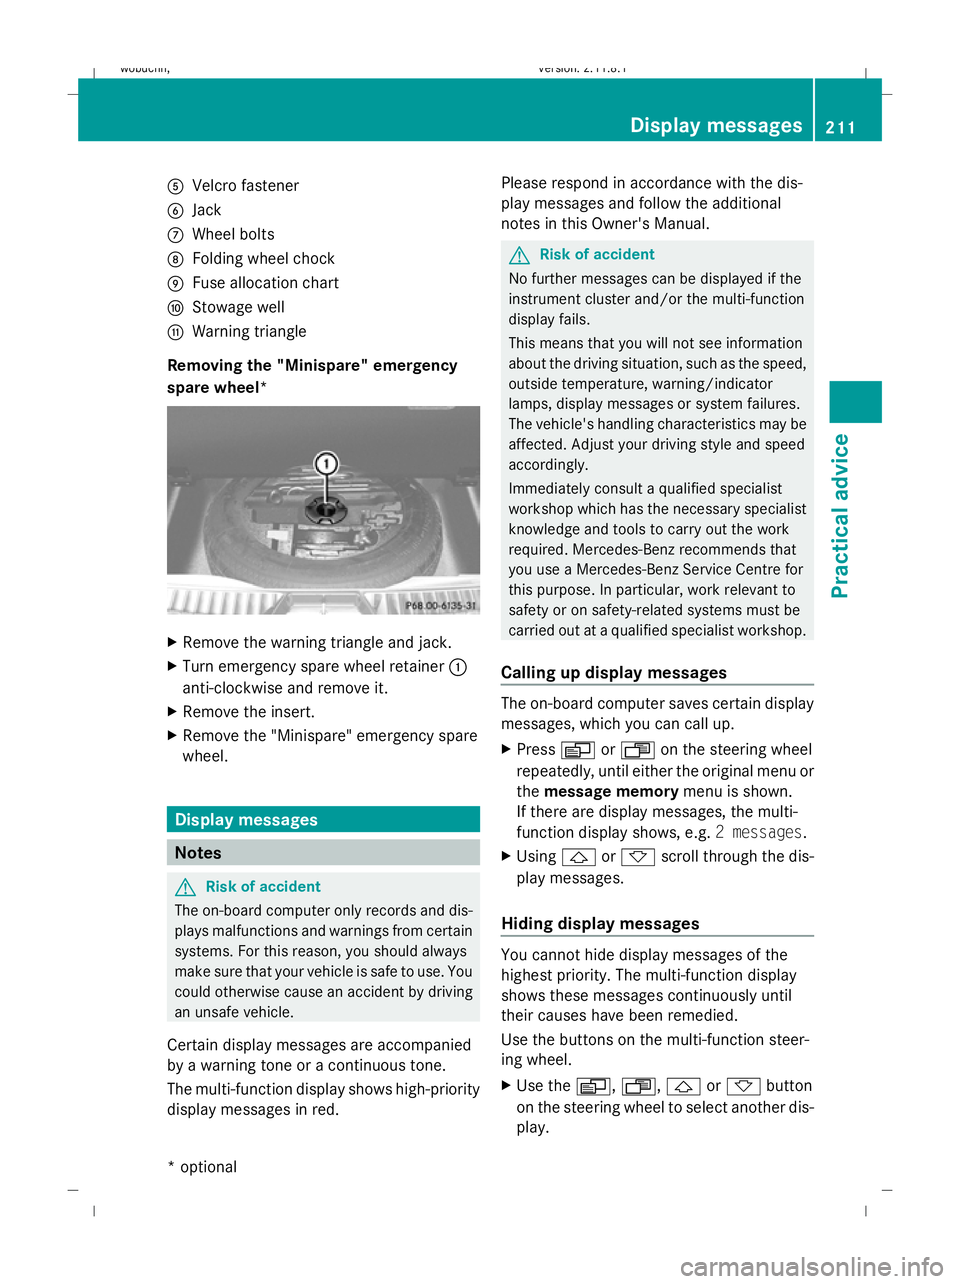
A
Velcro fastener
B Jack
C Wheel bolts
D Folding wheel chock
E Fuse allocation chart
F Stowage well
G Warning triangle
Removing the "Minispare" emergency
spare wheel* X
Remove the warning triangle and jack.
X Turn emergency spare wheel retainer :
anti-clockwise and remove it.
X Remove the insert.
X Remove the "Minispare" emergency spare
wheel. Display messages
Notes
G
Risk of accident
The on-board computer only records and dis-
plays malfunctions and warnings from certain
systems. For this reason, you should always
make sure that your vehicle is safe to use. You
could otherwise cause an accident by driving
an unsafe vehicle.
Certain display messages are accompanied
by a warning tone or a continuous tone.
The multi-function display shows high-priority
display messages in red. Please respond in accordance with the dis-
play messages and follow the additional
notes in this Owner's Manual. G
Risk of accident
No further messages can be displayed if the
instrument cluster and/or the multi-function
display fails.
This means that you will not see information
about the driving situation, such as the speed,
outside temperature, warning/indicator
lamps, display messages or system failures.
The vehicle's handling characteristics may be
affected. Adjust your driving style and speed
accordingly.
Immediately consult a qualified specialist
workshop which has the necessary specialist
knowledge and tools to carry out the work
required. Mercedes-Benz recommends that
you use a Mercedes-Benz Service Centre for
this purpose. In particular, work relevant to
safety or on safety-related systems must be
carried out at a qualified specialist workshop.
Calling up display messages The on-board computer saves certain display
messages, which you can call up.
X
Press VorU on the steering wheel
repeatedly, until either the original menu or
the message memory menu is shown.
If there are display messages, the multi-
function display shows, e.g. 2 messages.
X Using &or* scroll through the dis-
play messages.
Hiding display messages You cannot hide display messages of the
highest priority. The multi-function display
shows these messages continuously until
their causes have been remedied.
Use the buttons on the multi-function steer-
ing wheel.
X
Use the V,U,&or* button
on the steering wheel to select another dis-
play. Display messages
211Practical advice
* optional
X164_AKB; 2; 3, en-GB
wobuchh,
Version: 2.11.8.1 2009-03-31T14:14:58+02:00 - Seite 211 Z
Dateiname: 6515431202_buchblock.pdf; erzeugt am 01. Apr 2009 00:17:58; WK