2009 MERCEDES-BENZ GL SUV oil level
[x] Cancel search: oil levelPage 11 of 309

DVD audio
Operating (on-board computer) .....101
DVD video
Operating (on-board computer) .....102 E
EASY-ENTRY/EXIT feature Activating/deactivating (on-
board computer) ............................ 108
EASY-ENTRY feature ............................ 72
Activating/deactivating (on-
board computer) ............................ 108
EASY-EXIT feature ............................... 72
Crash-responsive ............................. 72
Easy-Pack fix kit ................................ 159
EBV (electronic brake force distri-
bution) .................................................. 52
Display message ............................ 220
Electronic brake force distribution
See EBV ........................................... 52
Electronic Stability Program
see ESP ®
......................................... 51
Electronic Traction System
see 4ETS .......................................... 53
Emergency key element
Lost ............................................... 247
Emergency locking
Vehicle .......................................... .251
Emergency release
Fuel filler fla p................................. 251
Spare wheel bracket ......................251
Emergency running mode
Automatic transmission .................244
Emergency unlocking
Vehicle .......................................... .250
Engine
Running irregularl y......................... 243
Starting problems ..................242, 243
Starting with KEYLESS GO ...............89
Starting with the key ........................ 88
Switching off .................................... 91
Engine diagnostics warning
lamp .................................................... 237
Engine electronics .............................284
Malfunction ................................... .242
Engine number .................................. 287Engine oil
.......................................... 289
Capacities ...................................... 177
Checking the oil level (dipstick) .....177
Checking the oil level (on-board
computer) ...................................... 176
Consumption ................................ 176
Display mes-
sage .............................. 176, 228, 229
Filler neck ...................................... 177
Topping up ..................................... 177
ESP ®
(Electronic Stability Pro-
gram) .................................................... 51
Activating/deactivating ...................52
Display mes-
sages ............................................. 215
Trailer stabilisatio n.......................... 51
Warning lamp ..................51, 235, 236
Exterior lighting
Delayed switch-off (on-board
computer) ...................................... 105
Exterior mirrors
Adjusting ......................................... 72
Anti-dazzle mode (automatic) ..........73
Folding in/out (automatically). ........73
Folding in/out (electrically). ............73
Folding in when locking (on-board
computer) ...................................... 109
Malfunction ................................... .246
Parking position ............................... 74
Resetting ......................................... 73
Storing settings ............................... 74
Exterior view
Overview .......................................... 22 F
Fault message see Display message .....................211
Fire extinguisher ............................... 208
First-aid kit ......................................... 208
Flat tyre Equipment ..................................... 262
Preparing the vehicle .....................262
TIREFIT kit ...................................... 263
Floormat ............................................ .168
Foglamps Display message ............................ 227
Fording ....................................... 188, 1928
Index X164_AKB; 2; 3, en-GB
wobuchh,
Version: 2.11.8.1 2009-03-31T14:14:58+02:00 - Seite 8Dateiname: 6515431202_buchblock.pdf; erzeugt am 01. Apr 2009 00:16:29; WK
Page 15 of 309

Oil level
Checking (dipstick) ........................177
Checking (on-board computer) ......176
On-board computer .............................97
Additional functions menu .............109
Audio menu ................................... 100
Convenience submenu ..................108
Display messages ..........................211
DVD menu ..................................... 102
Factory settings ............................. 103
Heating submenu ........................... 107
Instrument cluster submenu ..........103
Lighting submenu .......................... 105
Navi menu ..................................... 102
Off-road menu ............................... 102
Overview .......................................... 99
Settings menu ............................... 103
Standard display menu ....................99
Telephone menu ............................ 111
Time/date submenu ......................104
Trip computer menu ......................110
TV menu ........................................ 101
Vehicle submenu ........................... 106
On-board computer language ..........104
Operating system see On-board computer ...................97
Outside temperature display ............97
On-board computer .......................100
Override feature
Rear side windows ...........................49 P
Paint code .......................................... 286
Paintwork Cleaning ......................................... 202
Panel
Removing (third row of seats) ..........68
Parking ................................................. 90
Parking aid Exterior mirror on the front-
passenger side ................................. 74
PARKTRONIC ................................. 133
Reversing camera ..........................135
Parking brake ...................................... 91
Display message ............................ 221
Parking lamps
Display message ............................ 227Parking position
Exterior mirror on the front-
passenger side ................................. 74
PARKTRONIC ...................................... 133
Activating/deactivating .................135
Malfunction ................................... .244
Range of the sensors .....................134
Trailer towing ................................. 135
Warning displa y............................. 134
PASSENGER AIRBAG OFF warning
lamp ............................................. 43, 234
Permanent four-wheel drive see 4MATIC ................................... 112
Permanent Speedtronic ....................128
Petrol Minimum grade ............................ .173
see Fuel
Plastic trim
Cleaning ......................................... 205
Power supply (trailer) .......................199
Power window switch see Side windows
Pre-emptive occupant safety system
see PRE-SAFE ®
PRE-SAFE ®
system .............................. 40
Display message ............................ 217
Program selector button
Automatic transmission ...................95
Pulling away ......................................... 89 R
Radio Changing a station (on-board
computer) ...................................... 100
see separate operating instructions
Radio-controlled equipment
Installation ..................................... 168
Rain closing feature
Sliding/tilting sunroof ...................151
Range (on-board computer) .............111
Rear bench seat Folding forward/back ....................155
Rear compartment
Activating/deactivating the air
conditioning ........................... 140, 141
Setting the air vents ......................144
Setting the temperature ................142 12
Index X164_AKB; 2; 3, en-GB
wobuchh,
Version: 2.11.8.1 2009-03-31T14:14:58+02:00 - Seite 12Dateiname: 6515431202_buchblock.pdf; erzeugt am 01. Apr 2009 00:16:30; WK
Page 102 of 309

Menus and submenus
Function
:
Standard display
menu
(Y page 99)
R tyre pressure loss warning
(Y page 182) or tyre pressure mon-
itor* (Y page 183)
R ASSYST PLUS service interval dis-
play
R checking engine oil level*
(Y page 176) ;
Audio/TV*/DVD*
menu
(Y page 100) =
Navigation*
menu (Ypage 102) ?
Off-road*
menu (Ypage 102)
R off-road level (Y page 129)
R compass display (Y page 166)
R differential locks (status indicator)
(Y page 116) A
Distronic*
menu (Ypage 119) Function
B
Message memory
menu19
(Y page 211) C
Settings
menu (Ypage 103) D
Additional functions
menu
(Y page 109) E
Trip computer
menu (Ypage 110) F
Telephone
menu (Ypage 111) The number of menus shown depends on the
optional equipment in the vehicle.
Depending on the audio system fitted, the
Audio, Navigation* and Telephonemenus
are slightly different. The examples given in
this Owner's Manual apply to vehicles equip-
ped with COMAND APS*. Standard display menu
Use the buttons on the multi-function steer-
ing wheel.
19 The menu is only visible when there is a display message. On-board computer
99Controls
* optional
X164_AKB; 2; 3, en-GB
wobuchh,
Version: 2.11.8.1 2009-03-31T14:14:58+02:00 - Seite 99 Z
Dateiname: 6515431202_buchblock.pdf; erzeugt am 01. Apr 2009 00:17:15; WK
Page 103 of 309

X
Press the VorU button to select the
standard display. Standard display
:
Trip meter
; Total distance
You can select the following functions in the
Standard display menu using the&or
* button:
R tyre pressure loss warning (Y page 182) or
tyre pressure monitor* (Y page 183)
R coolant temperature (Y page 100)
R digital speedometer or outside tempera-
ture (Y page 104)
R ASSYST PLUS service interval display
R engine oil level* (Y page 176)
X To reset the trip meter: press and hold
the .reset button in the instrument clus-
ter until the trip meter is reset.
Displaying the coolant temperature X
Press the VorU button to select the
standard display.
X Press the &or* button to select the
coolant temperature. Under normal driving conditions, with the cor-
rect anti-corrosion and antifreeze additive concentration, the reading may rise to
120 †.
Displaying the digital speedometer or
outside temperature If you have selected the digital speedometer
as the status line (Y
page 104), select the
outside temperature display here 20
.
X Press the VorU button to select the
standard display.
X Press the &or* button to select
digital speedometer or the outside temper-
ature. Digital speedometer
Outside temperature
Audio/TV*/DVD* menu
Use the functions in the Audio/TV/DVD
menu to operate the audio equipment or
COMAND APS*.
Selecting a radio station You can only store new stations using the
audio system or COMAND APS* (see the sep-
arate operating instructions).
20 Vehicles for the United Kingdom: the outside temperature is always displayed. 100
On-board computerControls
* optional
X164_AKB; 2; 3, en-GB
wobuchh,
Version: 2.11.8.1 2009-03-31T14:14:58+02:00 - Seite 100
Dateiname: 6515431202_buchblock.pdf; erzeugt am 01. Apr 2009 00:17:15; WK
Page 178 of 309

Vehicles with a petrol engine:
The electronic ignition system uses high volt-
age. For this reason, you must never touch
ignition system components (ignition coil,
ignition cable, spark plug connector or test
socket) while:
R the engine is running.
R the engine is being started.
R the ignition is switched on and the engine
is being cranked by hand.
You could otherwise suffer an electric shock
and be seriously or even fatally injured.
Vehicles with a diesel engine:
The electronic injection control uses high volt-
age. For this reason, you must never touch
injection system components while:
R the engine is running.
R the engine is being started.
R the ignition is switched on.
You could otherwise suffer an electric shock
and be seriously or even fatally injured.
X Make sure that the windscreen wipers are
switched off. G
Risk of injury
The windscreen wipers and wiper linkage
could be set in motion.
When the bonnet is open, you or others could
be injured by the wiper linkage.
Make sure that the windscreen wiper is
switched off. Remove the key or make sure
that no ignition level has been selected on
KEYLESS GO *. Inthe instrument cluster, all of
the indicator lamps must be out. The bonnet release lever is located in the
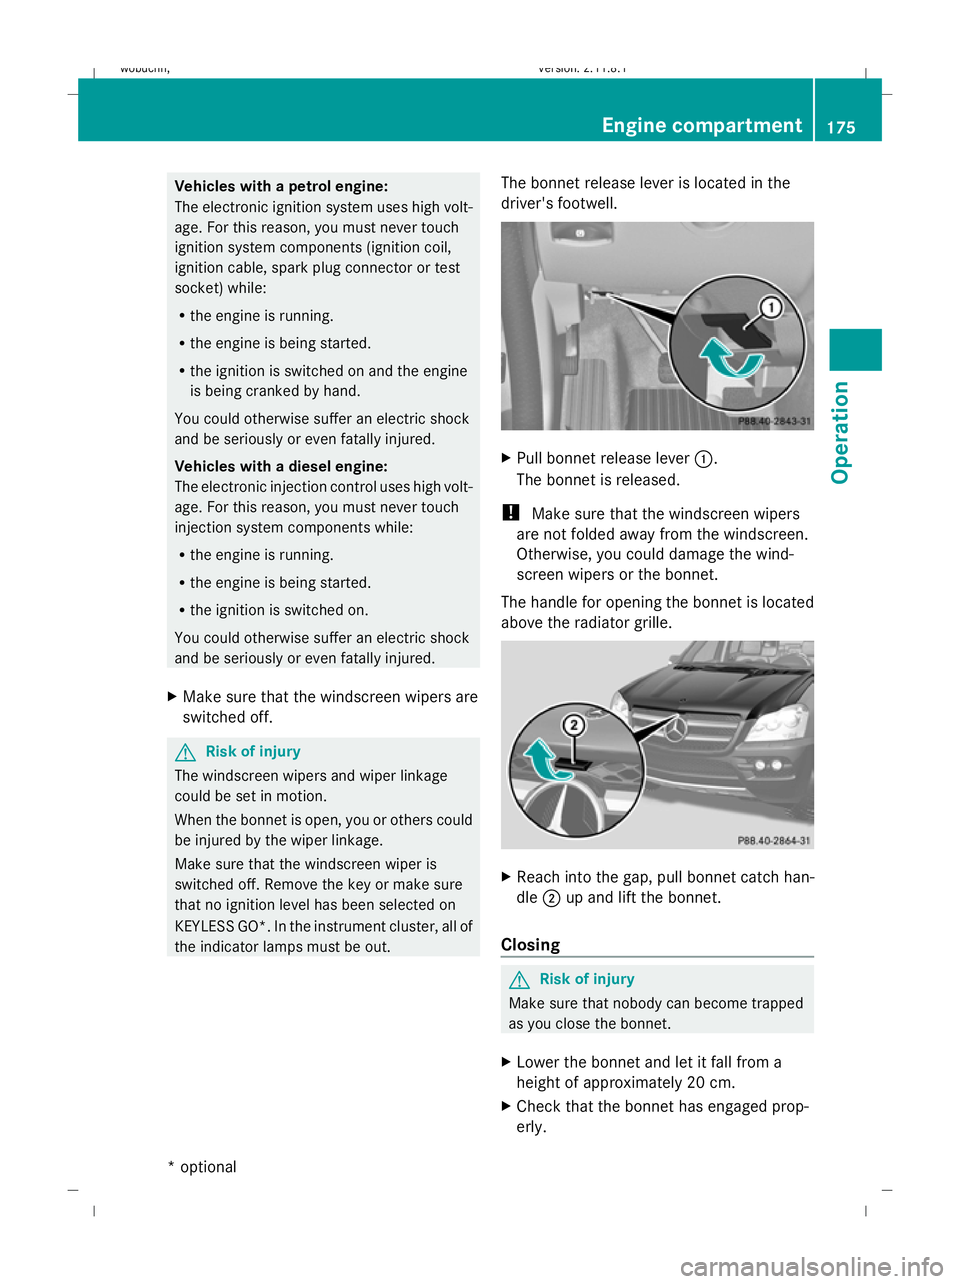
driver's footwell. X
Pull bonnet release lever :.
The bonnet is released.
! Make sure that the windscreen wipers
are not folded away from the windscreen.
Otherwise, you could damage the wind-
screen wipers or the bonnet.
The handle for opening the bonnet is located
above the radiator grille. X
Reach into the gap, pull bonnet catch han-
dle ;up and lift the bonnet.
Closing G
Risk of injury
Make sure that nobody can become trapped
as you close the bonnet.
X Lower the bonnet and let it fall from a
height of approximately 20 cm.
X Check that the bonnet has engaged prop-
erly. Engine compartment
175Operation
* optional
X164_AKB; 2; 3, en-GB
wobuchh
,V ersion: 2.11.8.1
2009-03-31T14:14:58+02:00 - Seite 175 Z
Dateiname: 6515431202_buchblock.pdf; erzeugt am 01. Apr 2009 00:17:45; WK
Page 179 of 309

i
If the bonnet can be raised slightly, it is
not properly engaged. Open it again and
close it with a little more force. Engine oil
Depending on driving style, the vehicle con-
sumes up to 0.8 l oil per 1,000 km. The oil
consumption may be higher than this when
the vehicle is new or if you frequently drive at
high engine speeds.
Checking the engine oil level Before checking the engine oil level the fol-
lowing conditions for the vehicle should be
met:
R the vehicle should be parked on level
ground.
R the engine should be switched off for at
least five minutes if the engine is at normal
operating temperature.
R the engine should be switched off for at
least 30 minutes if the engine is not at
operating temperature (i.e. if you only start
the engine briefly).
Using the on-board computer*
i Only possible on the GL 450 CDI 4MATIC.
On all other models, a dipstick is used to
check the engine oil level (Y page 177).
X Make sure that the key is in position
2(Y page 63) in the ignition lock.
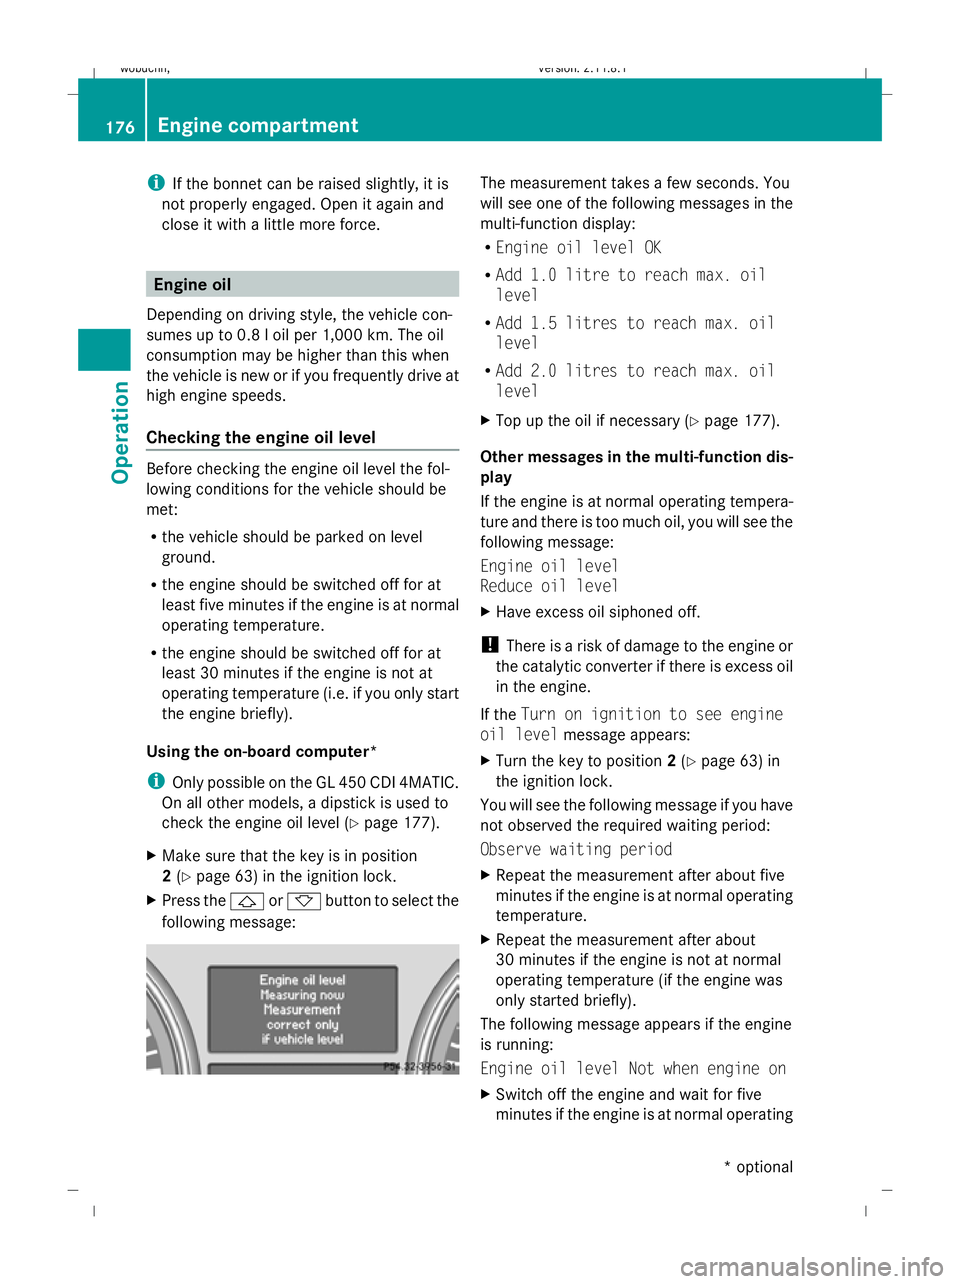
X Press the &or* button to select the
following message: The measurement takes a few seconds. You
will see one of the following messages in the
multi-function display:
R
Engine oil level OK
R Add 1.0 litre to reach max. oil
level
R Add 1.5 litres to reach max. oil
level
R Add 2.0 litres to reach max. oil
level
X Top up the oil if necessary (Y page 177).
Other messages in the multi-function dis-
play
If the engine is at normal operating tempera-
ture and there is too much oil, you will see the
following message:
Engine oil level
Reduce oil level
X Have excess oil siphoned off.
! There is a risk of damage to the engine or
the catalytic converter if there is excess oil
in the engine.
If the Turn on ignition to see engine
oil level message appears:
X Turn the key to position 2(Y page 63) in
the ignition lock.
You will see the following message if you have
not observed the required waiting period:
Observe waiting period
X Repeat the measurement after about five
minutes if the engine is at normal operating
temperature.
X Repeat the measurement after about
30 minutes if the engine is not at normal
operating temperature (if the engine was
only started briefly).
The following message appears if the engine
is running:
Engine oil level Not when engine on
X Switch off the engine and wait for five
minutes if the engine is at normal operating 176
Engine compartmentOperation
* optional
X164_AKB; 2; 3, en-GB
wobuchh,
Version: 2.11.8.1 2009-03-31T14:14:58+02:00 - Seite 176
Dateiname: 6515431202_buchblock.pdf; erzeugt am 01. Apr 2009 00:17:46; WK
Page 180 of 309

temperature, or for about 30 minutes if the
engine is not at normal operating temper-
ature (if you had started the engine only
briefly), before measuring.
i If you wish to cancel the measurement,
press the *or& button on the multi-
function steering wheel.
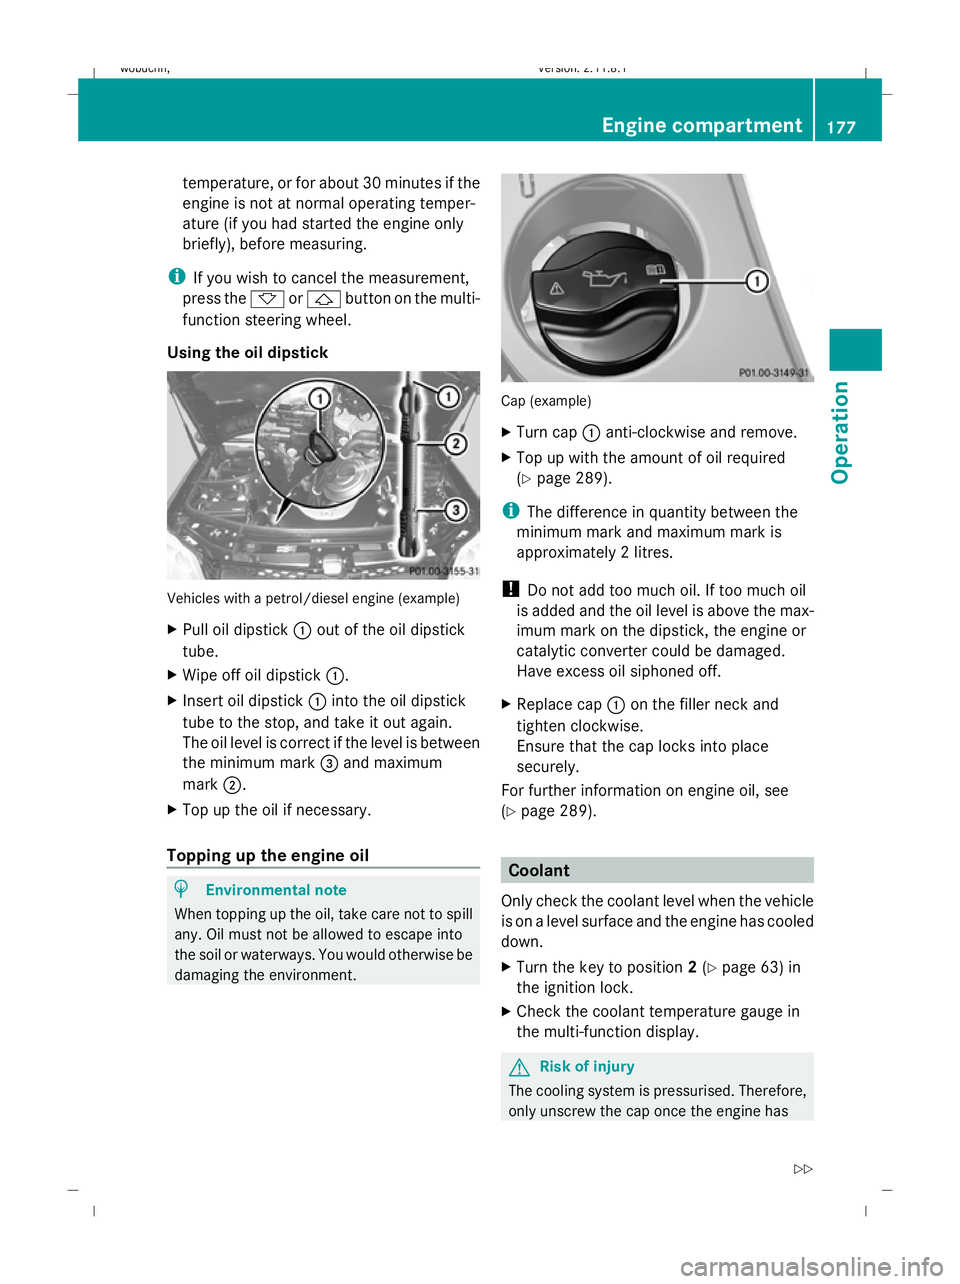
Using the oil dipstick Vehicles with a petrol/diesel engine (example)
X Pull oil dipstick :out of the oil dipstick
tube.
X Wipe off oil dipstick :.
X Insert oil dipstick :into the oil dipstick
tube to the stop, and take it out again.
The oil level is correct if the level is between
the minimum mark =and maximum
mark ;.
X Top up the oil if necessary.
Topping up the engine oil H
Environmental note
When topping up the oil, take care not to spill
any. Oil must not be allowed to escape into
the soil or waterways. You would otherwise be
damaging the environment. Cap (example)
X
Turn cap :anti-clockwise and remove.
X Top up with the amount of oil required
(Y page 289).
i The difference in quantity between the
minimum mark and maximum mark is
approximately 2 litres.
! Do not add too much oil. If too much oil
is added and the oil level is above the max-
imum mark on the dipstick, the engine or
catalytic converter could be damaged.
Have excess oil siphoned off.
X Replace cap :on the filler neck and
tighten clockwise.
Ensure that the cap locks into place
securely.
For further information on engine oil, see
(Y page 289). Coolant
Only check the coolant level when the vehicle
is on a level surface and the engine has cooled
down.
X Turn the key to position 2(Y page 63) in
the ignition lock.
X Check the coolant temperature gauge in
the multi-function display. G
Risk of injury
The cooling system is pressurised. Therefore,
only unscrew the cap once the engine has Engine compartment
177Operation
X164_AKB; 2; 3, en-GB
wobuchh,V ersion: 2.11.8.1
2009-03-31T14:14:58+02:00 - Seite 177 Z
Dateiname: 6515431202_buchblock.pdf; erzeugt am 01. Apr 2009 00:17:46; WK
Page 182 of 309

Tyres and wheels
Points to remember
! For safety reasons, Mercedes-Benz rec-
ommends that you only use tyres, wheels
and accessories which have been approved
by Mercedes-Benz specifically for your
vehicle. These tyres have been specially
adapted for use with the control systems,
such as ABS or ESP ®
, and are marked as
follows:
R MO = Mercedes-Benz Original
R MOE = Mercedes-Benz Original Exten-
ded* (tyres with run-flat characteristics)
Only use Mercedes-Benz Original Extended
tyres* on wheels that have been specifi-
cally approved by Mercedes-Benz.
If you use other tyres, wheels and acces-
sories, Mercedes-Benz cannot accept any
responsibility for damage that may result
from this. Further information about tyres,
wheels and approved combinations can be
obtained from any Mercedes-Benz Service
Centre.
! If you fit tyres other than those tested and
recommended by Mercedes-Benz, charac-
teristics such as handling, noise levels and
fuel consumption, etc. may be adversely
affected. In addition, when driving with a
load, tyre dimensional variations could
cause the tyres to come into contact with
the bodywork and axle components. This
could result in damage to the tyres or the
vehicle.
! Retreaded tyres are neither tested nor
recommended by Mercedes-Benz, since
previous damage cannot always be detec-
ted on retreaded tyres. As a result,
Mercedes-Benz cannot guarantee vehicle
safety if retreaded tyres are fitted. Do not
fit used tyres if you have no information
about their previous usage. G
Risk of accident
Tyres, wheels or accessories which have not
been approved by Mercedes-Benz for your
vehicle or are not used as they should be, can
impair driving safety. As a result, you could
cause an accident. Before purchasing and
using them, enquire about their suitability,
legal stipulations and factory recommenda-
tions at a Mercedes-Benz Service Centre.
Modification work on the brake system and
wheels is not permitted, nor is the use of
spacer plates or brake dust shields. This inva-
lidates the General Operating Permit for the
vehicle.
Notes on selecting, fitting and replac-
ing tyres R
Only fit tyres and wheels of the same type
and make.
R Only fit tyres of the correct size onto the
wheels.
R After fitting new tyres, run them in at mod-
erate speeds for the first 100 km as they
only reach their full performance after this
distance.
R Fit new tyres on the front wheels first if
tyres of the same size are required on the
front and rear wheels.
R Replace the tyres after six years at the lat-
est, regardless of wear. This also applies to
the spare wheel*.
R Do not drive with tyres which have too little
tread depth, as this significantly reduces
the traction on wet roads (aquaplaning).
! Store tyres that are not being used in a
cool, dry and preferably dark place. Protect
the tyres against oil, grease, petrol and die-
sel.
Notes on regularly inspecting wheels
and tyres R
Regularly check the wheels and tyres of
your vehicle for damage (e.g. cuts, punctu- Tyres and
wheels
179Operation
* optional
X164_AKB; 2; 3, en-GB
wobuchh
,V ersion: 2.11.8.1
2009-03-31T14:14:58+02:00 - Seite 179 Z
Dateiname: 6515431202_buchblock.pdf; erzeugt am 01. Apr 2009 00:17:47; WK