2009 MERCEDES-BENZ GL SUV winter tyres
[x] Cancel search: winter tyresPage 19 of 309

Vehicle battery
.................................. 272
Vehicle dimensions ...........................295
Vehicle electronics ...........................284
Vehicle identification number
(VIN) .................................................. 286
Vehicle identification plate ..............286
Vehicle level Display mes-
sage.............................................. 221, 222
Vehicle tool kit .................................. 209W
Warning and indicator lamps ABS (yellow) ................................... 235
ESP ®
........................................ 51, 236
LIM (cruise control) ........................ 118
LIM (Distronic) ............................... 121
LIM (variable Speedtronic) .............126
Malfunction indicator lamp ............234
Tyre pressure monitor ...................237
Warning tone ..................................... 239
Warning triangle ................................ 208
Washer fluid Display message ............................ 232
Washer fluid reservoir ..............178, 291
Filling capacity ............................... 291
Wearing seat belts .............................. 75
Wheel bolts Tightening torque ........................... 271
Wheel chock
Use ................................................ 268
Wheels
Cleaning ......................................... 202
General notes ................................ 179
Interchanging ................................. 184
Technical data ....................... 296, 297
Windowbag .......................................... 39
Windows Cleaning ......................................... 202
see Side windows
Windscreen
Infrared reflective .......................... 168
Windscreen washer fluid ..................291
Topping up ..................................... 178
Windscreen washer system .....178, 291 Windscreen wipers
.............................84
Malfunction ................................... .245
Replacing the wiper blades ............261
Winter diesel ..................................... 174
Winter driving ............................ 185, 186
Winter tyres ....................................... 185
Limiting the speed (on-board com-
puter) ............................................. 128
Wiper blades
Cleaning ......................................... 202
Replacing ....................................... 261
Wooden trim
Cleaning ......................................... 205 16
Index X164_AKB; 2; 3, en-GB
wobuchh,
Version: 2.11.8.1 2009-03-31T14:14:58+02:00 - Seite 16Dateiname: 6515431202_buchblock.pdf; erzeugt am 01. Apr 2009 00:16:30; WK
Page 53 of 309
R
4ETS ( Electronic Traction Support)
R Distance warning function* (vehicles with
Distronic*)
i In wintry driving conditions, always use
winter tyres (M+S tyres) and if necessary,
snow chains. Only in this way will the driv-
ing safety systems described in this section
work as effectively as possible. G
Risk of accident
The risk of an accident is significantly
increased by driving too fast. This is particu-
larly the case when cornering as well as on
wet or slippery roads or when driving too close
to the vehicle in front.
The driving safety systems described in this
section can neither reduce this risk nor over-
ride the laws of physics.
For this reason, always adapt your driving
style to suit prevailing road and weather con-
ditions. Maintain sufficient distance from
other road users and objects on the road. ABS (Anti-lock Braking System)
ABS regulates brake pressure in such a way
that the wheels do not lock when you brake.
This allows you to continue steering the vehi-
cle when braking.
ABS works from a speed of about 8 km/h
upwards, regardless of road-surface condi-
tions. ABS works on slippery surfaces, even
when you only brake gently. G
Risk of accident
Do not depress the brake pedal several times
in quick succession (pumping). Depress the
brake firmly and evenly. Pumping the brake
pedal reduces the braking effect.
Braking If ABS intervenes when braking, you will feel
a pulsing in the brake pedal. X
If ABS intervenes: continue to depress the
brake pedal with force until the braking sit-
uation is over.
X To make a full brake application:
depress the brake pedal with full force. G
Risk of accident
If ABS is faulty, the wheels could lock when
braking. This limits the steerability of the vehi-
cle when braking and the braking distance
may increase.
If ABS is deactivated due to a malfunction,
then BAS and ESP are also deactivated. There
is an increased risk of your vehicle skidding in
certain situations.
You should always adapt your driving style to
suit prevailing road and weather conditions.
Off-road ABS An ABS system specifically suited to off-road
terrain is activated automatically if the LOW
RANGE (Y
page 114) off-road gear is selec-
ted.
At speeds below 30 km/h, the front wheels
lock cyclically under braking. The resulting
digging-in effect reduces the stopping dis-
tance on off-road terrain. This limits steering
capability. BAS (Brake Assist)
BAS operates in emergency braking situa-
tions. If you depress the brake pedal quickly,
BAS automatically boosts the braking force,
thus shortening the stopping distance.
X Keep the brake pedal firmly depressed until
the emergency braking situation is over.
ABS prevents the wheels from locking.
The brakes will function as usual once you
release the brake pedal. BAS is deactivated. G
Risk of accident
If BAS has malfunctioned, the braking system
remains available with full brake boosting 50
Driving safety systemsSafety
* optional
X164_AKB; 2; 3, en-GB
wobuchh,
Version: 2.11.8.1 2009-03-31T14:14:58+02:00 - Seite 50
Dateiname: 6515431202_buchblock.pdf; erzeugt am 01. Apr 2009 00:16:48; WK
Page 115 of 309
If you are not in the
Telephonemenu, you can
still accept a call.
Rejecting or ending a call X
Press the ~button.
If you are not in the Telephonemenu, you can
still accept a call.
Dialling a number from the phone book You can use the mobile phone to enter new
telephone numbers into the phone book (see
separate operating instructions). If your
mobile phone is operational, you can select
and dial a number from the phone book at any
time.
X Press the VorU button to select the
Telephone menu.
X Press the &or* button to call up
the phone book.
X Press the &or* button to select the
name you are searching for. To scroll rap-
idly, press and hold the &or* but-
ton for longer than 1 second.
X Press the 6button to start dialling.
or
X If you do not want to make a call, press the
~ button.
Redialling The on-board computer saves the last names
or numbers dialled in the redial memory.
X Press the VorU button to select the
Telephone menu.
X Press the 6button to switch to the
redial memory.
X Press the &or* button to select the
desired name or number.
X Press the 6button to start dialling. Off-road driving
Overview of off-road driving systems
The systems which are relevant for off-road
driving are explained on the following pages:
R 4MATIC (permanent four-wheel drive), for
optimum traction
R DSR (Downhill Speed Regulation), which
assists you when driving downhill
R LOW RANGE off-road gear for better trac-
tion off-road
R Differential locks for increased traction off-
road
You will find further information about driving
off-road in the "Operation" section
(Y page 188). 4MATIC (permanent four-wheel drive)
4MATIC ensures that all four wheels are per-
manently driven. Together with ESP ®
and
4ETS, it improves the traction of your vehicle
whenever a drive wheel spins due to insuffi-
cient grip. G
Risk of accident
4MATIC cannot reduce the risk of an accident
if you drive too fast.
If a drive wheel spins due to insufficient grip:
R only depress the accelerator pedal as far as
necessary when pulling away.
R accelerate less when driving.
R adapt your driving style to suit road and
traffic conditions.
i In wintry driving conditions, the maximum
effect of 4MATIC can only be achieved if
you use winter tyres (M+S tyres), with snow
chains if necessary.
! When testing the parking brake, operate
the vehicle only briefly (for a maximum of
ten seconds) on a brake test dynamometer.
When doing this, turn the key to position 112
Off-road drivingControls
X164_AKB; 2; 3, en-GB
wobuchh,
Version: 2.11.8.1 2009-03-31T14:14:58+02:00 - Seite 112
Dateiname: 6515431202_buchblock.pdf; erzeugt am 01. Apr 2009 00:17:18; WK
Page 129 of 309
of its narrow width. The distance to the vehi-
cle in front will be too short.
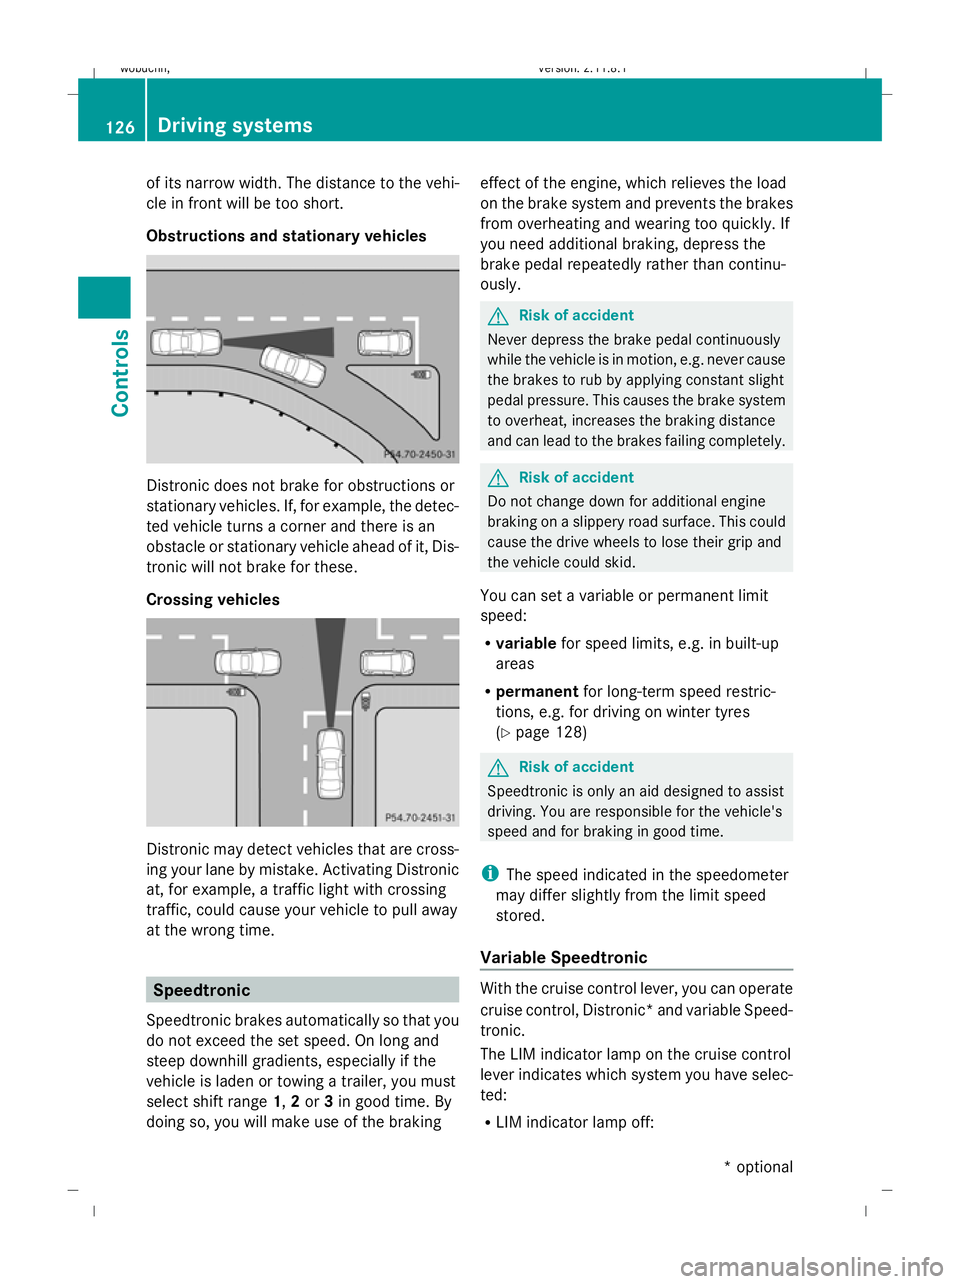
Obstructions and stationary vehicles Distronic does not brake for obstructions or
stationary vehicles. If, for example, the detec-
ted vehicle turns a corner and there is an
obstacle or stationary vehicle ahead of it, Dis-
tronic will not brake for these.
Crossing vehicles Distronic may detect vehicles that are cross-
ing your lane by mistake. Activating Distronic
at, for example, a traffic light with crossing
traffic, could cause your vehicle to pull away
at the wrong time. Speedtronic
Speedtronic brakes automatically so that you
do not exceed the set speed. On long and
steep downhill gradients, especially if the
vehicle is laden or towing a trailer, you must
select shift range 1,2or 3in good time. By
doing so, you will make use of the braking effect of the engine, which relieves the load
on the brake system and prevents the brakes
from overheating and wearing too quickly. If
you need additional braking, depress the
brake pedal repeatedly rather than continu-
ously. G
Risk of accident
Never depress the brake pedal continuously
while the vehicle is in motion, e.g. never cause
the brakes to rub by applying constant slight
pedal pressure. This causes the brake system
to overheat, increases the braking distance
and can lead to the brakes failing completely. G
Risk of accident
Do not change down for additional engine
braking on a slippery road surface. This could
cause the drive wheels to lose their grip and
the vehicle could skid.
You can set a variable or permanent limit
speed:
R variable for speed limits, e.g. in built-up
areas
R permanent for long-term speed restric-
tions, e.g. for driving on winter tyres
(Y page 128) G
Risk of accident
Speedtronic is only an aid designed to assist
driving. You are responsible for the vehicle's
speed and for braking in good time.
i The speed indicated in the speedometer
may differ slightly from the limit speed
stored.
Variable Speedtronic With the cruise control lever, you can operate
cruise control, Distronic* and variable Speed-
tronic.
The LIM indicator lamp on the cruise control
lever indicates which system you have selec-
ted:
R
LIM indicator lamp off: 126
Driving systemsControls
* optional
X164_AKB; 2; 3, en-GB
wobuchh,
Version: 2.11.8.1 2009-03-31T14:14:58+02:00 - Seite 126
Dateiname: 6515431202_buchblock.pdf; erzeugt am 01. Apr 2009 00:17:23; WK
Page 131 of 309
Making adjustments in 1 km/h incre-
ments X
Briefly press the cruise control lever to the
pressure point, up :for a higher speed or
down ?for a lower speed.
or
X Keep the cruise control lever pressed to the
pressure point until the desired speed is
set. Press the cruise control lever, up :
for a higher speed or down ?for a lower
speed.
Adjustment in 10 km/h increments X
Briefly press the cruise control lever
beyond the pressure point, up :for a
higher speed or down ?for a lower speed.
or
X Keep the cruise control lever pressed
beyond the pressure point until the desired
speed is set. Press the cruise control lever,
up : for a higher speed or down ?for a
lower speed.
Deactivating variable Speedtronic There are several ways to deactivate variable
Speedtronic:
X
Briefly press the cruise control lever for-
wards B.
The LIM indicator lamp in the instrument
cluster goes out.
or
X Briefly press the cruise control lever in the
direction of arrow A.
LIM indicator lamp ;in the cruise control
lever goes out. Variable Speedtronic is
deactivated.
Cruise control or Distronic* is selected.
Variable Speedtronic is deactivated automat-
ically when you depress the accelerator pedal
beyond the pressure point (kickdown), but
only if your current speed does not differ by
more than 20 km/h from the stored speed.
You will hear a warning tone if this is the case. G
Risk of accident
It is not possible to deactivate variable Speed-
tronic by braking.
i The last speed stored is cleared when you
switch off the engine.
Permanent Speedtronic i
Permanent Speedtronic is only available
in certain countries.
You can use the on-board computer to limit
the speed permanently to a value between
160 km/h (e.g. for driving with winter tyres)
and the maximum speed.
Just before the stored speed is reached, it
appears in the multi-function display.
Permanent Speedtronic remains active, even
if variable Speedtronic is deactivated.
You cannot exceed the stored limit speed,
even if you depress the accelerator pedal
beyond the pressure point (kickdown).
Setting permanent Speedtronic
X Press the VorU button to select the
Settings menu (Ypage 103).
X Press the &button to call up the selec-
tion of submenus.
X Press the WorX button to select the
Vehicle submenu.
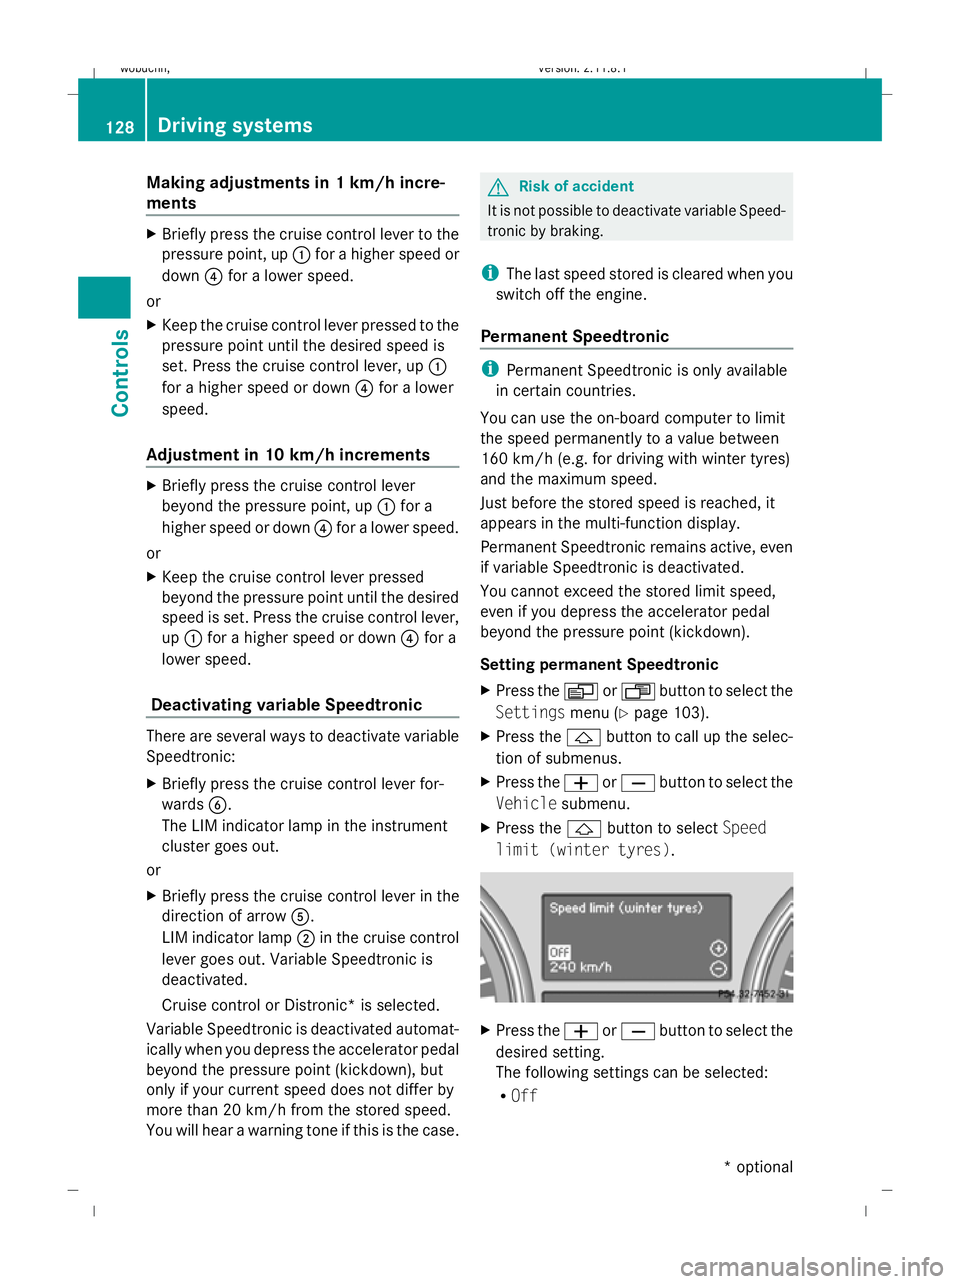
X Press the &button to select Speed
limit (winter tyres). X
Press the WorX button to select the
desired setting.
The following settings can be selected:
R Off 128
Driving systemsControls
* optional
X164_AKB; 2; 3, en-GB
wobuchh,
Version: 2.11.8.1 2009-03-31T14:14:58+02:00 - Seite 128
Dateiname: 6515431202_buchblock.pdf; erzeugt am 01. Apr 2009 00:17:23; WK
Page 174 of 309
Running-in notes
............................... 172
Refuelling ........................................... 172
Engine compartment ........................174
Tyres and wheels .............................. 179
Winter driving ................................... 185
Driving tips ........................................ 186
Off-road driving ................................. 188
Driving abroad ................................... 193
Trailer towing* .................................. 193
Service ............................................... 199
Care .................................................... 201 171Operation
X164_AKB; 2; 3, en-GB
wobuchh,
Version: 2.11.8.1 2009-03-31T14:14:58+02:00 - Seite 171
Dateiname: 6515431202_buchblock.pdf; erzeugt am 01. Apr 2009 00:17:45; WK
Page 183 of 309
res, tears, bulges on tyres and deformation,
cracks or severe corrosion on wheels), at
least every 14 days, as well as after driving
off-road or on rough roads. Damaged
wheels can cause a loss of tyre pressure.
R Regularly check the tyre tread depth and
the condition of the tread across the whole
width of the tyre (Y page 180). If neces-
sary, turn the front wheels to full lock in
order to inspect the inner side of the tyre
surface.
R All wheels must have a valve cap to protect
the valve against dirt and moisture. Do not
fit anything onto the valve (such as tyre
pressure monitoring systems) other than
the standard valve cap or other valve caps
approved by Mercedes-Benz for your vehi-
cle.
R Regularly check the pressure of all the tyres
including the spare tyre*, particularly prior
to long trips, and correct the pressure as
necessary (Y page 180).
Notes on driving R
While driving, pay attention to vibrations,
noises and unusual handling characteris-
tics, e.g. pulling to one side. This may indi-
cate that the wheels or tyres are damaged.
If you suspect that a tyre is defective,
reduce your speed and stop the vehicle as
soon as possible to check the wheels and
tyres for damage. Hidden tyre damage
could also be causing the unusual handling
characteristics. If you find no signs of dam-
age, have the wheels and tyres examined
at a specialist workshop, for example at a
Mercedes-Benz Service Centre.
R When parking your vehicle, make sure that
the tyres do not get deformed by the kerb
or other obstacles. If it is necessary to drive
over kerbs, speed humps or similar eleva-
tions, try to do so slowly and at an obtuse
angle. Otherwise, the tyres, particularly the
sidewalls, can get damaged. Direction of rotation
Tyres with a specified direction of rotation
have additional benefits, e.g. if there is a risk
of aquaplaning. You will only gain these ben-
efits if the correct direction of rotation is
observed.
An arrow on the sidewall of the tyre indicates
its correct direction of rotation.
i You may fit a spare tyre* against the
direction of rotation. Tyre tread
G
Risk of accident
Bear in mind that:
R tyre grip decreases rapidly on wet roads
when the tread depth is less than 3 mm.
Thus, you should replace tyres that have
insufficient tread.
R winter tyres should be replaced when the
tread depth is 4 mm or less as they will no
longer provide adequate grip.
R the tread on a tyre may not wear evenly.
Thus, you should regularly check the tread
depth and the condition of the tread across
the entire width of all tyres. If necessary,
turn the front wheels to full lock in order to
inspect the tyre tread more easily.
Otherwise, you could lose control of the vehi-
cle and cause an accident due to the reduced
grip of the tyres on the road. Tyre pressures
i You will find a table of tyre pressures for
various operating conditions on the inside
of your vehicle's fuel filler flap.
The applicable value for the spare
wheel*/"Minispare" emergency spare
wheel* is stated on the spare wheel and in
the technical data section.
Unless otherwise specified, the tyre pres-
sures on the inside of the fuel filler flap are 180
Tyres and wheelsOperation
* optional
X164_AKB; 2; 3, en-GB
wobuchh,
Version: 2.11.8.1 2009-03-31T14:14:58+02:00 - Seite 180
Dateiname: 6515431202_buchblock.pdf; erzeugt am 01. Apr 2009 00:17:47; WK
Page 188 of 309
Mercedes-Benz Service Centre for this pur-
pose. In particular, work relevant to safety or
on safety-related systems must be carried out
at a qualified specialist workshop.
The wheels could work loose if they are not
tightened to a torque of 150 Nm.
For safety reasons, Mercedes-Benz recom-
mends that you only use wheel bolts of the
correct size which have been approved for
Mercedes-Benz vehicles.
The wear patterns on the front and rear tyres
differ, depending on the operating conditions.
Interchange the wheels before a clear wear
pattern has formed on the tyres. Front tyres
typically wear more on the shoulders and the
rear tyres in the centre.
On vehicles that have the same size front and
rear wheels you can interchange the wheels
every 5,000 km to 10,000 km depending on
the degree of tyre wear. Do not reverse the
direction of tyre rotation.
Clean the contact surfaces of the wheel and
the brake disc thoroughly every time a wheel
is interchanged. Check the tyre pressure and,
if necessary, restart the tyre pressure loss
warning system or the tyre pressure moni-
tor*.
! On vehicles fitted with a tyre pressure
monitor*, electronic components are loca-
ted in the wheel.
Tyre-fitting tools should not be applied in
the area of the valve, as this could damage
the electronic components.
Always have the wheels interchanged/
changed at a qualified specialist workshop,
e.g. a Mercedes-Benz Service Centre.
i Vehicles with a tyre pressure monitor*
If the positions of the wheels on the vehicle
are changed, the tyre pressure may be tem-
porarily displayed in the wrong position.
This is rectified after a few minutes of driv-
ing; the tyre pressures are then displayed
in the correct positions. Winter driving
Points to remember
Have your vehicle winterproofed at a qualified
specialist workshop, e.g. at a Mercedes-Benz
Service Centre, at the onset of winter.
Observe the notes in the "Changing a wheel"
section (Y page 184). Winter tyres
At temperatures below +7 ˚C always use all-
weather tyres or winter tyres and always use
winter tyres in winter road conditions. Only
winter tyres displaying the isnowflake
symbol in addition to the M+S marking pro-
vide optimum grip in wintry road conditions.
Only these tyres will allow the ABS and
ESP ®
driving systems to function optimally in
winter, as these tyres have been designed
specifically for driving in snow.
Use winter tyres of the same make and tread
on all wheels to maintain safe handling char-
acteristics. G
Risk of accident
Winter tyres with a tread depth of less than
4 mm must be replaced immediately. They are
no longer suitable for winter use and can no
longer provide sufficient grip. This could
cause you to lose control of your vehicle and
cause an accident.
Always observe the maximum permissible
speed specified for the winter tyres you have
fitted. If you fit winter tyres which have a
lower maximum permissible speed than that
of the vehicle, affix an appropriate warning
sign in the driver's field of vision. This can be
obtained at a qualified specialist workshop,
e.g. from a Mercedes-Benz Service Centre.
Under these circumstances, you should also
restrict the maximum speed of the vehicle
using permanent Speedtronic 27
to the maxi-
27 Only available for certain countries. Winter driving
185Operation
* optional
X164_AKB; 2; 3, en-GB
wobuchh,
Version: 2.11.8.1 2009-03-31T14:14:58+02:00 - Seite 185 Z
Dateiname: 6515431202_buchblock.pdf; erzeugt am 01. Apr 2009 00:17:48; WK