2009 MERCEDES-BENZ GL SUV bonnet
[x] Cancel search: bonnetPage 8 of 309

Automatic transmission
DIRECT SELECT lever .......................92
Display mes-
sage .............................. 213, 216, 217
Driving tips ...................................... 94
Emergency running mode ..............244
Gear indicator .................................. 93
Kickdown ......................................... 94
Malfunction ................................... .244
Program selector button ..................95
Shift ranges ..................................... 94
Trailer towing ................................... 94
Transmission positions ....................93
Auxiliary heating ............................... 147
Display message .................... 231, 232
Notes ............................................. 147
Remote control .............................. 148
Setting (on-board computer) .......... 107
Auxiliary ventilation ..........................147 B
Backrest angle Adjusting (2nd row of seats) ............67
Ball coupling
Fitting ............................................ 194
Folding in ....................................... 198
Folding out ..................................... 193
Removing ....................................... 198
BAS (Brake Assist) ............................... 50
Battery Changing (auxiliary heating
remote control) .............................. 254
Charging ........................................ 275
Checking (key) ............................... 253
Check lamp (key )........................... 253
Disconnecting ................................ 273
Display message ............................ 220
Jump-starting ................................. 276
Maintenance (vehicle) .................... 272
Reconnecting ................................. 276
Removing/fitting ........................... 274
Vehicle battery .............................. 272
Belt force limiters
Activation ......................................... 35
Belt height adjustment .......................77
Belt reel (Easy-Pack fix kit) ..............160Belt tensioners
Activation ......................................... 35
Belt warning ......................................... 77
BlueTEC
AdBlue ®
......................................... 288
Bonnet
Bonnet catch ................................. 175
Display message ............................ 219
Opening/closing ........................... 174
Bonnet release lever
Release leve r................................. 175
Boot
Automatic opening ........................... 62
Boot lid
Opening/closing .............................. 60
Brake Assist
See BAS ........................................... 50
Brake fluid .......................................... 291
Display message ............................ 221
Brake lamps
Adaptive .......................................... .51
Display message ............................ 226
Brakes
Parking brake ................................... 91
Warning lamp ........................ 235, 236
Brake system
Display message ............................ 220
Bulbs .................................................. 254
Brake lamp .................................... 260
Dipped-beam headlamps ...............258
Display message ............................ 225
Licence plate lamp ......................... 260
Main-beam headlamps ................... 258
Overview ........................................ 256
Parking lamp .......................... 258, 260
Rear foglamp ................................. 260
Replacing .............................. .258, 259
Reversing lamp .............................. 260
Side lamp ....................................... 258
Tail lamp ........................................ 260
Turn signal lamp ....................258, 260
see Lamp Index
5 X164_AKB; 2; 3, en-GB
wobuchh,
Version: 2.11.8.1
2009-03-31T14:14:58+02:00 - Seite 5Dateiname: 6515431202_buchblock.pdf; erzeugt am 01. Apr 2009 00:16:29; WK
Page 25 of 309
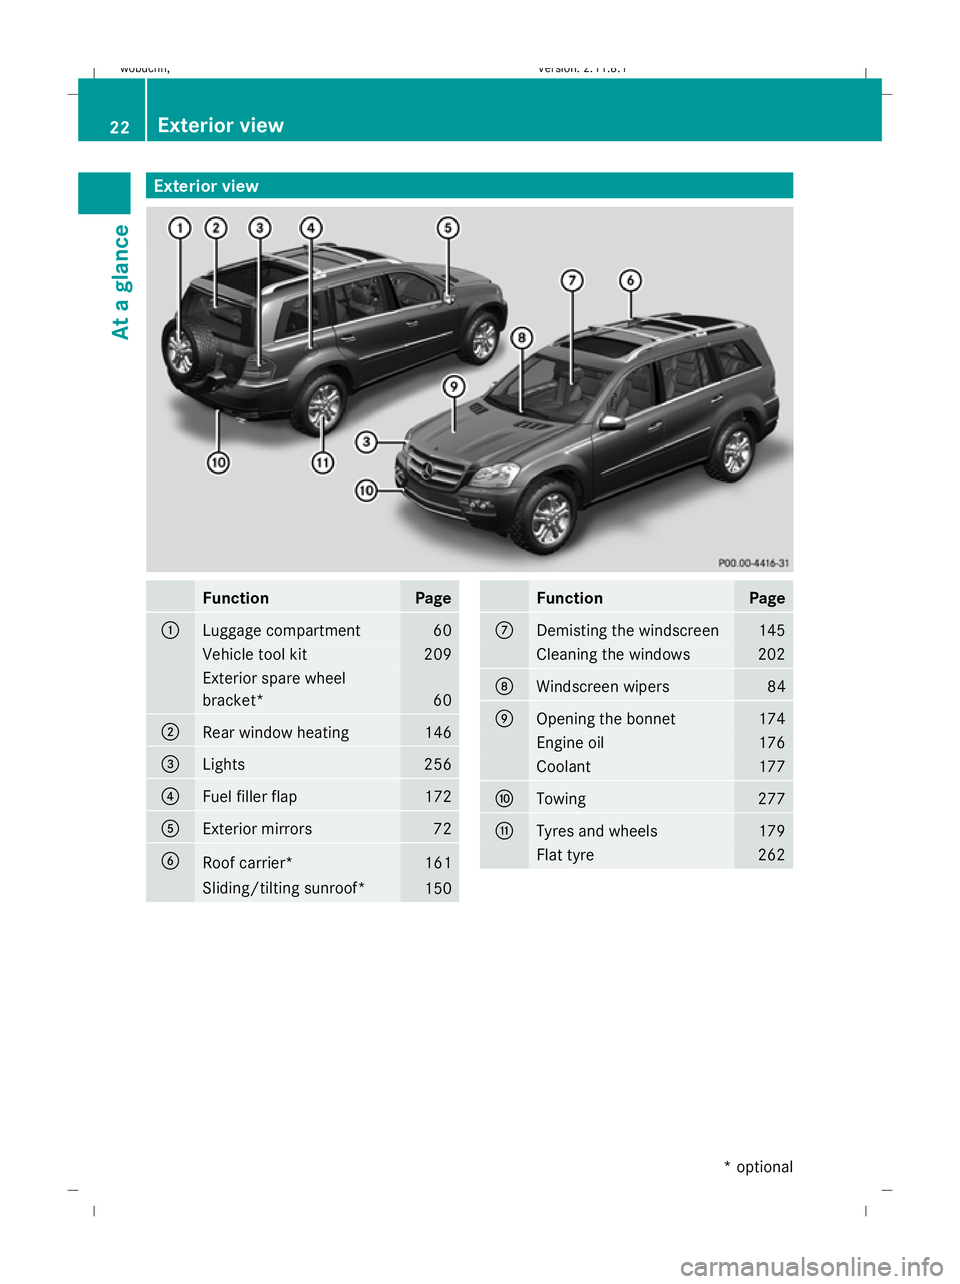
Exterior view
Function Page
:
Luggage compartment 60
Vehicle tool kit 209
Exterior spare wheel
bracket*
60
;
Rear window heating 146
=
Lights 256
?
Fuel filler flap 172
A
Exterior mirrors 72
B
Roof carrier* 161
Sliding/tilting sunroof*
150 Function Page
C
Demisting the windscreen 145
Cleaning the windows 202
D
Windscreen wipers 84
E
Opening the bonnet 174
Engine oil 176
Coolant 177
F
Towing 277
G
Tyres and wheels 179
Flat tyre 26222
Exterior viewAt a glance
* optional
X164_AKB; 2; 3, en-GB
wobuchh,
Version: 2.11.8.1 2009-03-31T14:14:58+02:00 - Seite 22
Dateiname: 6515431202_buchblock.pdf; erzeugt am 01. Apr 2009 00:16:32; WK
Page 26 of 309
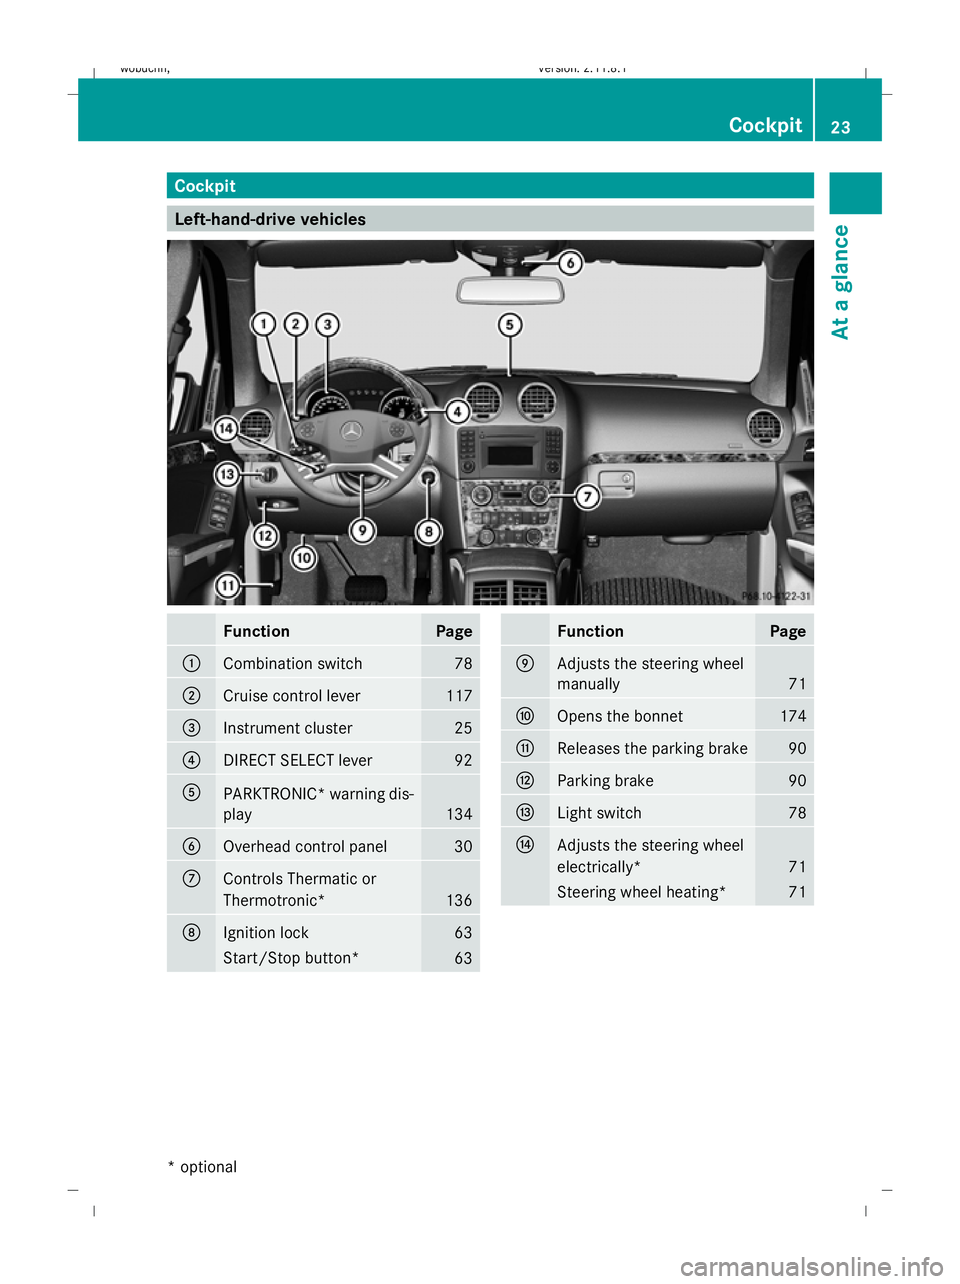
Cockpit
Left-hand-drive vehicles
Function Page
:
Combination switch 78
;
Cruise control lever 117
=
Instrument cluster 25
?
DIRECT SELECT lever 92
A
PARKTRONIC* warning dis-
play
134
B
Overhead control panel 30
C
Controls Thermatic or
Thermotronic*
136
D
Ignition lock 63
Start/Stop button*
63 Function Page
E
Adjusts the steering wheel
manually
71
F
Opens the bonnet 174
G
Releases the parking brake 90
H
Parking brake 90
I
Light switch 78
J
Adjusts the steering wheel
electrically*
71
Steering wheel heating* 71Cockpit
23At a glance
* optional
X164_AKB; 2; 3, en-GB
wobuchh,
Version: 2.11.8.1 2009-03-31T14:14:58+02:00 - Seite 23
Dateiname: 6515431202_buchblock.pdf; erzeugt am 01. Apr 2009 00:16:33; WK
Page 27 of 309
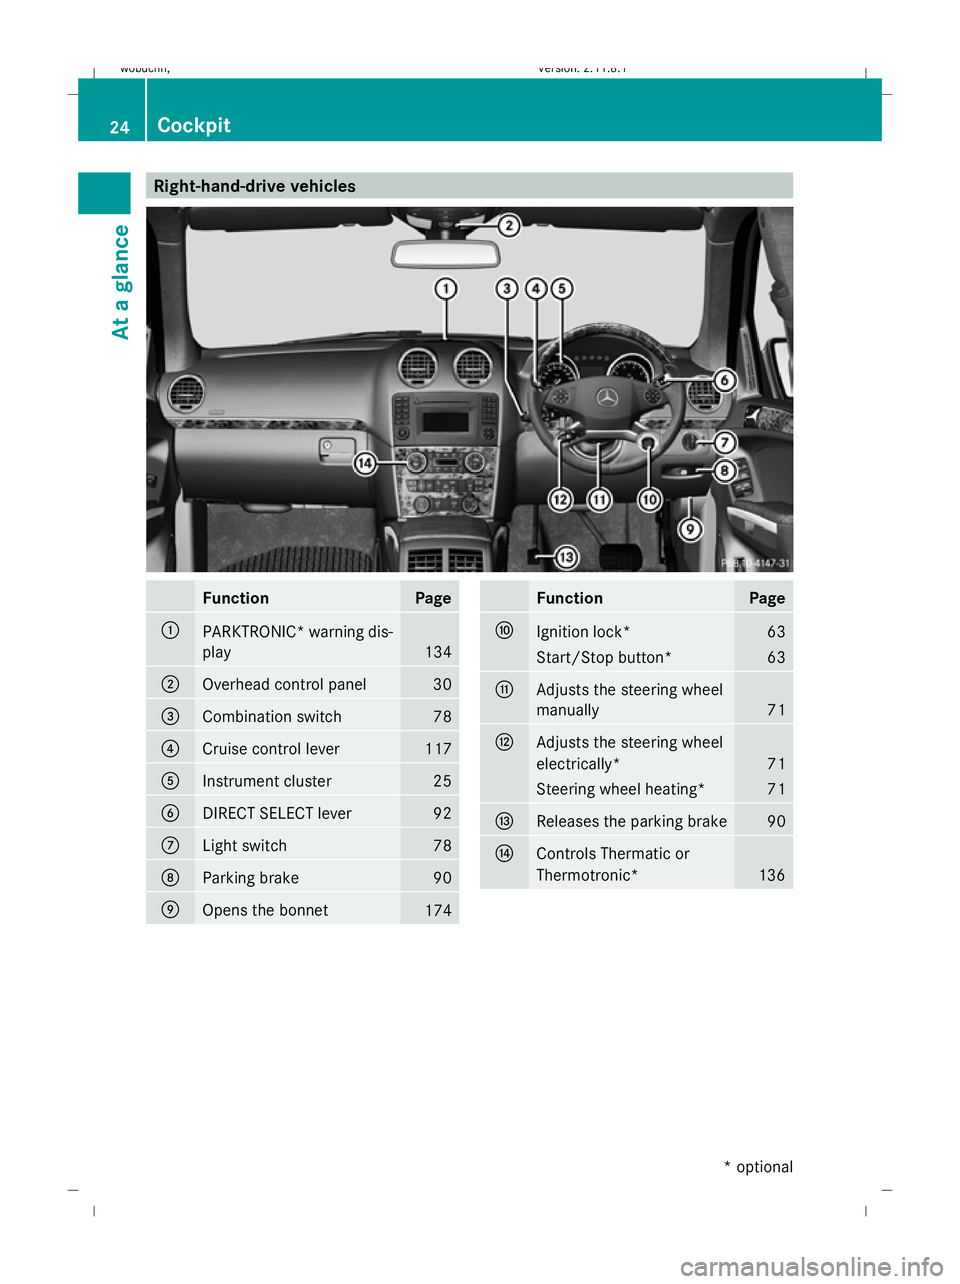
Right-hand-drive vehicles
Function Page
:
PARKTRONIC
*warning dis-
play 134
;
Overhead control panel 30
=
Combination switch 78
?
Cruise control lever 117
A
Instrument cluster 25
B
DIRECT SELECT lever 92
C
Light switch 78
D
Parking brake 90
E
Opens the bonnet
174 Function Page
F
Ignition lock* 63
Start/Stop button* 63
G
Adjusts the steering wheel
manually
71
H
Adjusts the steering wheel
electrically*
71
Steering wheel heating* 71
I
Releases the parking brake 90
J
Controls Thermatic or
Thermotronic*
13624
CockpitAt a glance
* optional
X164_AKB; 2; 3, en-GB
wobuchh,
Version: 2.11.8.1 2009-03-31T14:14:58+02:00 - Seite 24
Dateiname: 6515431202_buchblock.pdf; erzeugt am 01. Apr 2009 00:16:35; WK
Page 39 of 309
calculated, additional protection for the
vehicle occupants. Not all airbags are
deployed in an accident.
The different airbag systems work inde-
pendently of each other. However, the
deployment of each individual system will
depend on the type of accident determined
by the control system in the first stages of
the collision (head-on collision, side impact
and overturn) and the extent of the acci-
dent (in particular, the vehicle's rate of
deceleration or acceleration).
The rate of vehicle deceleration or accelera-
tion and the direction of the force are essen-
tially determined by:
R the distribution of forces during the colli-
sion
R the collision angle
R the deformation characteristics of the vehi-
cle
R the characteristics of the object with which
the vehicle collides, e.g. the other vehicle
Factors which can only be seen and measured
after a collision has occurred do not play a
decisive role in the deployment of an airbag,
nor do they provide an indication of it.
The vehicle may be deformed significantly,
e. g. on the bonnet or the wing, without an
airbag being deployed. This is the case if only
parts which are relatively easily deformed are
affected and the necessary deceleration does
not occur. Conversely, airbags may be
deployed even though the vehicle suffers only
minor deformations. For example, this is the
case if very rigid vehicle parts such as longi-
tudinal body members are affected and suf-
ficient deceleration occurs as a result.
Belt tensioners, belt force limiters The front seat belts and the outer seat belts
in the second row are equipped with belt ten-
sioners. The front seat belts are also fitted
with belt buckle tensioners. !
Do not engage the seat belt tongue in the
buckle on the front-passenger seat if the
seat is not occupied. The belt tensioners
could otherwise be triggered in an acci-
dent.
If the seat belt is also equipped with a belt
force limiter, the force exerted by the seat
belt on the seat occupant is reduced.
Belt tensioners tighten the seat belts in an
accident, pulling them close against the body.
i Belt tensioners do not correct incorrect
seat positions or incorrectly fastened seat
belts.
Belt tensioners do not pull occupants back
towards the backrest.
The front belt force limiters are synchronised
with the front airbags, which distribute a pro-
portion of the deceleration forces exerted on
the occupant over a greater area.
When the ignition is switched on, the belt ten-
sioners/belt buckle tensioners cannot be
triggered unless:
R the restraint systems are operational; see
+ warning lamp.
R the belt tongue is engaged in the buckle on
each lap-shoulder belt in the front of the
vehicle.
Depending on the type and severity of an
accident, the belt tensioners/belt buckle ten-
sioners may be triggered:
R in the event of a head-on or rear-end colli-
sion if the vehicle decelerates or acceler-
ates rapidly in a longitudinal direction dur-
ing the initial stages of impact
R in the event of a side impact if the vehicle
is subjected to high lateral acceleration/
deceleration
R in certain situations if the vehicle over-
turns, and the system determines that it
can provide additional protection
If the airbags are deployed, you will hear a
bang and a small amount of powder may also
be released. Only in rare cases will the bang 36
Occupant safetySafety
X164_AKB; 2; 3, en-GB
wobuchh,
Version: 2.11.8.1 2009-03-31T14:14:58+02:00 - Seite 36
Dateiname: 6515431202_buchblock.pdf; erzeugt am 01. Apr 2009 00:16:43; WK
Page 57 of 309
In order to maintain the appropriate distance
to the vehicle in front and thus prevent a
crash, you must apply the brakes yourself. G
Risk of accident
Pay particular attention to the traffic condi-
tions if the distance warning lamp ·in the
instrument cluster lights up or an intermittent
warning tone sounds.
If necessary, brake or manoeuvre to avoid an
obstacle.
X To activate/deactivate: activate or deac-
tivate the distance warning function in the
on-board computer (Y page 109).
After activation, the Äsymbol is dis-
played in the lower multi-function display.
For more information on the distance warning
function, see the Distronic section*
(Y page 119). Anti-theft systems
Immobiliser
The immobiliser prevents your vehicle from
being started without the correct key.
Activating the immobiliser X
With the key: remove the key from the
ignition lock.
X With KEYLESS GO*: press the start/stop
button on the dashboard.
The engine switches off.
Deactivating the immobiliser X
With the key: turn the key to position 2in
the ignition lock.
X With KEYLESS GO*: press the start/stop
button on the dashboard twice without
depressing the brake.
i The immobiliser is always deactivated
when you start the engine. ATA* (anti-theft alarm system)
A visual and audible alarm is triggered when
the alarm system is primed and you open:
R a door
R a door using the emergency key element
R the tailgate
R the bonnet
The alarm is not switched off even if you close
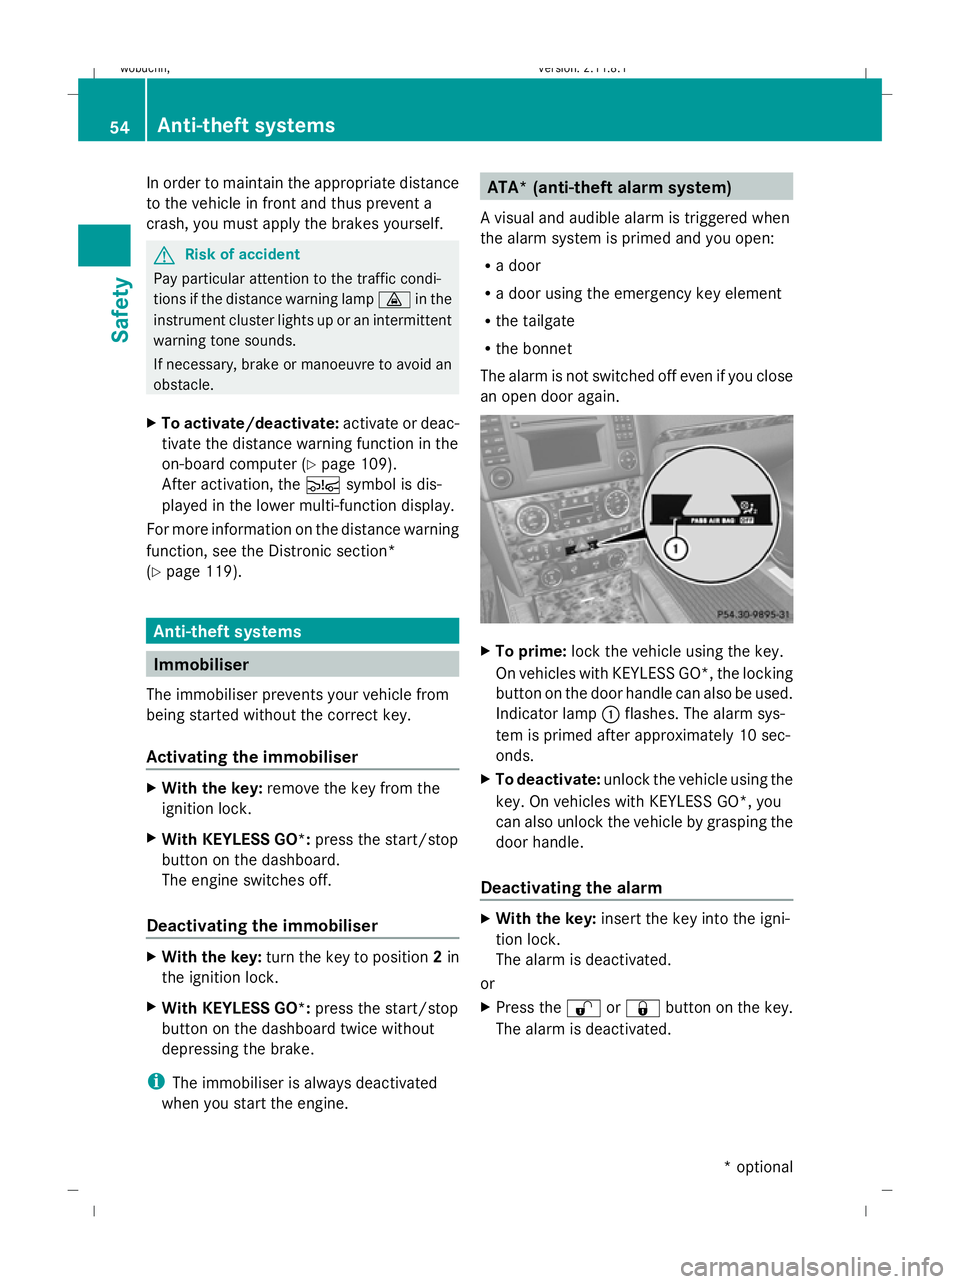
an open door again. X
To prime: lock the vehicle using the key.
On vehicles with KEYLESS GO*, the locking
button on the door handle can also be used.
Indicator lamp :flashes. The alarm sys-
tem is primed after approximately 10 sec-
onds.
X To deactivate: unlock the vehicle using the
key. On vehicles with KEYLESS GO*, you
can also unlock the vehicle by grasping the
door handle.
Deactivating the alarm X
With the key: insert the key into the igni-
tion lock.
The alarm is deactivated.
or
X Press the %or& button on the key.
The alarm is deactivated. 54
Anti-theft systemsSafety
* optional
X164_AKB; 2; 3, en-GB
wobuchh,
Version: 2.11.8.1 2009-03-31T14:14:58+02:00 - Seite 54
Dateiname: 6515431202_buchblock.pdf; erzeugt am 01. Apr 2009 00:16:49; WK
Page 124 of 309

G
Risk of accident
Distronic brakes your vehicle at a maximum
of 4m /s2
, depending on its speed. This cor-
responds to approximately 40% of your vehi-
cle's maximum brake force. You must also
apply the brakes yourself if this braking power
is not sufficient.
If Distronic detects a risk of collision with a
vehicle in front, an intermittent warning tone
sounds. In addition, the ·distance warn-
ing lamp in the instrument cluster lights up.
Brake to avoid a collision.
Cruise control lever You can operate Distronic and variable
Speedtronic with the cruise control lever.
The LIM indicator lamp on the cruise control
lever indicates which system you have selec-
ted:
R LIM indicator lamp off:
Distronic is selected.
R LIM indicator lamp lit:
Variable Speedtronic is selected. :
To store the current speed or a higher
speed
; To adjust the specified distance
= LIM indicator lamp
? To store the current speed or call up the
last stored speed
A To store the current speed or a lower
speed B
To switch between Distronic and variable
Speedtronic
C To deactivate Distronic
Selecting Distronic X
Check whether LIM indicator lamp =is off.
If it is off, Distronic is already selected.
If it is not, press the cruise control lever in
the direction of arrow B.
LIM indicator lamp =in the cruise control
lever goes off. Distronic is selected.
Switching on Distronic, storing and
maintaining the current speed G
Risk of accident
The vehicle can be braked when Distronic is
activated. For this reason, deactivate Dis-
tronic if the vehicle is to be set in motion by
other means (e.g. in a car wash or by towing).
You can activate Distronic in the following
circumstances:
R for about two minutes after the engine is
started
R when the engine is running
R if you do not brake during the journey
R when the parking brake is not applied
R if ESP ®
is activated
R if the automatic transmission is in position
D
R if the bonnet is closed
Activating while driving
When driving at speeds below 30 km/h, you
can only activate Distronic if the vehicle in
front has been detected and is shown in the
multi-function display. If the vehicle in front is
not shown in the multi-function display and is
no longer being detected, because it has
changed lanes, for example, Distronic is
deactivated and you hear a warning tone. Driving systems
121Controls
X164_AKB; 2; 3, en-GB
wobuchh,V ersion: 2.11.8.1
2009-03-31T14:14:58+02:00 - Seite 121 Z
Dateiname: 6515431202_buchblock.pdf; erzeugt am 01. Apr 2009 00:17:21; WK
Page 146 of 309
trol unit:
turn the key in the ignition lock
to position 2.
X Press the Ybutton.
The display message shown in the display
changes to rear-compartment air condi-
tioning.
X Turn control Eclockwise or anti-clockwise
(Y page 139). Only change the temperature
setting in small increments. Start at 22 †.
i Press the Ybutton to return to the
standard display.
i The rear-compartment display returns to
the standard display automatically after
three seconds.
X To increase/reduce the rear-compart-
ment temperature using the rear con-
trol unit*: turn the key in the ignition lock
to position 2.
X Turn control Rclockwise or anti-clockwise
(Y page 139). Only change the temperature
setting in small increments. Start at 22 †. Adjusting the air vents
G
Risk of injury
Very hot or very cold air can flow from the air
vents. This could cause burns or frostbite to
bare skin in the immediate vicinity of the
vents. Keep bare skin away from these air
outlets. If necessary, direct the airflow away
to a different area of the vehicle interior.
In order to ensure the direct flow of fresh air
through the air vents into the vehicle interior,
please observe the following notes:
R keep the air inlet grille on the bonnet free
of blockage, such as ice, snow or leaves.
R never cover the vents or air inlet and outlet
grilles in the vehicle interior. i
For virtually draught-free ventilation,
adjust the sliders of the air vents to the
centre position.
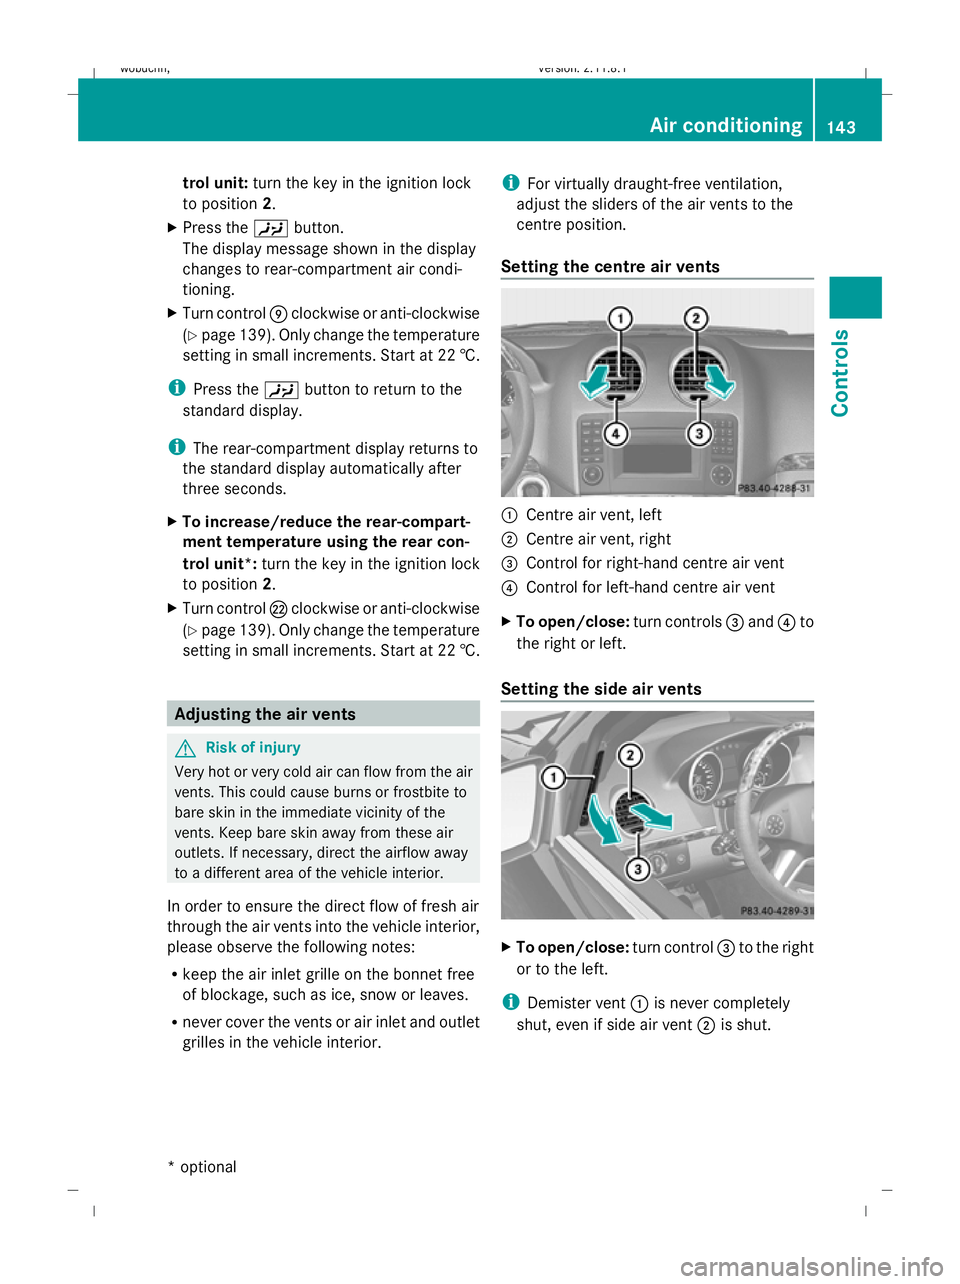
Setting the centre air vents :
Centre air vent, left
; Centre air vent, right
= Control for right-hand centre air vent
? Control for left-hand centre air vent
X To open/close: turn controls=and ?to
the right or left.
Setting the side air vents X
To open/close: turn control=to the right
or to the left.
i Demister vent :is never completely
shut, even if side air vent ;is shut. Air conditioning
143Controls
* optional
X164_AKB; 2; 3, en-GB
wobuchh
,V ersion: 2.11.8.1
2009-03-31T14:14:58+02:00 - Seite 143 Z
Dateiname: 6515431202_buchblock.pdf; erzeugt am 01. Apr 2009 00:17:30; WK