2009 MERCEDES-BENZ GL SUV remote control
[x] Cancel search: remote controlPage 8 of 309

Automatic transmission
DIRECT SELECT lever .......................92
Display mes-
sage .............................. 213, 216, 217
Driving tips ...................................... 94
Emergency running mode ..............244
Gear indicator .................................. 93
Kickdown ......................................... 94
Malfunction ................................... .244
Program selector button ..................95
Shift ranges ..................................... 94
Trailer towing ................................... 94
Transmission positions ....................93
Auxiliary heating ............................... 147
Display message .................... 231, 232
Notes ............................................. 147
Remote control .............................. 148
Setting (on-board computer) .......... 107
Auxiliary ventilation ..........................147 B
Backrest angle Adjusting (2nd row of seats) ............67
Ball coupling
Fitting ............................................ 194
Folding in ....................................... 198
Folding out ..................................... 193
Removing ....................................... 198
BAS (Brake Assist) ............................... 50
Battery Changing (auxiliary heating
remote control) .............................. 254
Charging ........................................ 275
Checking (key) ............................... 253
Check lamp (key )........................... 253
Disconnecting ................................ 273
Display message ............................ 220
Jump-starting ................................. 276
Maintenance (vehicle) .................... 272
Reconnecting ................................. 276
Removing/fitting ........................... 274
Vehicle battery .............................. 272
Belt force limiters
Activation ......................................... 35
Belt height adjustment .......................77
Belt reel (Easy-Pack fix kit) ..............160Belt tensioners
Activation ......................................... 35
Belt warning ......................................... 77
BlueTEC
AdBlue ®
......................................... 288
Bonnet
Bonnet catch ................................. 175
Display message ............................ 219
Opening/closing ........................... 174
Bonnet release lever
Release leve r................................. 175
Boot
Automatic opening ........................... 62
Boot lid
Opening/closing .............................. 60
Brake Assist
See BAS ........................................... 50
Brake fluid .......................................... 291
Display message ............................ 221
Brake lamps
Adaptive .......................................... .51
Display message ............................ 226
Brakes
Parking brake ................................... 91
Warning lamp ........................ 235, 236
Brake system
Display message ............................ 220
Bulbs .................................................. 254
Brake lamp .................................... 260
Dipped-beam headlamps ...............258
Display message ............................ 225
Licence plate lamp ......................... 260
Main-beam headlamps ................... 258
Overview ........................................ 256
Parking lamp .......................... 258, 260
Rear foglamp ................................. 260
Replacing .............................. .258, 259
Reversing lamp .............................. 260
Side lamp ....................................... 258
Tail lamp ........................................ 260
Turn signal lamp ....................258, 260
see Lamp Index
5 X164_AKB; 2; 3, en-GB
wobuchh,
Version: 2.11.8.1
2009-03-31T14:14:58+02:00 - Seite 5Dateiname: 6515431202_buchblock.pdf; erzeugt am 01. Apr 2009 00:16:29; WK
Page 12 of 309

Frequencies
Garage door opener .......................298
Telephone ...................................... 285
Front airbag ......................................... 38
Front-passenger airbag ....................... 38
Fuel ..................................................... 287
Diesel ............................................ 173
Loss ............................................... 241
Petrol ............................................. 173
Fuel consumption
Notes ............................................. 288
Fuel filler flap
Emergency release ........................251
Opening/closing ........................... 172
Fuel filter
Display message ............................ 221
Fuel gauge ............................................ 25
Fuel level Calling up the range (on-board
computer) ...................................... 111
Display ............................................. 25
Fuel line
Malfunction ................................... .241
Fuel tank
Defect ............................................ 241
Fuse allocation chart ........................280
Fuse box Dashboard ..................................... 281
Engine compartment .....................281
Luggage compartment ...................281
Fuses .................................................. 280G
Garage door Opening/closing (with the remote
control) .......................................... 166
Garage door opener ..........................165
Clearing the memory .....................166
Frequencies ................................... 298
Programming the remote control ...165
Gear indicator ...................................... 93
Genuine Mercedes-Benz parts .........284
Glove compartment ..........................152
Gradient-climbing capability (max-
imum) ................................................. 191 H
Handbrake Display message ............................ 221
Headlamp cleaning system ..............178
Headlamps Cleaning ......................................... 203
Cleaning system .............................. 83
Misting up ...................................... 245
Headlamps delayed switch-off
see Exterior lighting delayed switch-off
Head restraints
Adjusting (front) ............................... 65
Adjusting (rear) ................................ 68
Luxury .............................................. 66
NECK-PRO ....................................... 40
Removing (rear) ............................... 69
Resetting triggered NECK-PRO
head restraints .............................. 252
Resetting triggered NECK-PRO
luxury head restraints ....................252
Heating
see Air conditioning
High-pressure cleaners ....................202
Hill start assist .................................... 90
HomeLink ®
see Garage door opener I
Immobiliser .......................................... 54
Indicator and warning lamp Automatic child seat recognition
(malfunction) ................................. 234
Brakes (red) ........................... 235, 236
Engine diagnostics .........................237
ESP ®
.............................................. 235
PASSENGER AIRBAG OFF ........43, 234
Reserve fuel ................................... 239
Seat belt ........................................ 238
SRS .......................................... 35, 236
Thermotronic (malfunction) ...........234
Indicator and warning lamps ...........235
Indicator lamp see Indicator and warning lamp .....235
Instrument cluster .............................. 96
On-board computer .......................103 Index
9 X164_AKB; 2; 3, en-GB
wobuchh,
Version: 2.11.8.1
2009-03-31T14:14:58+02:00 - Seite 9Dateiname: 6515431202_buchblock.pdf; erzeugt am 01. Apr 2009 00:16:29; WK
Page 16 of 309
Rear-compartment seats
....................67
Rear foglamp Display message ............................ 227
Rear-view mirror
Adjusting ......................................... 72
Anti-dazzle (manual) ......................... 72
Anti-dazzle mode (automatic) ..........73
Rear window heating ........................146
Malfunction indicator lamp ............234
Rear window wiper .............................85
Replacing the wiper blade .............. 262
Refuelling ........................................... 172
Remote control Auxiliary heating ............................ 148
Changing the batteries (auxiliary
heating) ......................................... 254
Garage door opene r....................... 165
Programming (garage door
opener) .......................................... 165
Reserve
Warning lamp ................................. 239
Reserve fuel ....................................... 287
Display message ............................ 232
Fuel tank ........................................ 287
Warning lamp ................................. 239
Reset button ........................................ 25
Restraint system See SRS .......................................... 35
Restraint systems
For children ..................................... 41
Rev counter .......................................... 97
Reversing camera ............................. 135
Cleaning ......................................... 203
Reversing lamps
Display message ............................ 228
Roof carrier ....................................... 161S
Safety net .......................................... .158
Seat Adjusting ................................... 64, 65
Correct driver's seat position ........... 78
Folding down/up (3rd row of
seats) ............................................... 67
Storing settings ............................... 74Seat belt
Adjusting the driver's and front-
passenger seat belt .........................77
Adjusting the height ......................... 77
Fastening ......................................... 75
Warning lamp ........................... 77, 238
Seat covers
Cleaning ......................................... 204
Seat heating ........................................ .70
Seat ventilation ................................... 69
Malfunction indicator lamp ............233
Securing a load .................................. 156
Securing hooks .................................. 157
Service indicator see ASSYST PLUS service interval
displa y........................................... 199
Service products ............................... 287
AdBlue ®
additives .......................... 288
Brake fluid ..................................... 291
Coolant .......................................... 291
Engine oil ....................................... 289
Fuel ................................................ 287
Windscreen washer fluid ................291
Settings
Calling up a stored setting ...............74
Factory (on-board computer) .........103
On-board computer .......................103
Setting the unit (on-board computer)
Speedometer ................................. 103
Shift ranges
Automatic transmission ...................94
Sidebag ................................................ 39
Side windows Convenience closing ........................87
Convenience opening ......................87
Fault .............................................. 246
Hinged side windows .......................86
Opening/closing .............................. 85
resetting .......................................... 86
Sliding/tilting sunroof ......................150
Convenience closing ........................87
Convenience opening ......................87
Rain closing feature .......................151
Resetting ....................................... 151
Sliding sunroof
see Sliding/tilting sunroof
Snow chains ...................................... 186 Index
13 X164_AKB; 2; 3, en-GB
wobuchh,
Version: 2.11.8.1
2009-03-31T14:14:58+02:00 - Seite 13Dateiname: 6515431202_buchblock.pdf; erzeugt am 01. Apr 2009 00:16:30; WK
Page 65 of 309
X
Press handle :in the direction of
arrow ;as far as it will go and hold it there.
X From this position, pull handle :in the
direction of arrow =as far as it will go and
hold it there.
X Swing the tailgate upwards.
i Vehicles with the EASY-PACK tailgate*:
If you do not open the tailgate after unlock-
ing, it will lock again automatically after a
few seconds. Automatically opening/closing* the
vehicle from inside G
Risk of injury
Monitor the tailgate opening and closing pro-
cedures to make sure that nobody can
become trapped. To halt the opening or clos-
ing procedure, press the closing button* on
the tailgate again or pull the handle on the
outside of the tailgate.
Opening the spare wheel bracket You can open the tailgate automatically using
the key or the handle in the tailgate. 11
X To open: press and hold the Fbutton
on the key until the tailgate opens.
or
X When the tailgate is unlocked, pull the han-
dle and let it go again immediately.
Closing the spare wheel bracket You can close the tailgate automatically using
the key 11
, using the closing button 11
or lock-
ing button 12
. X
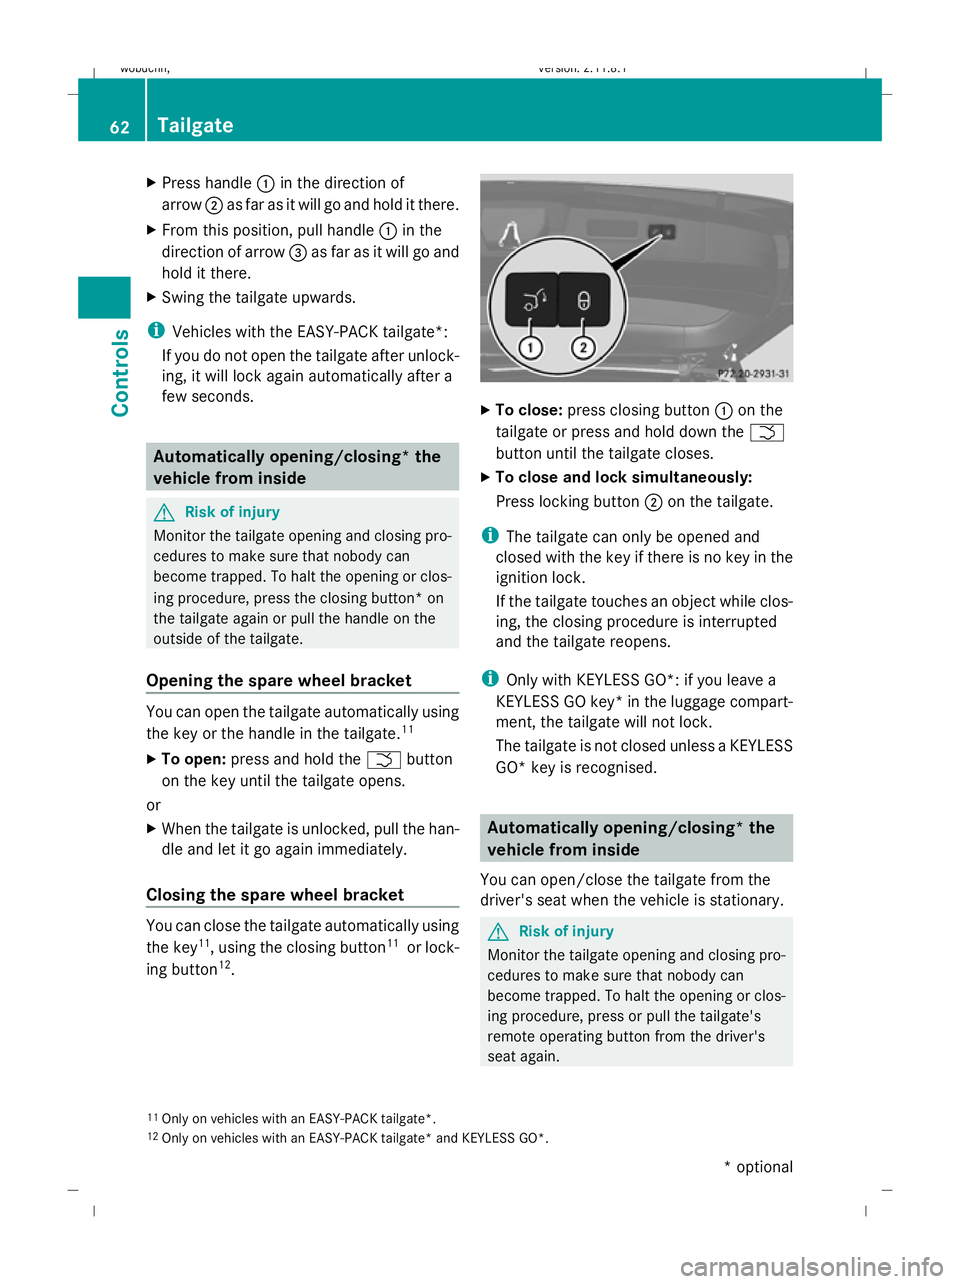
To close: press closing button :on the
tailgate or press and hold down the F
button until the tailgate closes.
X To close and lock simultaneously:
Press locking button ;on the tailgate.
i The tailgate can only be opened and
closed with the key if there is no key in the
ignition lock.
If the tailgate touches an object while clos-
ing, the closing procedure is interrupted
and the tailgate reopens.
i Only with KEYLESS GO*: if you leave a
KEYLESS GO key* in the luggage compart-
ment, the tailgate will not lock.
The tailgate is not closed unless a KEYLESS
GO* key is recognised. Automatically opening/closing* the
vehicle from inside
You can open/close the tailgate from the
driver's seat when the vehicle is stationary. G
Risk of injury
Monitor the tailgate opening and closing pro-
cedures to make sure that nobody can
become trapped. To halt the opening or clos-
ing procedure, press or pull the tailgate's
remote operating button from the driver's
seat again.
11 Only on vehicles with an EASY-PACK tailgate*.
12 Only on vehicles with an EASY-PACK tailgate* and KEYLESS GO*. 62
TailgateControls
* optional
X164_AKB; 2; 3, en-GB
wobuchh,
Version: 2.11.8.1 2009-03-31T14:14:58+02:00 - Seite 62
Dateiname: 6515431202_buchblock.pdf; erzeugt am 01. Apr 2009 00:16:54; WK
Page 66 of 309
X
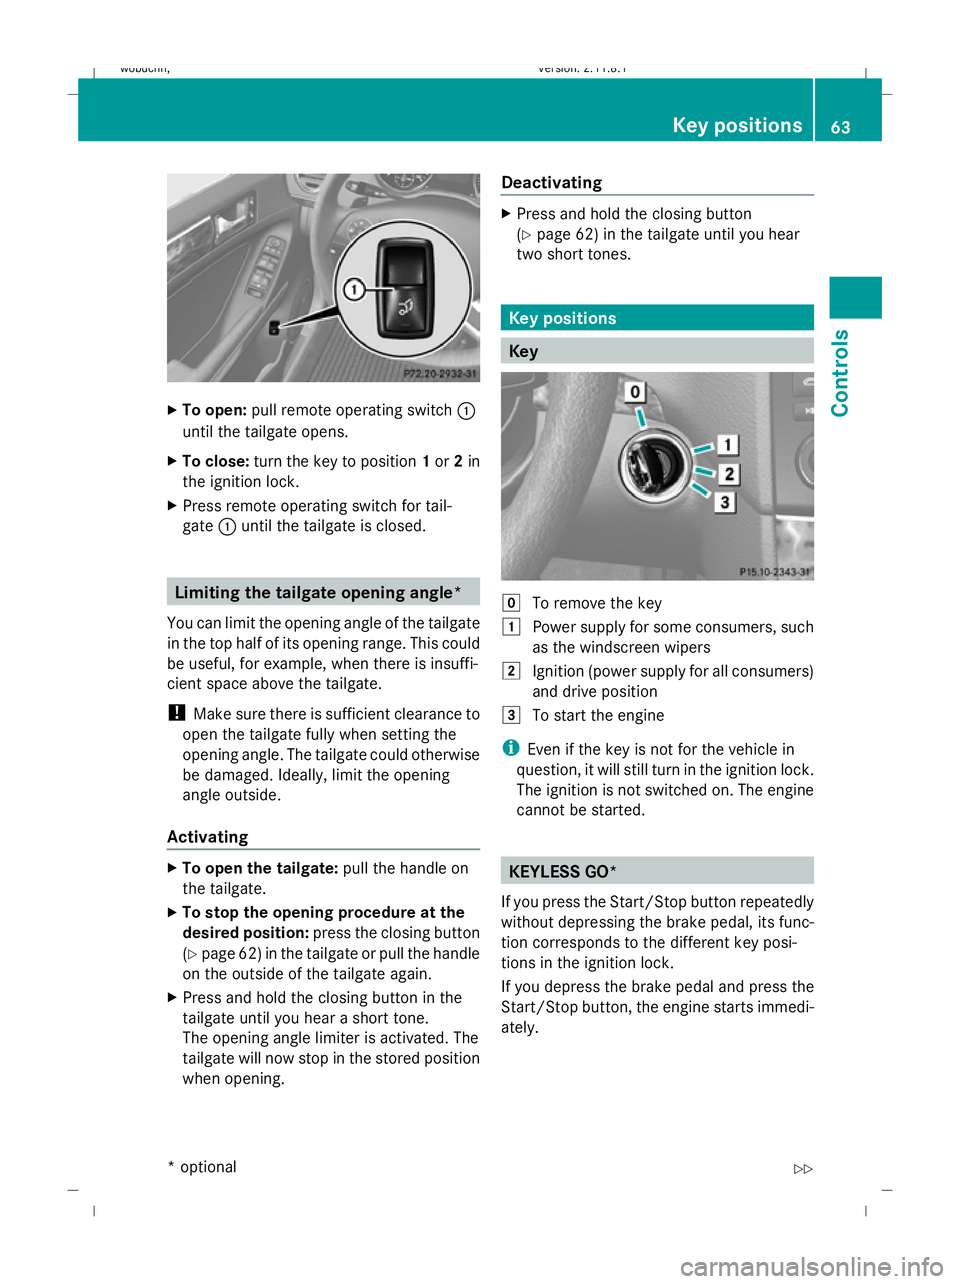
To open: pull remote operating switch :
until the tailgate opens.
X To close: turn the key to position 1or 2in
the ignition lock.
X Press remote operating switch for tail-
gate :until the tailgate is closed. Limiting the tailgate opening angle*
You can limit the opening angle of the tailgate
in the top half of its opening range. This could
be useful, for example, when there is insuffi-
cient space above the tailgate.
! Make sure there is sufficient clearance to
open the tailgate fully when setting the
opening angle. The tailgate could otherwise
be damaged. Ideally, limit the opening
angle outside.
Activating X
To open the tailgate: pull the handle on
the tailgate.
X To stop the opening procedure at the
desired position: press the closing button
(Y page 62) in the tailgate or pull the handle
on the outside of the tailgate again.
X Press and hold the closing button in the
tailgate until you hear a short tone.
The opening angle limiter is activated. The
tailgate will now stop in the stored position
when opening. Deactivating X
Press and hold the closing button
(Y page 62) in the tailgate until you hear
two short tones. Key positions
Key
g
To remove the key
1 Power supply for some consumers, such
as the windscreen wipers
2 Ignition (power supply for all consumers)
and drive position
3 To start the engine
i Even if the key is not for the vehicle in
question, it will still turn in the ignition lock.
The ignition is not switched on. The engine
cannot be started. KEYLESS GO*
If you press the Start/Stop button repeatedly
without depressing the brake pedal, its func-
tion corresponds to the different key posi-
tions in the ignition lock.
If you depress the brake pedal and press the
Start/Stop button, the engine starts immedi-
ately. Key positions
63Controls
* optional
X164_AKB; 2; 3, en-GB
wobuchh
,V ersion: 2.11.8.1
2009-03-31T14:14:58+02:00 - Seite 63 Z
Dateiname: 6515431202_buchblock.pdf; erzeugt am 01. Apr 2009 00:16:54; WK
Page 110 of 309
Setting the display when the ignition is
switched off
The
Display when ignition off function
allows you to set which display you see in the
multi-function display after removing the key
from the ignition lock.
X Press VorU on the steering wheel
to select the Settings... menu.
X Press the &button to select submenus.
X Press the WorX button to select the
Vehicle submenu.
X Press the &button to select Display
when ignition off.
X Press the WorX button to select
Interior motion sensor, Tow-away
protection orMiles/km.
X Press the &,VorU button to
select a different display.
Activating/deactivating the automatic
door locking feature
When you activate the Automatic door
locking function, your vehicle will be cen-
trally locked above a speed of approximately
15 km/h.
i For more information on the automatic
door locking feature, see (Y page 60).
X Press VorU on the steering wheel
to select the Settings... menu.
X Press the &button to select submenus.
X Press the WorX button to select the
Vehicle submenu.
X Press the &button to select Auto‐
matic door locking.
X Press the WorX button to activate
or deactivate the Automatic door lock‐
ing feature.
X Press the &,VorU button to
select a different display. Heating submenu Auxiliary heating* departure time
Only vehicles with auxiliary heating have this
function.
The
Aux.heating departure time function
allows you to select a stored departure time
or change the departure time for which the
vehicle with auxiliary heating is preheated.
The auxiliary heating timer function calcu-
lates the switch-on time according to the out-
side temperature so that the vehicle is pre-
heated by the departure time. When the
departure time is reached, the auxiliary heat-
ing continues to heat for a further five
minutes and then switches off. The auxiliary
heating adopts the temperature settings
selected for Thermatic 2-zone automatic cli-
mate control or Thermotronic luxury multi-
zone automatic climate control*.
You can switch off the auxiliary heating by
using the remote control or the auxiliary heat-
ing button on the centre console. G
Risk of poisoning
Exhaust fumes are produced when the auxili-
ary heating is in operation. Inhaling these
exhaust fumes can be poisonous. You should
therefore switch off the auxiliary heating in
confined spaces without an extraction sys-
tem, e.g. a garage. G
Risk of fire
When the auxiliary heating is in operation,
parts of the vehicle can become very hot.
Make sure that the exhaust system does
not under any circumstances come into con-
tact with highly flammable materials such as
dry grass or fuels. The highly flammable mate-
rial could otherwise ignite and set the vehicle
alight. Select your parking space accordingly.
Operating the auxiliary heating is therefore
prohibited at filling stations or when your vehi-
cle is being refuelled. Always switch off the
auxiliary heating at filling stations. On-board computer
107Controls
* optional
X164_AKB; 2; 3, en-GB
wobuchh,
Version: 2.11.8.1 2009-03-31T14:14:58+02:00 - Seite 107 Z
Dateiname: 6515431202_buchblock.pdf; erzeugt am 01. Apr 2009 00:17:17; WK
Page 151 of 309
switch off the auxiliary heating at filling sta-
tions.
i Switch the auxiliary heating on regularly
once a month for about ten minutes.
The auxiliary heating heats the air in the vehi-
cle interior to the set temperature without
using the heat of the running engine. The aux-
iliary heating is operated using the vehicle's
fuel. For this reason, the tank content must
be at least at reserve fuel level to ensure that
the auxiliary heating functions.
The auxiliary heating/ventilation automati-
cally adjusts to changes in temperature and
weather conditions. For this reason, the aux-
iliary heating could switch from ventilation
mode to heating mode or from heating mode
to ventilation mode.
You cannot use the auxiliary ventilation to
cool the vehicle interior to a temperature
lower than the outside temperature.
Before activating X
Turn the key to position 2in the ignition
lock.
X Set the temperature.
The auxiliary heating/ventilation can be acti-
vated even when the air conditioning is being
controlled manually. Optimum comfort can
be attained when the system is set to auto-
matic mode. Set the temperature to 22 †.
The auxiliary heating/ventilation can be acti-
vated or deactivated using the remote control
or the button on the centre console.
The on-board computer can be used to spec-
ify up to three departure times, one of which
may be preselected (Y page 107). Switching the auxiliary heating/venti-
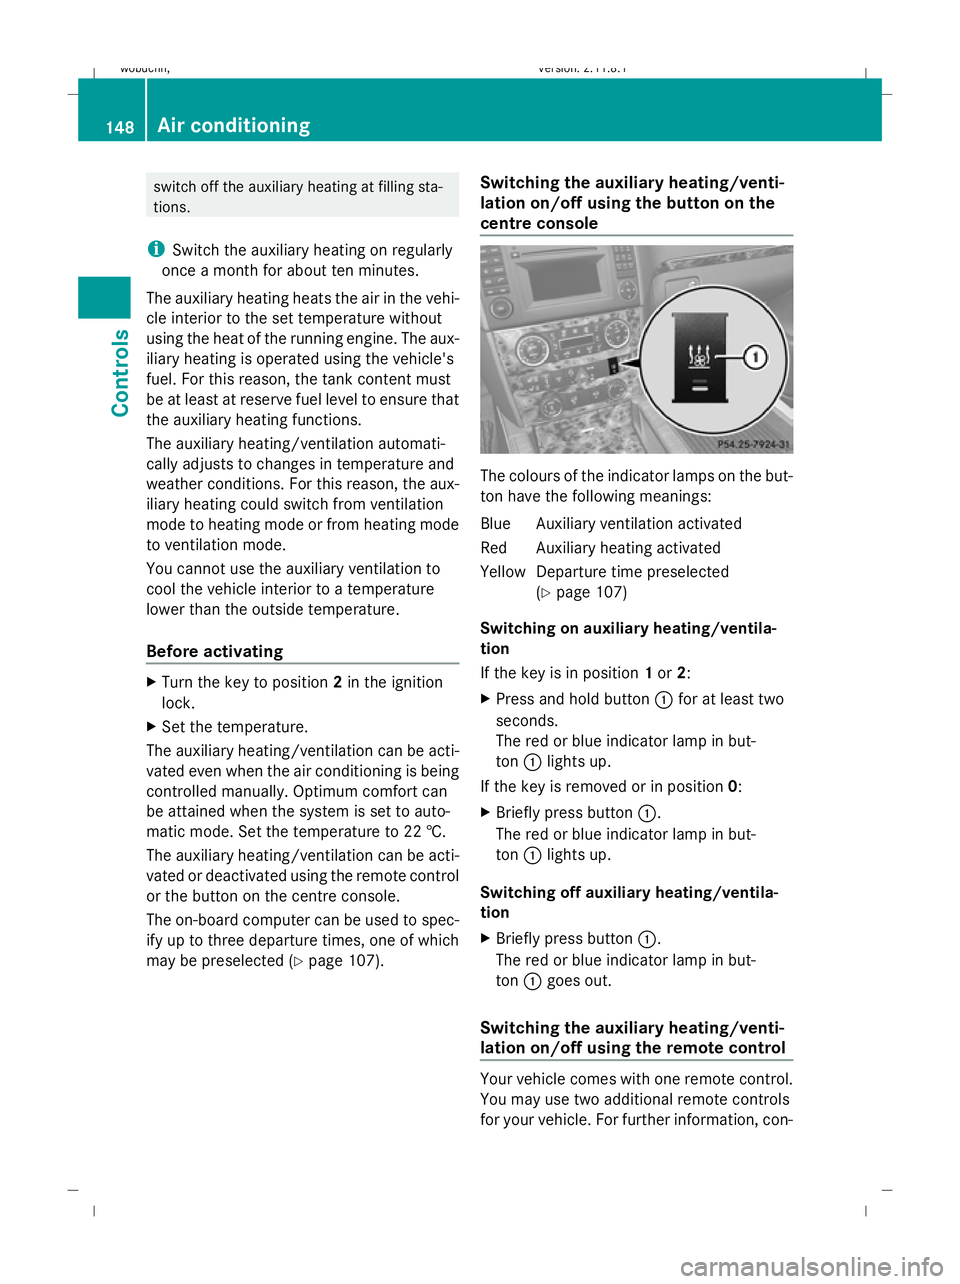
lation on/off using the button on the
centre console The colours of the indicator lamps on the but-
ton have the following meanings:
Blue Auxiliary ventilation activated
Red Auxiliary heating activated
YellowD eparture time preselected
(Y page 107)
Switching on auxiliary heating/ventila-
tion
If the key is in position 1or 2:
X Press and hold button :for at least two
seconds.
The red or blue indicator lamp in but-
ton :lights up.
If the key is removed or in position 0:
X Briefly press button :.
The red or blue indicator lamp in but-
ton :lights up.
Switching off auxiliary heating/ventila-
tion
X Briefly press button :.
The red or blue indicator lamp in but-
ton :goes out.
Switching the auxiliary heating/venti-
lation on/off using the remote control Your vehicle comes with one remote control.
You may use two additional remote controls
for your vehicle. For further information, con-148
Air conditioningControls
X164_AKB; 2; 3, en-GB
wobuchh,
Version: 2.11.8.1 2009-03-31T14:14:58+02:00 - Seite 148
Dateiname: 6515431202_buchblock.pdf; erzeugt am 01. Apr 2009 00:17:32; WK
Page 152 of 309
sult a qualified specialist workshop, e.g. a
Mercedes-Benz Service Centre.
The remote control has a maximum range of
approximately 300 metres. This range is
reduced by:
R sources of radio interference
R solid objects between the remote control
and the vehicle
R the remote control being in an unfavoura-
ble position in relation to the vehicle
R transmitting from an enclosed space
i The optimum range can be achieved if you
hold the remote control vertically, pointing
upwards when you press one of the but-
tons.
i A battery symbol appears in the display
when the batteries in the remote control
are low. Replace the remote control bat-
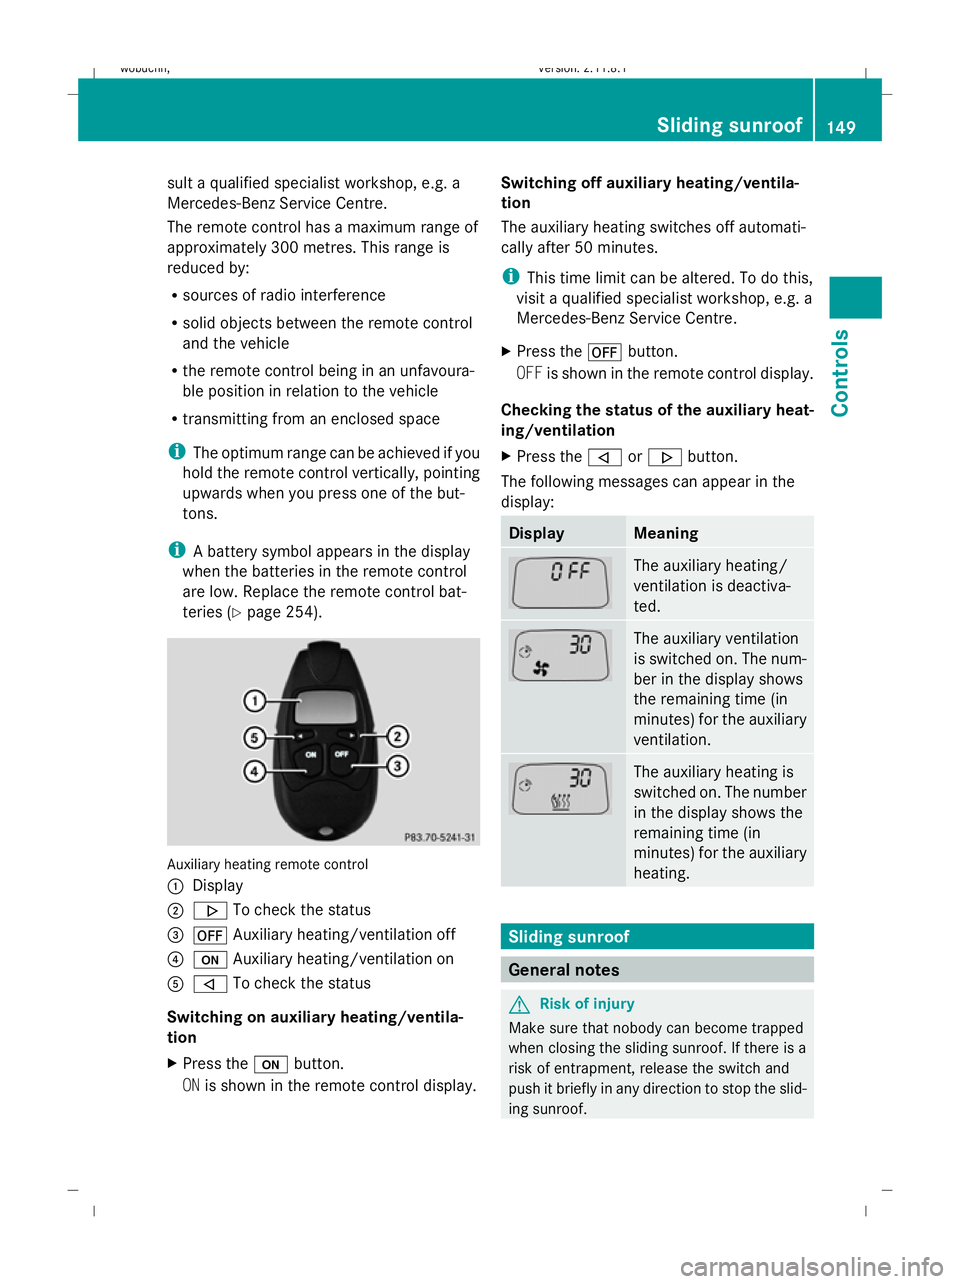
teries (Y page 254). Auxiliary heating remote control
: Display
; . To check the status
= ^ Auxiliary heating/ventilation off
? u Auxiliary heating/ventilation on
A , To check the status
Switching on auxiliary heating/ventila-
tion
X Press the ubutton.
ON is shown in the remote control display. Switching off auxiliary heating/ventila-
tion
The auxiliary heating switches off automati-
cally after 50 minutes.
i
This time limit can be altered. To do this,
visit a qualified specialist workshop, e.g. a
Mercedes-Benz Service Centre.
X Press the ^button.
OFF is shown in the remote control display.
Checking the status of the auxiliary heat-
ing/ventilation
X Press the ,or. button.
The following messages can appear in the
display: Display Meaning
The auxiliary heating/
ventilation is deactiva-
ted.
The auxiliary ventilation
is switched on. The num-
ber in the display shows
the remaining time (in
minutes) for the auxiliary
ventilation.
The auxiliary heating is
switched on. The number
in the display shows the
remaining time (in
minutes) for the auxiliary
heating.
Sliding sunroof
General notes
G
Risk of injury
Make sure that nobody can become trapped
when closing the sliding sunroof. If there is a
risk of entrapment, release the switch and
push it briefly in any direction to stop the slid-
ing sunroof. Sliding sunroof
149Controls
X164_AKB; 2; 3, en-GB
wobuchh, Version: 2.11.8.1 2009-03-31T14:14:58+02:00 - Seite 149 Z
Dateiname: 6515431202_buchblock.pdf; erzeugt am 01. Apr 2009 00:17:32; WK