2009 MERCEDES-BENZ GL SUV remove seats
[x] Cancel search: remove seatsPage 51 of 309
For this reason, have child restraint systems
and their anchorages which have been dam-
aged or subjected to a load in an accident
checked immediately at a qualified specialist
workshop.
! When fitting the child restraint system,
make sure that the seat belt for the centre
seat does not become trapped. Otherwise,
it could be damaged. X
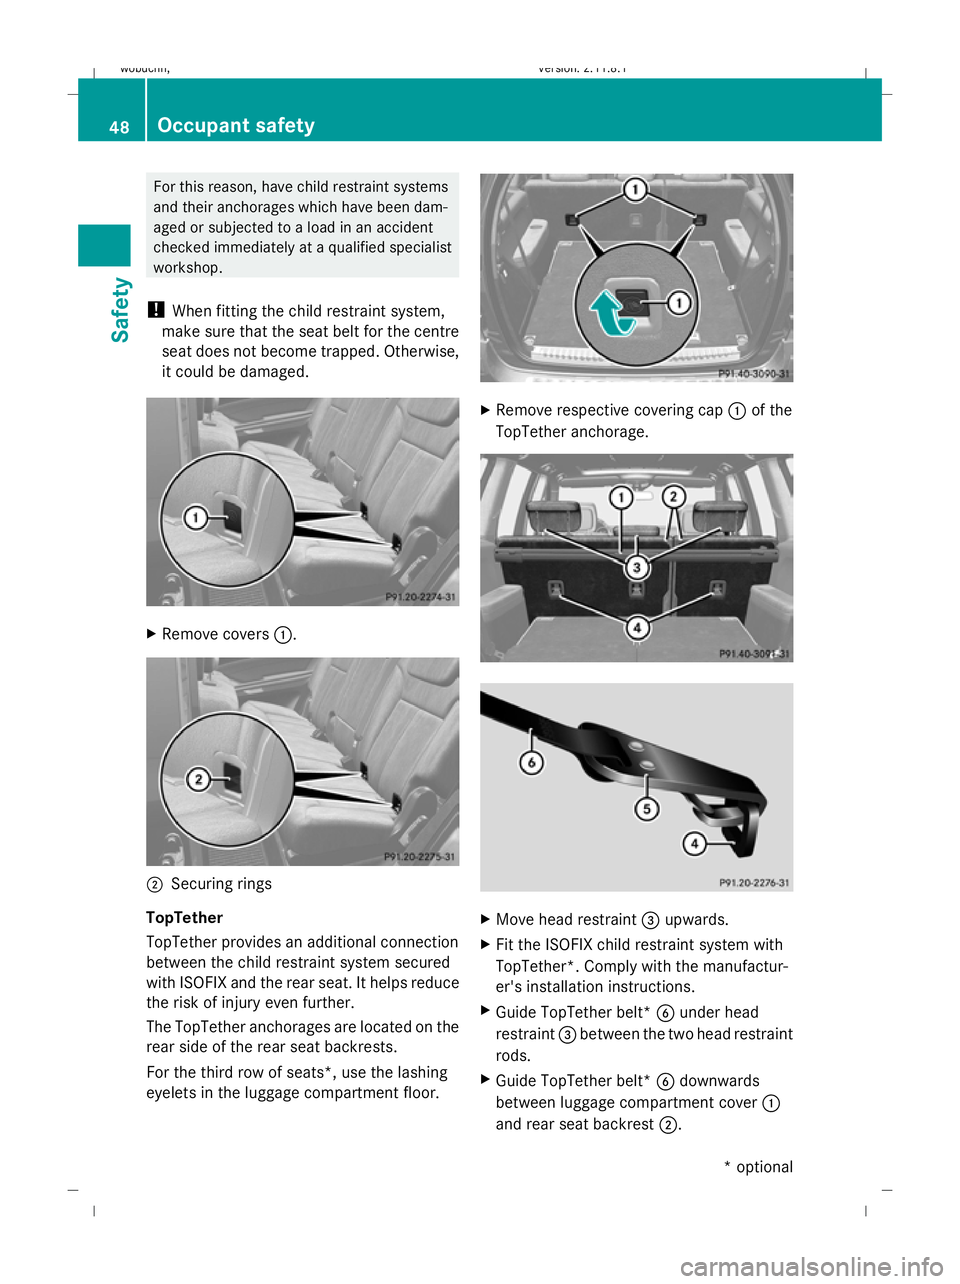
Remove covers :. ;
Securing rings
TopTether
TopTether provides an additional connection
between the child restraint system secured
with ISOFIX and the rear seat. It helps reduce
the risk of injury even further.
The TopTether anchorages are located on the
rear side of the rear seat backrests.
For the third row of seats*, use the lashing
eyelets in the luggage compartment floor. X
Remove respective covering cap :of the
TopTether anchorage. X
Move head restraint =upwards.
X Fit the ISOFIX child restraint system with
TopTether*. Comply with the manufactur-
er's installation instructions.
X Guide TopTether belt* Bunder head
restraint =between the two head restraint
rods.
X Guide TopTether belt* Bdownwards
between luggage compartment cover :
and rear seat backrest ;.48
Occupant safetySafety
* optional
X164_AKB; 2; 3, en-GB
wobuchh
,V ersion: 2.11.8.1
2009-03-31T14:14:58+02:00 - Seite 48
Dateiname: 6515431202_buchblock.pdf; erzeugt am 01. Apr 2009 00:16:48; WK
Page 67 of 309
X
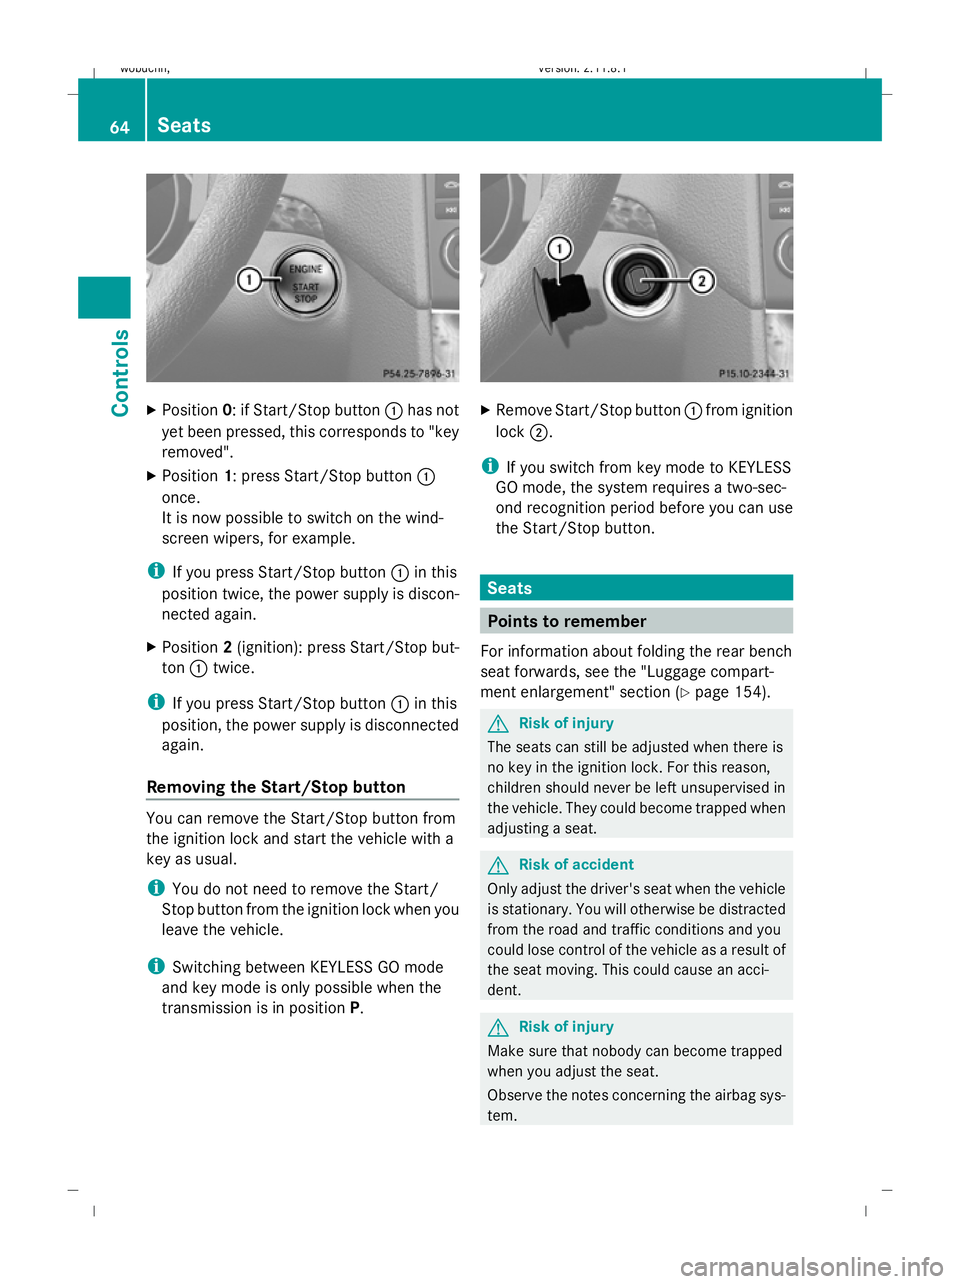
Position 0: if Start/Stop button :has not
yet been pressed, this corresponds to "key
removed".
X Position 1: press Start/Stop button :
once.
It is now possible to switch on the wind-
screen wipers, for example.
i If you press Start/Stop button :in this
position twice, the power supply is discon-
nected again.
X Position 2(ignition): press Start/Stop but-
ton :twice.
i If you press Start/Stop button :in this
position, the power supply is disconnected
again.
Removing the Start/Stop button You can remove the Start/Stop button from
the ignition lock and start the vehicle with a
key as usual.
i You do not need to remove the Start/
Stop button from the ignition lock when you
leave the vehicle.
i Switching between KEYLESS GO mode
and key mode is only possible when the
transmission is in position P. X
Remove Start/Stop button :from ignition
lock ;.
i If you switch from key mode to KEYLESS
GO mode, the system requires a two-sec-
ond recognition period before you can use
the Start/Stop button. Seats
Points to remember
For information about folding the rear bench
seat forwards, see the "Luggage compart-
ment enlargement" section (Y page 154). G
Risk of injury
The seats can still be adjusted when there is
no key in the ignition lock. For this reason,
children should never be left unsupervised in
the vehicle. They could become trapped when
adjusting a seat. G
Risk of accident
Only adjust the driver's seat when the vehicle
is stationary. You will otherwise be distracted
from the road and traffic conditions and you
could lose control of the vehicle as a result of
the seat moving. This could cause an acci-
dent. G
Risk of injury
Make sure that nobody can become trapped
when you adjust the seat.
Observe the notes concerning the airbag sys-
tem. 64
SeatsControls
X164_AKB; 2; 3, en-GB
wobuchh,
Version: 2.11.8.1 2009-03-31T14:14:58+02:00 - Seite 64
Dateiname: 6515431202_buchblock.pdf; erzeugt am 01. Apr 2009 00:16:55; WK
Page 68 of 309
Secure children as recommended; see "Chil-
dren in the vehicle" section.
G
Risk of injury
Make sure that the central area of the head
restraint supports the back of your head at
about eye level. You could seriously injure
your neck if your head is not correctly sup-
ported by the head restraint in the event of an
accident. Never travel without a correctly
adjusted and engaged head restraint.
! When you move the seats, make sure that
there are no objects in the footwell or
behind the seats. Otherwise, you could
damage the seats and the objects.
! When the rear bench seat is folded for-
wards, the front seats cannot be moved to
their rearmost position. Otherwise, you
could damage the seats and the rear bench
seat.
! Make sure that the sun visor is folded up
before setting the backrest angle and head
restraint height. Otherwise, the head
restraint and sun visor could collide when
the head restraint is fully extended.
i The rear-compartment head restraints
can be removed (Y page 69).
Please contact a Mercedes-Benz Service
Centre for more information. Adjusting the seat electrically i
If PRE-SAFE ®
is triggered in vehicles with
the memory function*, the front-passenger
seat will be moved to a better position if it
was previously in an unfavourable position.
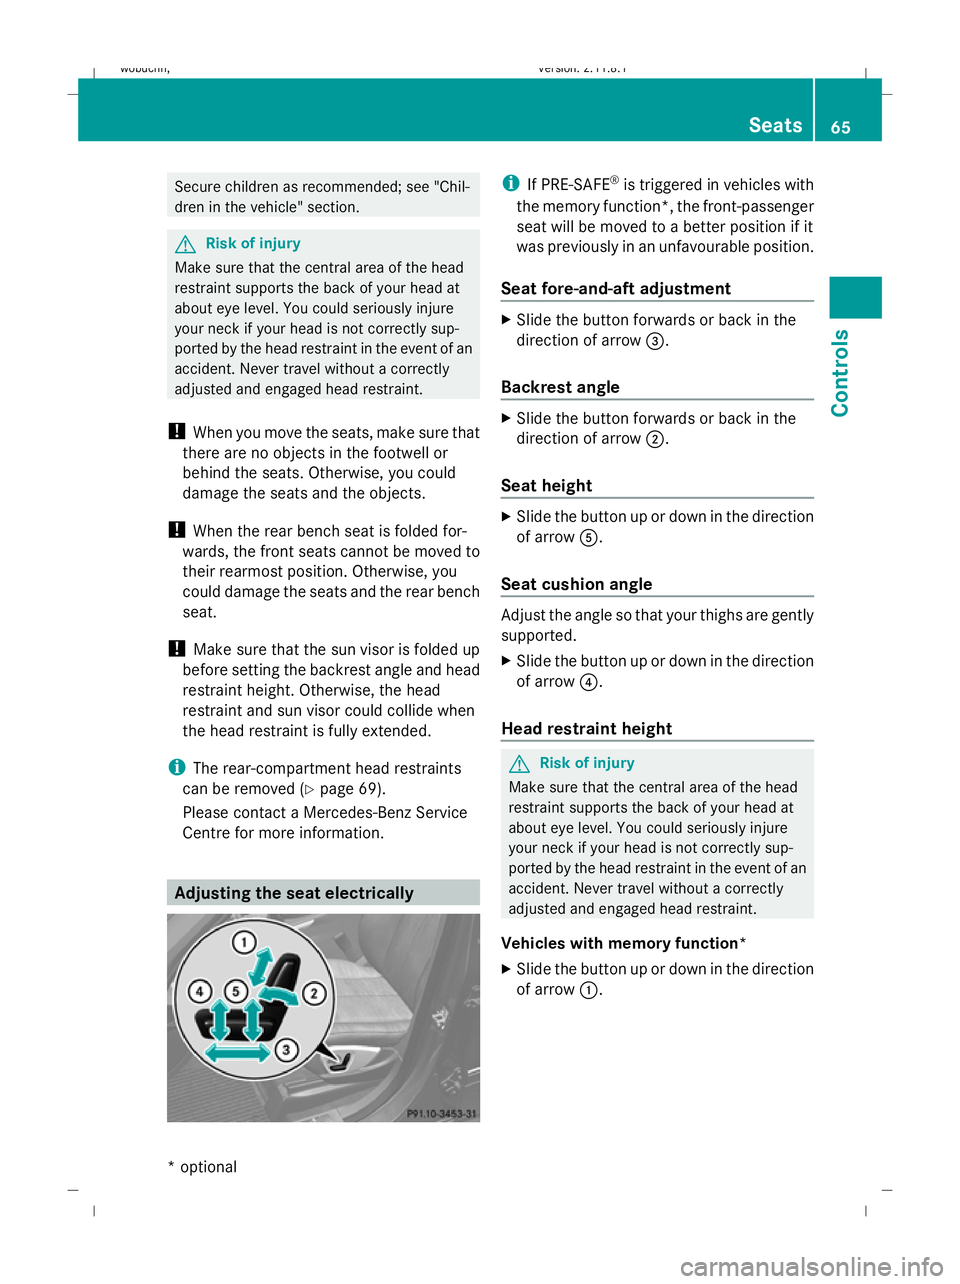
Seat fore-and-aft adjustment X
Slide the button forwards or back in the
direction of arrow =.
Backrest angle X
Slide the button forwards or back in the
direction of arrow ;.
Seat height X
Slide the button up or down in the direction
of arrow A.
Seat cushion angle Adjust the angle so that your thighs are gently
supported.
X
Slide the button up or down in the direction
of arrow ?.
Head restraint height G
Risk of injury
Make sure that the central area of the head
restraint supports the back of your head at
about eye level. You could seriously injure
your neck if your head is not correctly sup-
ported by the head restraint in the event of an
accident. Never travel without a correctly
adjusted and engaged head restraint.
Vehicles with memory function*
X Slide the button up or down in the direction
of arrow :. Seats
65Controls
* optional
X164_AKB; 2; 3, en-GB
wobuchh,
Version: 2.11.8.1 2009-03-31T14:14:58+02:00 - Seite 65 Z
Dateiname: 6515431202_buchblock.pdf; erzeugt am 01. Apr 2009 00:16:56; WK
Page 71 of 309
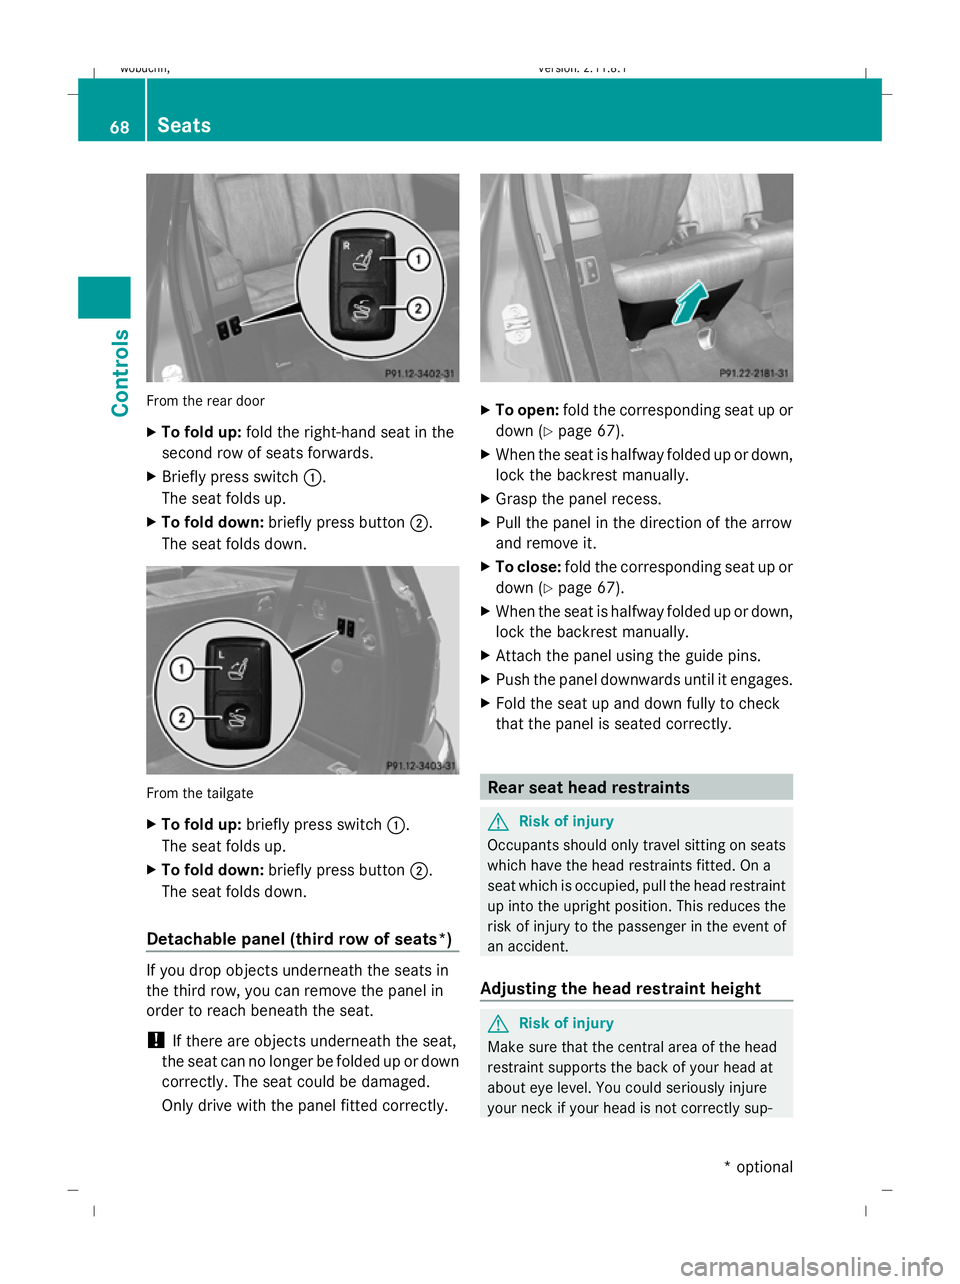
From the rear door
X
To fold up: fold the right-hand seat in the
second row of seats forwards.
X Briefly press switch :.
The seat folds up.
X To fold down: briefly press button ;.
The seat folds down. From the tailgate
X
To fold up: briefly press switch :.
The seat folds up.
X To fold down: briefly press button ;.
The seat folds down.
Detachable panel (third row of seats*) If you drop objects underneath the seats in
the third row, you can remove the panel in
order to reach beneath the seat.
! If there are objects underneath the seat,
the seat can no longer be folded up or down
correctly. The seat could be damaged.
Only drive with the panel fitted correctly. X
To open: fold the corresponding seat up or
down (Y page 67).
X When the seat is halfway folded up or down,
lock the backrest manually.
X Grasp the panel recess.
X Pull the panel in the direction of the arrow
and remove it.
X To close: fold the corresponding seat up or
down (Y page 67).
X When the seat is halfway folded up or down,
lock the backrest manually.
X Attach the panel using the guide pins.
X Push the panel downwards until it engages.
X Fold the seat up and down fully to check
that the panel is seated correctly. Rear seat head restraints
G
Risk of injury
Occupants should only travel sitting on seats
which have the head restraints fitted. On a
seat which is occupied, pull the head restraint
up into the upright position. This reduces the
risk of injury to the passenger in the event of
an accident.
Adjusting the head restraint height G
Risk of injury
Make sure that the central area of the head
restraint supports the back of your head at
about eye level. You could seriously injure
your neck if your head is not correctly sup- 68
SeatsControls
* optional
X164_AKB; 2; 3, en-GB
wobuchh
,V ersion: 2.11.8.1
2009-03-31T14:14:58+02:00 - Seite 68
Dateiname: 6515431202_buchblock.pdf; erzeugt am 01. Apr 2009 00:16:59; WK
Page 72 of 309
ported by the head restraint in the event of an
accident. Never travel without a correctly
adjusted and engaged head restraint.
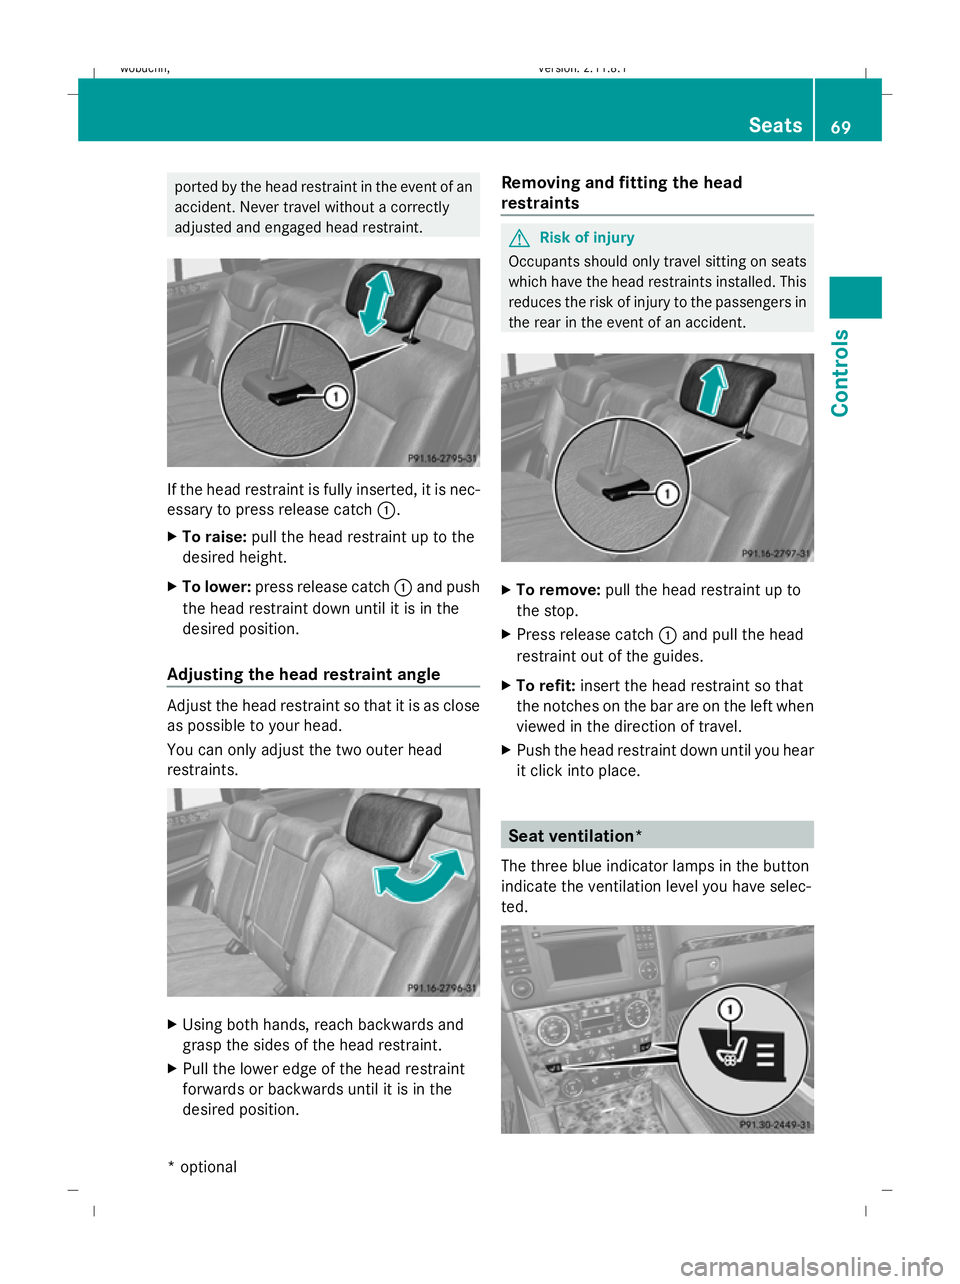
If the head restraint is fully inserted, it is nec-
essary to press release catch
:.
X To raise: pull the head restraint up to the
desired height.
X To lower: press release catch :and push
the head restraint down until it is in the
desired position.
Adjusting the head restraint angle Adjust the head restraint so that it is as close
as possible to your head.
You can only adjust the two outer head
restraints. X
Using both hands, reach backwards and
grasp the sides of the head restraint.
X Pull the lower edge of the head restraint
forwards or backwards until it is in the
desired position. Removing and fitting the head
restraints G
Risk of injury
Occupants should only travel sitting on seats
which have the head restraints installed. This
reduces the risk of injury to the passengers in
the rear in the event of an accident. X
To remove: pull the head restraint up to
the stop.
X Press release catch :and pull the head
restraint out of the guides.
X To refit: insert the head restraint so that
the notches on the bar are on the left when
viewed in the direction of travel.
X Push the head restraint down until you hear
it click into place. Seat ventilation*
The three blue indicator lamps in the button
indicate the ventilation level you have selec-
ted. Seats
69Controls
* optional
X164_AKB; 2; 3, en-GB
wobuchh,
Version: 2.11.8.1 2009-03-31T14:14:58+02:00 - Seite 69 Z
Dateiname: 6515431202_buchblock.pdf; erzeugt am 01. Apr 2009 00:17:01; WK
Page 73 of 309
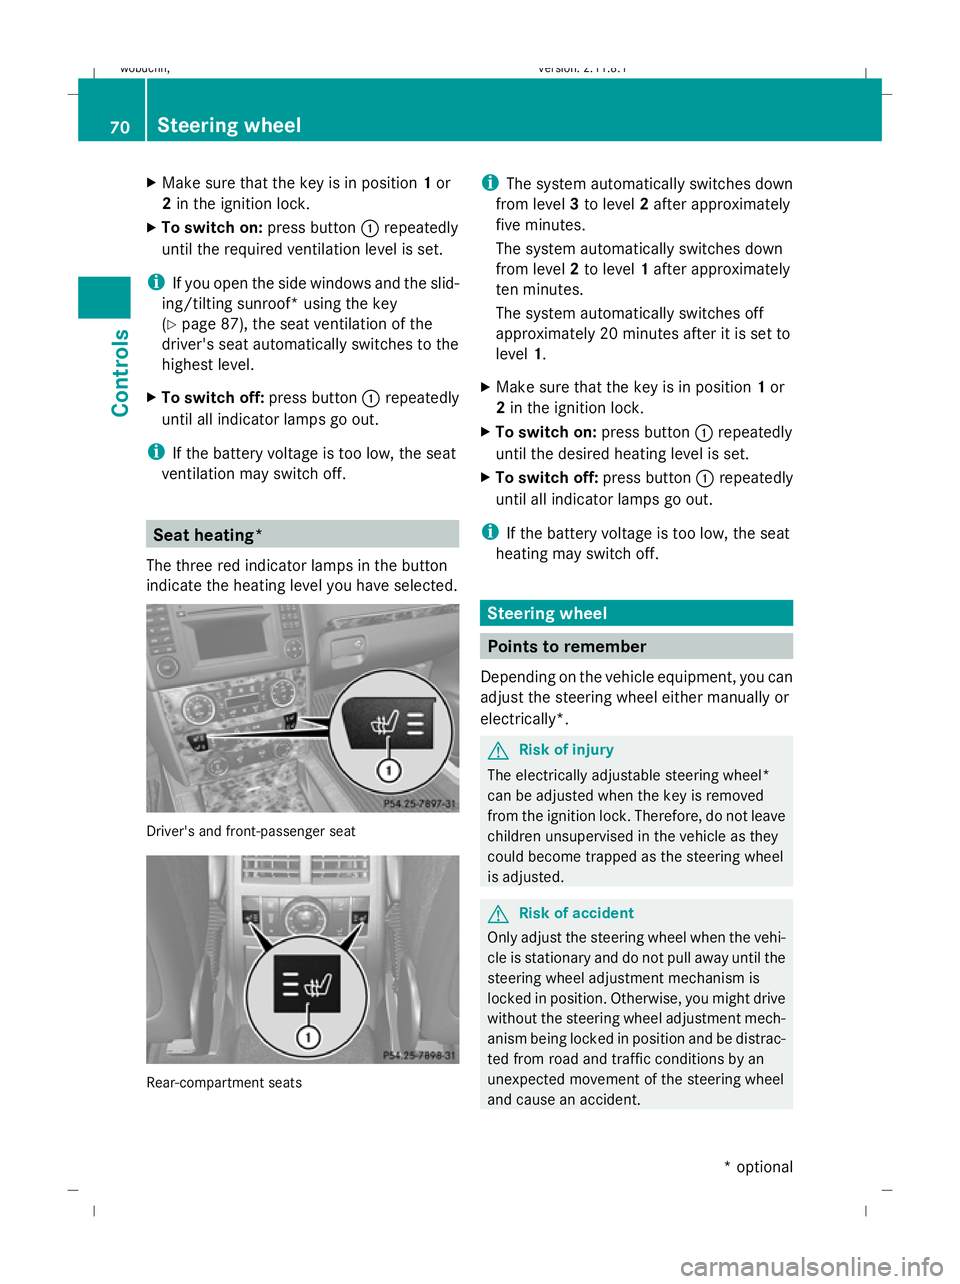
X
Make sure that the key is in position 1or
2 in the ignition lock.
X To switch on: press button:repeatedly
until the required ventilation level is set.
i If you open the side windows and the slid-
ing/tilting sunroof* using the key
(Y page 87), the seat ventilation of the
driver's seat automatically switches to the
highest level.
X To switch off: press button:repeatedly
until all indicator lamps go out.
i If the battery voltage is too low, the seat
ventilation may switch off. Seat heating*
The three red indicator lamps in the button
indicate the heating level you have selected. Driver's and front-passenger seat
Rear-compartment seats i
The system automatically switches down
from level 3to level 2after approximately
five minutes.
The system automatically switches down
from level 2to level 1after approximately
ten minutes.
The system automatically switches off
approximately 20 minutes after it is set to
level 1.
X Make sure that the key is in position 1or
2 in the ignition lock.
X To switch on: press button:repeatedly
until the desired heating level is set.
X To switch off: press button:repeatedly
until all indicator lamps go out.
i If the battery voltage is too low, the seat
heating may switch off. Steering wheel
Points to remember
Depending on the vehicle equipment, you can
adjust the steering wheel either manually or
electrically*. G
Risk of injury
The electrically adjustable steering wheel*
can be adjusted when the key is removed
from the ignition lock. Therefore, do not leave
children unsupervised in the vehicle as they
could become trapped as the steering wheel
is adjusted. G
Risk of accident
Only adjust the steering wheel when the vehi-
cle is stationary and do not pull away until the
steering wheel adjustment mechanism is
locked in position. Otherwise, you might drive
without the steering wheel adjustment mech-
anism being locked in position and be distrac-
ted from road and traffic conditions by an
unexpected movement of the steering wheel
and cause an accident. 70
Steering wheelControls
* optional
X164_AKB; 2; 3, en-GB
wobuchh,
Version: 2.11.8.1 2009-03-31T14:14:58+02:00 - Seite 70
Dateiname: 6515431202_buchblock.pdf; erzeugt am 01. Apr 2009 00:17:02; WK
Page 87 of 309
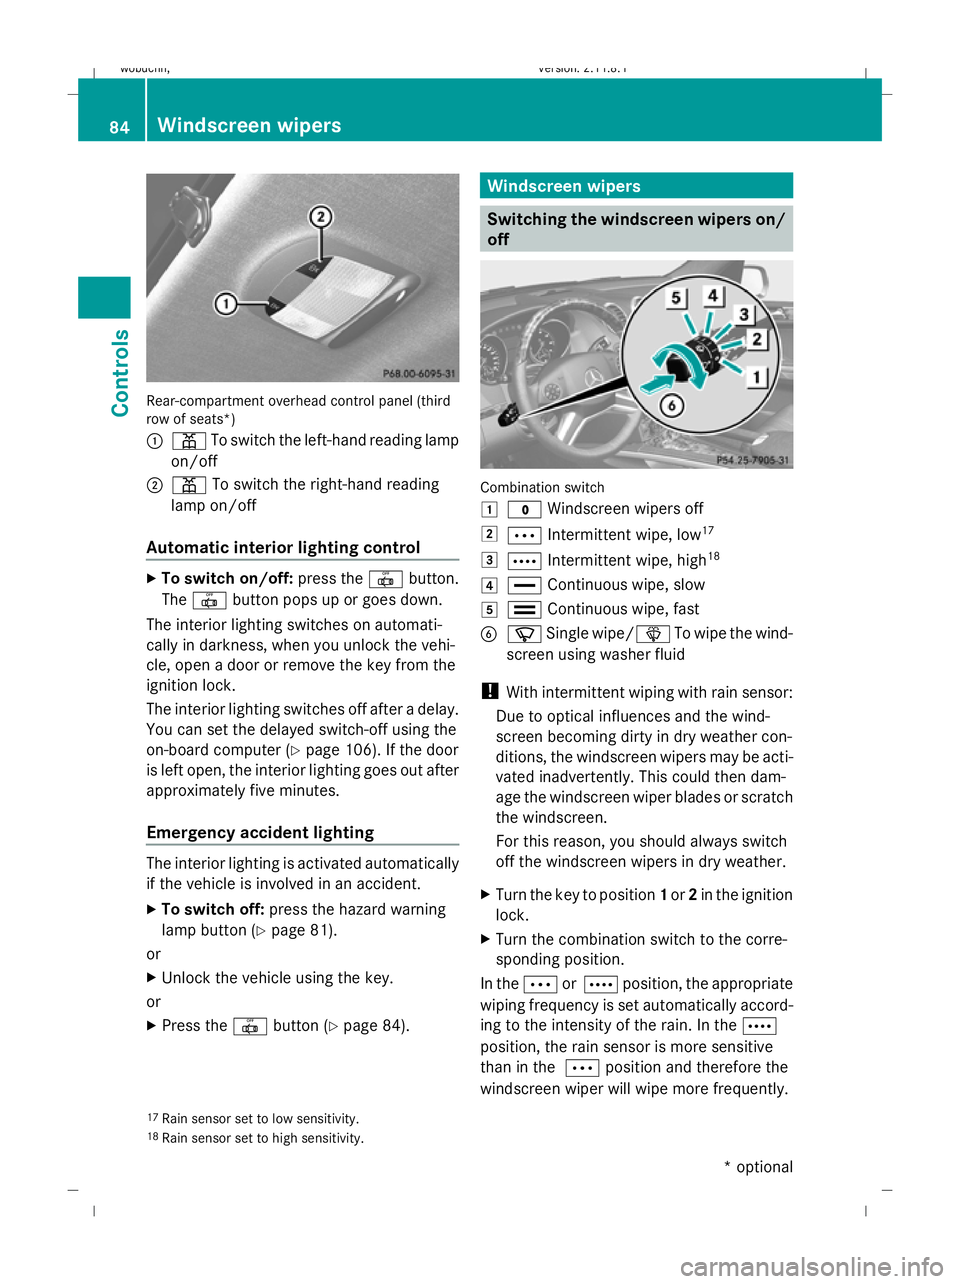
Rear-compartment overhead control panel (third
row of seats*)
:
p To switch the left-hand reading lamp
on/off
; p To switch the right-hand reading
lamp on/off
Automatic interior lighting control X
To switch on/off: press the|button.
The | button pops up or goes down.
The interior lighting switches on automati-
cally in darkness, when you unlock the vehi-
cle, open a door or remove the key from the
ignition lock.
The interior lighting switches off after a delay.
You can set the delayed switch-off using the
on-board computer (Y page 106). If the door
is left open, the interior lighting goes out after
approximately five minutes.
Emergency accident lighting The interior lighting is activated automatically
if the vehicle is involved in an accident.
X To switch off: press the hazard warning
lamp button (Y page 81).
or
X Unlock the vehicle using the key.
or
X Press the |button (Y page 84). Windscreen wipers
Switching the windscreen wipers on/
off Combination switch
1
$ Windscreen wipers off
2 Ä Intermittent wipe, low 17
3 Å Intermittent wipe, high 18
4 ° Continuous wipe, slow
5 ¯ Continuous wipe, fast
B í Single wipe/ îTo wipe the wind-
screen using washer fluid
! With intermittent wiping with rain sensor:
Due to optical influences and the wind-
screen becoming dirty in dry weather con-
ditions, the windscreen wipers may be acti-
vated inadvertently. This could then dam-
age the windscreen wiper blades or scratch
the windscreen.
For this reason, you should always switch
off the windscreen wipers in dry weather.
X Turn the key to position 1or 2in the ignition
lock.
X Turn the combination switch to the corre-
sponding position.
In the ÄorÅ position, the appropriate
wiping frequency is set automatically accord-
ing to the intensity of the rain. In the Å
position, the rain sensor is more sensitive
than in the Äposition and therefore the
windscreen wiper will wipe more frequently.
17 Rain sensor set to low sensitivity.
18 Rain sensor set to high sensitivity. 84
Windscreen wipersCont
rols
* optional
X164_AKB; 2; 3, en-GB
wobuchh,
Version: 2.11.8.1 2009-03-31T14:14:58+02:00 - Seite 84
Dateiname: 6515431202_buchblock.pdf; erzeugt am 01. Apr 2009 00:17:08; WK
Page 162 of 309
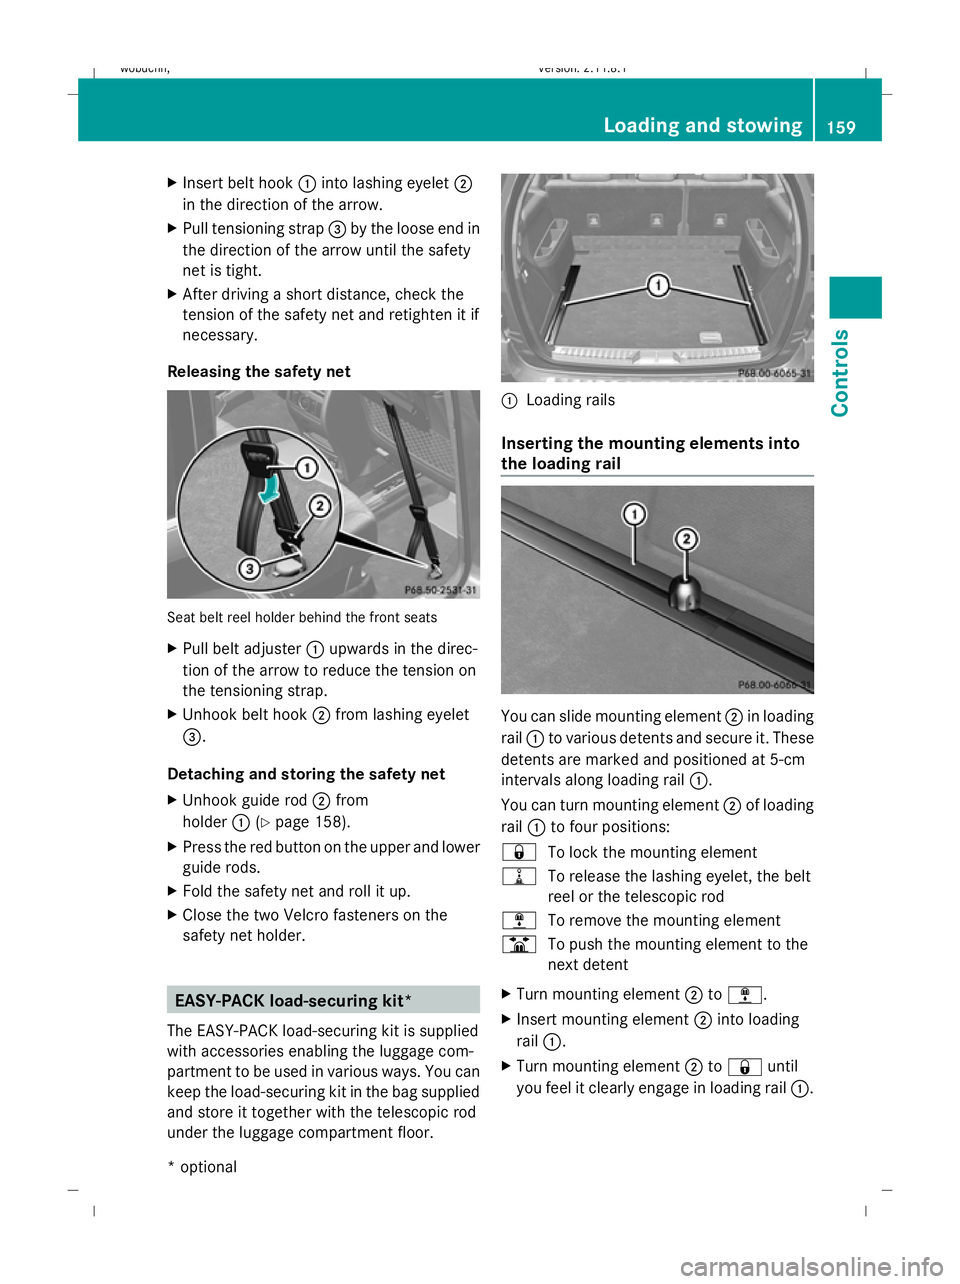
X
Insert belt hook :into lashing eyelet ;
in the direction of the arrow.
X Pull tensioning strap =by the loose end in
the direction of the arrow until the safety
net is tight.
X After driving a short distance, check the
tension of the safety net and retighten it if
necessary.
Releasing the safety net Seat belt reel holder behind the front seats
X
Pull belt adjuster :upwards in the direc-
tion of the arrow to reduce the tension on
the tensioning strap.
X Unhook belt hook ;from lashing eyelet
=.
Detaching and storing the safety net
X Unhook guide rod ;from
holder :(Ypage 158).
X Press the red button on the upper and lower
guide rods.
X Fold the safety net and roll it up.
X Close the two Velcro fasteners on the
safety net holder. EASY-PACK load-securing kit*
The EASY-PACK load-securing kit is supplied
with accessories enabling the luggage com-
partment to be used in various ways. You can
keep the load-securing kit in the bag supplied
and store it together with the telescopic rod
under the luggage compartment floor. :
Loading rails
Inserting the mounting elements into
the loading rail You can slide mounting element
;in loading
rail :to various detents and secure it. These
detents are marked and positioned at 5-cm
intervals along loading rail :.
You can turn mounting element ;of loading
rail :to four positions:
& To lock the mounting element
= To release the lashing eyelet, the belt
reel or the telescopic rod
; To remove the mounting element
B To push the mounting element to the
next detent
X Turn mounting element ;to;.
X Insert mounting element ;into loading
rail :.
X Turn mounting element ;to& until
you feel it clearly engage in loading rail :. Loading and stowing
159Controls
* optional
X164_AKB; 2; 3, en-GB
wobuchh,
Version: 2.11.8.1 2009-03-31T14:14:58+02:00 - Seite 159 Z
Dateiname: 6515431202_buchblock.pdf; erzeugt am 01. Apr 2009 00:17:39; WK