2009 MERCEDES-BENZ GL SUV radio controls
[x] Cancel search: radio controlsPage 61 of 309

Opening and closing
Key
The key centrally locks/unlocks:
R the doors
R the tailgate
R the fuel filler flap G
Risk of accident
If children are left unsupervised in the vehicle,
they could:
R open a door from the inside at any time,
even if it has been locked
R start the vehicle using a key which has been
left in the vehicle
R release the parking brake
They could thereby endanger themselves and
others. Never leave children unsupervised in
the vehicle. Always take the key with you
when leaving the vehicle, even if you are only
leaving it for a short time. :
& To lock the vehicle
; F To open/close the tailgate*
= Emergency key element
? % To unlock the vehicle
A Battery check lamp
When unlocking, the turn signals flash once.
When locking, they flash three times.
When it is dark, the surround lighting also
comes on if it is activated in the on-board
computer. The vehicle relocks automatically if you do not
open a door or the tailgate within 40 seconds
of unlocking the vehicle.
KEYLESS GO* You can start, lock or unlock the vehicle using
the KEYLESS GO key. To do this, you only
need carry the key with you. When you touch
the surface of the sensors on the vehicle's
door handles, KEYLESS GO establishes a
radio connection between the vehicle and the
key.
The distance to the door handle from which
you wish to lock or unlock the vehicle must
not be greater than 1 m.
When starting the engine and whilst driving,
KEYLESS GO also checks whether a valid key
is in the vehicle by periodically establishing
radio contact. X
To unlock the vehicle: touch the inner
surface of the door handle.
X To lock the vehicle: press locking but-
ton :.
If you pull on the handle of the tailgate, only
the luggage compartment of the vehicle is
unlocked.
i If the vehicle has been parked for a long
time, you must pull the door handle to acti-
vate KEYLESS GO. 58
Opening and closingControls
* optional
X164_AKB; 2; 3, en-GB
wobuchh,
Version: 2.11.8.1 2009-03-31T14:14:58+02:00 - Seite 58
Dateiname: 6515431202_buchblock.pdf; erzeugt am 01. Apr 2009 00:16:51; WK
Page 103 of 309

X
Press the VorU button to select the
standard display. Standard display
:
Trip meter
; Total distance
You can select the following functions in the
Standard display menu using the&or
* button:
R tyre pressure loss warning (Y page 182) or
tyre pressure monitor* (Y page 183)
R coolant temperature (Y page 100)
R digital speedometer or outside tempera-
ture (Y page 104)
R ASSYST PLUS service interval display
R engine oil level* (Y page 176)
X To reset the trip meter: press and hold
the .reset button in the instrument clus-
ter until the trip meter is reset.
Displaying the coolant temperature X
Press the VorU button to select the
standard display.
X Press the &or* button to select the
coolant temperature. Under normal driving conditions, with the cor-
rect anti-corrosion and antifreeze additive concentration, the reading may rise to
120 †.
Displaying the digital speedometer or
outside temperature If you have selected the digital speedometer
as the status line (Y
page 104), select the
outside temperature display here 20
.
X Press the VorU button to select the
standard display.
X Press the &or* button to select
digital speedometer or the outside temper-
ature. Digital speedometer
Outside temperature
Audio/TV*/DVD* menu
Use the functions in the Audio/TV/DVD
menu to operate the audio equipment or
COMAND APS*.
Selecting a radio station You can only store new stations using the
audio system or COMAND APS* (see the sep-
arate operating instructions).
20 Vehicles for the United Kingdom: the outside temperature is always displayed. 100
On-board computerControls
* optional
X164_AKB; 2; 3, en-GB
wobuchh,
Version: 2.11.8.1 2009-03-31T14:14:58+02:00 - Seite 100
Dateiname: 6515431202_buchblock.pdf; erzeugt am 01. Apr 2009 00:17:15; WK
Page 104 of 309
X
Switch on the audio system or COMAND
APS* and select the radio; see the separate
operating instructions.
X Press VorU on the steering wheel
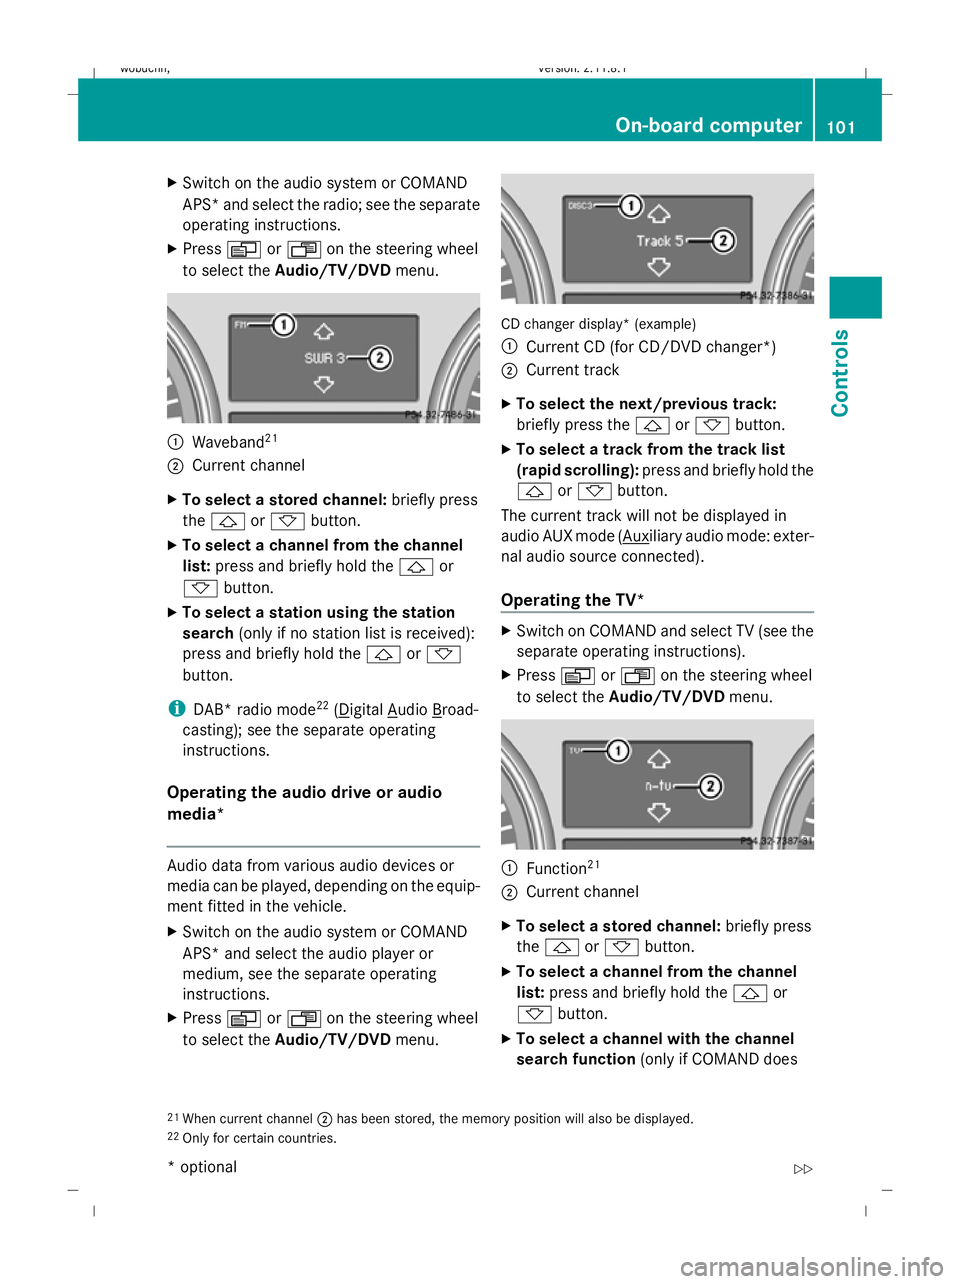
to select the Audio/TV/DVD menu. :
Waveband 21
; Current channel
X To select a stored channel: briefly press
the & or* button.
X To select a channel from the channel
list: press and briefly hold the &or
* button.
X To select a station using the station
search (only if no station list is received):
press and briefly hold the &or*
button.
i DAB* radio mode 22
( Digital Audio Broad-
casting); see the separate operating
instructions.
Operating the audio drive or audio
media* Audio data from various audio devices or
media can be played, depending on the equip-
ment fitted in the vehicle.
X Switch on the audio system or COMAND
APS* and select the audio player or
medium, see the separate operating
instructions.
X Press VorU on the steering wheel
to select the Audio/TV/DVD menu. CD changer display* (example)
:
Current CD (for CD/DVD changer *)
; Current track
X To select the next/previous track:
briefly press the &or* button.
X To select a track from the track list
(rapid scrolling): press and briefly hold the
& or* button.
The current track will not be displayed in
audio AUX mode ( Auxiliary audio mode: exter-
nal audio source connected).
Operating the TV* X
Switch on COMAND and select TV (see the
separate operating instructions).
X Press VorU on the steering wheel
to select the Audio/TV/DVD menu. :
Function 21
; Current channel
X To select a stored channel: briefly press
the & or* button.
X To select a channel from the channel
list: press and briefly hold the &or
* button.
X To select a channel with the channel
search function (only if COMAND does
21 When current channel ;has been stored, the memory position will also be displayed.
22 Only for certain countries. On-board computer
101Controls
* optional
X164_AKB; 2; 3, en-GB
wobuchh,
Version: 2.11.8.1 2009-03-31T14:14:58+02:00 - Seite 101 Z
Dateiname: 6515431202_buchblock.pdf; erzeugt am 01. Apr 2009 00:17:15; WK
Page 152 of 309
sult a qualified specialist workshop, e.g. a
Mercedes-Benz Service Centre.
The remote control has a maximum range of
approximately 300 metres. This range is
reduced by:
R sources of radio interference
R solid objects between the remote control
and the vehicle
R the remote control being in an unfavoura-
ble position in relation to the vehicle
R transmitting from an enclosed space
i The optimum range can be achieved if you
hold the remote control vertically, pointing
upwards when you press one of the but-
tons.
i A battery symbol appears in the display
when the batteries in the remote control
are low. Replace the remote control bat-
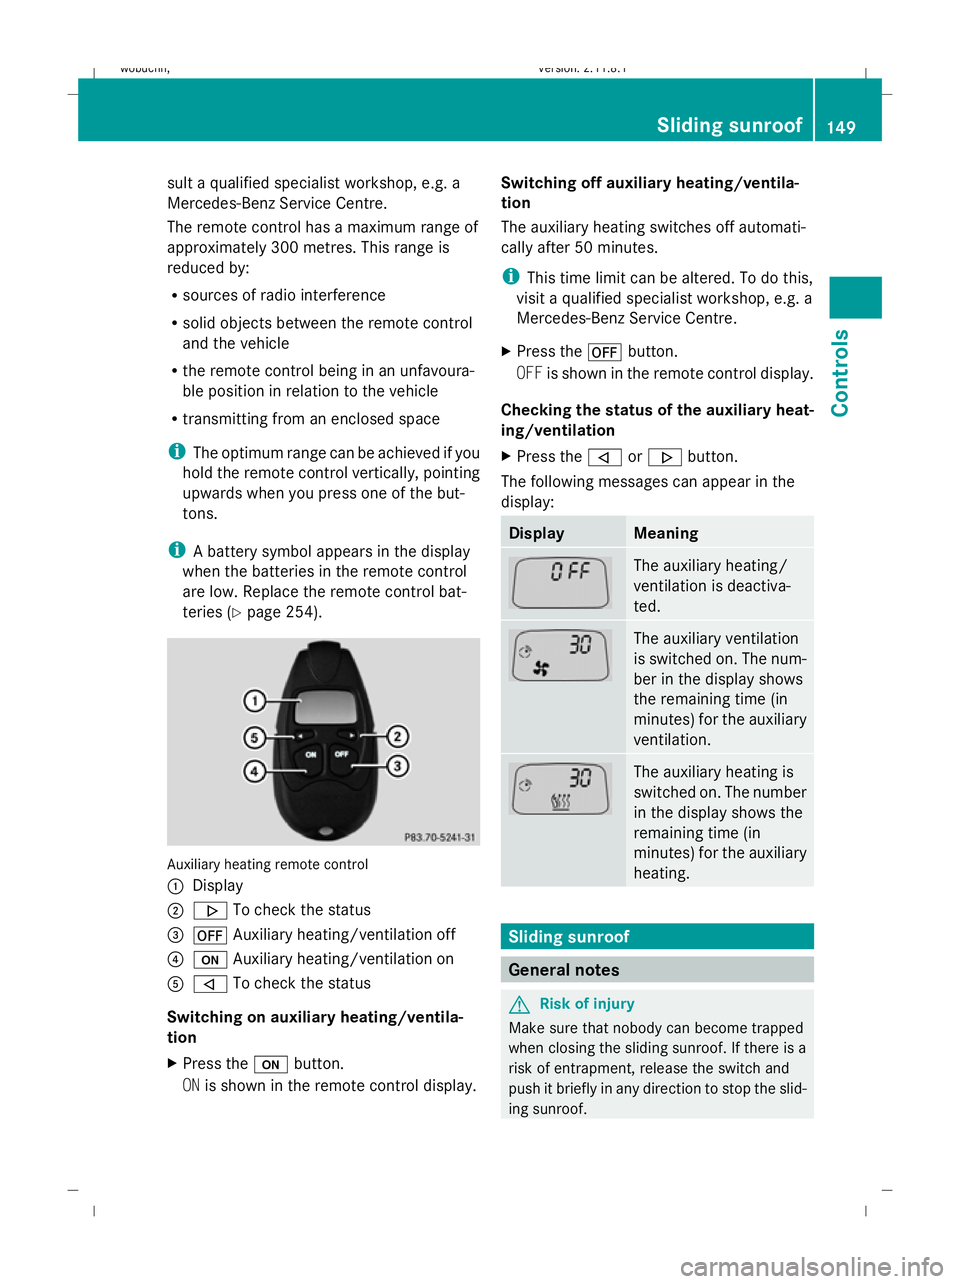
teries (Y page 254). Auxiliary heating remote control
: Display
; . To check the status
= ^ Auxiliary heating/ventilation off
? u Auxiliary heating/ventilation on
A , To check the status
Switching on auxiliary heating/ventila-
tion
X Press the ubutton.
ON is shown in the remote control display. Switching off auxiliary heating/ventila-
tion
The auxiliary heating switches off automati-
cally after 50 minutes.
i
This time limit can be altered. To do this,
visit a qualified specialist workshop, e.g. a
Mercedes-Benz Service Centre.
X Press the ^button.
OFF is shown in the remote control display.
Checking the status of the auxiliary heat-
ing/ventilation
X Press the ,or. button.
The following messages can appear in the
display: Display Meaning
The auxiliary heating/
ventilation is deactiva-
ted.
The auxiliary ventilation
is switched on. The num-
ber in the display shows
the remaining time (in
minutes) for the auxiliary
ventilation.
The auxiliary heating is
switched on. The number
in the display shows the
remaining time (in
minutes) for the auxiliary
heating.
Sliding sunroof
General notes
G
Risk of injury
Make sure that nobody can become trapped
when closing the sliding sunroof. If there is a
risk of entrapment, release the switch and
push it briefly in any direction to stop the slid-
ing sunroof. Sliding sunroof
149Controls
X164_AKB; 2; 3, en-GB
wobuchh, Version: 2.11.8.1 2009-03-31T14:14:58+02:00 - Seite 149 Z
Dateiname: 6515431202_buchblock.pdf; erzeugt am 01. Apr 2009 00:17:32; WK
Page 167 of 309
X
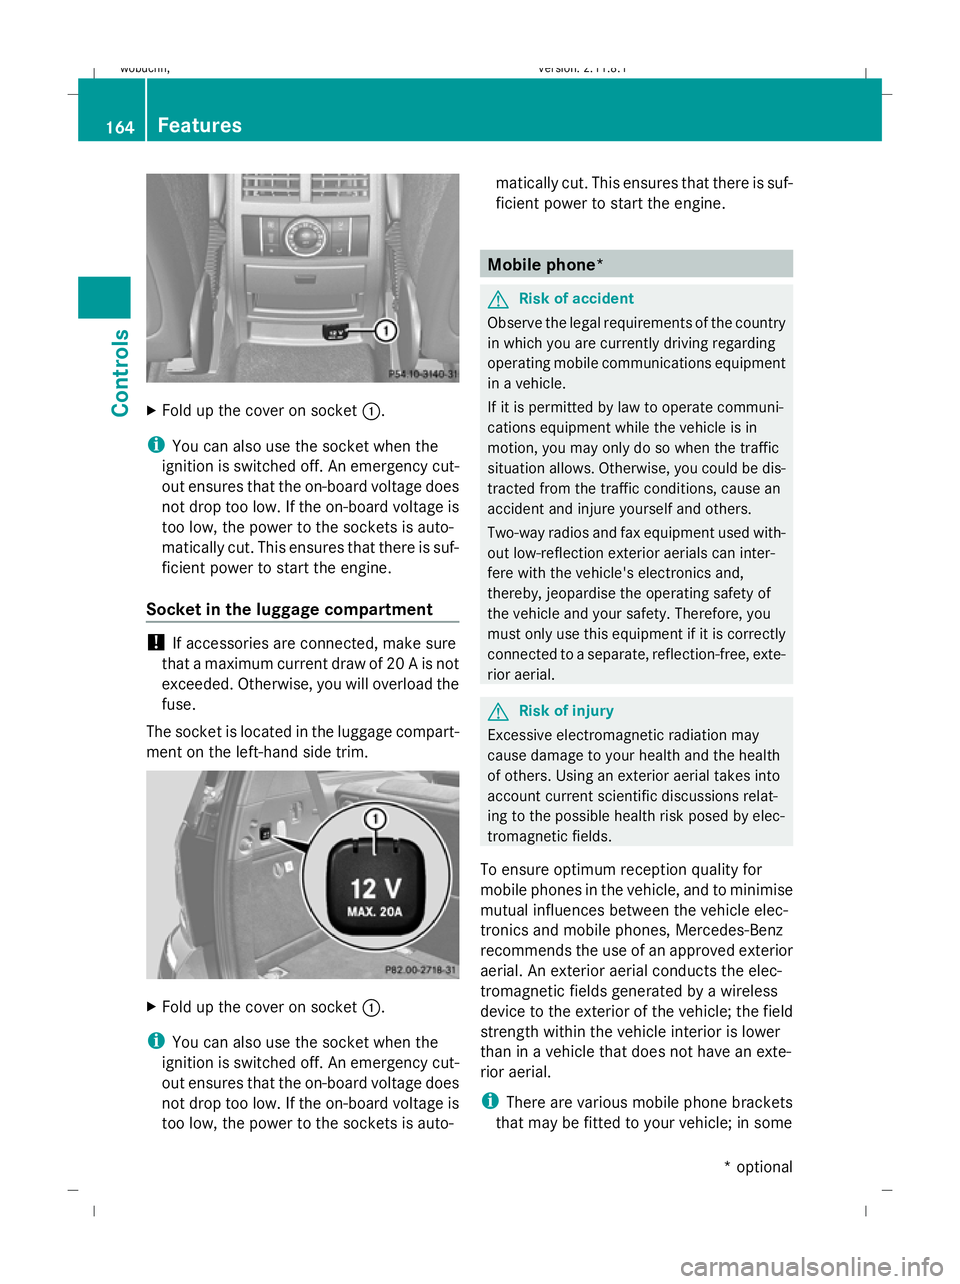
Fold up the cover on socket :.
i You can also use the socket when the
ignition is switched off. An emergency cut-
out ensures that the on-board voltage does
not drop too low. If the on-board voltage is
too low, the power to the sockets is auto-
matically cut. This ensures that there is suf-
ficient power to start the engine.
Socket in the luggage compartment !
If accessories are connected, make sure
that a maximum current draw of 20 A is not
exceeded. Otherwise, you will overload the
fuse.
The socket is located in the luggage compart-
ment on the left-hand side trim. X
Fold up the cover on socket :.
i You can also use the socket when the
ignition is switched off. An emergency cut-
out ensures that the on-board voltage does
not drop too low. If the on-board voltage is
too low, the power to the sockets is auto- matically cut. This ensures that there is suf-
ficient power to start the engine. Mobile phone*
G
Risk of accident
Observe the legal requirements of the country
in which you are currently driving regarding
operating mobile communications equipment
in a vehicle.
If it is permitted by law to operate communi-
cations equipment while the vehicle is in
motion, you may only do so when the traffic
situation allows. Otherwise, you could be dis-
tracted from the traffic conditions, cause an
accident and injure yourself and others.
Two-way radios and fax equipment used with-
out low-reflection exterior aerials can inter-
fere with the vehicle's electronics and,
thereby, jeopardise the operating safety of
the vehicle and your safety. Therefore, you
must only use this equipment if it is correctly
connected to a separate, reflection-free, exte-
rior aerial. G
Risk of injury
Excessive electromagnetic radiation may
cause damage to your health and the health
of others. Using an exterior aerial takes into
account current scientific discussions relat-
ing to the possible health risk posed by elec-
tromagnetic fields.
To ensure optimum reception quality for
mobile phones in the vehicle, and to minimise
mutual influences between the vehicle elec-
tronics and mobile phones, Mercedes-Benz
recommends the use of an approved exterior
aerial. An exterior aerial conducts the elec-
tromagnetic fields generated by a wireless
device to the exterior of the vehicle; the field
strength within the vehicle interior is lower
than in a vehicle that does not have an exte-
rior aerial.
i There are various mobile phone brackets
that may be fitted to your vehicle; in some 164
FeaturesControls
* optional
X164_AKB; 2; 3, en-GB
wobuchh
,V ersion: 2.11.8.1
2009-03-31T14:14:58+02:00 - Seite 164
Dateiname: 6515431202_buchblock.pdf; erzeugt am 01. Apr 2009 00:17:42; WK
Page 171 of 309
X
Start the engine.
X Use W orX on the multi-function
steering wheel to select the Vehiclesub-
menu.
X Keep pressing &or* until the Com‐
pass calibration message appears.
The selection marker highlights switched
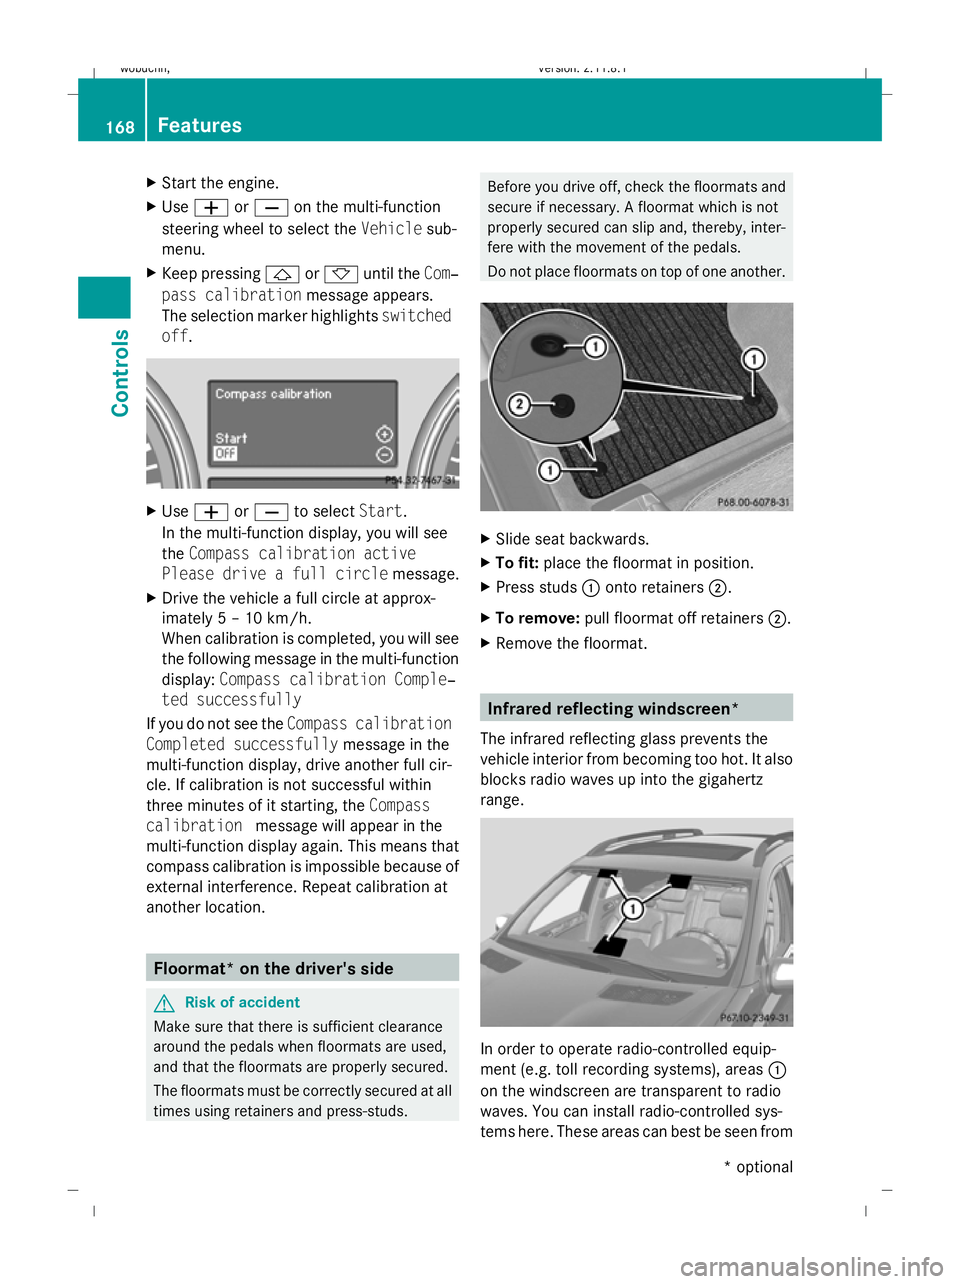
off . X
Use W orX to select Start.
In the multi-function display, you will see
the Compass calibration active
Please drive a full circle message.
X Drive the vehicle a full circle at approx-
imately 5 – 10 km/h.
When calibration is completed, you will see
the following message in the multi-function
display: Compass calibration Comple‐
ted successfully
If you do not see the Compass calibration
Completed successfully message in the
multi-function display, drive another full cir-
cle. If calibration is not successful within
three minutes of it starting, the Compass
calibration message will appear in the
multi-function display again. This means that
compass calibration is impossible because of
external interference. Repeat calibration at
another location. Floormat* on the driver's side
G
Risk of accident
Make sure that there is sufficient clearance
around the pedals when floormats are used,
and that the floormats are properly secured.
The floormats must be correctly secured at all
times using retainers and press-studs. Before you drive off, check the floormats and
secure if necessary. A floormat which is not
properly secured can slip and, thereby, inter-
fere with the movement of the pedals.
Do not place floormats on top of one another.
X
Slide seat backwards.
X To fit: place the floormat in position.
X Press studs :onto retainers ;.
X To remove: pull floormat off retainers ;.
X Remove the floormat. Infrared reflecting windscreen*
The infrared reflecting glass prevents the
vehicle interior from becoming too hot. It also
blocks radio waves up into the gigahertz
range. In order to operate radio-controlled equip-
ment (e.g. toll recording systems), areas :
on the windscreen are transparent to radio
waves. You can install radio-controlled sys-
tems here. These areas can best be seen from 168
FeaturesControls
* optional
X164_AKB; 2; 3, en-GB
wobuchh,
Version: 2.11.8.1 2009-03-31T14:14:58+02:00 - Seite 168
Dateiname: 6515431202_buchblock.pdf; erzeugt am 01. Apr 2009 00:17:44; WK
Page 172 of 309
outside the vehicle by observing the light
reflected off the windscreen.
Retrofitted anti-glare film
Anti-glare film retrofitted to the insides of the
windows could interfere with radio or mobile
phone reception, especially if it is conductive
or metal-coated film. Information about anti-
glare film can be obtained from any
Mercedes-Benz Service Centre. Features
169Controls
X164_AKB; 2; 3, en-GB
wobuchh, Version: 2.11.8.1 2009-03-31T14:14:58+02:00 - Seite 169 Z
Dateiname: 6515431202_buchblock.pdf; erzeugt am 01. Apr 2009 00:17:44; WK