2009 MERCEDES-BENZ GL SUV spare tire
[x] Cancel search: spare tirePage 11 of 309

DVD audio
Operating (on-board computer) .....101
DVD video
Operating (on-board computer) .....102 E
EASY-ENTRY/EXIT feature Activating/deactivating (on-
board computer) ............................ 108
EASY-ENTRY feature ............................ 72
Activating/deactivating (on-
board computer) ............................ 108
EASY-EXIT feature ............................... 72
Crash-responsive ............................. 72
Easy-Pack fix kit ................................ 159
EBV (electronic brake force distri-
bution) .................................................. 52
Display message ............................ 220
Electronic brake force distribution
See EBV ........................................... 52
Electronic Stability Program
see ESP ®
......................................... 51
Electronic Traction System
see 4ETS .......................................... 53
Emergency key element
Lost ............................................... 247
Emergency locking
Vehicle .......................................... .251
Emergency release
Fuel filler fla p................................. 251
Spare wheel bracket ......................251
Emergency running mode
Automatic transmission .................244
Emergency unlocking
Vehicle .......................................... .250
Engine
Running irregularl y......................... 243
Starting problems ..................242, 243
Starting with KEYLESS GO ...............89
Starting with the key ........................ 88
Switching off .................................... 91
Engine diagnostics warning
lamp .................................................... 237
Engine electronics .............................284
Malfunction ................................... .242
Engine number .................................. 287Engine oil
.......................................... 289
Capacities ...................................... 177
Checking the oil level (dipstick) .....177
Checking the oil level (on-board
computer) ...................................... 176
Consumption ................................ 176
Display mes-
sage .............................. 176, 228, 229
Filler neck ...................................... 177
Topping up ..................................... 177
ESP ®
(Electronic Stability Pro-
gram) .................................................... 51
Activating/deactivating ...................52
Display mes-
sages ............................................. 215
Trailer stabilisatio n.......................... 51
Warning lamp ..................51, 235, 236
Exterior lighting
Delayed switch-off (on-board
computer) ...................................... 105
Exterior mirrors
Adjusting ......................................... 72
Anti-dazzle mode (automatic) ..........73
Folding in/out (automatically). ........73
Folding in/out (electrically). ............73
Folding in when locking (on-board
computer) ...................................... 109
Malfunction ................................... .246
Parking position ............................... 74
Resetting ......................................... 73
Storing settings ............................... 74
Exterior view
Overview .......................................... 22 F
Fault message see Display message .....................211
Fire extinguisher ............................... 208
First-aid kit ......................................... 208
Flat tyre Equipment ..................................... 262
Preparing the vehicle .....................262
TIREFIT kit ...................................... 263
Floormat ............................................ .168
Foglamps Display message ............................ 227
Fording ....................................... 188, 1928
Index X164_AKB; 2; 3, en-GB
wobuchh,
Version: 2.11.8.1 2009-03-31T14:14:58+02:00 - Seite 8Dateiname: 6515431202_buchblock.pdf; erzeugt am 01. Apr 2009 00:16:29; WK
Page 183 of 309
res, tears, bulges on tyres and deformation,
cracks or severe corrosion on wheels), at
least every 14 days, as well as after driving
off-road or on rough roads. Damaged
wheels can cause a loss of tyre pressure.
R Regularly check the tyre tread depth and
the condition of the tread across the whole
width of the tyre (Y page 180). If neces-
sary, turn the front wheels to full lock in
order to inspect the inner side of the tyre
surface.
R All wheels must have a valve cap to protect
the valve against dirt and moisture. Do not
fit anything onto the valve (such as tyre
pressure monitoring systems) other than
the standard valve cap or other valve caps
approved by Mercedes-Benz for your vehi-
cle.
R Regularly check the pressure of all the tyres
including the spare tyre*, particularly prior
to long trips, and correct the pressure as
necessary (Y page 180).
Notes on driving R
While driving, pay attention to vibrations,
noises and unusual handling characteris-
tics, e.g. pulling to one side. This may indi-
cate that the wheels or tyres are damaged.
If you suspect that a tyre is defective,
reduce your speed and stop the vehicle as
soon as possible to check the wheels and
tyres for damage. Hidden tyre damage
could also be causing the unusual handling
characteristics. If you find no signs of dam-
age, have the wheels and tyres examined
at a specialist workshop, for example at a
Mercedes-Benz Service Centre.
R When parking your vehicle, make sure that
the tyres do not get deformed by the kerb
or other obstacles. If it is necessary to drive
over kerbs, speed humps or similar eleva-
tions, try to do so slowly and at an obtuse
angle. Otherwise, the tyres, particularly the
sidewalls, can get damaged. Direction of rotation
Tyres with a specified direction of rotation
have additional benefits, e.g. if there is a risk
of aquaplaning. You will only gain these ben-
efits if the correct direction of rotation is
observed.
An arrow on the sidewall of the tyre indicates
its correct direction of rotation.
i You may fit a spare tyre* against the
direction of rotation. Tyre tread
G
Risk of accident
Bear in mind that:
R tyre grip decreases rapidly on wet roads
when the tread depth is less than 3 mm.
Thus, you should replace tyres that have
insufficient tread.
R winter tyres should be replaced when the
tread depth is 4 mm or less as they will no
longer provide adequate grip.
R the tread on a tyre may not wear evenly.
Thus, you should regularly check the tread
depth and the condition of the tread across
the entire width of all tyres. If necessary,
turn the front wheels to full lock in order to
inspect the tyre tread more easily.
Otherwise, you could lose control of the vehi-
cle and cause an accident due to the reduced
grip of the tyres on the road. Tyre pressures
i You will find a table of tyre pressures for
various operating conditions on the inside
of your vehicle's fuel filler flap.
The applicable value for the spare
wheel*/"Minispare" emergency spare
wheel* is stated on the spare wheel and in
the technical data section.
Unless otherwise specified, the tyre pres-
sures on the inside of the fuel filler flap are 180
Tyres and wheelsOperation
* optional
X164_AKB; 2; 3, en-GB
wobuchh,
Version: 2.11.8.1 2009-03-31T14:14:58+02:00 - Seite 180
Dateiname: 6515431202_buchblock.pdf; erzeugt am 01. Apr 2009 00:17:47; WK
Page 212 of 309
Observe the legal requirements in all coun-
tries concerned.
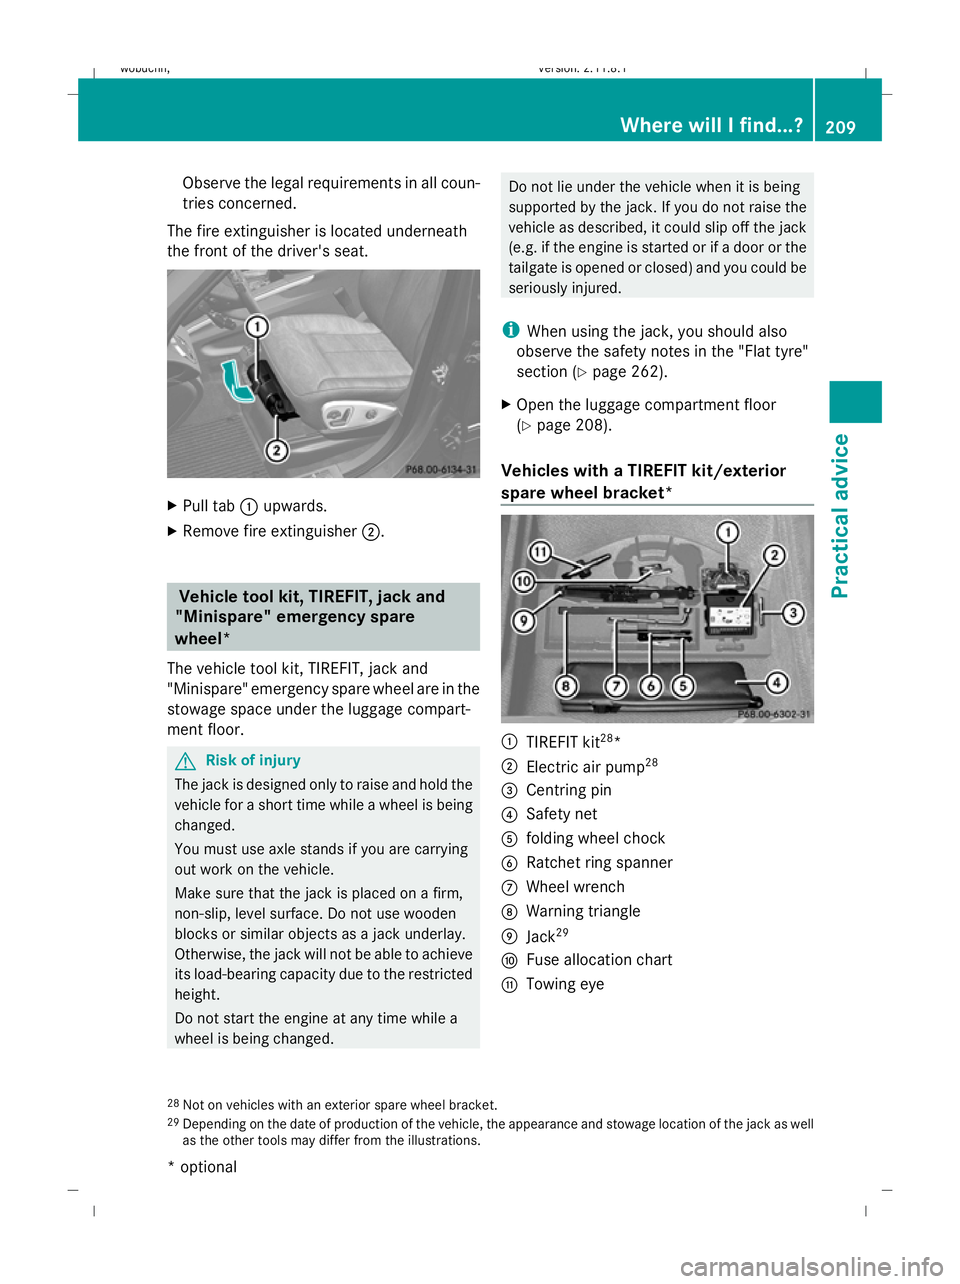
The fire extinguisher is located underneath
the front of the driver's seat. X
Pull tab :upwards.
X Remove fire extinguisher ;. Vehicle tool kit, TIREFIT, jack and
"Minispare" emergency spare
wheel*
The vehicle tool kit, TIREFIT, jack and
"Minispare" emergency spare wheel are in the
stowage space under the luggage compart-
ment floor. G
Risk of injury
The jack is designed only to raise and hold the
vehicle for a short time while a wheel is being
changed.
You must use axle stands if you are carrying
out work on the vehicle.
Make sure that the jack is placed on a firm,
non-slip, level surface. Do not use wooden
blocks or similar objects as a jack underlay.
Otherwise, the jack will not be able to achieve
its load-bearing capacity due to the restricted
height.
Do not start the engine at any time while a
wheel is being changed. Do not lie under the vehicle when it is being
supported by the jack. If you do not raise the
vehicle as described, it could slip off the jack
(e.g. if the engine is started or if a door or the
tailgate is opened or closed) and you could be
seriously injured.
i When using the jack, you should also
observe the safety notes in the "Flat tyre"
section (Y page 262).
X Open the luggage compartment floor
(Y page 208).
Vehicles with a TIREFIT kit/exterior
spare wheel bracket* :
TIREFIT kit 28
*
; Electric air pump 28
= Centring pin
? Safety net
A folding wheel chock
B Ratchet ring spanner
C Wheel wrench
D Warning triangle
E Jack 29
F Fuse allocation chart
G Towing eye
28 Not on vehicles with an exterior spare wheel bracket.
29 Depending on the date of production of the vehicle, the appearance and stowage location of the jack as well
as the other tools may differ from the illustrations. Where will I find...?
209Practical advice
* optional
X164_AKB; 2; 3, en-GB
wobuchh,
Version: 2.11.8.1 2009-03-31T14:14:58+02:00 - Seite 209 Z
Dateiname: 6515431202_buchblock.pdf; erzeugt am 01. Apr 2009 00:17:56; WK
Page 213 of 309
Exterior spare wheel bracket*
G
Risk of injury
The spare wheel is heavy. Make sure that
nobody is injured as you remove the spare
wheel.
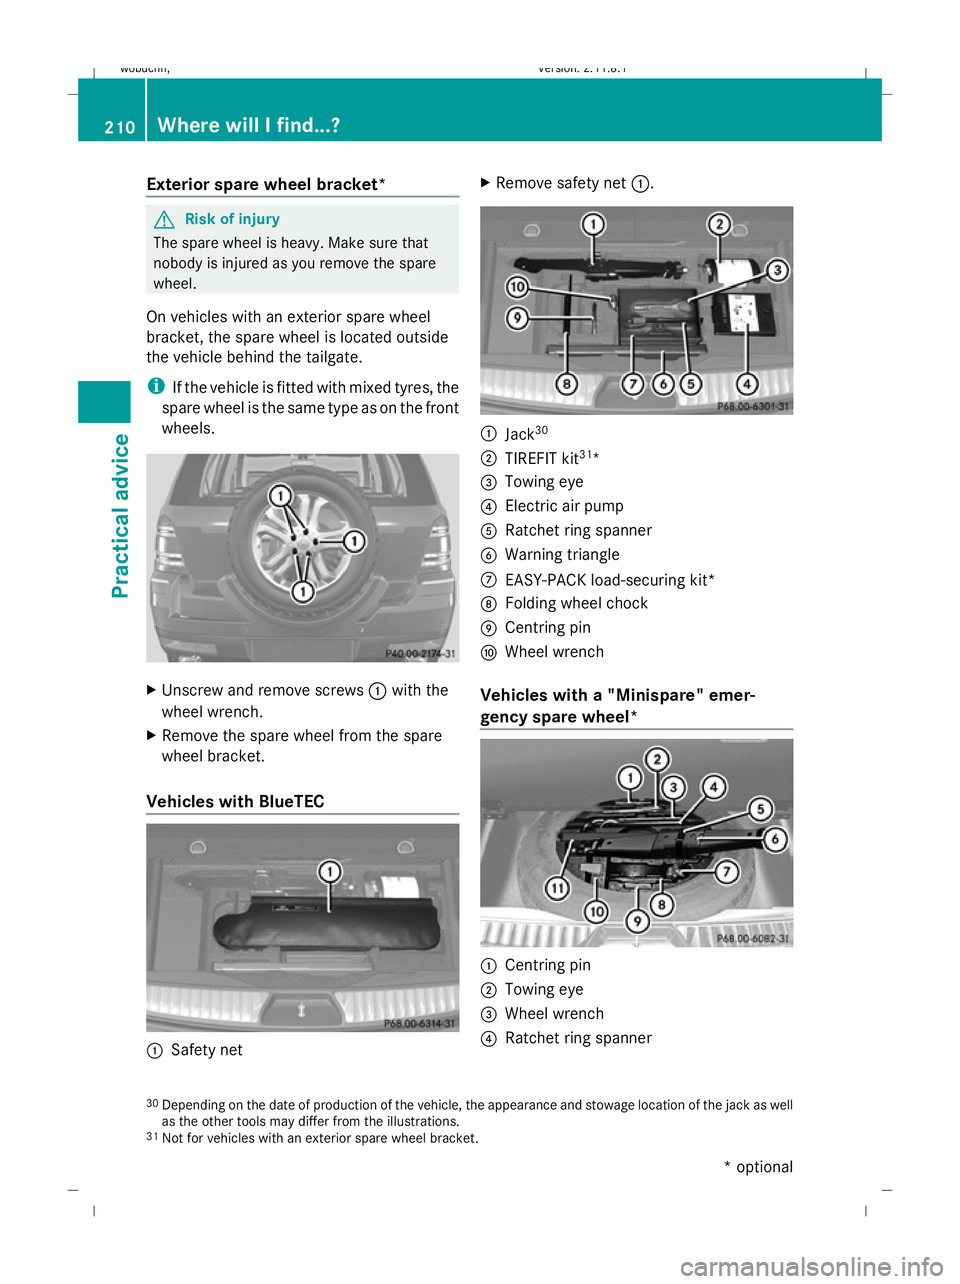
On vehicles with an exterior spare wheel
bracket, the spare wheel is located outside
the vehicle behind the tailgate.
i If the vehicle is fitted with mixed tyres, the
spare wheel is the same type as on the front
wheels. X
Unscrew and remove screws :with the
wheel wrench.
X Remove the spare wheel from the spare
wheel bracket.
Vehicles with BlueTEC :
Safety net X
Remove safety net :. :
Jack 30
; TIREFIT kit 31
*
= Towing eye
? Electric air pump
A Ratchet ring spanner
B Warning triangle
C EASY-PACK load-securing kit*
D Folding wheel chock
E Centring pin
F Wheel wrench
Vehicles with a "Minispare" emer-
gency spare wheel* :
Centring pin
; Towing eye
= Wheel wrench
? Ratchet ring spanner
30 Depending on the date of production of the vehicle, the appearance and stowage location of the jack as well
as the other tools may differ from the illustrations.
31 Not for vehicles with an exterior spare wheel bracket. 210
Where will I find...?Practical advice
* optional
X164_AKB; 2; 3, en-GB
wobuchh,
Version: 2.11.8.1 2009-03-31T14:14:58+02:00 - Seite 210
Dateiname: 6515431202_buchblock.pdf; erzeugt am 01. Apr 2009 00:17:58; WK
Page 265 of 309
Rear window wiper blade
G
Risk of injury
The wiper arm could be set in motion and
injure you if the windscreen wipers are
switched on.
Remove the key from the ignition lock before
replacing the wiper blade.
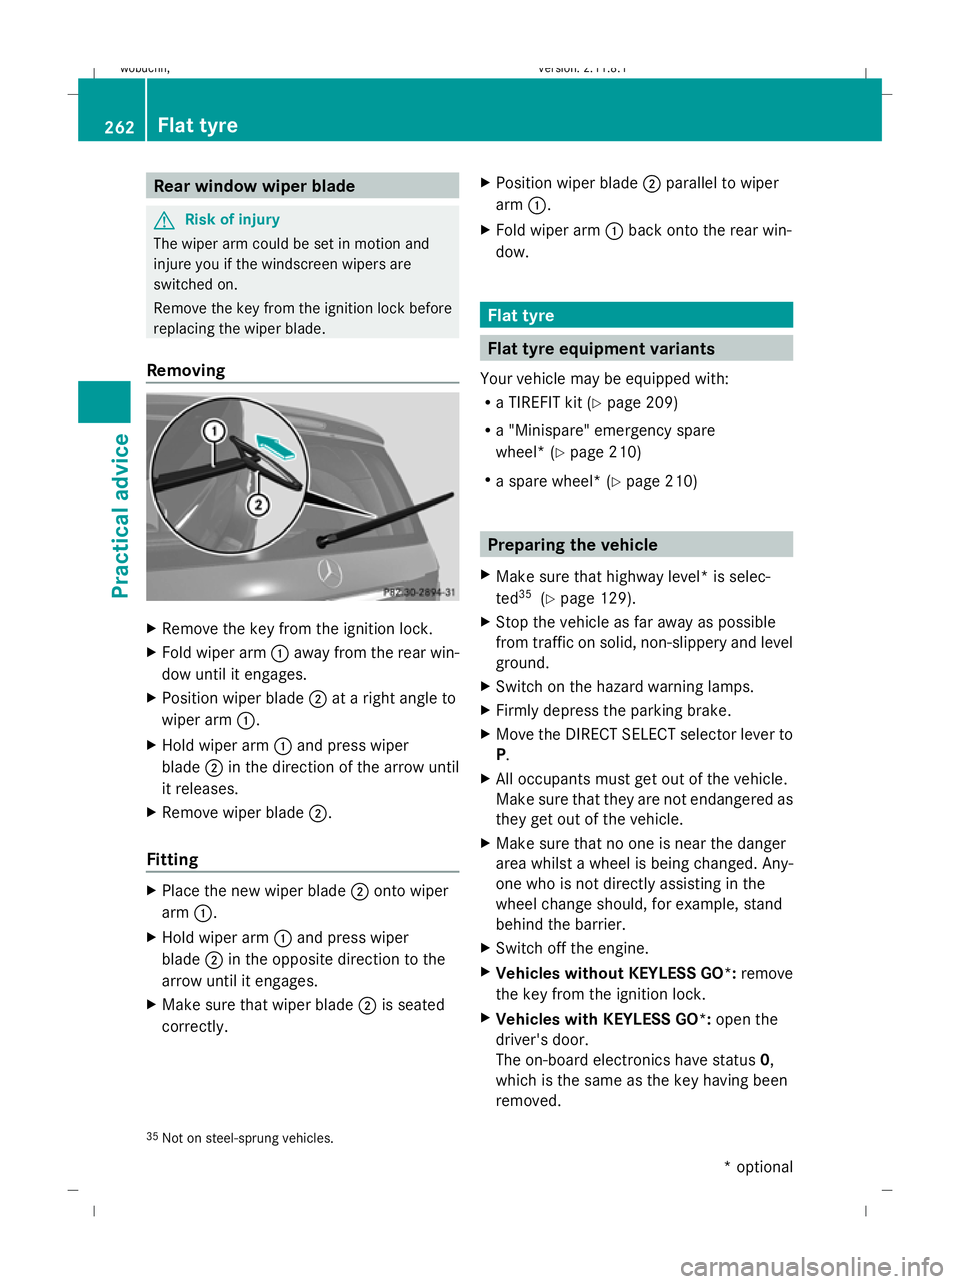
Removing X
Remove the key from the ignition lock.
X Fold wiper arm :away from the rear win-
dow until it engages.
X Position wiper blade ;at a right angle to
wiper arm :.
X Hold wiper arm :and press wiper
blade ;in the direction of the arrow until
it releases.
X Remove wiper blade ;.
Fitting X
Place the new wiper blade ;onto wiper
arm :.
X Hold wiper arm :and press wiper
blade ;in the opposite direction to the
arrow until it engages.
X Make sure that wiper blade ;is seated
correctly. X
Position wiper blade ;parallel to wiper
arm :.
X Fold wiper arm :back onto the rear win-
dow. Flat tyre
Flat tyre equipment variants
Your vehicle may be equipped with:
R a TIREFIT kit (Y page 209)
R a "Minispare" emergency spare
wheel* (Y page 210)
R a spare wheel * (Ypage 210) Preparing the vehicle
X Make sure that highway level* is selec-
ted 35
(Ypage 129).
X Stop the vehicle as far away as possible
from traffic on solid, non-slippery and level
ground.
X Switch on the hazard warning lamps.
X Firmly depress the parking brake.
X Move the DIRECT SELECT selector lever to
P.
X All occupants must get out of the vehicle.
Make sure that they are not endangered as
they get out of the vehicle.
X Make sure that no one is near the danger
area whilst a wheel is being changed. Any-
one who is not directly assisting in the
wheel change should, for example, stand
behind the barrier.
X Switch off the engine.
X Vehicles without KEYLESS GO*: remove
the key from the ignition lock.
X Vehicles with KEYLESS GO*: open the
driver's door.
The on-board electronics have status 0,
which is the same as the key having been
removed.
35 Not on steel-sprung vehicles. 262
Flat tyrePractical advice
* optional
X164_AKB; 2; 3, en-GB
wobuchh,
Version: 2.11.8.1 2009-03-31T14:14:58+02:00 - Seite 262
Dateiname: 6515431202_buchblock.pdf; erzeugt am 01. Apr 2009 00:18:09; WK
Page 300 of 309
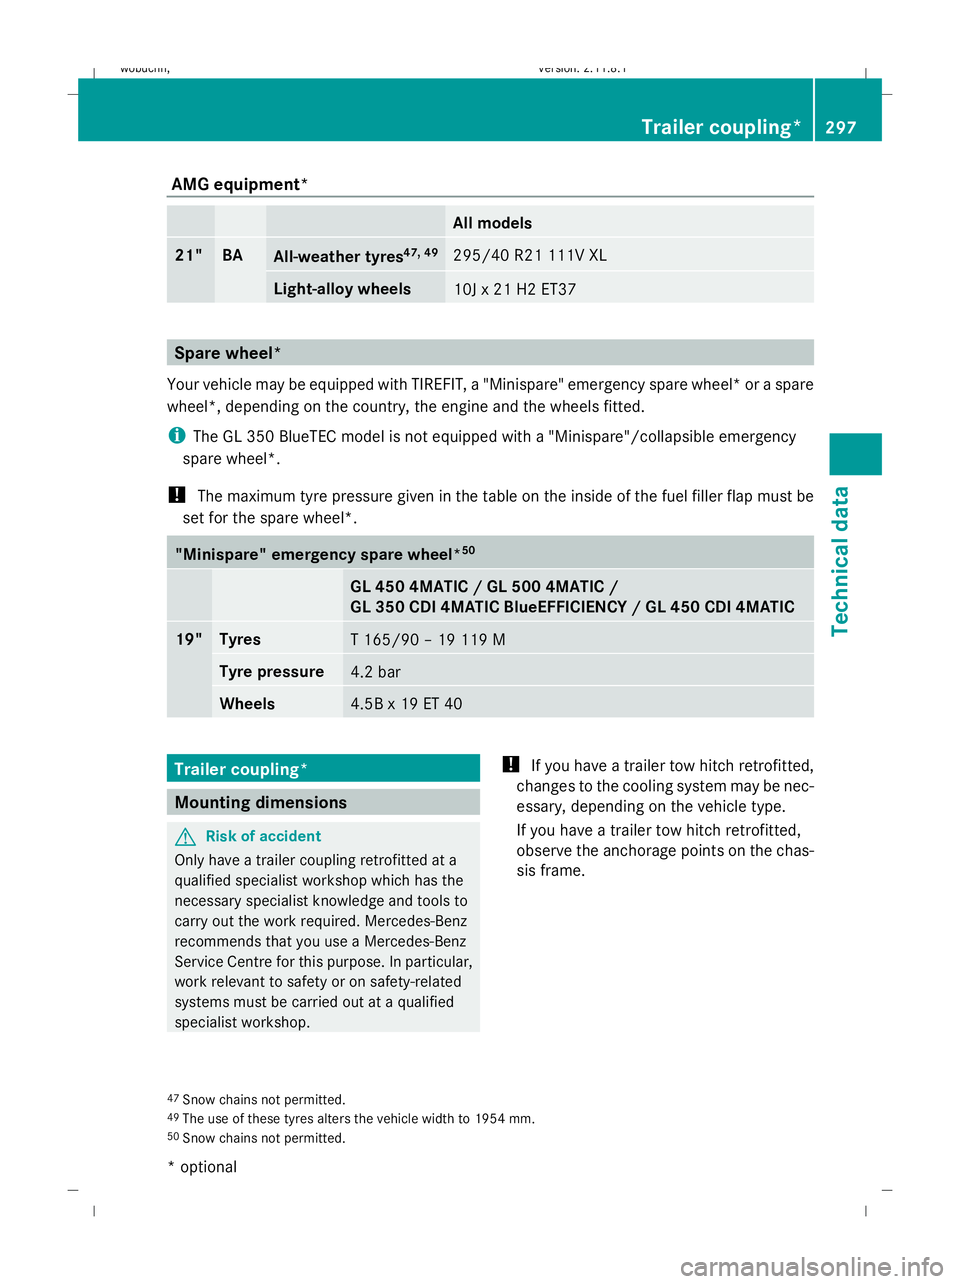
AMG equipment*
All models
21" BA
All-weather tyres
47, 49 295/40 R21 111V XL
Light-alloy wheels
10J x 21 H2 ET37
Spare wheel*
Your vehicle may be equipped with TIREFIT, a "Minispare" emergency spare wheel* or a spare
wheel*, depending on the country, the engine and the wheels fitted.
i The GL 350 BlueTEC model is not equipped with a "Minispare"/collapsible emergency
spare wheel*.
! The maximum tyre pressure given in the table on the inside of the fuel filler flap must be
set for the spare wheel*. "Minispare" emergency spare wheel*
50 GL 450 4MATIC / GL 500 4MATIC /
GL 350 CDI 4MATIC BlueEFFICIENCY / GL 450 CDI 4MATIC
19" Tyres
T 165/90 – 19 119 M
Tyre pressure
4.2 bar
Wheels
4.5B x 19 ET 40
Trailer coupling*
Mounting dimensions
G
Risk of accident
Only have a trailer coupling retrofitted at a
qualified specialist workshop which has the
necessary specialist knowledge and tools to
carry out the work required. Mercedes-Benz
recommends that you use a Mercedes-Benz
Service Centre for this purpose. In particular,
work relevant to safety or on safety-related
systems must be carried out at a qualified
specialist workshop. !
If you have a trailer tow hitch retrofitted,
changes to the cooling system may be nec-
essary, depending on the vehicle type.
If you have a trailer tow hitch retrofitted,
observe the anchorage points on the chas-
sis frame.
47 Snow chains not permitted.
49 The use of these tyres alters the vehicle width to 1954 mm.
50 Snow chains not permitted. Trailer coupling*
297Technical data
* optional
X164_AKB; 2; 3, en-GB
wobuchh,
Version: 2.11.8.1 2009-03-31T14:14:58+02:00 - Seite 297 Z
Dateiname: 6515431202_buchblock.pdf; erzeugt am 01. Apr 2009 00:18:26; WK