2009 MERCEDES-BENZ GL SUV fold seats
[x] Cancel search: fold seatsPage 8 of 309

Automatic transmission
DIRECT SELECT lever .......................92
Display mes-
sage .............................. 213, 216, 217
Driving tips ...................................... 94
Emergency running mode ..............244
Gear indicator .................................. 93
Kickdown ......................................... 94
Malfunction ................................... .244
Program selector button ..................95
Shift ranges ..................................... 94
Trailer towing ................................... 94
Transmission positions ....................93
Auxiliary heating ............................... 147
Display message .................... 231, 232
Notes ............................................. 147
Remote control .............................. 148
Setting (on-board computer) .......... 107
Auxiliary ventilation ..........................147 B
Backrest angle Adjusting (2nd row of seats) ............67
Ball coupling
Fitting ............................................ 194
Folding in ....................................... 198
Folding out ..................................... 193
Removing ....................................... 198
BAS (Brake Assist) ............................... 50
Battery Changing (auxiliary heating
remote control) .............................. 254
Charging ........................................ 275
Checking (key) ............................... 253
Check lamp (key )........................... 253
Disconnecting ................................ 273
Display message ............................ 220
Jump-starting ................................. 276
Maintenance (vehicle) .................... 272
Reconnecting ................................. 276
Removing/fitting ........................... 274
Vehicle battery .............................. 272
Belt force limiters
Activation ......................................... 35
Belt height adjustment .......................77
Belt reel (Easy-Pack fix kit) ..............160Belt tensioners
Activation ......................................... 35
Belt warning ......................................... 77
BlueTEC
AdBlue ®
......................................... 288
Bonnet
Bonnet catch ................................. 175
Display message ............................ 219
Opening/closing ........................... 174
Bonnet release lever
Release leve r................................. 175
Boot
Automatic opening ........................... 62
Boot lid
Opening/closing .............................. 60
Brake Assist
See BAS ........................................... 50
Brake fluid .......................................... 291
Display message ............................ 221
Brake lamps
Adaptive .......................................... .51
Display message ............................ 226
Brakes
Parking brake ................................... 91
Warning lamp ........................ 235, 236
Brake system
Display message ............................ 220
Bulbs .................................................. 254
Brake lamp .................................... 260
Dipped-beam headlamps ...............258
Display message ............................ 225
Licence plate lamp ......................... 260
Main-beam headlamps ................... 258
Overview ........................................ 256
Parking lamp .......................... 258, 260
Rear foglamp ................................. 260
Replacing .............................. .258, 259
Reversing lamp .............................. 260
Side lamp ....................................... 258
Tail lamp ........................................ 260
Turn signal lamp ....................258, 260
see Lamp Index
5 X164_AKB; 2; 3, en-GB
wobuchh,
Version: 2.11.8.1
2009-03-31T14:14:58+02:00 - Seite 5Dateiname: 6515431202_buchblock.pdf; erzeugt am 01. Apr 2009 00:16:29; WK
Page 15 of 309

Oil level
Checking (dipstick) ........................177
Checking (on-board computer) ......176
On-board computer .............................97
Additional functions menu .............109
Audio menu ................................... 100
Convenience submenu ..................108
Display messages ..........................211
DVD menu ..................................... 102
Factory settings ............................. 103
Heating submenu ........................... 107
Instrument cluster submenu ..........103
Lighting submenu .......................... 105
Navi menu ..................................... 102
Off-road menu ............................... 102
Overview .......................................... 99
Settings menu ............................... 103
Standard display menu ....................99
Telephone menu ............................ 111
Time/date submenu ......................104
Trip computer menu ......................110
TV menu ........................................ 101
Vehicle submenu ........................... 106
On-board computer language ..........104
Operating system see On-board computer ...................97
Outside temperature display ............97
On-board computer .......................100
Override feature
Rear side windows ...........................49 P
Paint code .......................................... 286
Paintwork Cleaning ......................................... 202
Panel
Removing (third row of seats) ..........68
Parking ................................................. 90
Parking aid Exterior mirror on the front-
passenger side ................................. 74
PARKTRONIC ................................. 133
Reversing camera ..........................135
Parking brake ...................................... 91
Display message ............................ 221
Parking lamps
Display message ............................ 227Parking position
Exterior mirror on the front-
passenger side ................................. 74
PARKTRONIC ...................................... 133
Activating/deactivating .................135
Malfunction ................................... .244
Range of the sensors .....................134
Trailer towing ................................. 135
Warning displa y............................. 134
PASSENGER AIRBAG OFF warning
lamp ............................................. 43, 234
Permanent four-wheel drive see 4MATIC ................................... 112
Permanent Speedtronic ....................128
Petrol Minimum grade ............................ .173
see Fuel
Plastic trim
Cleaning ......................................... 205
Power supply (trailer) .......................199
Power window switch see Side windows
Pre-emptive occupant safety system
see PRE-SAFE ®
PRE-SAFE ®
system .............................. 40
Display message ............................ 217
Program selector button
Automatic transmission ...................95
Pulling away ......................................... 89 R
Radio Changing a station (on-board
computer) ...................................... 100
see separate operating instructions
Radio-controlled equipment
Installation ..................................... 168
Rain closing feature
Sliding/tilting sunroof ...................151
Range (on-board computer) .............111
Rear bench seat Folding forward/back ....................155
Rear compartment
Activating/deactivating the air
conditioning ........................... 140, 141
Setting the air vents ......................144
Setting the temperature ................142 12
Index X164_AKB; 2; 3, en-GB
wobuchh,
Version: 2.11.8.1 2009-03-31T14:14:58+02:00 - Seite 12Dateiname: 6515431202_buchblock.pdf; erzeugt am 01. Apr 2009 00:16:30; WK
Page 16 of 309
Rear-compartment seats
....................67
Rear foglamp Display message ............................ 227
Rear-view mirror
Adjusting ......................................... 72
Anti-dazzle (manual) ......................... 72
Anti-dazzle mode (automatic) ..........73
Rear window heating ........................146
Malfunction indicator lamp ............234
Rear window wiper .............................85
Replacing the wiper blade .............. 262
Refuelling ........................................... 172
Remote control Auxiliary heating ............................ 148
Changing the batteries (auxiliary
heating) ......................................... 254
Garage door opene r....................... 165
Programming (garage door
opener) .......................................... 165
Reserve
Warning lamp ................................. 239
Reserve fuel ....................................... 287
Display message ............................ 232
Fuel tank ........................................ 287
Warning lamp ................................. 239
Reset button ........................................ 25
Restraint system See SRS .......................................... 35
Restraint systems
For children ..................................... 41
Rev counter .......................................... 97
Reversing camera ............................. 135
Cleaning ......................................... 203
Reversing lamps
Display message ............................ 228
Roof carrier ....................................... 161S
Safety net .......................................... .158
Seat Adjusting ................................... 64, 65
Correct driver's seat position ........... 78
Folding down/up (3rd row of
seats) ............................................... 67
Storing settings ............................... 74Seat belt
Adjusting the driver's and front-
passenger seat belt .........................77
Adjusting the height ......................... 77
Fastening ......................................... 75
Warning lamp ........................... 77, 238
Seat covers
Cleaning ......................................... 204
Seat heating ........................................ .70
Seat ventilation ................................... 69
Malfunction indicator lamp ............233
Securing a load .................................. 156
Securing hooks .................................. 157
Service indicator see ASSYST PLUS service interval
displa y........................................... 199
Service products ............................... 287
AdBlue ®
additives .......................... 288
Brake fluid ..................................... 291
Coolant .......................................... 291
Engine oil ....................................... 289
Fuel ................................................ 287
Windscreen washer fluid ................291
Settings
Calling up a stored setting ...............74
Factory (on-board computer) .........103
On-board computer .......................103
Setting the unit (on-board computer)
Speedometer ................................. 103
Shift ranges
Automatic transmission ...................94
Sidebag ................................................ 39
Side windows Convenience closing ........................87
Convenience opening ......................87
Fault .............................................. 246
Hinged side windows .......................86
Opening/closing .............................. 85
resetting .......................................... 86
Sliding/tilting sunroof ......................150
Convenience closing ........................87
Convenience opening ......................87
Rain closing feature .......................151
Resetting ....................................... 151
Sliding sunroof
see Sliding/tilting sunroof
Snow chains ...................................... 186 Index
13 X164_AKB; 2; 3, en-GB
wobuchh,
Version: 2.11.8.1
2009-03-31T14:14:58+02:00 - Seite 13Dateiname: 6515431202_buchblock.pdf; erzeugt am 01. Apr 2009 00:16:30; WK
Page 67 of 309
X
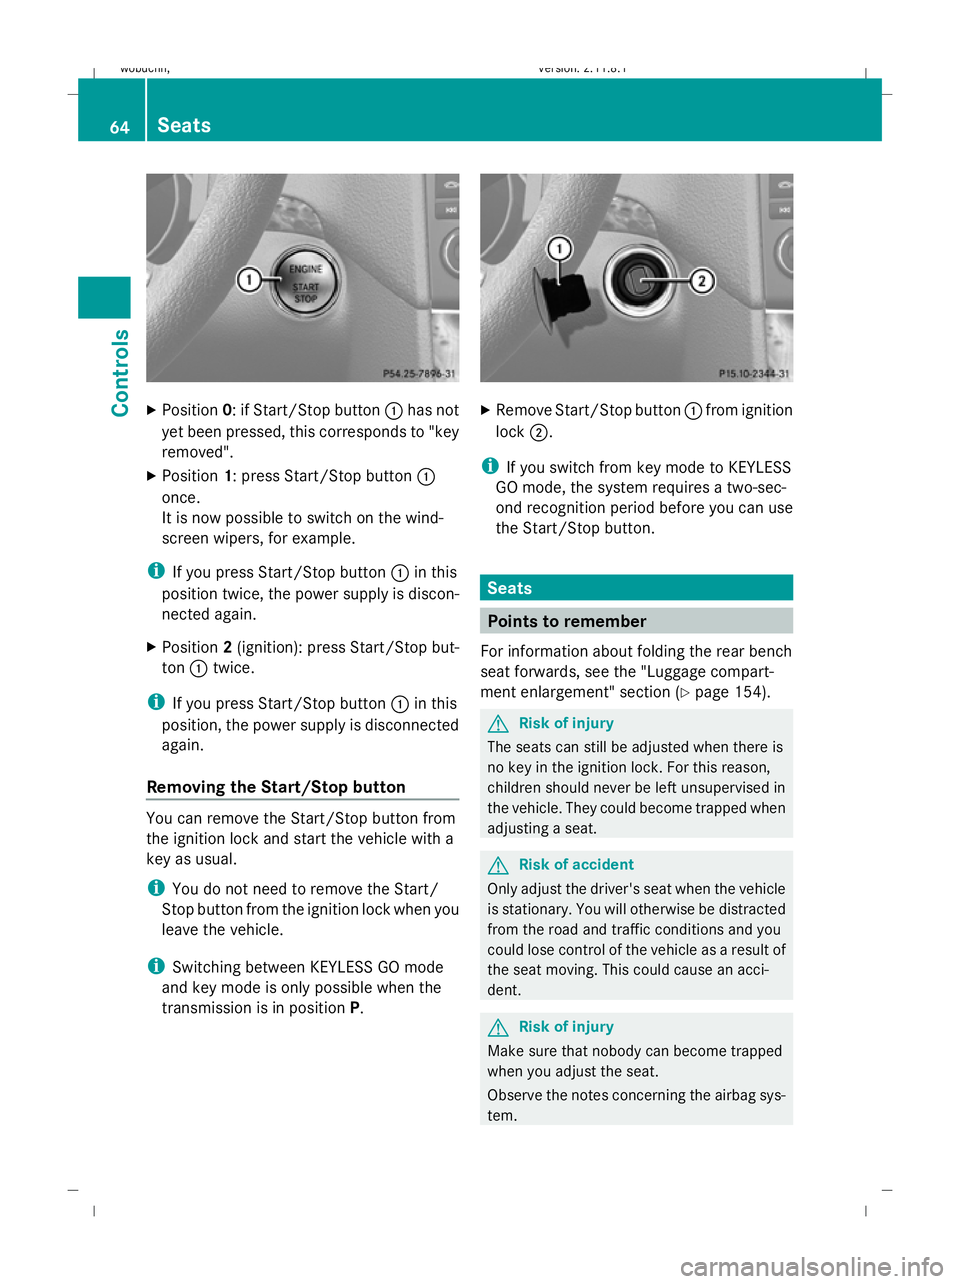
Position 0: if Start/Stop button :has not
yet been pressed, this corresponds to "key
removed".
X Position 1: press Start/Stop button :
once.
It is now possible to switch on the wind-
screen wipers, for example.
i If you press Start/Stop button :in this
position twice, the power supply is discon-
nected again.
X Position 2(ignition): press Start/Stop but-
ton :twice.
i If you press Start/Stop button :in this
position, the power supply is disconnected
again.
Removing the Start/Stop button You can remove the Start/Stop button from
the ignition lock and start the vehicle with a
key as usual.
i You do not need to remove the Start/
Stop button from the ignition lock when you
leave the vehicle.
i Switching between KEYLESS GO mode
and key mode is only possible when the
transmission is in position P. X
Remove Start/Stop button :from ignition
lock ;.
i If you switch from key mode to KEYLESS
GO mode, the system requires a two-sec-
ond recognition period before you can use
the Start/Stop button. Seats
Points to remember
For information about folding the rear bench
seat forwards, see the "Luggage compart-
ment enlargement" section (Y page 154). G
Risk of injury
The seats can still be adjusted when there is
no key in the ignition lock. For this reason,
children should never be left unsupervised in
the vehicle. They could become trapped when
adjusting a seat. G
Risk of accident
Only adjust the driver's seat when the vehicle
is stationary. You will otherwise be distracted
from the road and traffic conditions and you
could lose control of the vehicle as a result of
the seat moving. This could cause an acci-
dent. G
Risk of injury
Make sure that nobody can become trapped
when you adjust the seat.
Observe the notes concerning the airbag sys-
tem. 64
SeatsControls
X164_AKB; 2; 3, en-GB
wobuchh,
Version: 2.11.8.1 2009-03-31T14:14:58+02:00 - Seite 64
Dateiname: 6515431202_buchblock.pdf; erzeugt am 01. Apr 2009 00:16:55; WK
Page 68 of 309
Secure children as recommended; see "Chil-
dren in the vehicle" section.
G
Risk of injury
Make sure that the central area of the head
restraint supports the back of your head at
about eye level. You could seriously injure
your neck if your head is not correctly sup-
ported by the head restraint in the event of an
accident. Never travel without a correctly
adjusted and engaged head restraint.
! When you move the seats, make sure that
there are no objects in the footwell or
behind the seats. Otherwise, you could
damage the seats and the objects.
! When the rear bench seat is folded for-
wards, the front seats cannot be moved to
their rearmost position. Otherwise, you
could damage the seats and the rear bench
seat.
! Make sure that the sun visor is folded up
before setting the backrest angle and head
restraint height. Otherwise, the head
restraint and sun visor could collide when
the head restraint is fully extended.
i The rear-compartment head restraints
can be removed (Y page 69).
Please contact a Mercedes-Benz Service
Centre for more information. Adjusting the seat electrically i
If PRE-SAFE ®
is triggered in vehicles with
the memory function*, the front-passenger
seat will be moved to a better position if it
was previously in an unfavourable position.
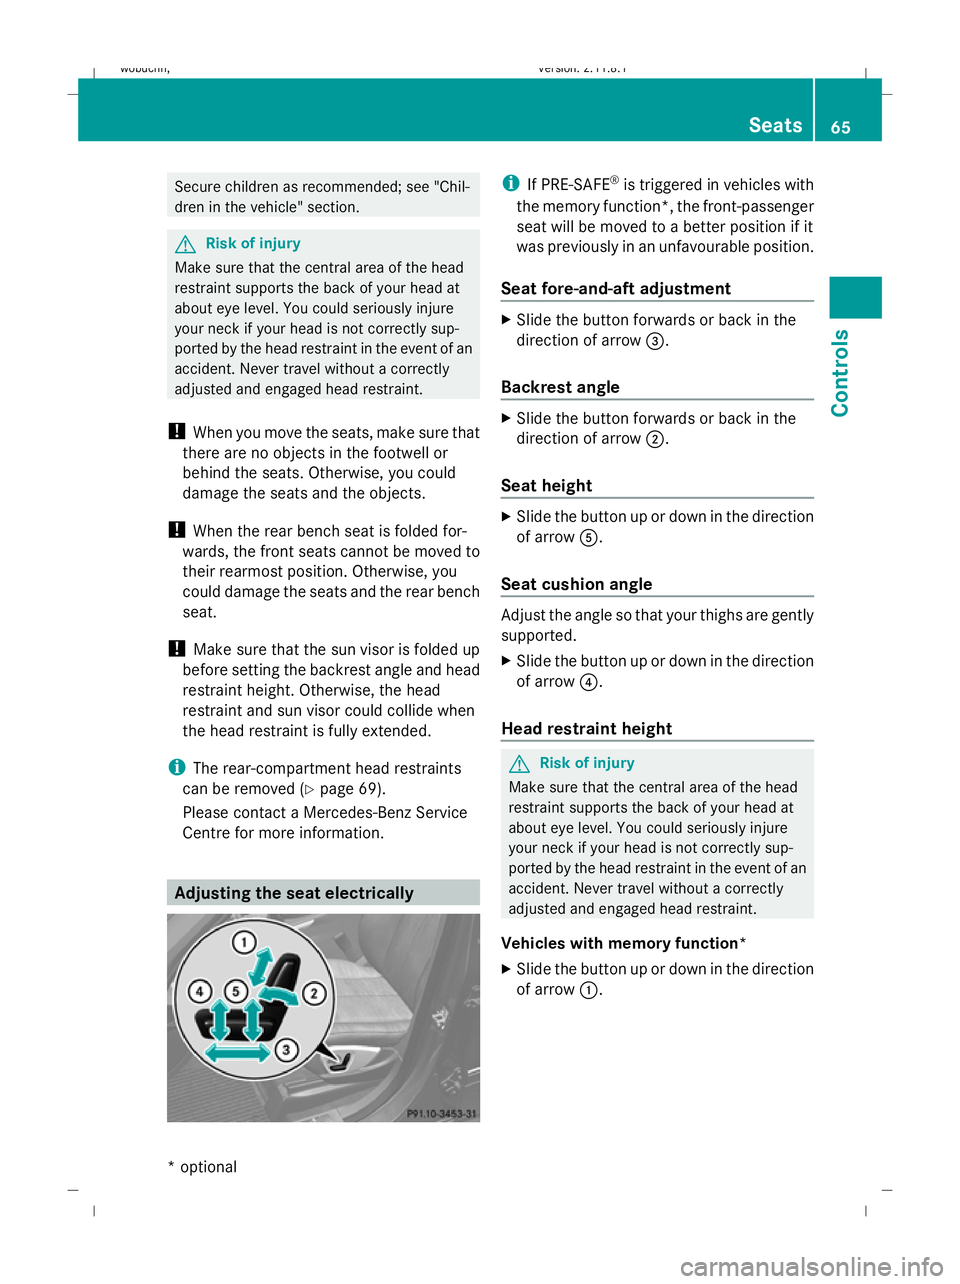
Seat fore-and-aft adjustment X
Slide the button forwards or back in the
direction of arrow =.
Backrest angle X
Slide the button forwards or back in the
direction of arrow ;.
Seat height X
Slide the button up or down in the direction
of arrow A.
Seat cushion angle Adjust the angle so that your thighs are gently
supported.
X
Slide the button up or down in the direction
of arrow ?.
Head restraint height G
Risk of injury
Make sure that the central area of the head
restraint supports the back of your head at
about eye level. You could seriously injure
your neck if your head is not correctly sup-
ported by the head restraint in the event of an
accident. Never travel without a correctly
adjusted and engaged head restraint.
Vehicles with memory function*
X Slide the button up or down in the direction
of arrow :. Seats
65Controls
* optional
X164_AKB; 2; 3, en-GB
wobuchh,
Version: 2.11.8.1 2009-03-31T14:14:58+02:00 - Seite 65 Z
Dateiname: 6515431202_buchblock.pdf; erzeugt am 01. Apr 2009 00:16:56; WK
Page 69 of 309
Vehicles without memory function
X
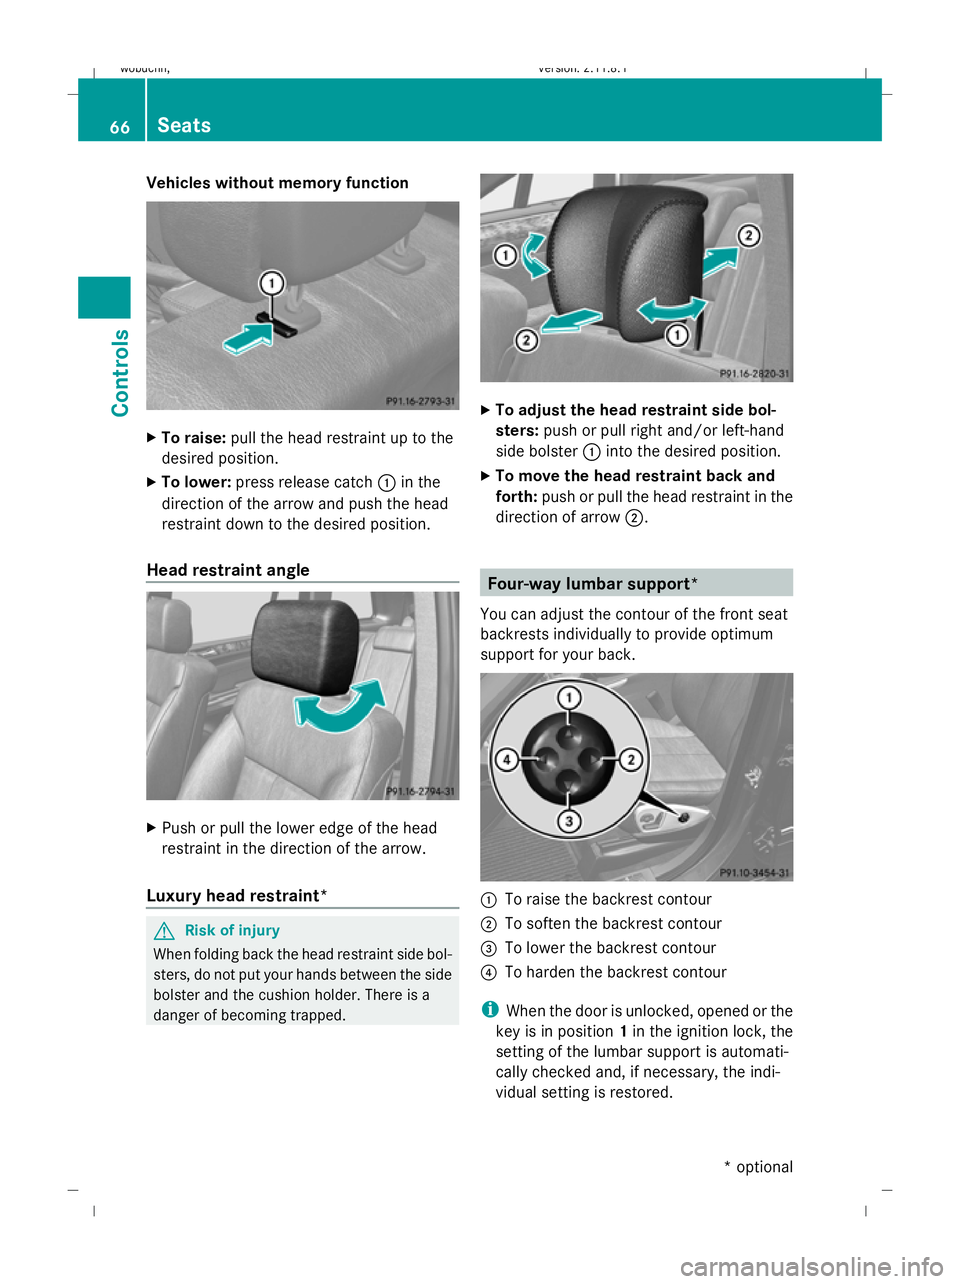
To raise: pull the head restraint up to the
desired position.
X To lower: press release catch :in the
direction of the arrow and push the head
restraint down to the desired position.
Head restraint angle X
Push or pull the lower edge of the head
restraint in the direction of the arrow.
Luxury head restraint* G
Risk of injury
When folding back the head restraint side bol-
sters, do not put your hands between the side
bolster and the cushion holder. There is a
danger of becoming trapped. X
To adjust the head restraint side bol-
sters: push or pull right and/or left-hand
side bolster :into the desired position.
X To move the head restraint back and
forth: push or pull the head restraint in the
direction of arrow ;. Four-way lumbar support*
You can adjust the contour of the front seat
backrests individually to provide optimum
support for your back. :
To raise the backrest contour
; To soften the backrest contour
= To lower the backrest contour
? To harden the backrest contour
i When the door is unlocked, opened or the
key is in position 1in the ignition lock, the
setting of the lumbar support is automati-
cally checked and, if necessary, the indi-
vidual setting is restored. 66
SeatsControls
* optional
X164_AKB; 2; 3, en-GB
wobuchh,
Version: 2.11.8.1 2009-03-31T14:14:58+02:00 - Seite 66
Dateiname: 6515431202_buchblock.pdf; erzeugt am 01. Apr 2009 00:16:57; WK
Page 70 of 309
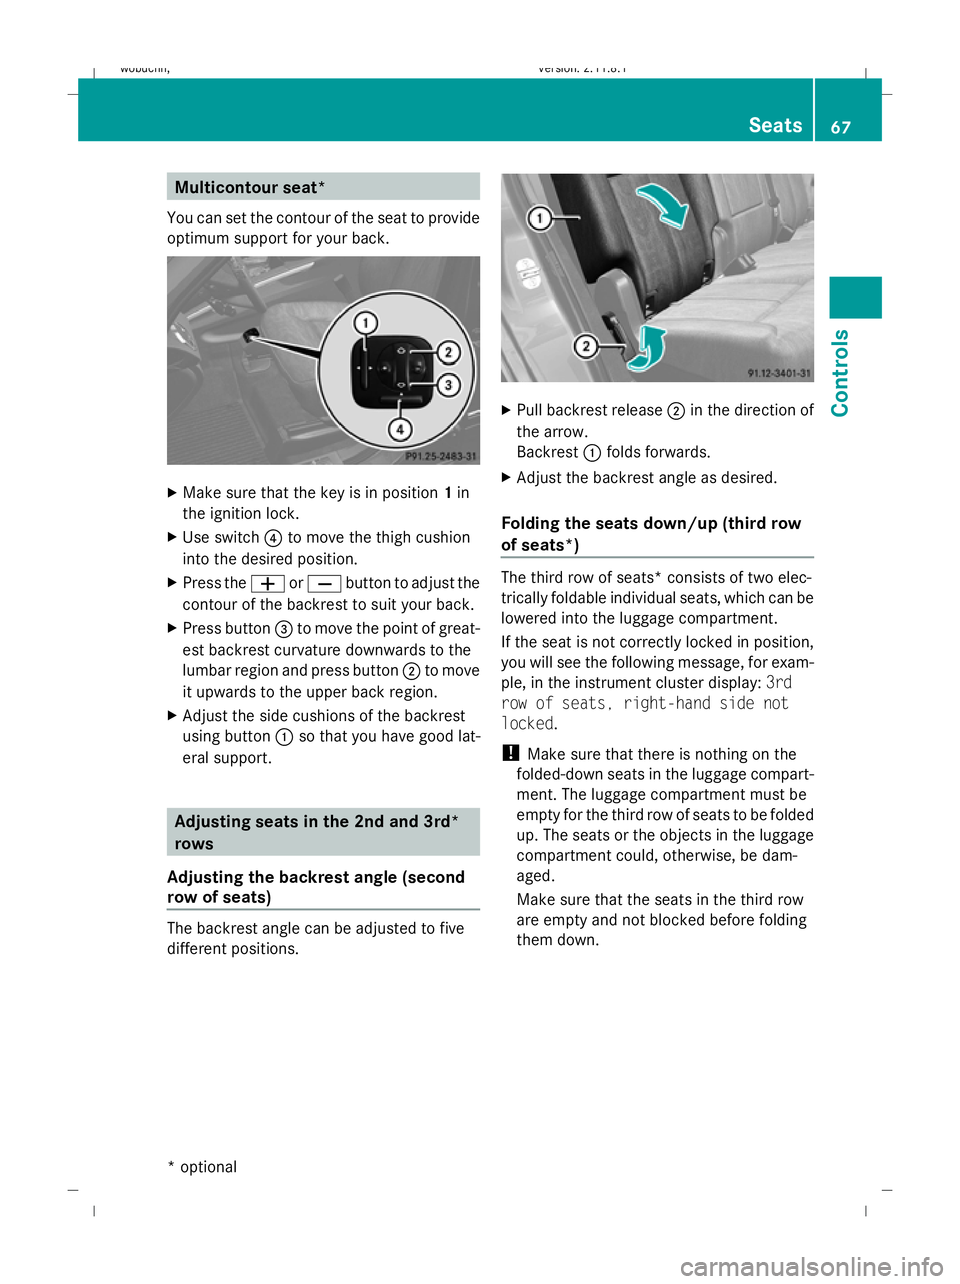
Multicontour seat*
You can set the contour of the seat to provide
optimum support for your back. X
Make sure that the key is in position 1in
the ignition lock.
X Use switch ?to move the thigh cushion
into the desired position.
X Press the WorX button to adjust the
contour of the backrest to suit your back.
X Press button =to move the point of great-
est backrest curvature downwards to the
lumbar region and press button ;to move
it upwards to the upper back region.
X Adjust the side cushions of the backrest
using button :so that you have good lat-
eral support. Adjusting seats in the 2nd and 3rd*
rows
Adjusting the backrest angle (second
row of seats) The backrest angle can be adjusted to five
different positions. X
Pull backrest release ;in the direction of
the arrow.
Backrest :folds forwards.
X Adjust the backrest angle as desired.
Folding the seats down/up (third row
of seats*) The third row of seats* consists of two elec-
trically foldable individual seats, which can be
lowered into the luggage compartment.
If the seat is not correctly locked in position,
you will see the following message, for exam-
ple, in the instrument cluster display:
3rd
row of seats, right-hand side not
locked.
! Make sure that there is nothing on the
folded-down seats in the luggage compart-
ment. The luggage compartment must be
empty for the third row of seats to be folded
up. The seats or the objects in the luggage
compartment could, otherwise, be dam-
aged.
Make sure that the seats in the third row
are empty and not blocked before folding
them down. Seats
67Controls
* optional
X164_AKB; 2; 3, en-GB
wobuchh,
Version: 2.11.8.1 2009-03-31T14:14:58+02:00 - Seite 67 Z
Dateiname: 6515431202_buchblock.pdf; erzeugt am 01. Apr 2009 00:16:58; WK
Page 71 of 309
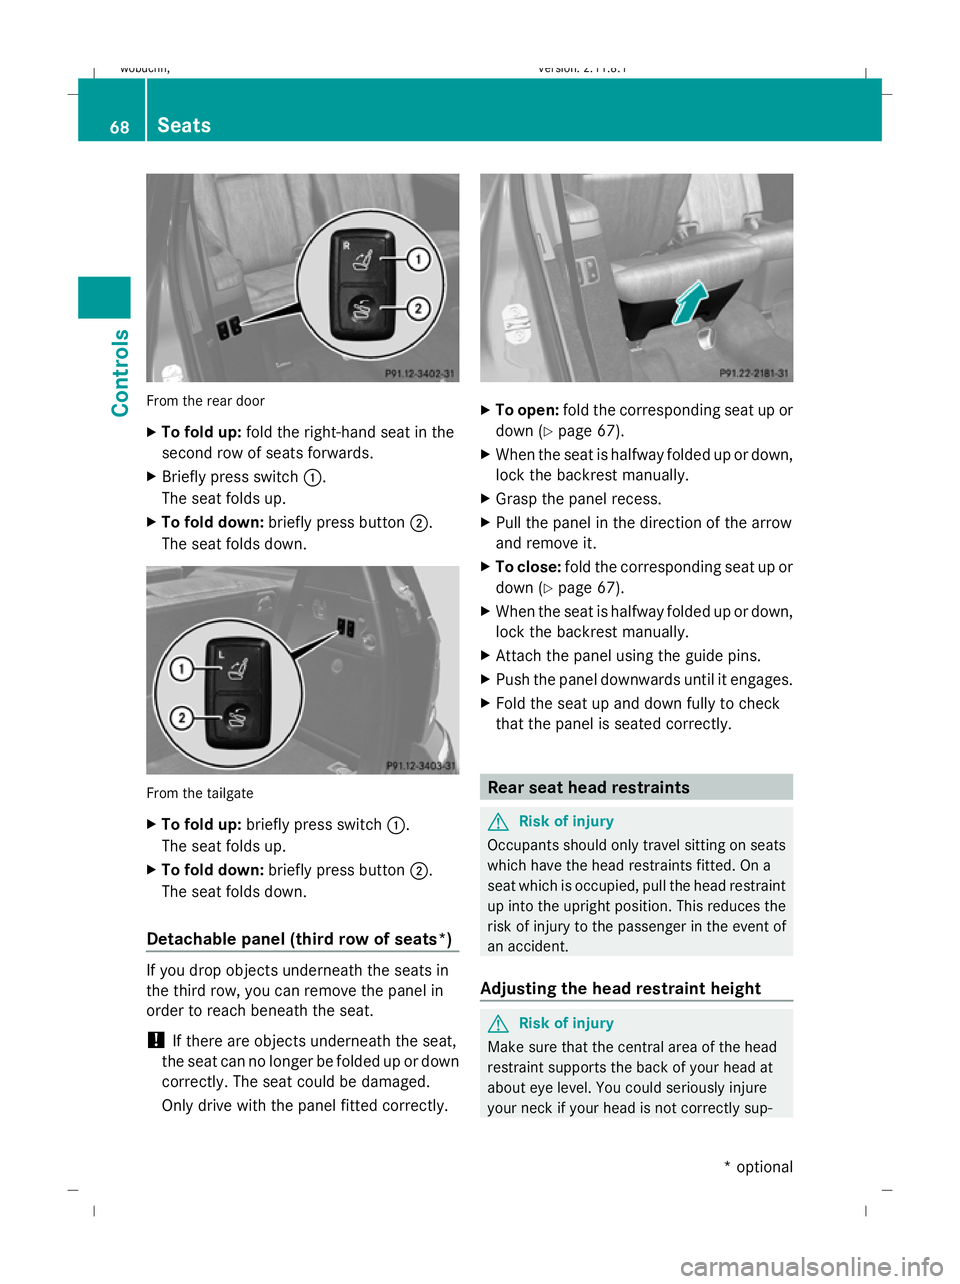
From the rear door
X
To fold up: fold the right-hand seat in the
second row of seats forwards.
X Briefly press switch :.
The seat folds up.
X To fold down: briefly press button ;.
The seat folds down. From the tailgate
X
To fold up: briefly press switch :.
The seat folds up.
X To fold down: briefly press button ;.
The seat folds down.
Detachable panel (third row of seats*) If you drop objects underneath the seats in
the third row, you can remove the panel in
order to reach beneath the seat.
! If there are objects underneath the seat,
the seat can no longer be folded up or down
correctly. The seat could be damaged.
Only drive with the panel fitted correctly. X
To open: fold the corresponding seat up or
down (Y page 67).
X When the seat is halfway folded up or down,
lock the backrest manually.
X Grasp the panel recess.
X Pull the panel in the direction of the arrow
and remove it.
X To close: fold the corresponding seat up or
down (Y page 67).
X When the seat is halfway folded up or down,
lock the backrest manually.
X Attach the panel using the guide pins.
X Push the panel downwards until it engages.
X Fold the seat up and down fully to check
that the panel is seated correctly. Rear seat head restraints
G
Risk of injury
Occupants should only travel sitting on seats
which have the head restraints fitted. On a
seat which is occupied, pull the head restraint
up into the upright position. This reduces the
risk of injury to the passenger in the event of
an accident.
Adjusting the head restraint height G
Risk of injury
Make sure that the central area of the head
restraint supports the back of your head at
about eye level. You could seriously injure
your neck if your head is not correctly sup- 68
SeatsControls
* optional
X164_AKB; 2; 3, en-GB
wobuchh
,V ersion: 2.11.8.1
2009-03-31T14:14:58+02:00 - Seite 68
Dateiname: 6515431202_buchblock.pdf; erzeugt am 01. Apr 2009 00:16:59; WK