2009 MERCEDES-BENZ GL SUV jump start
[x] Cancel search: jump startPage 8 of 309

Automatic transmission
DIRECT SELECT lever .......................92
Display mes-
sage .............................. 213, 216, 217
Driving tips ...................................... 94
Emergency running mode ..............244
Gear indicator .................................. 93
Kickdown ......................................... 94
Malfunction ................................... .244
Program selector button ..................95
Shift ranges ..................................... 94
Trailer towing ................................... 94
Transmission positions ....................93
Auxiliary heating ............................... 147
Display message .................... 231, 232
Notes ............................................. 147
Remote control .............................. 148
Setting (on-board computer) .......... 107
Auxiliary ventilation ..........................147 B
Backrest angle Adjusting (2nd row of seats) ............67
Ball coupling
Fitting ............................................ 194
Folding in ....................................... 198
Folding out ..................................... 193
Removing ....................................... 198
BAS (Brake Assist) ............................... 50
Battery Changing (auxiliary heating
remote control) .............................. 254
Charging ........................................ 275
Checking (key) ............................... 253
Check lamp (key )........................... 253
Disconnecting ................................ 273
Display message ............................ 220
Jump-starting ................................. 276
Maintenance (vehicle) .................... 272
Reconnecting ................................. 276
Removing/fitting ........................... 274
Vehicle battery .............................. 272
Belt force limiters
Activation ......................................... 35
Belt height adjustment .......................77
Belt reel (Easy-Pack fix kit) ..............160Belt tensioners
Activation ......................................... 35
Belt warning ......................................... 77
BlueTEC
AdBlue ®
......................................... 288
Bonnet
Bonnet catch ................................. 175
Display message ............................ 219
Opening/closing ........................... 174
Bonnet release lever
Release leve r................................. 175
Boot
Automatic opening ........................... 62
Boot lid
Opening/closing .............................. 60
Brake Assist
See BAS ........................................... 50
Brake fluid .......................................... 291
Display message ............................ 221
Brake lamps
Adaptive .......................................... .51
Display message ............................ 226
Brakes
Parking brake ................................... 91
Warning lamp ........................ 235, 236
Brake system
Display message ............................ 220
Bulbs .................................................. 254
Brake lamp .................................... 260
Dipped-beam headlamps ...............258
Display message ............................ 225
Licence plate lamp ......................... 260
Main-beam headlamps ................... 258
Overview ........................................ 256
Parking lamp .......................... 258, 260
Rear foglamp ................................. 260
Replacing .............................. .258, 259
Reversing lamp .............................. 260
Side lamp ....................................... 258
Tail lamp ........................................ 260
Turn signal lamp ....................258, 260
see Lamp Index
5 X164_AKB; 2; 3, en-GB
wobuchh,
Version: 2.11.8.1
2009-03-31T14:14:58+02:00 - Seite 5Dateiname: 6515431202_buchblock.pdf; erzeugt am 01. Apr 2009 00:16:29; WK
Page 13 of 309

Overview
.......................................... 25
Selecting the language (on-board
computer) ...................................... 104
Instrument lighting .............................25
Intelligent Light System Menu (on-board computer) ............106
Interior lighting
Ambient lighting (on-board com-
puter) ............................................. 106
Automatic control system ................84
Delayed switch-off (on-board
computer) ...................................... 106
Emergency lighting ..........................84
Manual control ................................ .83
Reading lamp ................................... 83
Interior motion sensor ........................55
Activating/deactivating (on-
board computer) ............................ 110
ISOFIX child seat securing system ....47 J
Jack .................................................... .209
Operation ....................................... 268
Jump-starting ..................................... 276
Jump leads ..................................... 276K
Key ........................................................ 58
Checking the battery .....................253
Convenience closing ........................87
Convenience opening ......................87
Display mes-
sage .............................................. 230, 231
Loss ............................................... 247
Malfunction ................................... .247
Modifying the programming .............59
KEYLESS GO
Button .............................................. 63
Changing the battery .....................254
Checking the battery .....................253
Convenience closing ........................88
Locking ............................................ 58
Malfunction ................................... .247
Starting the engine ..........................89
Unlocking ......................................... 58 Key positions
Key .................................................. 63
KEYLESS GO .................................... 63
Kickdown ....................................... 94, 96 L
Lamp see Indicator and warning lamp .....235
Lashing eyelets ................................. 156
Level control ...................................... 129
Licence plate lighting Display message ............................ 227
Lighting
see Lights
Lights
Active light function .........................82
Automatic headlamp mode ..............80
Combination switch .........................78
Daytime driving lights ......................80
Dipped-beam headlamps .................80
Display messages ..........................225
Foglamps ................................... 80, 83
Hazard warning lamps .....................81
Headlamp flasher ............................. 80
Light switch ..................................... 78
Main-beam headlamps ..................... 81
Motorway mode ............................... 82
Rear foglamp ................................... 81
Switching off (display message) ..... 227
Turn signals ..................................... 81
LIM indicator lamp
Cruise control ................................ 118
Distronic ........................................ 121
Variable Speedtronic .....................126
Loading guidelines ............................151
Locking Automatic ........................................ 60
Emergency locking ........................251
From the inside (central locking
button) ............................................. 59
LOW RANGE
Display mes-
sage ............................................... 223
Off-road gear ................................ 114
LOW RANGE off-road gear ................114
Luggage compartment enlarge-
ment ................................................... 15410
Index X164_AKB; 2; 3, en-GB
wobuchh,
Version: 2.11.8.1 2009-03-31T14:14:58+02:00 - Seite 10Dateiname: 6515431202_buchblock.pdf; erzeugt am 01. Apr 2009 00:16:29; WK
Page 210 of 309
Where will I find...?
...........................208
Display messages ............................. 211
Troubleshooting ................................ 233
Locking/unlocking in an emer-
gency ................................................. 250
Resetting triggered NECK-PRO
head restraints .................................. 252
Replacing batteries (key and
remote control) ................................. 253
Changing bulbs ................................. 254
Replacing the wiper blades ..............261
Flat tyre ............................................. 262
Battery ............................................... 272
Jump-starting .................................... 276
Towing and tow-starting ..................277
Fuses .................................................. 280 207Practical advice
X164_AKB; 2; 3, en-GB
wobuchh,
Version: 2.11.8.1 2009-03-31T14:14:58+02:00 - Seite 207
Dateiname: 6515431202_buchblock.pdf; erzeugt am 01. Apr 2009 00:17:55; WK
Page 245 of 309
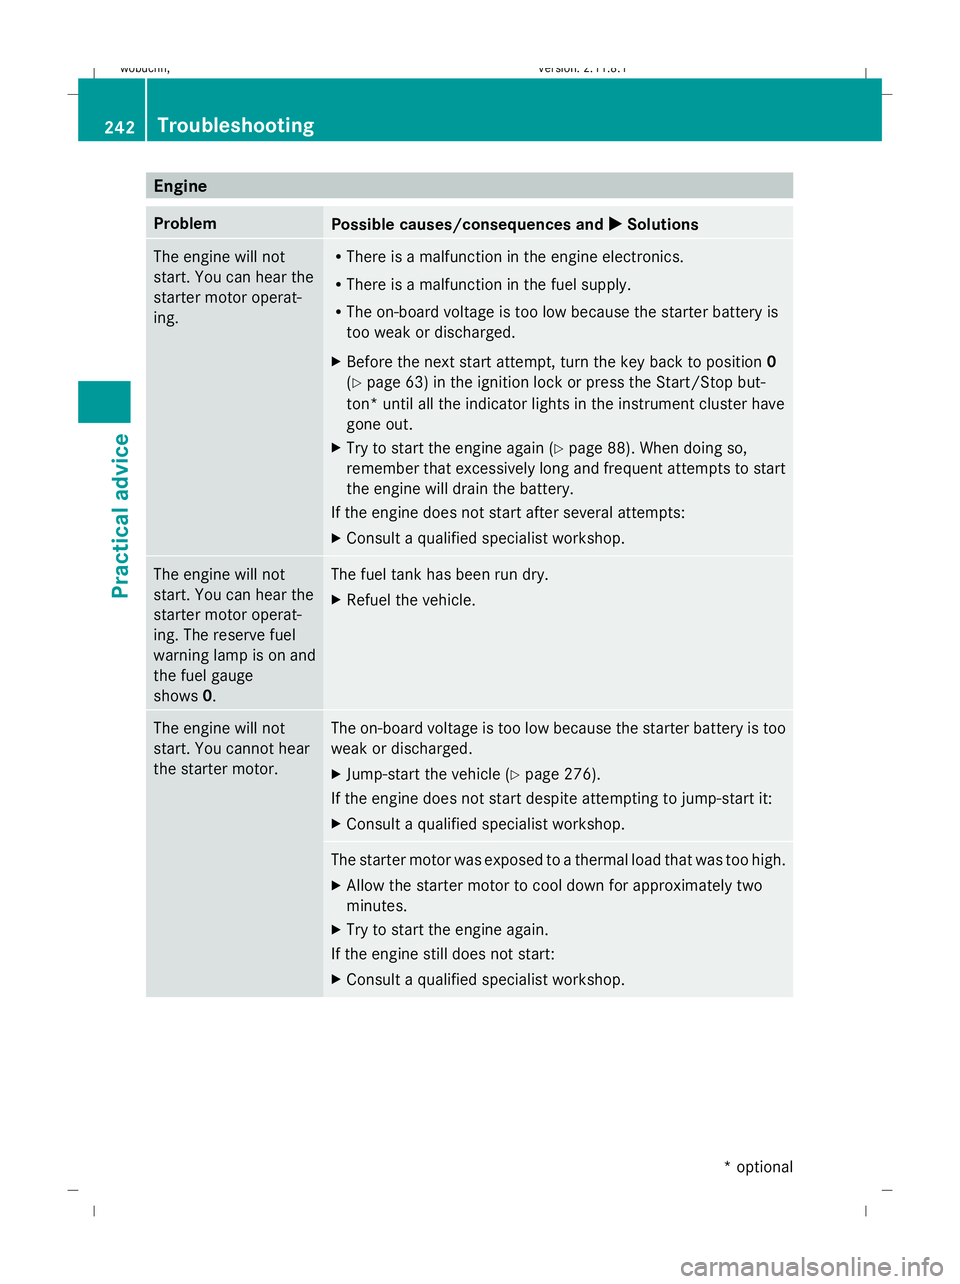
Engine
Problem
Possible causes/consequences and
X
X Solutions The engine will not
start. You can hear the
starter motor operat-
ing. R
There is a malfunction in the engine electronics.
R There is a malfunction in the fuel supply.
R The on-board voltage is too low because the starter battery is
too weak or discharged.
X Before the next start attempt, turn the key back to position 0
(Y page 63) in the ignition lock or press the Start/Stop but-
ton* until all the indicator lights in the instrument cluster have
gone out.
X Try to start the engine again (Y page 88). When doing so,
remember that excessively long and frequent attempts to start
the engine will drain the battery.
If the engine does not start after several attempts:
X Consult a qualified specialist workshop. The engine will not
start. You can hear the
starter motor operat-
ing. The reserve fuel
warning lamp is on and
the fuel gauge
shows
0. The fuel tank has been run dry.
X
Refuel the vehicle. The engine will not
start. You cannot hear
the starter motor. The on-board voltage is too low because the starter battery is too
weak or discharged.
X
Jump-start the vehicle (Y page 276).
If the engine does not start despite attempting to jump-start it:
X Consult a qualified specialist workshop. The starter motor was exposed to a thermal load that was too high.
X
Allow the starter motor to cool down for approximately two
minutes.
X Try to start the engine again.
If the engine still does not start:
X Consult a qualified specialist workshop. 242
TroubleshootingPractical advice
* optional
X164_AKB; 2; 3, en-GB
wobuchh,
Version: 2.11.8.1 2009-03-31T14:14:58+02:00 - Seite 242
Dateiname: 6515431202_buchblock.pdf; erzeugt am 01. Apr 2009 00:18:02; WK
Page 251 of 309
Problem
Possible causes/consequences and
X XSolutions The engine cannot be
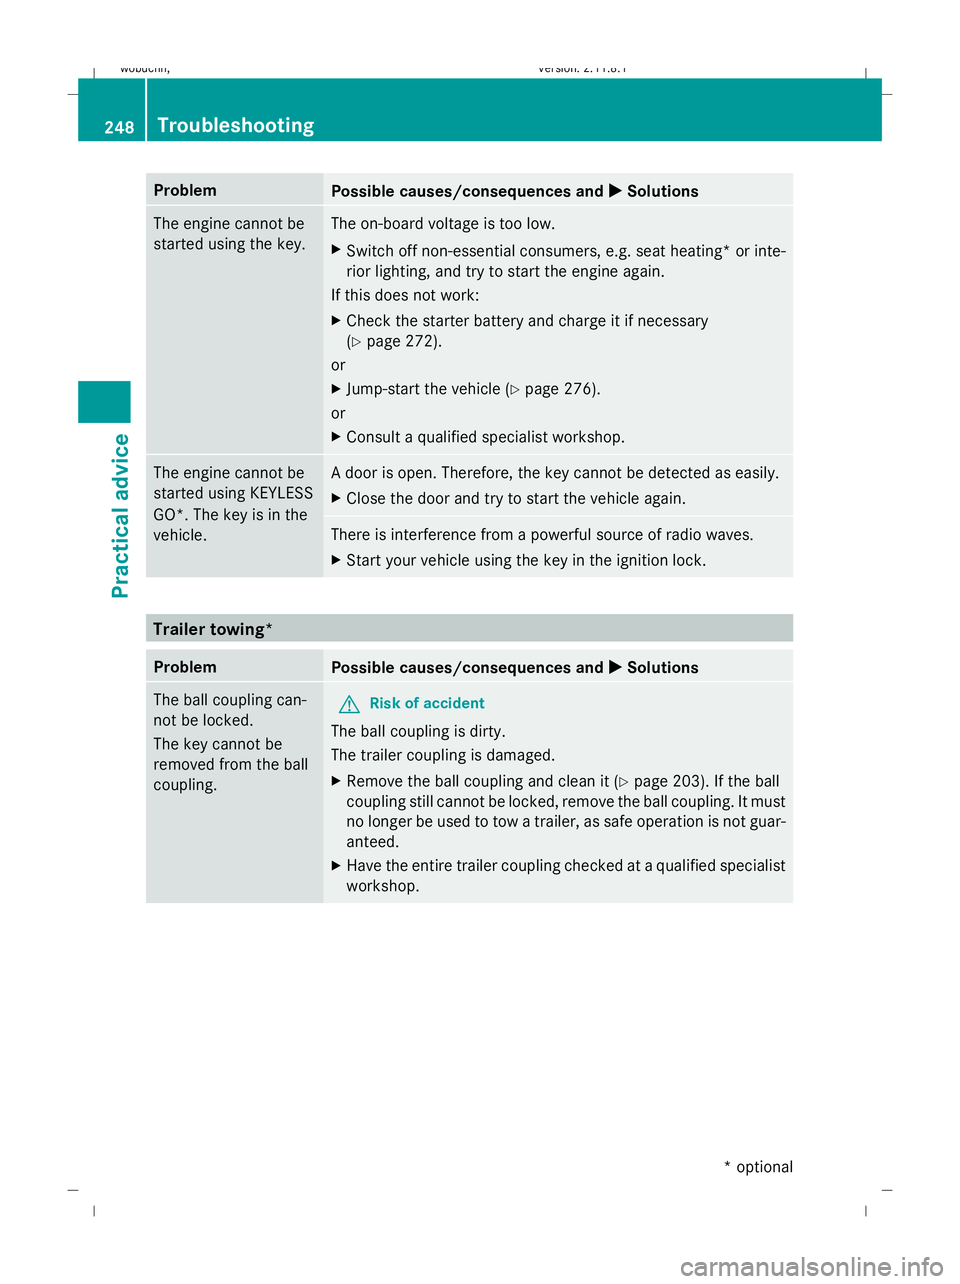
started using the key. The on-board voltage is too low.
X
Switch off non-essential consumers, e.g. seat heating* or inte-
rior lighting, and try to start the engine again.
If this does not work:
X Check the starter battery and charge it if necessary
(Y page 272).
or
X Jump-start the vehicle (Y page 276).
or
X Consult a qualified specialist workshop. The engine cannot be
started using KEYLESS
GO*. The key is in the
vehicle. A door is open. Therefore, the key cannot be detected as easily.
X
Close the door and try to start the vehicle again. There is interference from a powerful source of radio waves.
X
Start your vehicle using the key in the ignition lock. Trailer towing*
Problem
Possible causes/consequences and
X XSolutions The ball coupling can-
not be locked.
The key cannot be
removed from the ball
coupling.
G
Risk of accident
The ball coupling is dirty.
The trailer coupling is damaged.
X Remove the ball coupling and clean it (Y page 203). If the ball
coupling still cannot be locked, remove the ball coupling. It must
no longer be used to tow a trailer, as safe operation is not guar-
anteed.
X Have the entire trailer coupling checked at a qualified specialist
workshop. 248
TroubleshootingPractical advice
* optional
X164_AKB; 2; 3, en-GB
wobuchh,
Version: 2.11.8.1 2009-03-31T14:14:58+02:00 - Seite 248
Dateiname: 6515431202_buchblock.pdf; erzeugt am 01. Apr 2009 00:18:03; WK
Page 278 of 309
X
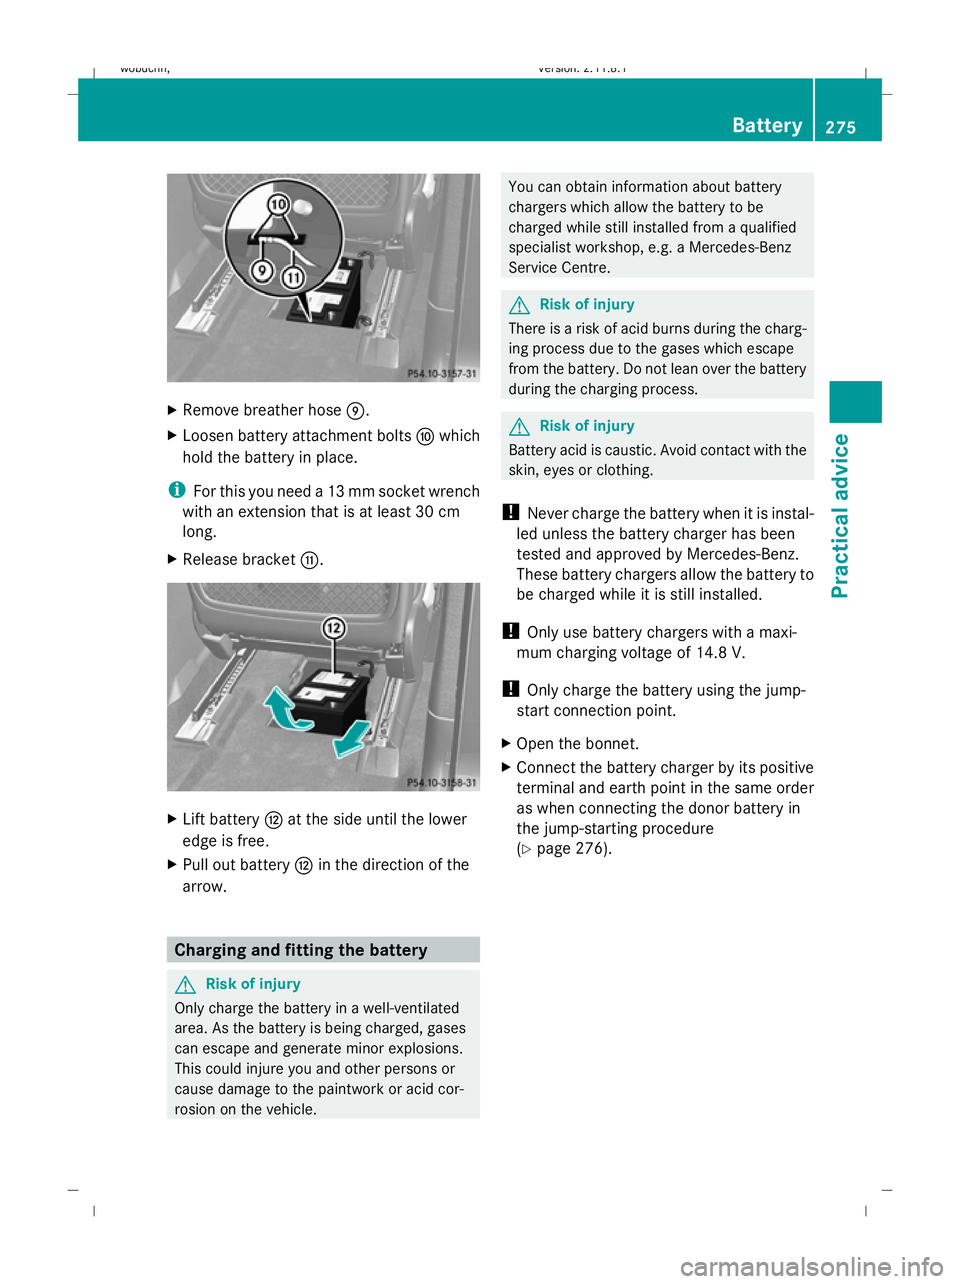
Remove breather hose E.
X Loosen battery attachment bolts Fwhich
hold the battery in place.
i For this you need a 13 mm socket wrench
with an extension that is at least 30 cm
long.
X Release bracket G. X
Lift battery Hat the side until the lower
edge is free.
X Pull out battery Hin the direction of the
arrow. Charging and fitting the battery
G
Risk of injury
Only charge the battery in a well-ventilated
area. As the battery is being charged, gases
can escape and generate minor explosions.
This could injure you and other persons or
cause damage to the paintwork or acid cor-
rosion on the vehicle. You can obtain information about battery
chargers which allow the battery to be
charged while still installed from a qualified
specialist workshop, e.g. a Mercedes-Benz
Service Centre.
G
Risk of injury
There is a risk of acid burns during the charg-
ing process due to the gases which escape
from the battery. Do not lean over the battery
during the charging process. G
Risk of injury
Battery acid is caustic. Avoid contact with the
skin, eyes or clothing.
! Never charge the battery when it is instal-
led unless the battery charger has been
tested and approved by Mercedes-Benz.
These battery chargers allow the battery to
be charged while it is still installed.
! Only use battery chargers with a maxi-
mum charging voltage of 14.8 V.
! Only charge the battery using the jump-
start connection point.
X Open the bonnet.
X Connect the battery charger by its positive
terminal and earth point in the same order
as when connecting the donor battery in
the jump-starting procedure
(Y page 276). Battery
275Practical advice
X164_AKB; 2; 3, en-GB
wobuchh, Version: 2.11.8.1 2009-03-31T14:14:58+02:00 - Seite 275 Z
Dateiname: 6515431202_buchblock.pdf; erzeugt am 01. Apr 2009 00:18:17; WK
Page 279 of 309
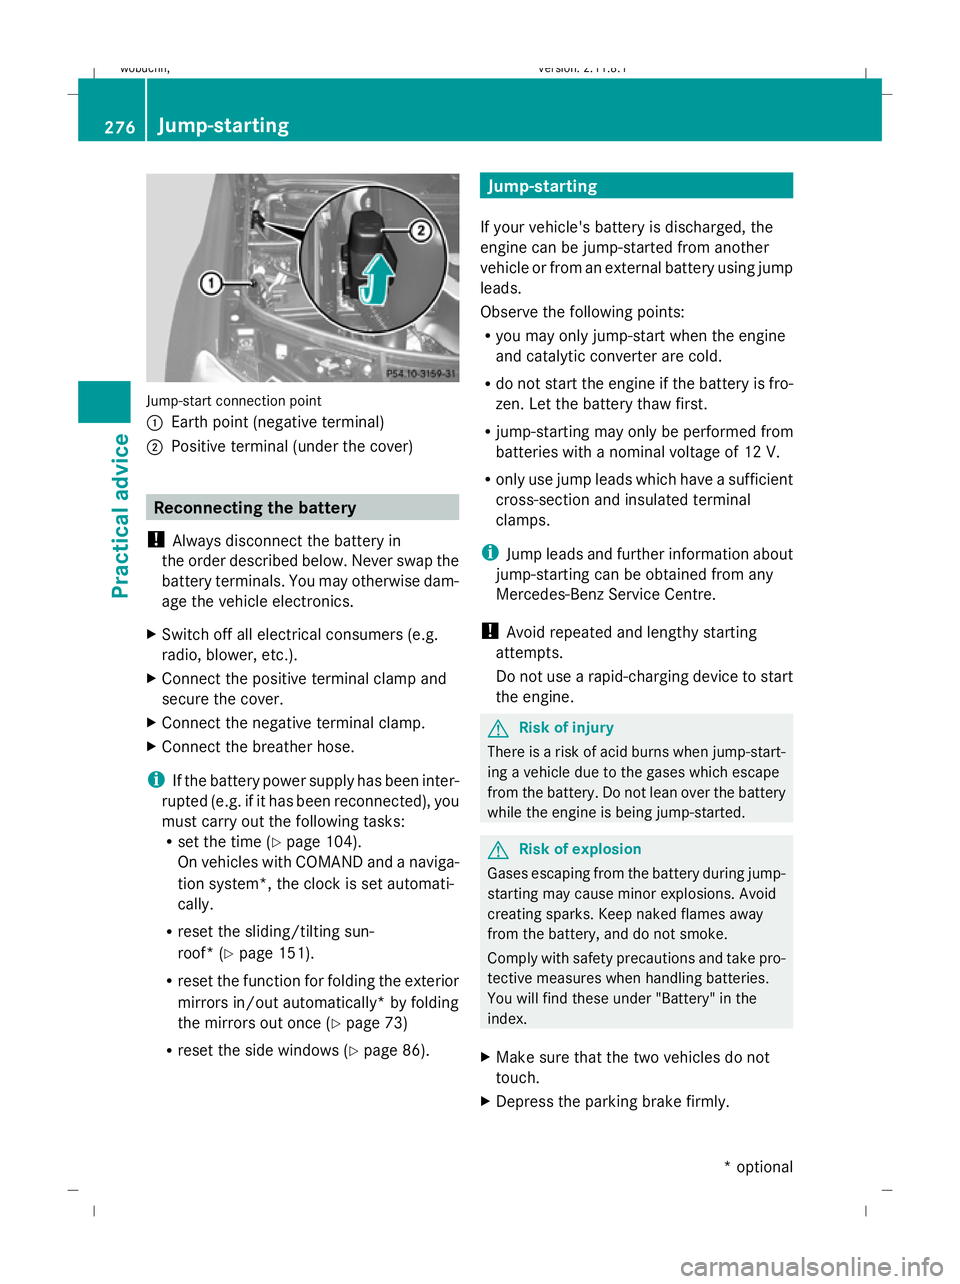
Jump-start connection point
:
Earth point (negative terminal)
; Positive terminal (under the cover) Reconnecting the battery
! Always disconnect the battery in
the order described below. Never swap the
battery terminals. You may otherwise dam-
age the vehicle electronics.
X Switch off all electrical consumers (e.g.
radio, blower, etc.).
X Connect the positive terminal clamp and
secure the cover.
X Connect the negative terminal clamp.
X Connect the breather hose.
i If the battery power supply has been inter-
rupted (e.g. if it has been reconnected), you
must carry out the following tasks:
R set the time (Y page 104).
On vehicles with COMAND and a naviga-
tion system*, the clock is set automati-
cally.
R reset the sliding/tilting sun-
roof* (Y page 151).
R reset the function for folding the exterior
mirrors in/out automatically* by folding
the mirrors out once (Y page 73)
R reset the side windows ( Ypage 86). Jump-starting
If your vehicle's battery is discharged, the
engine can be jump-started from another
vehicle or from an external battery using jump
leads.
Observe the following points:
R you may only jump-start when the engine
and catalytic converter are cold.
R do not start the engine if the battery is fro-
zen. Let the battery thaw first.
R jump-starting may only be performed from
batteries with a nominal voltage of 12 V.
R only use jump leads which have a sufficient
cross-section and insulated terminal
clamps.
i Jump leads and further information about
jump-starting can be obtained from any
Mercedes-Benz Service Centre.
! Avoid repeated and lengthy starting
attempts.
Do not use a rapid-charging device to start
the engine. G
Risk of injury
There is a risk of acid burns when jump-start-
ing a vehicle due to the gases which escape
from the battery. Do not lean over the battery
while the engine is being jump-started. G
Risk of explosion
Gases escaping from the battery during jump-
starting may cause minor explosions. Avoid
creating sparks. Keep naked flames away
from the battery, and do not smoke.
Comply with safety precautions and take pro-
tective measures when handling batteries.
You will find these under "Battery" in the
index.
X Make sure that the two vehicles do not
touch.
X Depress the parking brake firmly. 276
Jump-startingPractical advice
* optional
X164_AKB; 2; 3, en-GB
wobuchh,
Version: 2.11.8.1 2009-03-31T14:14:58+02:00 - Seite 276
Dateiname: 6515431202_buchblock.pdf; erzeugt am 01. Apr 2009 00:18:17; WK
Page 280 of 309
X
Shift the transmission to position P.
X Switch off all electrical consumers (e.g.
radio, blower, etc.).
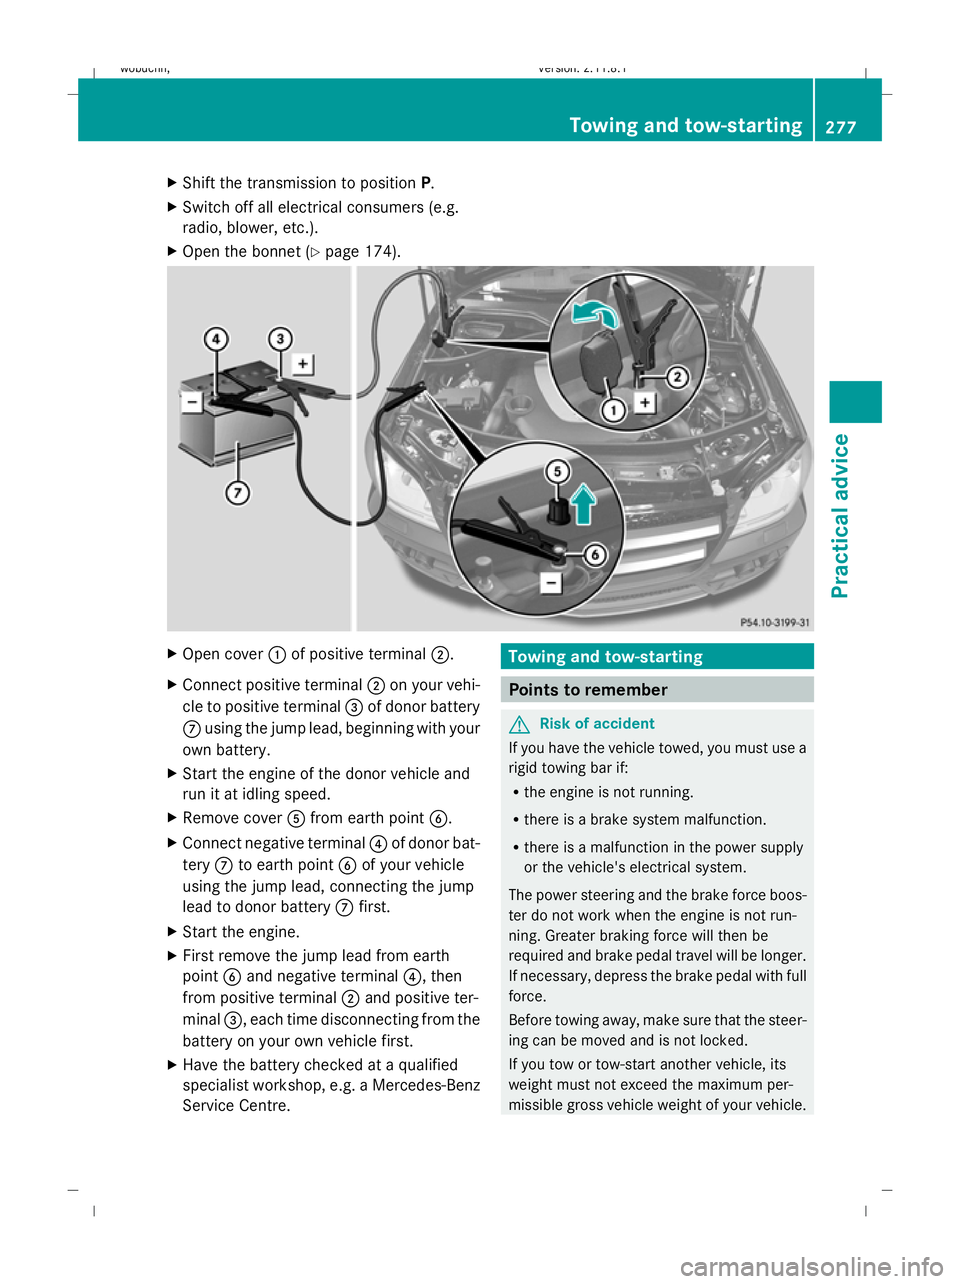
X Open the bonnet (Y page 174). X
Open cover :of positive terminal ;.
X Connect positive terminal ;on your vehi-
cle to positive terminal =of donor battery
C using the jump lead, beginning with your
own battery.
X Start the engine of the donor vehicle and
run it at idling speed.
X Remove cover Afrom earth point B.
X Connect negative terminal ?of donor bat-
tery Cto earth point Bof your vehicle
using the jump lead, connecting the jump
lead to donor battery Cfirst.
X Start the engine.
X First remove the jump lead from earth
point Band negative terminal ?, then
from positive terminal ;and positive ter-
minal =, each time disconnecting from the
battery on your own vehicle first.
X Have the battery checked at a qualified
specialist workshop, e.g. a Mercedes-Benz
Service Centre. Towing and tow-starting
Points to remember
G
Risk of accident
If you have the vehicle towed, you must use a
rigid towing bar if:
R the engine is not running.
R there is a brake system malfunction.
R there is a malfunction in the power supply
or the vehicle's electrical system.
The power steering and the brake force boos-
ter do not work when the engine is not run-
ning. Greater braking force will then be
required and brake pedal travel will be longer.
If necessary, depress the brake pedal with full
force.
Before towing away, make sure that the steer-
ing can be moved and is not locked.
If you tow or tow-start another vehicle, its
weight must not exceed the maximum per-
missible gross vehicle weight of your vehicle. Towing and tow-starting
277Practical advice
X164_AKB; 2; 3, en-GB
wobuchh, Version: 2.11.8.1 2009-03-31T14:14:58+02:00 - Seite 277 Z
Dateiname: 6515431202_buchblock.pdf; erzeugt am 01. Apr 2009 00:18:19; WK