2009 MERCEDES-BENZ GL SUV clock
[x] Cancel search: clockPage 28 of 309
Instrument cluster
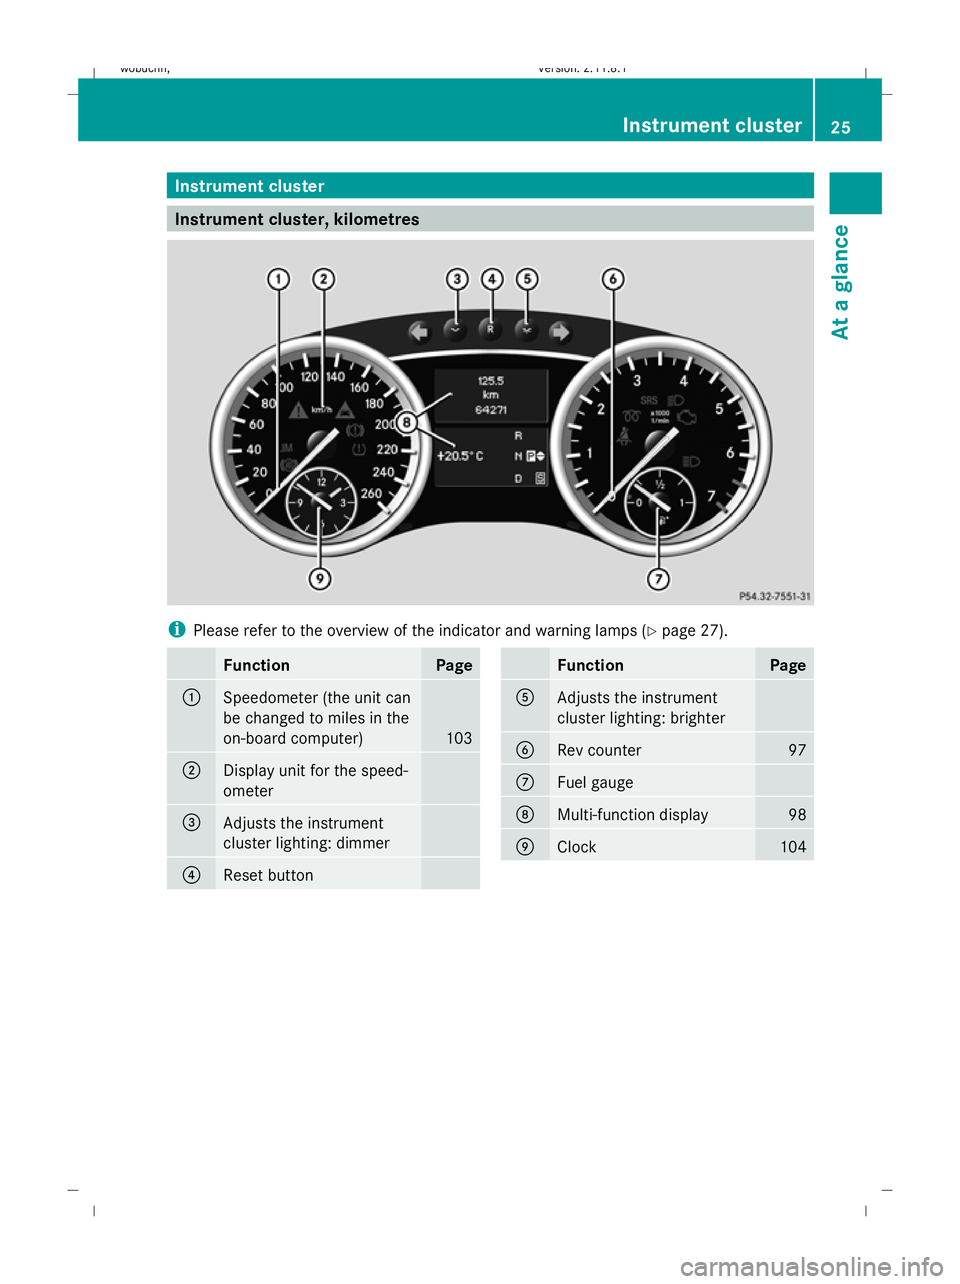
Instrument cluster, kilometres
i
Please refer to the overview of the indicator and warning lamps ( Ypage 27). Function Page
:
Speedometer (the unit can
be changed to miles in the
on-board computer)
103
;
Display unit for the speed-
ometer
=
Adjusts the instrument
cluster lighting: dimmer
?
Reset button Function Page
A
Adjusts the instrument
cluster lighting: brighter
B
Rev counter 97
C
Fuel gauge
D
Multi-function display 98
E
Clock 104Instrument cluster
25At a glance
X164_AKB; 2; 3, en-GB
wobuchh, Version: 2.11.8.1 2009-03-31T14:14:58+02:00 - Seite 25 Z
Dateiname: 6515431202_buchblock.pdf; erzeugt am 01. Apr 2009 00:16:35; WK
Page 29 of 309
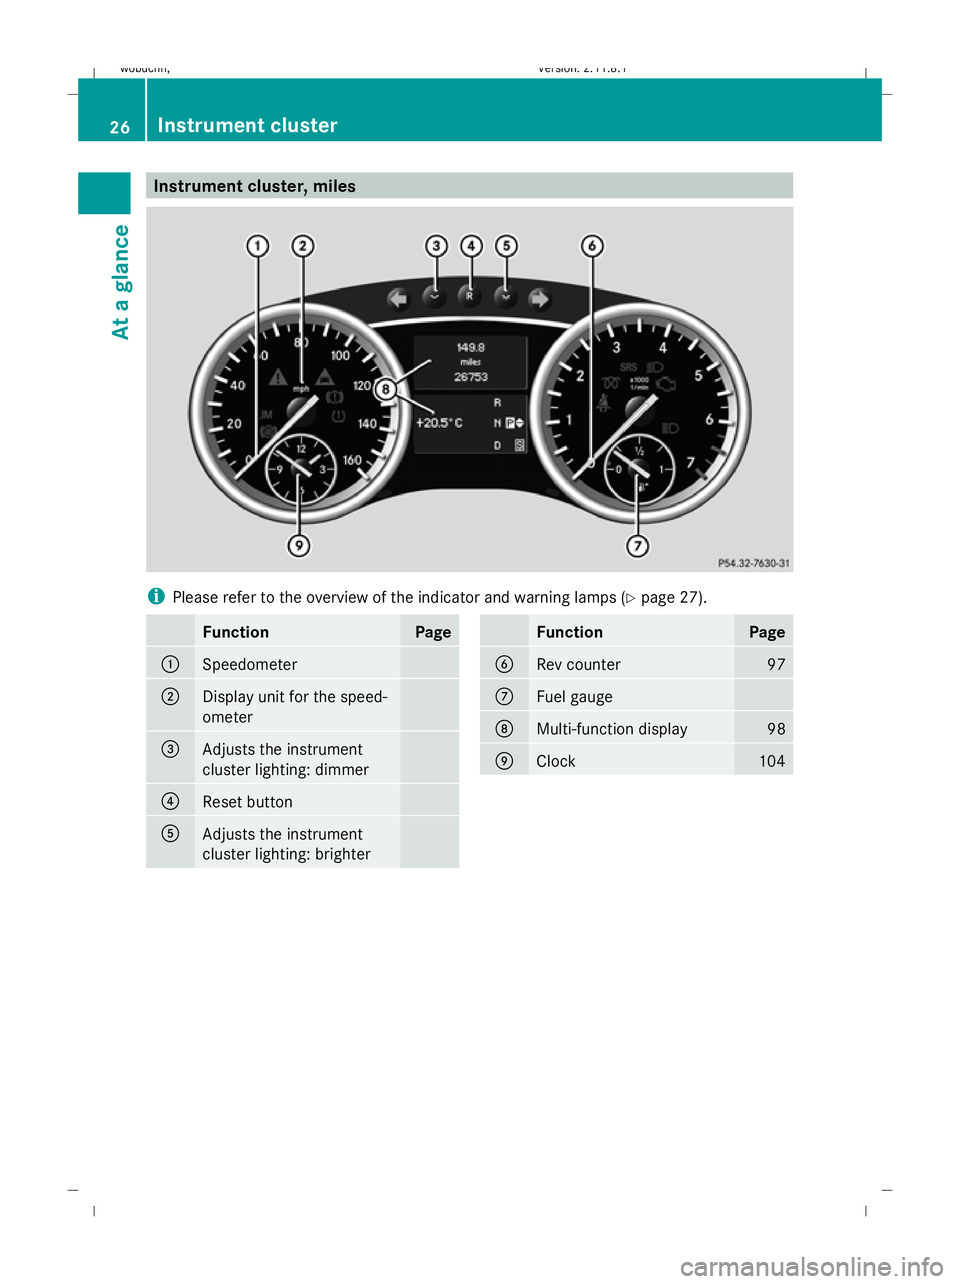
Instrument cluster, miles
i
Please refer to the overview of the indicator and warning lamps ( Ypage 27). Function Page
:
Speedometer
;
Display unit for the speed-
ometer
=
Adjusts the instrument
cluster lighting: dimmer
?
Reset button
A
Adjusts the instrument
cluster lighting: brighter Function Page
B
Rev counter 97
C
Fuel gauge
D
Multi-function display 98
E
Clock 10426
Instrument clusterAt a glance
X164_AKB; 2; 3, en-GB
wobuchh,
Version: 2.11.8.1 2009-03-31T14:14:58+02:00 - Seite 26
Dateiname: 6515431202_buchblock.pdf; erzeugt am 01. Apr 2009 00:16:36; WK
Page 134 of 309
X
Start the engine.
X Turn selector wheel :clockwise.
The vehicle is raised.
or
X Turn selector wheel ;anti-clockwise.
The vehicle is lowered.
Indicator lamps =for the desired off-road
level flash:
R Off-road level 1: the lower indicator lamp
flashes
R Off-road level 2: the lower and centre indi-
cator lamps flash
R Off-road level 3: all three indicator lamps
flash
The vehicle is being adjusted to the off-road
level selected. As soon as an off-road level is
reached, the corresponding indicator lamp
stops flashing and lights up constantly.
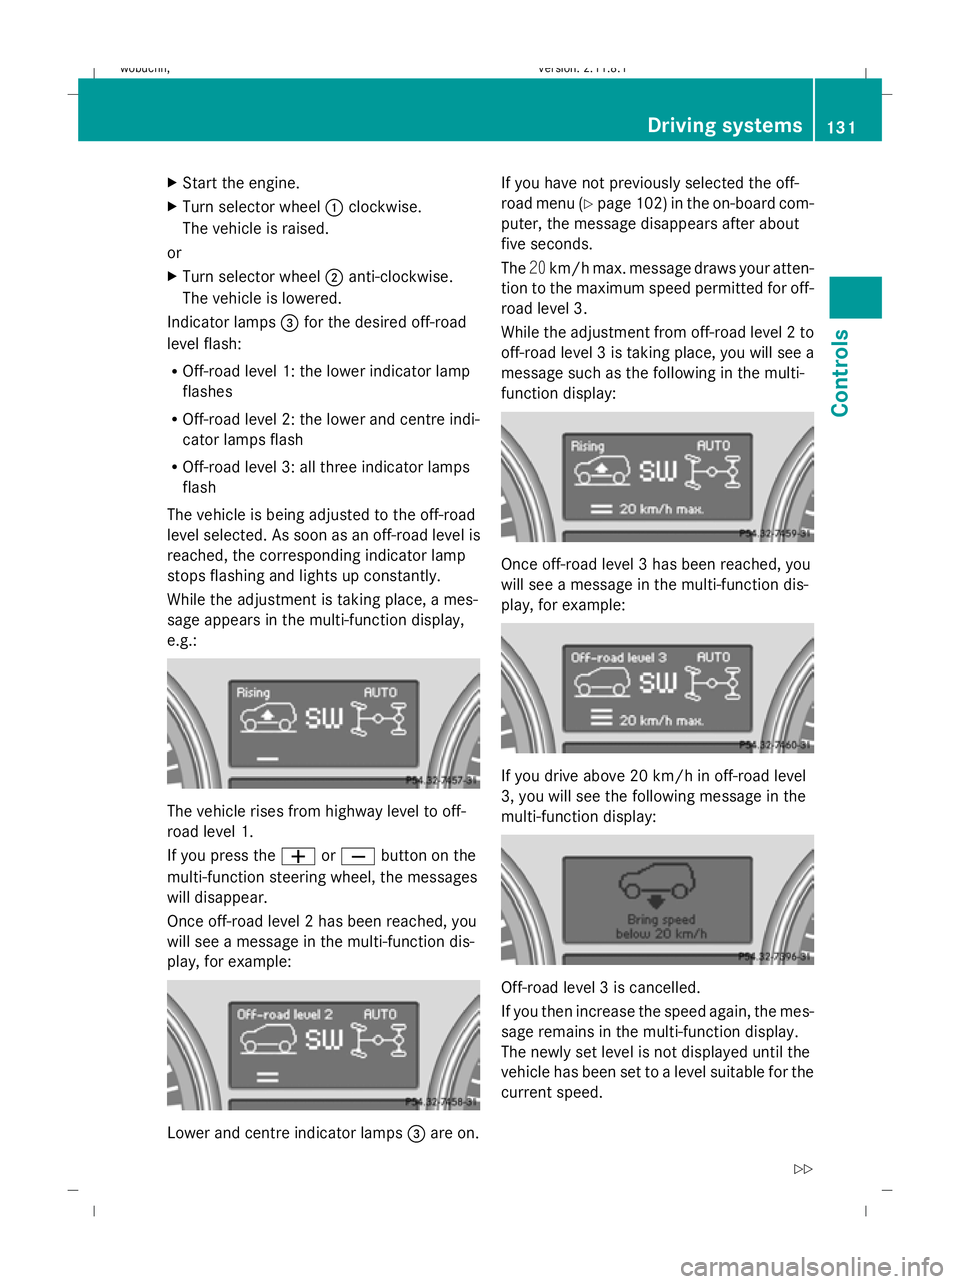
While the adjustment is taking place, a mes-
sage appears in the multi-function display,
e.g.: The vehicle rises from highway level to off-
road level 1.
If you press the
WorX button on the
multi-function steering wheel, the messages
will disappear.
Once off-road level 2 has been reached, you
will see a message in the multi-function dis-
play, for example: Lower and centre indicator lamps
=are on. If you have not previously selected the off-
road menu (Y
page 102) in the on-board com-
puter, the message disappears after about
five seconds.
The 20km/h max. message draws your atten-
tion to the maximum speed permitted for off-
road level 3.
While the adjustment from off-road level 2 to
off-road level 3 is taking place, you will see a
message such as the following in the multi-
function display: Once off-road level 3 has been reached, you
will see a message in the multi-function dis-
play, for example:
If you drive above 20 km/h in off-road level
3, you will see the following message in the
multi-function display:
Off-road level 3 is cancelled.
If you then increase the speed again, the mes-
sage remains in the multi-function display.
The newly set level is not displayed until the
vehicle has been set to a level suitable for the
current speed. Driving systems
131Controls
X164_AKB; 2; 3, en-GB
wobuchh, Version: 2.11.8.1 2009-03-31T14:14:58+02:00 - Seite 131 Z
Dateiname: 6515431202_buchblock.pdf; erzeugt am 01. Apr 2009 00:17:25; WK
Page 136 of 309

If one or more indicator lamps
=are on:
X Turn the selector wheel anti-clockwise ;
until all indicator lamps =that are lit start
to flash.
The vehicle is lowered to highway level. As
soon as the next lowest level is reached,
the indicator lamp stops flashing and goes
out.
While the adjustment is taking place, a mes-
sage appears in the multi-function display,
e.g.: If you press the
WorX button on the
multi-function steering wheel, the messages
will disappear.
Once highway level has been reached, all indi-
cator lamps =go out. You will see a message
in the multi-function display, for example: If you have not previously selected the off-
road menu (Y
page 102) in the on-board com-
puter, the message disappears after about
five seconds.
The vehicle automatically selects highway
level if you are driving at a speed above
115 km/h or if you drive at between
100 km/h and 115 km/h for around 20 sec-
onds. Depending on the ADS basic setting
(Y page 129), the vehicle is lowered to high-
speed level at high speeds. PARKTRONIC*
G
Risk of accident
PARKTRONIC is only an aid and may not
detect all obstacles. It is not a substitute for
attentive driving.
You are always responsible for safety and
must continue to pay attention to your imme-
diate surroundings when parking and
manoeuvring. You could otherwise endanger
yourself and others. G
Risk of injury
Make sure that no persons or animals are in
the manoeuvring range. Otherwise, they
could be injured.
PARKTRONIC is an electronic parking aid
using ultrasound. It indicates visually and
audibly the distance between your vehicle
and an object.
PARKTRONIC is activated automatically when
you:
R switch on the ignition
R release the parking brake
R shift the automatic transmission to D,Ror
N
PARKTRONIC is deactivated at speeds above
18 km/h. It is reactivated at lower speeds.
PARKTRONIC monitors the area around your
vehicle using six sensors in the front bumper
and four sensors in the rear bumper. :
Example: sensors in the front bumper,
left-hand side Driving systems
133Controls
* optional
X164_AKB; 2; 3, en-GB
wobuchh,
Version: 2.11.8.1 2009-03-31T14:14:58+02:00 - Seite 133 Z
Dateiname: 6515431202_buchblock.pdf; erzeugt am 01. Apr 2009 00:17:26; WK
Page 145 of 309
X
To deactivate: press theKorI
button.
The indicator lamp in the Ãbutton goes
out. Automatic airflow is deactivated and
the airflow is controlled according to the
level set. Automatic air distribution
remains activated.
or
X Press the Z,M,¯,\,P,
c orO button.
The indicator lamp in the Ãbutton goes
out. Automatic air distribution is deactiva-
ted. Air distribution is controlled according
to the position set. Automatic airflow
remains activated.
Controlling the rear-compartment air
conditioning automatically via the rear
control unit* X
Turn the key to position 2in the ignition
lock.
X Activate Thermotronic luxury multi-zone
automatic climate control*.
X Set the desired temperature.
X To switch on: press theÃbutton.
The indicator lamp in the Ãbutton lights
up. Automatic air distribution and airflow
are activated.
X To deactivate: press theKorI
button.
Automatic airflow is deactivated and the
airflow is controlled according to the level
set. Automatic air distribution remains acti-
vated.
or
X Press one of the MorO buttons.
Automatic air distribution is deactivated.
Air distribution is controlled according to
the position set. Automatic airflow remains
activated. Setting the temperature
Thermatic 2-zone automatic climate
control Different temperatures can be set for the
driver's and front-passenger sides.
X
Turn the key to position 2in the ignition
lock.
X To increase/reduce: turn controls:and
C clockwise or anti-clockwise
(Y page 138). Only change the temperature
setting in small increments. Start at 22 †.
Thermotronic multi-zone luxury auto-
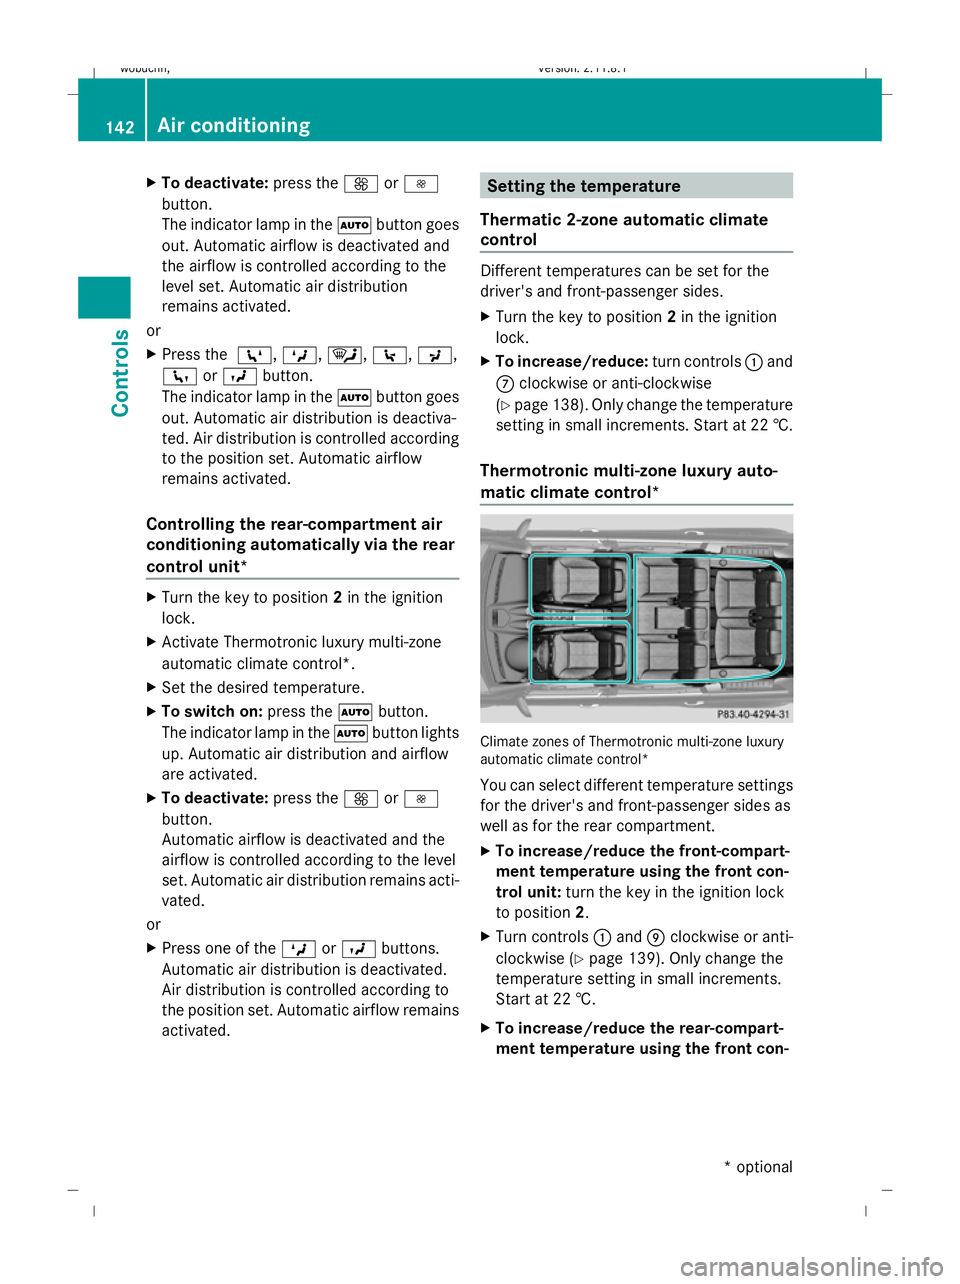
matic climate control* Climate zones of Thermotronic multi-zone luxury
automatic climate control*
You can select different temperature settings
for the driver's and front-passenger sides as
well as for the rear compartment.
X To increase/reduce the front-compart-
ment temperature using the front con-
trol unit: turn the key in the ignition lock
to position 2.
X Turn controls :and Eclockwise or anti-
clockwise (Y page 139). Only change the
temperature setting in small increments.
Start at 22 †.
X To increase/reduce the rear-compart-
ment temperature using the front con- 142
Air conditioningControls
* optional
X164_AKB; 2; 3, en-GB
wobuchh
,V ersion: 2.11.8.1
2009-03-31T14:14:58+02:00 - Seite 142
Dateiname: 6515431202_buchblock.pdf; erzeugt am 01. Apr 2009 00:17:29; WK
Page 146 of 309
trol unit:
turn the key in the ignition lock
to position 2.
X Press the Ybutton.
The display message shown in the display
changes to rear-compartment air condi-
tioning.
X Turn control Eclockwise or anti-clockwise
(Y page 139). Only change the temperature
setting in small increments. Start at 22 †.
i Press the Ybutton to return to the
standard display.
i The rear-compartment display returns to
the standard display automatically after
three seconds.
X To increase/reduce the rear-compart-
ment temperature using the rear con-
trol unit*: turn the key in the ignition lock
to position 2.
X Turn control Rclockwise or anti-clockwise
(Y page 139). Only change the temperature
setting in small increments. Start at 22 †. Adjusting the air vents
G
Risk of injury
Very hot or very cold air can flow from the air
vents. This could cause burns or frostbite to
bare skin in the immediate vicinity of the
vents. Keep bare skin away from these air
outlets. If necessary, direct the airflow away
to a different area of the vehicle interior.
In order to ensure the direct flow of fresh air
through the air vents into the vehicle interior,
please observe the following notes:
R keep the air inlet grille on the bonnet free
of blockage, such as ice, snow or leaves.
R never cover the vents or air inlet and outlet
grilles in the vehicle interior. i
For virtually draught-free ventilation,
adjust the sliders of the air vents to the
centre position.
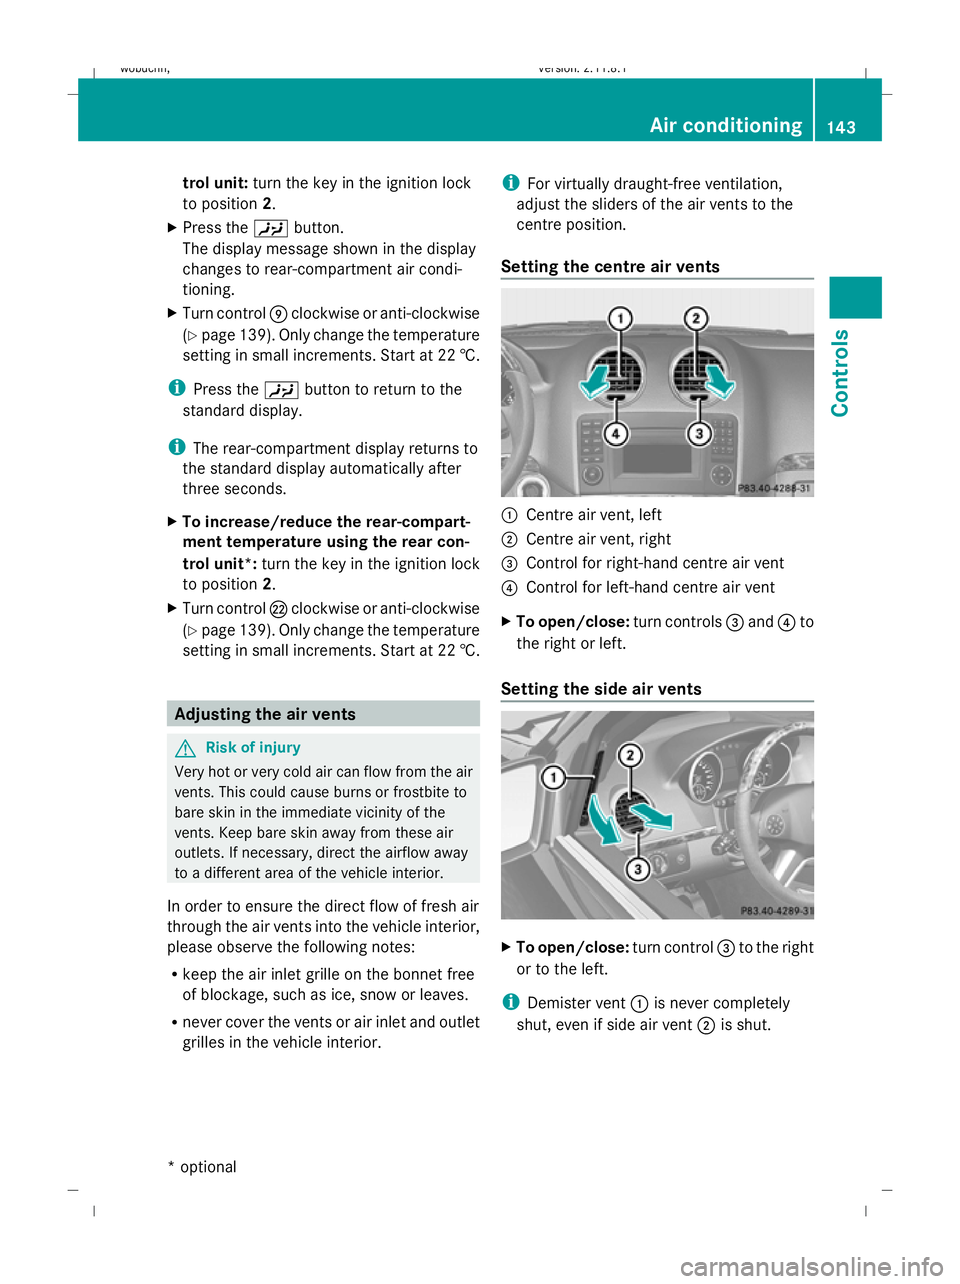
Setting the centre air vents :
Centre air vent, left
; Centre air vent, right
= Control for right-hand centre air vent
? Control for left-hand centre air vent
X To open/close: turn controls=and ?to
the right or left.
Setting the side air vents X
To open/close: turn control=to the right
or to the left.
i Demister vent :is never completely
shut, even if side air vent ;is shut. Air conditioning
143Controls
* optional
X164_AKB; 2; 3, en-GB
wobuchh
,V ersion: 2.11.8.1
2009-03-31T14:14:58+02:00 - Seite 143 Z
Dateiname: 6515431202_buchblock.pdf; erzeugt am 01. Apr 2009 00:17:30; WK
Page 148 of 309
\
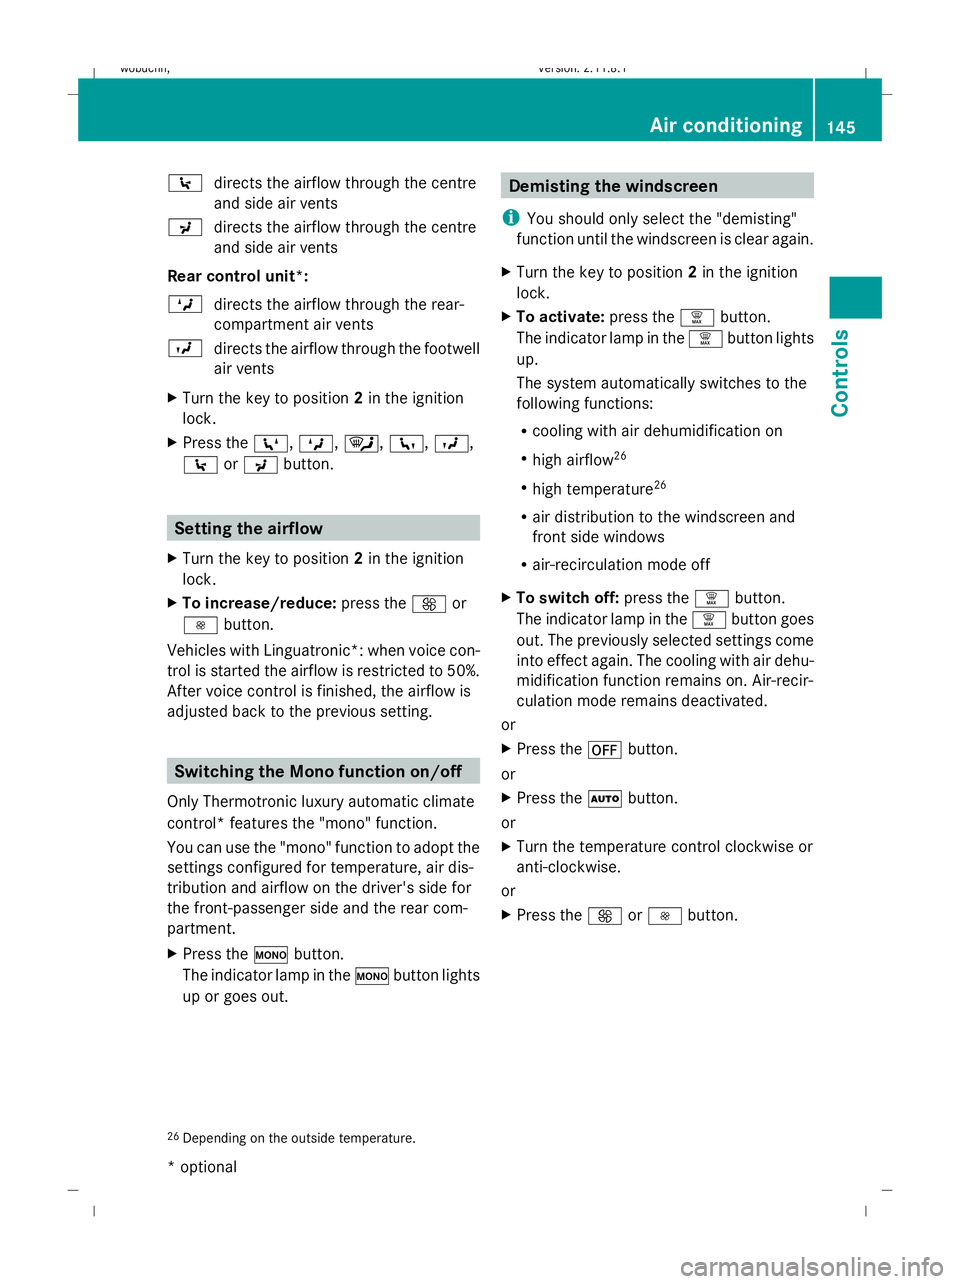
directs the airflow through the centre
and side air vents
P directs the airflow through the centre
and side air vents
Rear control unit*:
M directs the airflow through the rear-
compartment air vents
O directs the airflow through the footwell
air vents
X Turn the key to position 2in the ignition
lock.
X Press the Z,M,¯,c,O,
\ orP button. Setting the airflow
X Turn the key to position 2in the ignition
lock.
X To increase/reduce: press theKor
I button.
Vehicles with Linguatronic*: when voice con-
trol is started the airflow is restricted to 50%.
After voice control is finished, the airflow is
adjusted back to the previous setting. Switching the Mono function on/off
Only Thermotronic luxury automatic climate
control* features the "mono" function.
You can use the "mono" function to adopt the
settings configured for temperature, air dis-
tribution and airflow on the driver's side for
the front-passenger side and the rear com-
partment.
X Press the ºbutton.
The indicator lamp in the ºbutton lights
up or goes out. Demisting the windscreen
i You should only select the "demisting"
function until the windscreen is clear again.
X Turn the key to position 2in the ignition
lock.
X To activate: press the¦button.
The indicator lamp in the ¦button lights
up.
The system automatically switches to the
following functions:
R cooling with air dehumidification on
R high airflow 26
R high temperature 26
R air distribution to the windscreen and
front side windows
R air-recirculation mode off
X To switch off: press the¦button.
The indicator lamp in the ¦button goes
out. The previously selected settings come
into effect again. The cooling with air dehu-
midification function remains on. Air-recir-
culation mode remains deactivated.
or
X Press the ^button.
or
X Press the Ãbutton.
or
X Turn the temperature control clockwise or
anti-clockwise.
or
X Press the KorI button.
26 Depending on the outside temperature. Air conditioning
145Controls
* optional
X164_AKB; 2; 3, en-GB
wobuchh,
Version: 2.11.8.1 2009-03-31T14:14:58+02:00 - Seite 145 Z
Dateiname: 6515431202_buchblock.pdf; erzeugt am 01. Apr 2009 00:17:31; WK
Page 176 of 309
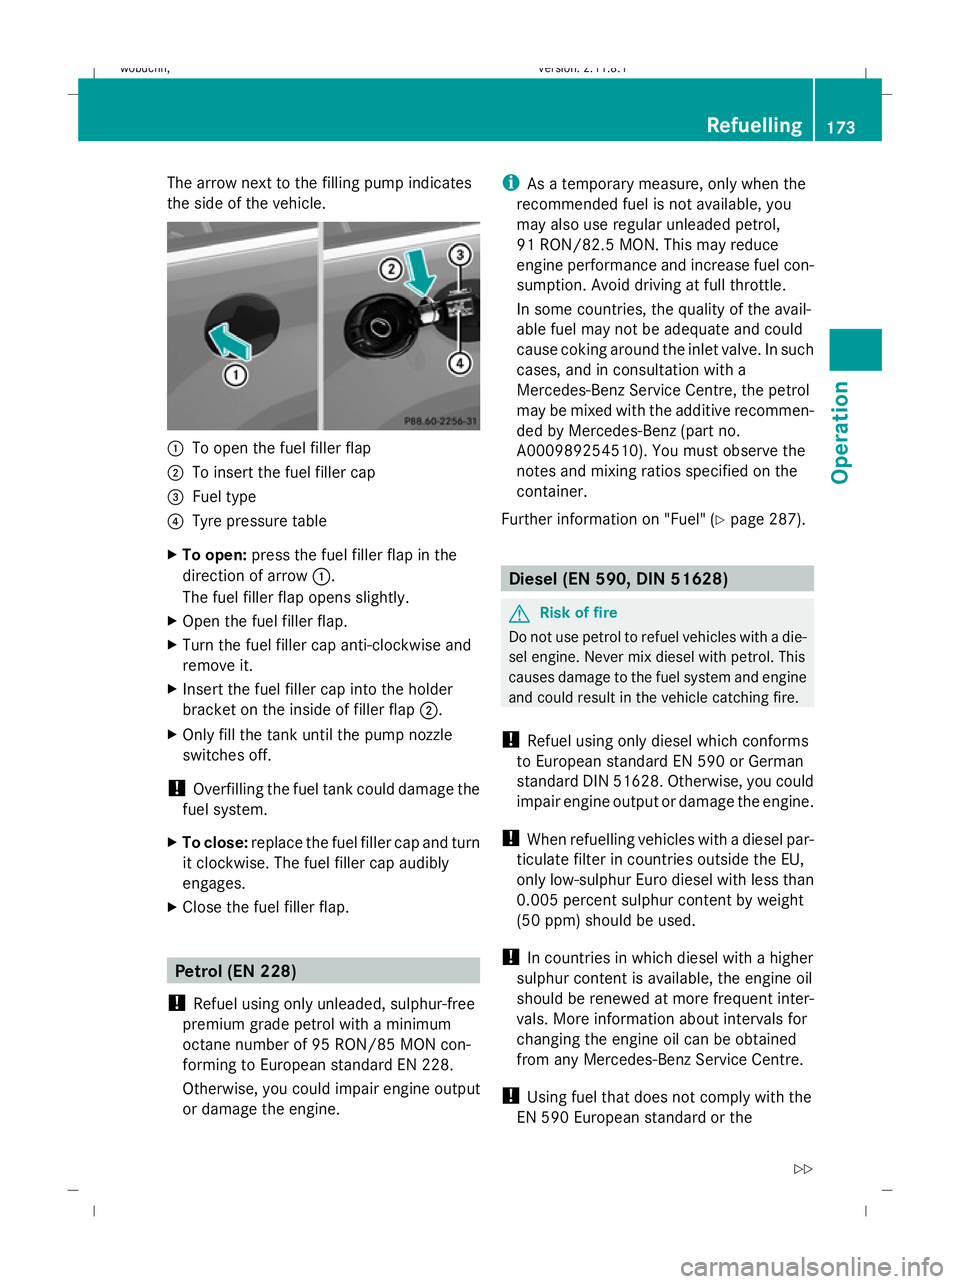
The arrow next to the filling pump indicates
the side of the vehicle.
:
To open the fuel filler flap
; To insert the fuel filler cap
= Fuel type
? Tyre pressure table
X To open: press the fuel filler flap in the
direction of arrow :.
The fuel filler flap opens slightly.
X Open the fuel filler flap.
X Turn the fuel filler cap anti-clockwise and
remove it.
X Insert the fuel filler cap into the holder
bracket on the inside of filler flap ;.
X Only fill the tank until the pump nozzle
switches off.
! Overfilling the fuel tank could damage the
fuel system.
X To close: replace the fuel filler cap and turn
it clockwise. The fuel filler cap audibly
engages.
X Close the fuel filler flap. Petrol (EN 228)
! Refuel using only unleaded, sulphur-free
premium grade petrol with a minimum
octane number of 95 RON/85 MON con-
forming to European standard EN 228.
Otherwise, you could impair engine output
or damage the engine. i
As a temporary measure, only when the
recommended fuel is not available, you
may also use regular unleaded petrol,
91 RON/82.5 MON. This may reduce
engine performance and increase fuel con-
sumption. Avoid driving at full throttle.
In some countries, the quality of the avail-
able fuel may not be adequate and could
cause coking around the inlet valve. In such
cases, and in consultation with a
Mercedes-Benz Service Centre, the petrol
may be mixed with the additive recommen-
ded by Mercedes-Benz (part no.
A000989254510). You must observe the
notes and mixing ratios specified on the
container.
Further information on "Fuel" (Y page 287). Diesel (EN 590, DIN 51628)
G
Risk of fire
Do not use petrol to refuel vehicles with a die-
sel engine. Never mix diesel with petrol. This
causes damage to the fuel system and engine
and could result in the vehicle catching fire.
! Refuel using only diesel which conforms
to European standard EN 590 or German
standard DIN 51628. Otherwise, you could
impair engine output or damage the engine.
! When refuelling vehicles with a diesel par-
ticulate filter in countries outside the EU,
only low-sulphur Euro diesel with less than
0.005 percent sulphur content by weight
(50 ppm) should be used.
! In countries in which diesel with a higher
sulphur content is available, the engine oil
should be renewed at more frequent inter-
vals. More information about intervals for
changing the engine oil can be obtained
from any Mercedes-Benz Service Centre.
! Using fuel that does not comply with the
EN 590 European standard or the Refuelling
173Operation
X164_AKB; 2; 3, en-GB
wobuchh, Version: 2.11.8.1 2009-03-31T14:14:58+02:00 - Seite 173 Z
Dateiname: 6515431202_buchblock.pdf; erzeugt am 01. Apr 2009 00:17:45; WK