2009 MERCEDES-BENZ GL SUV ECU
[x] Cancel search: ECUPage 93 of 309
i
It is only possible to move the DIRECT
SELECT lever to the desired position from
position Pif you depress the brake pedal.
Only then is the parking lock released.
i The vehicle locks centrally once you have
pulled away. The locking knobs in the doors
drop down.
You can open the doors from the inside at
any time.
You can also deactivate the automatic lock-
ing feature (Y page 107).
X Depress the brake pedal and keep it
depressed.
X Shift the transmission to position Dor R.
X Release the parking brake (Y page 91).
X Release the brake pedal.
X Carefully depress the accelerator pedal.
i Upshifts take place at higher engine
speeds after a cold start. This helps the
catalytic converter to reach its operating
temperature more quickly.
Hill start assist Hill start assist helps you when pulling away
forwards or in reverse on an uphill gradient.
It holds the vehicle for a short time after you
have removed your foot from the brake pedal.
This gives you time to move your foot from
the brake pedal to the accelerator pedal and
depress it before the vehicle begins to roll. G
Risk of accident
Never leave the vehicle when it is held by hill
start assist. After approximately one second,
hill start assist will no longer brake your vehi-
cle and it could roll away.
X Take your foot off the brake pedal.
i Once you have taken your foot off the
brake pedal, the vehicle is held for around
one second.
X Pull away. Hill start assist will not function if:
R you are pulling away on a level road or a
downhill gradient.
R the transmission is in position N.
R the vehicle is secured with the parking
brake.
R ESP ®
is malfunctioning. Parking
G
Risk of accident
Only remove the key from the ignition lock
when the vehicle is stationary, as you cannot
steer the vehicle with the key removed.
Never leave children unsupervised in the vehi-
cle. They could release the parking brake. This
could lead to a serious or fatal accident. G
Risk of fire
Make sure that the exhaust system does not
under any circumstances come into contact
with flammable materials such as dry grass or
petrol. The material could otherwise ignite
and set the vehicle on fire.
To ensure that the vehicle is secured against
rolling away unintentionally:
R the parking brake must be applied
R the transmission must be in position Pand
the ignition key must be removed
R on steep uphill or downhill gradients, turn
the front wheels towards the kerb 90
Driving and parkingControls
X164_AKB; 2; 3, en-GB
wobuchh,
Version: 2.11.8.1 2009-03-31T14:14:58+02:00 - Seite 90
Dateiname: 6515431202_buchblock.pdf; erzeugt am 01. Apr 2009 00:17:11; WK
Page 94 of 309
Parking brake
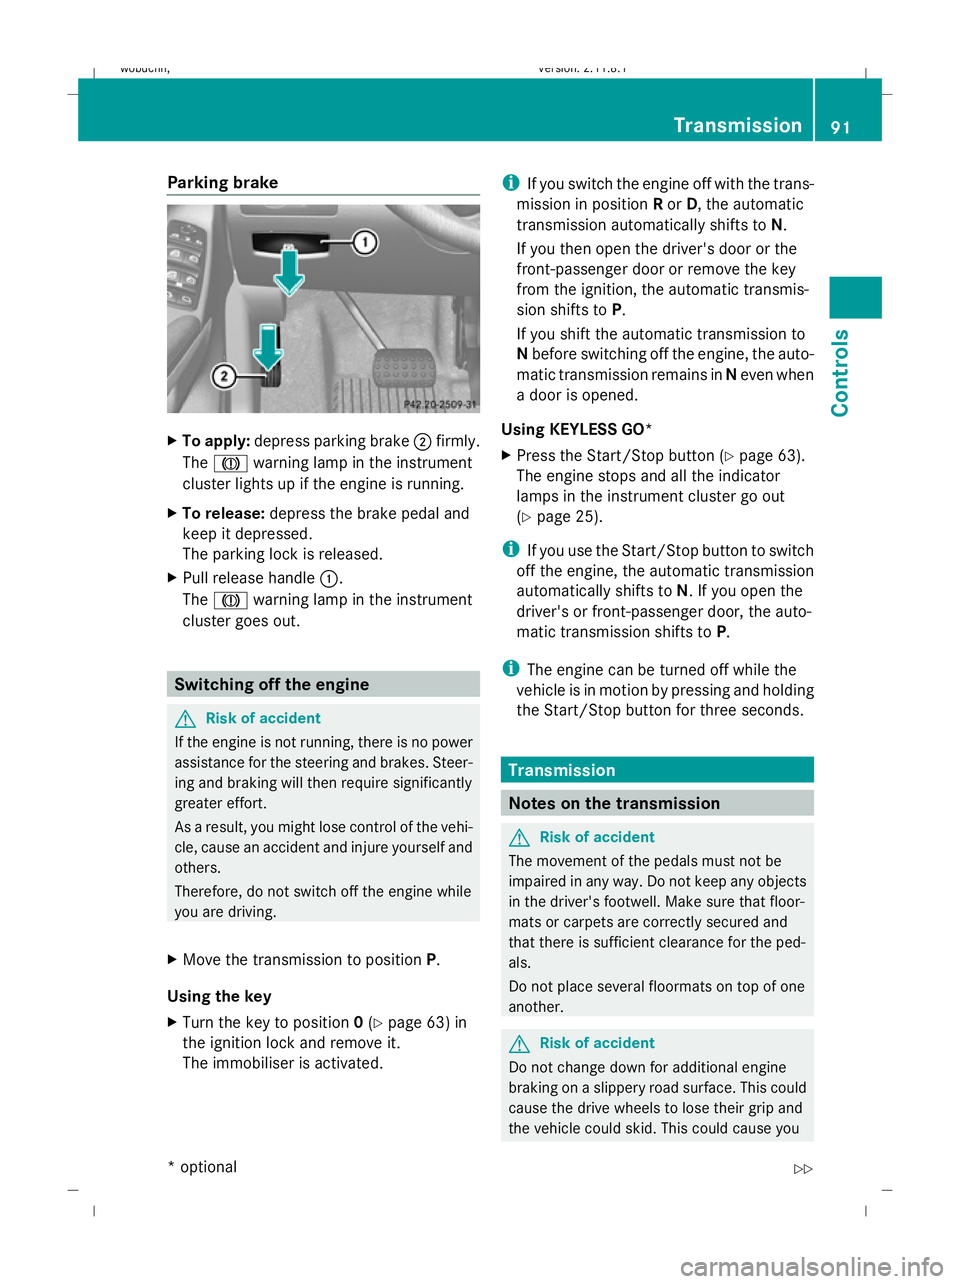
X
To apply: depress parking brake ;firmly.
The J warning lamp in the instrument
cluster lights up if the engine is running.
X To release: depress the brake pedal and
keep it depressed.
The parking lock is released.
X Pull release handle :.
The J warning lamp in the instrument
cluster goes out. Switching off the engine
G
Risk of accident
If the engine is not running, there is no power
assistance for the steering and brakes. Steer-
ing and braking will then require significantly
greater effort.
As a result, you might lose control of the vehi-
cle, cause an accident and injure yourself and
others.
Therefore, do not switch off the engine while
you are driving.
X Move the transmission to position P.
Using the key
X Turn the key to position 0(Y page 63) in
the ignition lock and remove it.
The immobiliser is activated. i
If you switch the engine off with the trans-
mission in position Ror D, the automatic
transmission automatically shifts to N.
If you then open the driver's door or the
front-passenger door or remove the key
from the ignition, the automatic transmis-
sion shifts to P.
If you shift the automatic transmission to
N before switching off the engine, the auto-
matic transmission remains in Neven when
a door is opened.
Using KEYLESS GO*
X Press the Start/Stop button (Y page 63).
The engine stops and all the indicator
lamps in the instrument cluster go out
(Y page 25).
i If you use the Start/Stop button to switch
off the engine, the automatic transmission
automatically shifts to N. If you open the
driver's or front-passenger door, the auto-
matic transmission shifts to P.
i The engine can be turned off while the
vehicle is in motion by pressing and holding
the Start/Stop button for three seconds. Transmission
Notes on the transmission
G
Risk of accident
The movement of the pedals must not be
impaired in any way. Do not keep any objects
in the driver's footwell. Make sure that floor-
mats or carpets are correctly secured and
that there is sufficient clearance for the ped-
als.
Do not place several floormats on top of one
another. G
Risk of accident
Do not change down for additional engine
braking on a slippery road surface. This could
cause the drive wheels to lose their grip and
the vehicle could skid. This could cause you Transmission
91Controls
* optional
X164_AKB; 2; 3, en-GB
wobuchh,
Version: 2.11.8.1 2009-03-31T14:14:58+02:00 - Seite 91 Z
Dateiname: 6515431202_buchblock.pdf; erzeugt am 01. Apr 2009 00:17:11; WK
Page 111 of 309
Selecting the departure time or deactivat-
ing a selected departure time
You can call up the Aux.heating depar‐
ture time function directly.
X Turn the key to position 1or 2in the ignition
lock.
X Press the button for the auxiliary heating on
the centre console (Y page 147).
or
X Press VorU on the steering wheel
to select the Settings... menu.
X Press the &button to select submenus.
X Press the WorX button to select the
Heater submenu.
X Press the &button to select Aux.heat‐
ing departure time.
You will see the selected setting.
X Press the WorX button to select
one of the three departure times or Timer
off (no timer active).
When a switch-on time is selected, the yel-
low indicator lamp lights up in the auxiliary
heating button.
Changing the departure time
X Press VorU on the steering wheel
to select the Settings... menu.
X Press the &button to select submenus.
X Press the WorX button to select the
Heater submenu.
X Press the &button to select Aux.heat‐
ing departure time.
X Press WorX to select Time 1,
Time 2 orTime 3 to be changed.
X Press &to select Departure time
X Set hour.
X Press the WorX button to set the
hour.
X Press the &button to select Depar‐
ture time X Set minutes. X
Press the WorX button to set the
minutes.
X Press the *button to select a different
display.
After changing from one menu to another,
the new time setting is stored. The yellow
indicator lamp lights up on the button for
the auxiliary heating on the centre console.
Convenience submenu* Activating or deactivating the easy-entry/
exit feature*
G
Risk of injury
The steering wheel moves when the EASY-
ENTRY/EXIT feature is active. There is a risk
of occupants becoming trapped. Before acti-
vating the EASY-ENTRY/EXIT feature, make
sure that nobody can become trapped.
Do not leave children unsupervised in the
vehicle, even if they are secured in a child
restraint system. The children could open the
driver's door and thereby unintentionally acti-
vate the EASY-ENTRY/EXIT feature and
become trapped.
X Press VorU on the steering wheel
to select the Settings... menu.
X Press the &button to select submenus.
X Press the WorX button to select the
Convenience submenu.
X Press the &button to select the EASY-
ENTRY feature.
X Press the WorX button to activate
or deactivate the EASY-ENTRY system.
X Press the &,VorU button to
select a different display.
Switching the belt adjustment on/off
X Press VorU on the steering wheel
to select the Settings... menu.
X Press the WorX button to select the
Convenience submenu. 108
On-board computerControls
* optional
X164_AKB; 2; 3, en-GB
wobuchh,
Version: 2.11.8.1 2009-03-31T14:14:58+02:00 - Seite 108
Dateiname: 6515431202_buchblock.pdf; erzeugt am 01. Apr 2009 00:17:17; WK
Page 121 of 309
G
Risk of accident
Do not use cruise control:
R in road and traffic conditions which do not
allow you to maintain a constant speed (e.g.
heavy traffic or winding roads). You could
otherwise cause an accident.
R on slippery roads. Braking or accelerating
could cause the drive wheels to lose trac-
tion and the vehicle could then skid.
R when there is poor visibility, e.g. due to fog,
heavy rain or snow
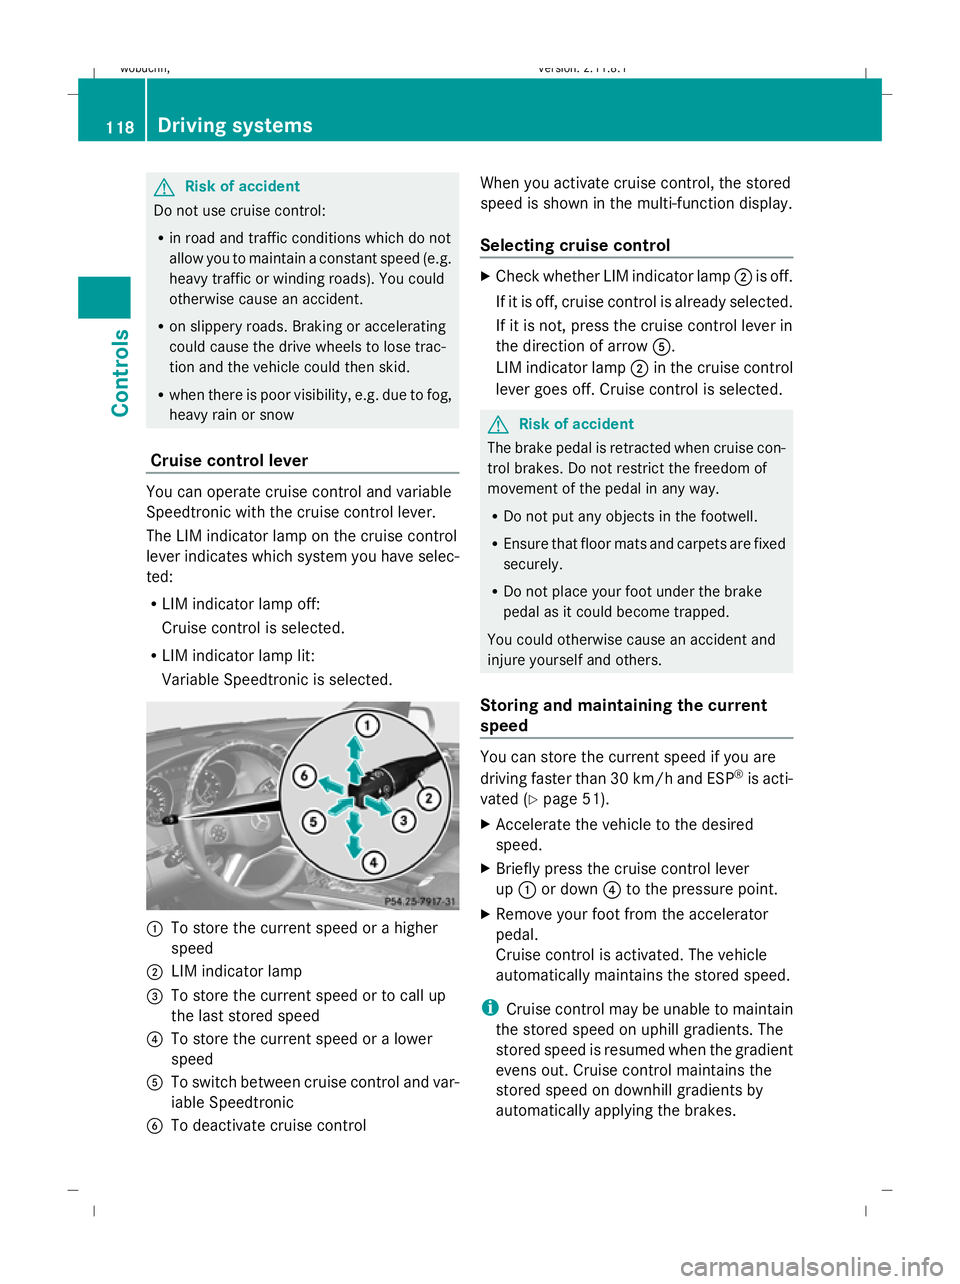
Cruise control lever You can operate cruise control and variable
Speedtronic with the cruise control lever.
The LIM indicator lamp on the cruise control
lever indicates which system you have selec-
ted:
R LIM indicator lamp off:
Cruise control is selected.
R LIM indicator lamp lit:
Variable Speedtronic is selected. :
To store the current speed or a higher
speed
; LIM indicator lamp
= To store the current speed or to call up
the last stored speed
? To store the current speed or a lower
speed
A To switch between cruise control and var-
iable Speedtronic
B To deactivate cruise control When you activate cruise control, the stored
speed is shown in the multi-function display.
Selecting cruise control X
Check whether LIM indicator lamp ;is off.
If it is off, cruise control is already selected.
If it is not, press the cruise control lever in
the direction of arrow A.
LIM indicator lamp ;in the cruise control
lever goes off. Cruise control is selected. G
Risk of accident
The brake pedal is retracted when cruise con-
trol brakes. Do not restrict the freedom of
movement of the pedal in any way.
R Do not put any objects in the footwell.
R Ensure that floor mats and carpets are fixed
securely.
R Do not place your foot under the brake
pedal as it could become trapped.
You could otherwise cause an accident and
injure yourself and others.
Storing and maintaining the current
speed You can store the current speed if you are
driving faster than 30 km/h and ESP ®
is acti-
vated (Y page 51).
X Accelerate the vehicle to the desired
speed.
X Briefly press the cruise control lever
up : or down ?to the pressure point.
X Remove your foot from the accelerator
pedal.
Cruise control is activated. The vehicle
automatically maintains the stored speed.
i Cruise control may be unable to maintain
the stored speed on uphill gradients. The
stored speed is resumed when the gradient
evens out. Cruise control maintains the
stored speed on downhill gradients by
automatically applying the brakes. 118
Driving systemsControls
X164_AKB; 2; 3, en-GB
wobuchh,
Version: 2.11.8.1 2009-03-31T14:14:58+02:00 - Seite 118
Dateiname: 6515431202_buchblock.pdf; erzeugt am 01. Apr 2009 00:17:20; WK
Page 123 of 309
laden or towing a trailer, you must select shift
range 1,2or 3in good time. By doing so, you
will make use of the braking effect of the
engine, which relieves the load on the brake
system and prevents the brakes from over-
heating and wearing too quickly. G
Risk of accident
The brake pedal is retracted when Distronic
brakes. Do not restrict the movement of the
pedal in any way.
R Do not put any objects in the footwell.
R Ensure that floor mats and carpets are fixed
securely.
R Do not place your foot under the brake
pedal as it could become trapped.
You could otherwise cause an accident and
injure yourself and others. G
Risk of accident
Do not change down for additional engine
braking on a slippery road surface. This could
cause the drive wheels to lose their grip and
the vehicle could skid. G
Risk of accident
Distronic is only an aid designed to assist
driving. The driver is fully responsible for the
vehicle's distance from other vehicles, the
vehicle's speed and for braking in good time.
Distronic does not react to:
R pedestrians
R stationary obstacles on the road, e.g. sta-
tionary or parked vehicles
R oncoming and crossing traffic
Distronic may not detect narrow vehicles driv-
ing in front, e.g. motorcycles, or vehicles driv-
ing on a different line. Therefore, always pay
attention to traffic conditions even when Dis-
tronic is activated. Otherwise, you may fail to
recognise dangers in time, cause an accident
and injure yourself and others.
If a slower-moving vehicle is detected in front,
Distronic causes your vehicle to brake and maintain the preset distance to the vehicle in
front that you have set. G
Risk of accident
Distronic cannot take account of road and
traffic conditions. Deactivate, or do not acti-
vate, Distronic if it does not detect the vehicle
in front, or if it no longer detects it. This is
especially the case:
R before corners
R in filter lanes
R when changing to a lane with faster moving
traffic
R in complex driving situations or where the
lanes are diverted, e.g. at motorway/road-
way construction sites
Otherwise, Distronic maintains the current
speed or accelerates to the set speed.
Distronic cannot take account of weather
conditions. Deactivate, or do not activate,
Distronic:
R if the roads are slippery, snow-covered or
icy. The wheels could lose their grip when
braking or accelerating. The vehicle could
start to skid.
R if the sensors are dirty or there is poor vis-
ibility, e.g. due to snow, rain or fog. Dis-
tance control may be impaired.
Always pay attention to traffic conditions
even when Distronic is activated. Otherwise,
you may fail to recognise dangers in time,
cause an accident and injure yourself and oth-
ers.
If no car is driving in front of you, Distronic
works like cruise control in the speed range
between 30 km/h and 200 km/h. If a vehicle
is driving in front of you, Distronic Plus works
in the speed range between 0 km/h and
200 km/h.
Do not use Distronic while driving on roads
with steep gradients. 120
Driving systemsControls
X164_AKB; 2; 3, en-GB
wobuchh,
Version: 2.11.8.1 2009-03-31T14:14:58+02:00 - Seite 120
Dateiname: 6515431202_buchblock.pdf; erzeugt am 01. Apr 2009 00:17:21; WK
Page 125 of 309
X
Briefly pull the cruise control lever towards
you ?or press it up :or down Ato the
pressure point.
Distronic is activated.
X Keep the cruise control lever pressed
up : or down Auntil the desired speed
is set.
X Remove your foot from the accelerator
pedal.
Your vehicle adapts its speed to that of the
vehicle in front, but only up to the stored
speed.
i You can use the cruise control lever to set
the stored speed and the thumbwheel on
the cruise control lever to set the specified
minimum distance (Y page 123).
i If you do not fully release the accelerator
pedal, the DISTRONIC Override message
appears in the multi-function display. The
distance to a slower-moving vehicle in front
will then not be governed. You will be driv-
ing at the speed you determine by the posi-
tion of the accelerator pedal.
Driving
If there is no vehicle in front, Distronic oper-
ates in the same way as cruise control.
If a slower-moving vehicle is detected in front,
Distronic causes your vehicle to brake and
maintain the preset distance to the vehicle in
front.
If Distronic detects a faster-moving vehicle in
front, it increases the driving speed, but only
as far as the stored speed. G
Risk of accident
If you depress the brake pedal, Distronic is
deactivated. Distronic will then no longer
brake your vehicle. The driver is fully respon-
sible for the vehicle's distance from other
vehicles, its speed and for braking in good
time. Stopping G
Risk of accident
The Distronic braking effect is cancelled and
the vehicle can start moving if:
R Distronic is deactivated using the cruise
control lever.
R you accelerate.
R the system or the power supply is disrup-
ted, e.g. due to battery failure.
R the electrical system in the engine com-
partment or the fuses have been tampered
with.
R the battery is disconnected. G
Risk of accident
Distronic must never be operated or deacti-
vated by a passenger or from outside the vehi-
cle.
If you wish to leave the vehicle or park it,
deactivate Distronic and secure the vehicle
against rolling away.
If Distronic detects that the vehicle in front is
stopping, it brakes your vehicle until it is sta-
tionary.
i Depending on the specified minimum dis-
tance, your vehicle will come to a standstill
about four metres behind the vehicle in
front. The specified minimum distance is
set using the thumbwheel on the cruise-
control lever.
Distronic is deactivated automatically when
stopping:
R on flat stretches of road or on downhill gra-
dients when the vehicle is stationary.
R while the vehicle is still moving on uphill
gradients, to prevent the vehicle from unex-
pectedly rolling back when Distronic is
deactivated.
If Distronic is deactivated, you will hear a
warning tone.
X Secure the vehicle against rolling away. 122
Driving systemsControls
X164_AKB; 2; 3, en-GB
wobuchh,
Version: 2.11.8.1 2009-03-31T14:14:58+02:00 - Seite 122
Dateiname: 6515431202_buchblock.pdf; erzeugt am 01. Apr 2009 00:17:21; WK
Page 154 of 309
direction of arrow
;until the sliding/tilt-
ing sunroof is closed.
The sliding/tilting sunroof is closed with
more force.
If the sliding/tilting sunroof locks up during
closing again:
X Immediately after it locks up, pull the
switch again to the pressure point in the
direction of arrow ;until the sliding/tilt-
ing sunroof is closed.
The sliding/tilting sunroof is closed without
the anti-entrapment feature.
Rain closing feature* The sliding/tilting sunroof closes automati-
cally:
R
if it starts to rain
R after 12 hours
The rear of the sliding/tilting sunroof is then
raised in order to ventilate the interior of the
vehicle.
i The sliding/tilting sunroof is opened
slightly again if it is obstructed while being
closed by the rain closing feature. The rain
closing feature is then deactivated.
The sliding/tilting sunroof does not close if:
R it is raised at the rear
R it is blocked
R no rain is falling on the area of the wind-
screen being monitored by the rain sensor
(e.g. because the vehicle is under a bridge
or in a carport)
Resetting Reset the sliding/tilting sunroof if it does not
open smoothly, or if the battery has been dis-
connected or has become discharged.
X
Switch the ignition off and then on again.
X The sliding/tilting sunroof is raised fully at
the rear. X
Keep the switch pressed for an additional
second.
X Make sure that the sliding/tilting sunroof
can be opened or closed fully again
(Y page 150).
X If this is not the case, consult a qualified
specialist workshop. Loading and stowing
Loading guidelines
G
Risk of injury
Secure and position the load as described in
the loading guidelines.
Otherwise, vehicle occupants could
be injured by the load being thrown around in
the event of sharp braking, a sudden change
in direction or an accident.
You will find further information in the "Secur-
ing a load" section.
Even if you follow all the loading guidelines,
the load will increase the risk of injury in the
event of an accident. G
Risk of poisoning
Keep the tailgate closed when the engine is
running. Otherwise, you could be poisoned by
exhaust fumes entering the vehicle.
The handling characteristics of a laden vehi-
cle are dependent on the distribution of the
load within the vehicle. For this reason, you
should observe the following notes when
transporting a load:
R never exceed the maximum permissible
gross vehicle weight or the permissible axle
loads for the vehicle (including occupants).
R position heavy loads as far forwards and as
low down in the luggage compartment as
possible.
R the load must not protrude above the upper
edge of the seat backrests.
R always place the load against the rear or
front seat backrests. Make sure that the Loading and stowing
151Controls
* optional
X164_AKB; 2; 3, en-GB
wobuchh,
Version: 2.11.8.1 2009-03-31T14:14:58+02:00 - Seite 151 Z
Dateiname: 6515431202_buchblock.pdf; erzeugt am 01. Apr 2009 00:17:32; WK
Page 155 of 309
seat backrests are securely locked into
place.
R always place the load behind unoccupied
seats if possible.
R secure the load with sufficiently strong and
wear-resistant load restraints. Pad sharp
edges for protection.
i Load restraints are available at any quali-
fied specialist workshop, e.g. a Mercedes-
Benz Service Centre. Stowage compartments
G
Risk of injury
The stowage compartments must be closed
when items are stored in them. Luggage nets
are not designed to secure heavy items of
luggage.
You or other vehicle occupants could be
injured by objects being thrown around if you:
R brake sharply
R change direction suddenly
R are involved in an accident
Sharp-edged and fragile objects must not be
placed in the luggage net.
Glove compartment i
Depending on the vehicle's equipment,
there is an AUX-IN connection installed in
the glove compartment, or a Media Inter-
face*, which is a universal interface for
portable audio equipment, e.g. for an iPod
or USB device. The glove compartment can be locked and
unlocked using the emergency key element
(Y
page 250).
X To open: pull handle :in the direction of
the arrow and fold down cover ;.
X To close: fold cover ;upwards until it
engages.
Stowage compartment in the centre
console X
To open: briefly press marking ;.
X To close: push stowage compartment :
in the direction of the arrow until it
engages. 152
Loading and stowingControls
* optional
X164_AKB; 2; 3, en-GB
wobuchh,
Version: 2.11.8.1 2009-03-31T14:14:58+02:00 - Seite 152
Dateiname: 6515431202_buchblock.pdf; erzeugt am 01. Apr 2009 00:17:33; WK