2009 MERCEDES-BENZ GL SUV steering wheel adjustment
[x] Cancel search: steering wheel adjustmentPage 73 of 309
X
Make sure that the key is in position 1or
2 in the ignition lock.
X To switch on: press button:repeatedly
until the required ventilation level is set.
i If you open the side windows and the slid-
ing/tilting sunroof* using the key
(Y page 87), the seat ventilation of the
driver's seat automatically switches to the
highest level.
X To switch off: press button:repeatedly
until all indicator lamps go out.
i If the battery voltage is too low, the seat
ventilation may switch off. Seat heating*
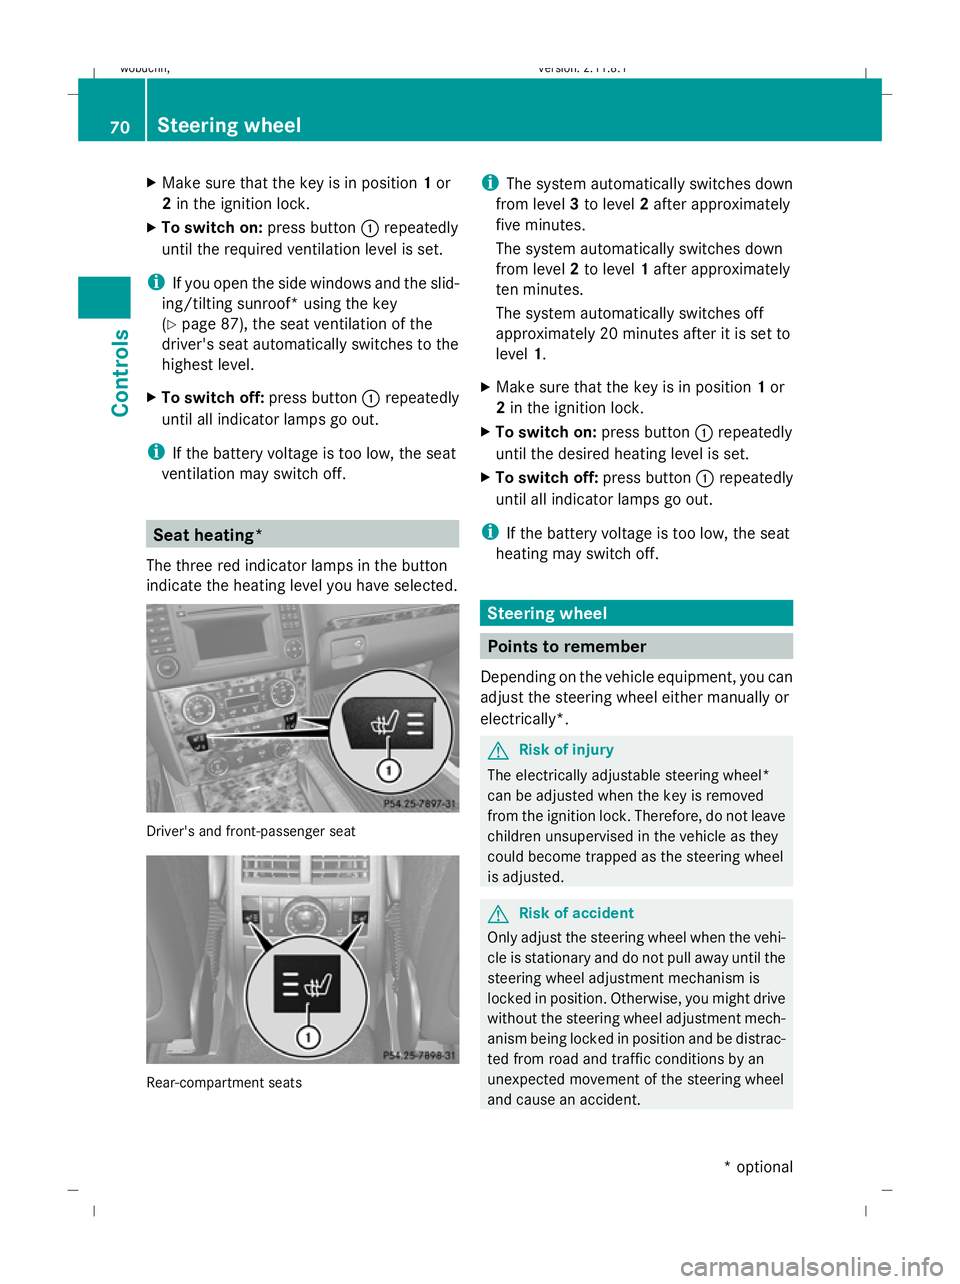
The three red indicator lamps in the button
indicate the heating level you have selected. Driver's and front-passenger seat
Rear-compartment seats i
The system automatically switches down
from level 3to level 2after approximately
five minutes.
The system automatically switches down
from level 2to level 1after approximately
ten minutes.
The system automatically switches off
approximately 20 minutes after it is set to
level 1.
X Make sure that the key is in position 1or
2 in the ignition lock.
X To switch on: press button:repeatedly
until the desired heating level is set.
X To switch off: press button:repeatedly
until all indicator lamps go out.
i If the battery voltage is too low, the seat
heating may switch off. Steering wheel
Points to remember
Depending on the vehicle equipment, you can
adjust the steering wheel either manually or
electrically*. G
Risk of injury
The electrically adjustable steering wheel*
can be adjusted when the key is removed
from the ignition lock. Therefore, do not leave
children unsupervised in the vehicle as they
could become trapped as the steering wheel
is adjusted. G
Risk of accident
Only adjust the steering wheel when the vehi-
cle is stationary and do not pull away until the
steering wheel adjustment mechanism is
locked in position. Otherwise, you might drive
without the steering wheel adjustment mech-
anism being locked in position and be distrac-
ted from road and traffic conditions by an
unexpected movement of the steering wheel
and cause an accident. 70
Steering wheelControls
* optional
X164_AKB; 2; 3, en-GB
wobuchh,
Version: 2.11.8.1 2009-03-31T14:14:58+02:00 - Seite 70
Dateiname: 6515431202_buchblock.pdf; erzeugt am 01. Apr 2009 00:17:02; WK
Page 74 of 309
However, the steerability of the vehicle is not
affected.
When you adjust the steering wheel, make
sure that:
R the steering wheel can be reached with
your arms slightly bent
R you can move your legs freely
R you can see all the displays in the instru-
ment cluster clearly Adjusting the steering wheel man-
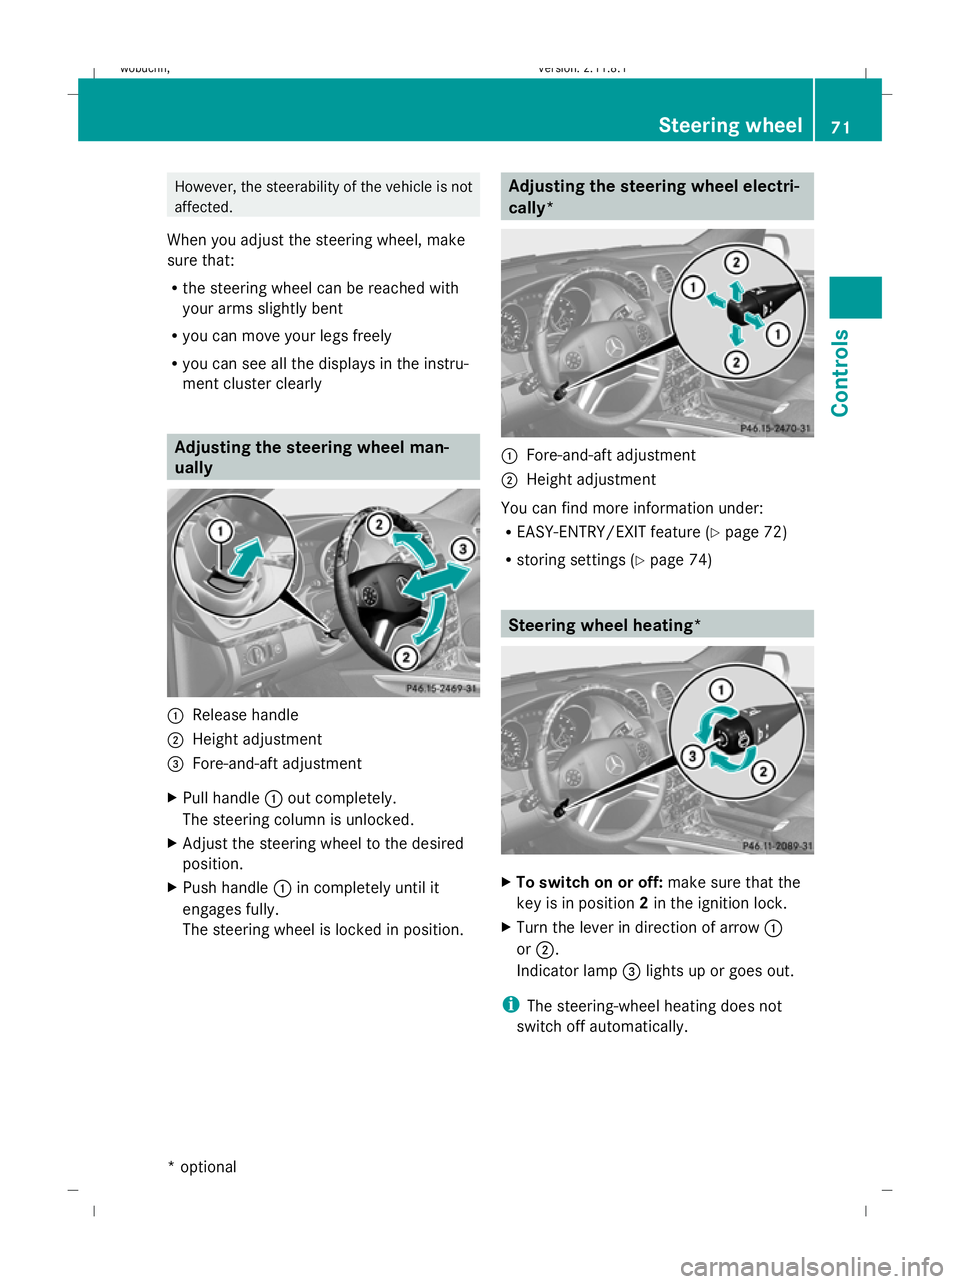
ually
:
Release handle
; Height adjustment
= Fore-and-aft adjustment
X Pull handle :out completely.
The steering column is unlocked.
X Adjust the steering wheel to the desired
position.
X Push handle :in completely until it
engages fully.
The steering wheel is locked in position. Adjusting the steering wheel electri-
cally*
:
Fore-and-aft adjustment
; Height adjustment
You can find more information under:
R EASY-ENTRY/EXIT feature (Y page 72)
R storing settings (Y page 74) Steering wheel heating*
X
To switch on or off: make sure that the
key is in position 2in the ignition lock.
X Turn the lever in direction of arrow :
or ;.
Indicator lamp =lights up or goes out.
i The steering-wheel heating does not
switch off automatically. Steering wheel
71Controls
* optional
X164_AKB; 2; 3, en-GB
wobuchh
,V ersion: 2.11.8.1
2009-03-31T14:14:58+02:00 - Seite 71 Z
Dateiname: 6515431202_buchblock.pdf; erzeugt am 01. Apr 2009 00:17:02; WK
Page 75 of 309
Easy-entry/exit feature*
The EASY-ENTRY/EXIT feature makes getting
in and out of your vehicle easier.
The steering wheel swings upwards when
you:
R remove the key from the ignition lock
R open the driver's door when the key is in
position 0or 1in the ignition lock
When the key is inserted into the ignition lock
with the driver's door closed, the steering
wheel is automatically moved to the previ-
ously set position. G
Risk of injury
Make sure that nobody can become trapped
when you activate the easy-entry/exit fea-
ture.
If there is a risk of becoming trapped, stop the
adjustment procedure. To halt the procedure:
R press the steering-column adjustment
switch
R press one of the memory function position
buttons
The steering column stops moving immedi-
ately.
Never leave children unsupervised in the vehi-
cle. They could open the driver's door and
thereby unintentionally activate the easy-
entry feature and become trapped.
The most recent position of the steering
wheel is stored when you switch off the igni-
tion or when you store a memory position
(Y page 74).
You can activate and deactivate the EASY-
ENTRY/EXIT feature via the on-board com-
puter (Y page 108).
i The crash-responsive EASY-EXIT fea-
ture* can only be activated after an acci-
dent if the EASY-ENTRY/EXIT feature is
activated in the on-board computer.
When the crash-responsive EASY-EXIT fea-
ture is triggered in an accident, the steering
wheel column will move upwards irrespec- tive of the position of the key in the ignition
lock. This makes it easier to exit the vehicle
or rescue the occupants. Mirrors
Rear-view mirror
X Adjust the rear-view mirror by hand so you
have a good overview of the traffic condi-
tions.
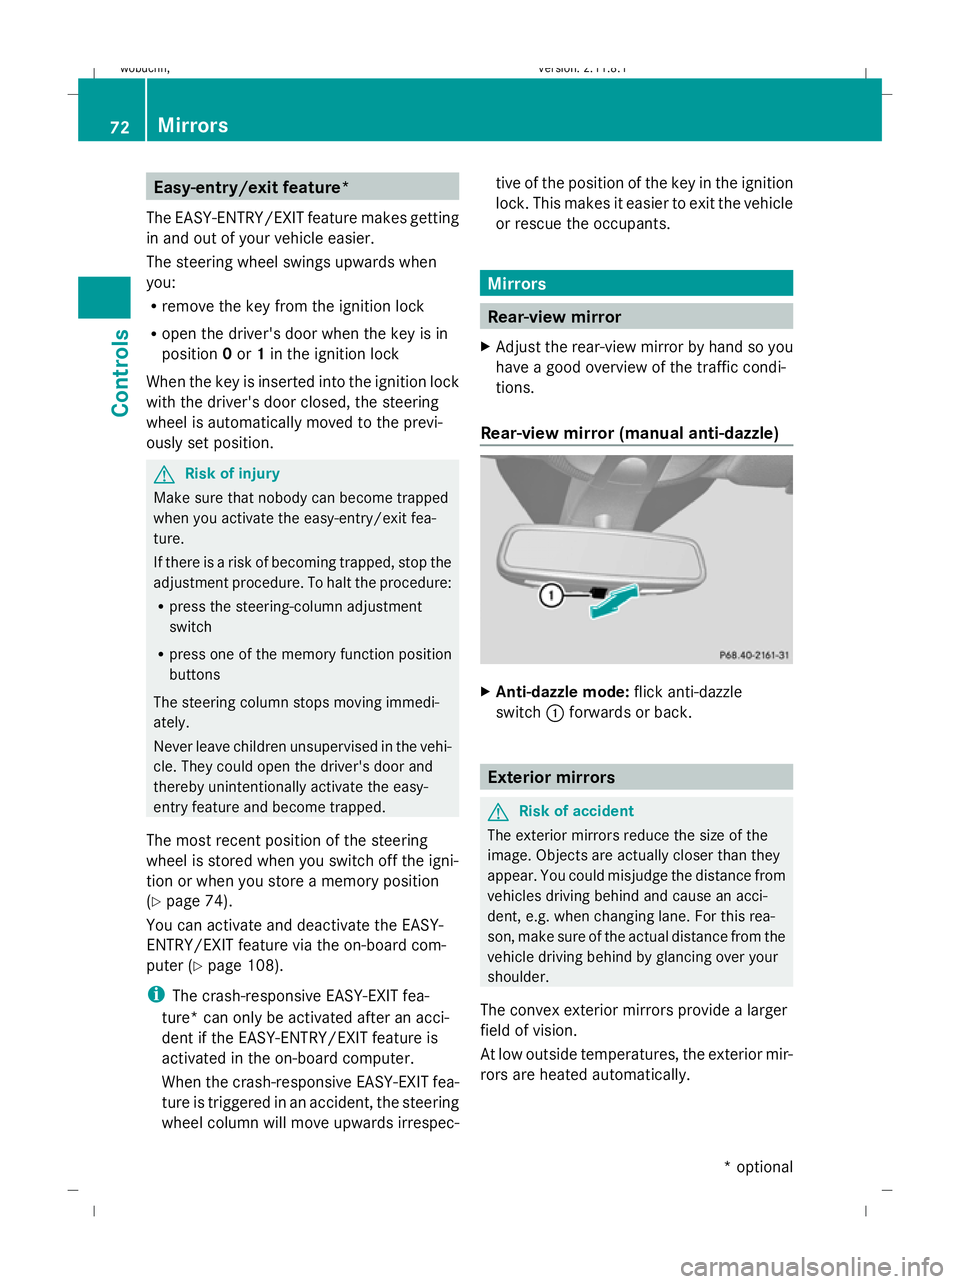
Rear-view mirror (manual anti-dazzle) X
Anti-dazzle mode: flick anti-dazzle
switch :forwards or back. Exterior mirrors
G
Risk of accident
The exterior mirrors reduce the size of the
image. Objects are actually closer than they
appear. You could misjudge the distance from
vehicles driving behind and cause an acci-
dent, e.g. when changing lane. For this rea-
son, make sure of the actual distance from the
vehicle driving behind by glancing over your
shoulder.
The convex exterior mirrors provide a larger
field of vision.
At low outside temperatures, the exterior mir-
rors are heated automatically. 72
MirrorsControls
* optional
X164_AKB; 2; 3, en-GB
wobuchh,
Version: 2.11.8.1 2009-03-31T14:14:58+02:00 - Seite 72
Dateiname: 6515431202_buchblock.pdf; erzeugt am 01. Apr 2009 00:17:03; WK
Page 81 of 309
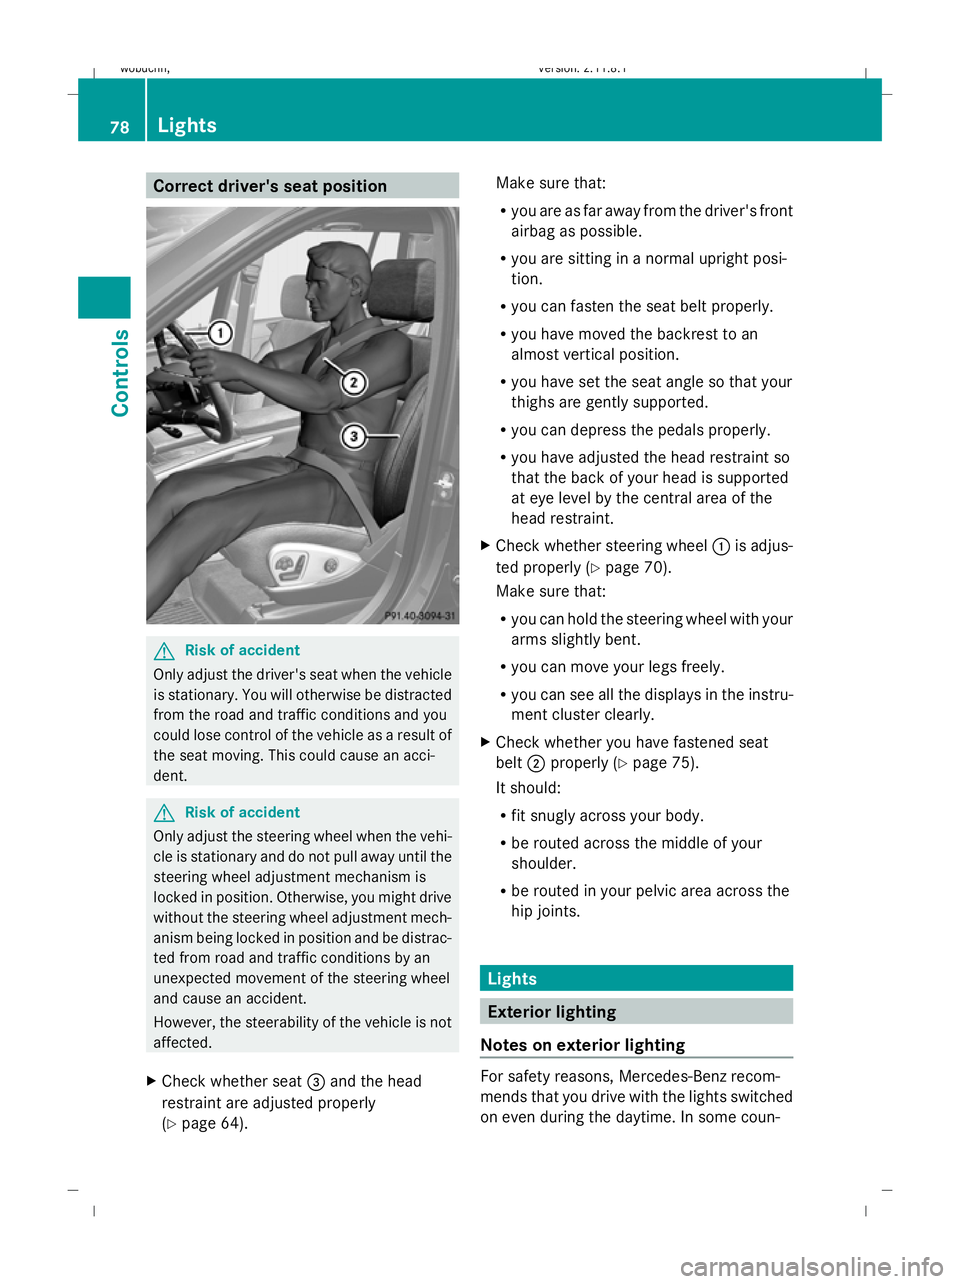
Correct driver's seat position
G
Risk of accident
Only adjust the driver's seat when the vehicle
is stationary. You will otherwise be distracted
from the road and traffic conditions and you
could lose control of the vehicle as a result of
the seat moving. This could cause an acci-
dent. G
Risk of accident
Only adjust the steering wheel when the vehi-
cle is stationary and do not pull away until the
steering wheel adjustment mechanism is
locked in position. Otherwise, you might drive
without the steering wheel adjustment mech-
anism being locked in position and be distrac-
ted from road and traffic conditions by an
unexpected movement of the steering wheel
and cause an accident.
However, the steerability of the vehicle is not
affected.
X Check whether seat =and the head
restraint are adjusted properly
(Y page 64). Make sure that:
R
you are as far away from the driver's front
airbag as possible.
R you are sitting in a normal upright posi-
tion.
R you can fasten the seat belt properly.
R you have moved the backrest to an
almost vertical position.
R you have set the seat angle so that your
thighs are gently supported.
R you can depress the pedals properly.
R you have adjusted the head restraint so
that the back of your head is supported
at eye level by the central area of the
head restraint.
X Check whether steering wheel :is adjus-
ted properly (Y page 70).
Make sure that:
R you can hold the steering wheel with your
arms slightly bent.
R you can move your legs freely.
R you can see all the displays in the instru-
ment cluster clearly.
X Check whether you have fastened seat
belt ;properly (Y page 75).
It should:
R fit snugly across your body.
R be routed across the middle of your
shoulder.
R be routed in your pelvic area across the
hip joints. Lights
Exterior lighting
Notes on exterior lighting For safety reasons, Mercedes-Benz recom-
mends that you drive with the lights switched
on even during the daytime. In some coun-78
LightsControls
X164_AKB; 2; 3, en-GB
wobuchh,
Version: 2.11.8.1 2009-03-31T14:14:58+02:00 - Seite 78
Dateiname: 6515431202_buchblock.pdf; erzeugt am 01. Apr 2009 00:17:06; WK
Page 111 of 309
Selecting the departure time or deactivat-
ing a selected departure time
You can call up the Aux.heating depar‐
ture time function directly.
X Turn the key to position 1or 2in the ignition
lock.
X Press the button for the auxiliary heating on
the centre console (Y page 147).
or
X Press VorU on the steering wheel
to select the Settings... menu.
X Press the &button to select submenus.
X Press the WorX button to select the
Heater submenu.
X Press the &button to select Aux.heat‐
ing departure time.
You will see the selected setting.
X Press the WorX button to select
one of the three departure times or Timer
off (no timer active).
When a switch-on time is selected, the yel-
low indicator lamp lights up in the auxiliary
heating button.
Changing the departure time
X Press VorU on the steering wheel
to select the Settings... menu.
X Press the &button to select submenus.
X Press the WorX button to select the
Heater submenu.
X Press the &button to select Aux.heat‐
ing departure time.
X Press WorX to select Time 1,
Time 2 orTime 3 to be changed.
X Press &to select Departure time
X Set hour.
X Press the WorX button to set the
hour.
X Press the &button to select Depar‐
ture time X Set minutes. X
Press the WorX button to set the
minutes.
X Press the *button to select a different
display.
After changing from one menu to another,
the new time setting is stored. The yellow
indicator lamp lights up on the button for
the auxiliary heating on the centre console.
Convenience submenu* Activating or deactivating the easy-entry/
exit feature*
G
Risk of injury
The steering wheel moves when the EASY-
ENTRY/EXIT feature is active. There is a risk
of occupants becoming trapped. Before acti-
vating the EASY-ENTRY/EXIT feature, make
sure that nobody can become trapped.
Do not leave children unsupervised in the
vehicle, even if they are secured in a child
restraint system. The children could open the
driver's door and thereby unintentionally acti-
vate the EASY-ENTRY/EXIT feature and
become trapped.
X Press VorU on the steering wheel
to select the Settings... menu.
X Press the &button to select submenus.
X Press the WorX button to select the
Convenience submenu.
X Press the &button to select the EASY-
ENTRY feature.
X Press the WorX button to activate
or deactivate the EASY-ENTRY system.
X Press the &,VorU button to
select a different display.
Switching the belt adjustment on/off
X Press VorU on the steering wheel
to select the Settings... menu.
X Press the WorX button to select the
Convenience submenu. 108
On-board computerControls
* optional
X164_AKB; 2; 3, en-GB
wobuchh,
Version: 2.11.8.1 2009-03-31T14:14:58+02:00 - Seite 108
Dateiname: 6515431202_buchblock.pdf; erzeugt am 01. Apr 2009 00:17:17; WK
Page 112 of 309
X
Press the &button to select Belt
adjustment.
X Press the WorX button to activate
or deactivate Belt adjustment.
Switching the fold in mirrors when lock-
ing* function on/off
When you activate the Fold in mirrors
when locking function, the exterior mirrors
are folded in when the vehicle is locked. When
you switch on the ignition, the exterior mir-
rors fold out again.
If the function is activated and you fold in the
exterior mirrors using the button on the door
(Y page 73), the exterior mirrors do not fold
out automatically. The exterior mirrors can
then only be folded out using the button on
the door.
X Press VorU on the steering wheel
to select the Settings... menu.
X Press the &button to select submenus.
X Press the WorX button to select the
Convenience submenu.
X Press the &button to select Fold in
mirrors when locking.
X Press the WorX button to activate
or deactivate the Fold in mirrors when
locking feature.
X Press the &,VorU button to
select a different display. Additional functions menu
In the Additional functions menu, you can:
R activate/deactivate the distance warning
function*
R set DSR (Y page 109)
R prime/deactivate tow-away protec-
tion* (Y page 109)
R prime/deactivate the interior motion sen-
sor* (Y page 110) Activating/deactivating the distance
warning function* This function is only available with Dis-
tronic* (Y
page 119).
X Press VorU on the steering wheel
to select the Additional functions menu.
X If the Distance warning function is not
displayed, press the &or* button
to select the Distance warning system.
X Press the WorX button to activate
or deactivate the Distance warning sys-
tem.
When the distance warning function is acti-
vated, the Äsymbol is shown in the
lower multi-function display.
X Press &, VorU to select a dif-
ferent display.
Setting DSR The
DSR Speed function allows you to set the
threshold speed (vehicle speed for driving
downhill) of the DSR (Y page 113) to a value
between 4 km/h and 18 km/h. The adjust-
ment is carried out in increments of 2 km/h.
X Press VorU on the steering wheel
to select the Additional functions menu.
X If the DSR Speed function is not displayed,
press the &or* button to select the
DSR.
X Press the WorX button to set the
desired threshold speed.
X Press &, VorU to select a dif-
ferent display.
Priming/deactivating tow-away protec-
tion* If you deactivate
Tow-away protection, it
will not be primed when you next lock the
vehicle. On-board computer
109Controls
* optional
X164_AKB; 2; 3, en-GB
wobuchh,
Version: 2.11.8.1 2009-03-31T14:14:58+02:00 - Seite 109 Z
Dateiname: 6515431202_buchblock.pdf; erzeugt am 01. Apr 2009 00:17:17; WK
Page 134 of 309
X
Start the engine.
X Turn selector wheel :clockwise.
The vehicle is raised.
or
X Turn selector wheel ;anti-clockwise.
The vehicle is lowered.
Indicator lamps =for the desired off-road
level flash:
R Off-road level 1: the lower indicator lamp
flashes
R Off-road level 2: the lower and centre indi-
cator lamps flash
R Off-road level 3: all three indicator lamps
flash
The vehicle is being adjusted to the off-road
level selected. As soon as an off-road level is
reached, the corresponding indicator lamp
stops flashing and lights up constantly.
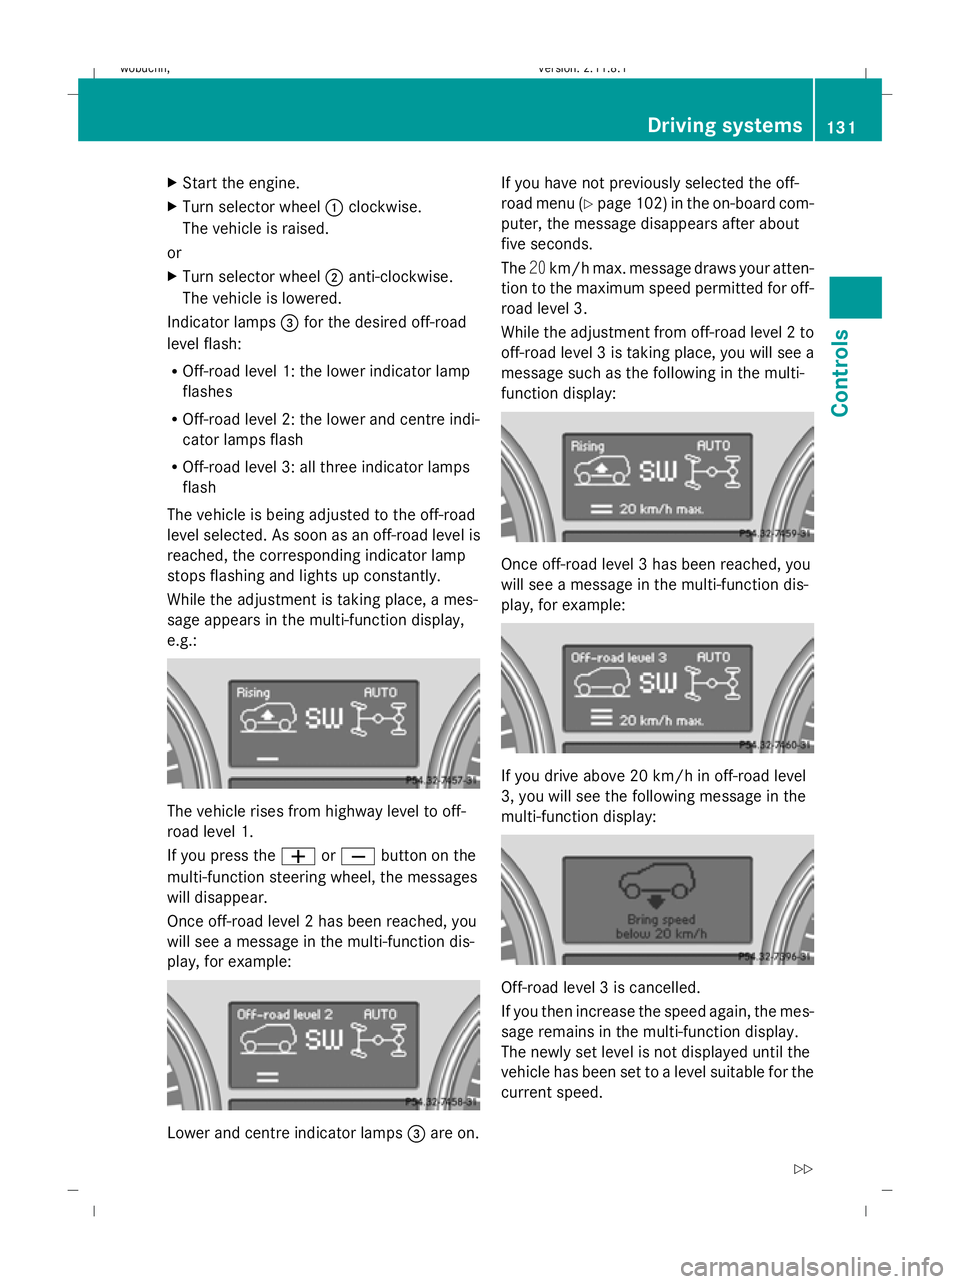
While the adjustment is taking place, a mes-
sage appears in the multi-function display,
e.g.: The vehicle rises from highway level to off-
road level 1.
If you press the
WorX button on the
multi-function steering wheel, the messages
will disappear.
Once off-road level 2 has been reached, you
will see a message in the multi-function dis-
play, for example: Lower and centre indicator lamps
=are on. If you have not previously selected the off-
road menu (Y
page 102) in the on-board com-
puter, the message disappears after about
five seconds.
The 20km/h max. message draws your atten-
tion to the maximum speed permitted for off-
road level 3.
While the adjustment from off-road level 2 to
off-road level 3 is taking place, you will see a
message such as the following in the multi-
function display: Once off-road level 3 has been reached, you
will see a message in the multi-function dis-
play, for example:
If you drive above 20 km/h in off-road level
3, you will see the following message in the
multi-function display:
Off-road level 3 is cancelled.
If you then increase the speed again, the mes-
sage remains in the multi-function display.
The newly set level is not displayed until the
vehicle has been set to a level suitable for the
current speed. Driving systems
131Controls
X164_AKB; 2; 3, en-GB
wobuchh, Version: 2.11.8.1 2009-03-31T14:14:58+02:00 - Seite 131 Z
Dateiname: 6515431202_buchblock.pdf; erzeugt am 01. Apr 2009 00:17:25; WK
Page 136 of 309

If one or more indicator lamps
=are on:
X Turn the selector wheel anti-clockwise ;
until all indicator lamps =that are lit start
to flash.
The vehicle is lowered to highway level. As
soon as the next lowest level is reached,
the indicator lamp stops flashing and goes
out.
While the adjustment is taking place, a mes-
sage appears in the multi-function display,
e.g.: If you press the
WorX button on the
multi-function steering wheel, the messages
will disappear.
Once highway level has been reached, all indi-
cator lamps =go out. You will see a message
in the multi-function display, for example: If you have not previously selected the off-
road menu (Y
page 102) in the on-board com-
puter, the message disappears after about
five seconds.
The vehicle automatically selects highway
level if you are driving at a speed above
115 km/h or if you drive at between
100 km/h and 115 km/h for around 20 sec-
onds. Depending on the ADS basic setting
(Y page 129), the vehicle is lowered to high-
speed level at high speeds. PARKTRONIC*
G
Risk of accident
PARKTRONIC is only an aid and may not
detect all obstacles. It is not a substitute for
attentive driving.
You are always responsible for safety and
must continue to pay attention to your imme-
diate surroundings when parking and
manoeuvring. You could otherwise endanger
yourself and others. G
Risk of injury
Make sure that no persons or animals are in
the manoeuvring range. Otherwise, they
could be injured.
PARKTRONIC is an electronic parking aid
using ultrasound. It indicates visually and
audibly the distance between your vehicle
and an object.
PARKTRONIC is activated automatically when
you:
R switch on the ignition
R release the parking brake
R shift the automatic transmission to D,Ror
N
PARKTRONIC is deactivated at speeds above
18 km/h. It is reactivated at lower speeds.
PARKTRONIC monitors the area around your
vehicle using six sensors in the front bumper
and four sensors in the rear bumper. :
Example: sensors in the front bumper,
left-hand side Driving systems
133Controls
* optional
X164_AKB; 2; 3, en-GB
wobuchh,
Version: 2.11.8.1 2009-03-31T14:14:58+02:00 - Seite 133 Z
Dateiname: 6515431202_buchblock.pdf; erzeugt am 01. Apr 2009 00:17:26; WK