2008 NISSAN TIIDA check engine
[x] Cancel search: check enginePage 1759 of 2771
EM-82
< SERVICE INFORMATION >
CYLINDER BLOCK
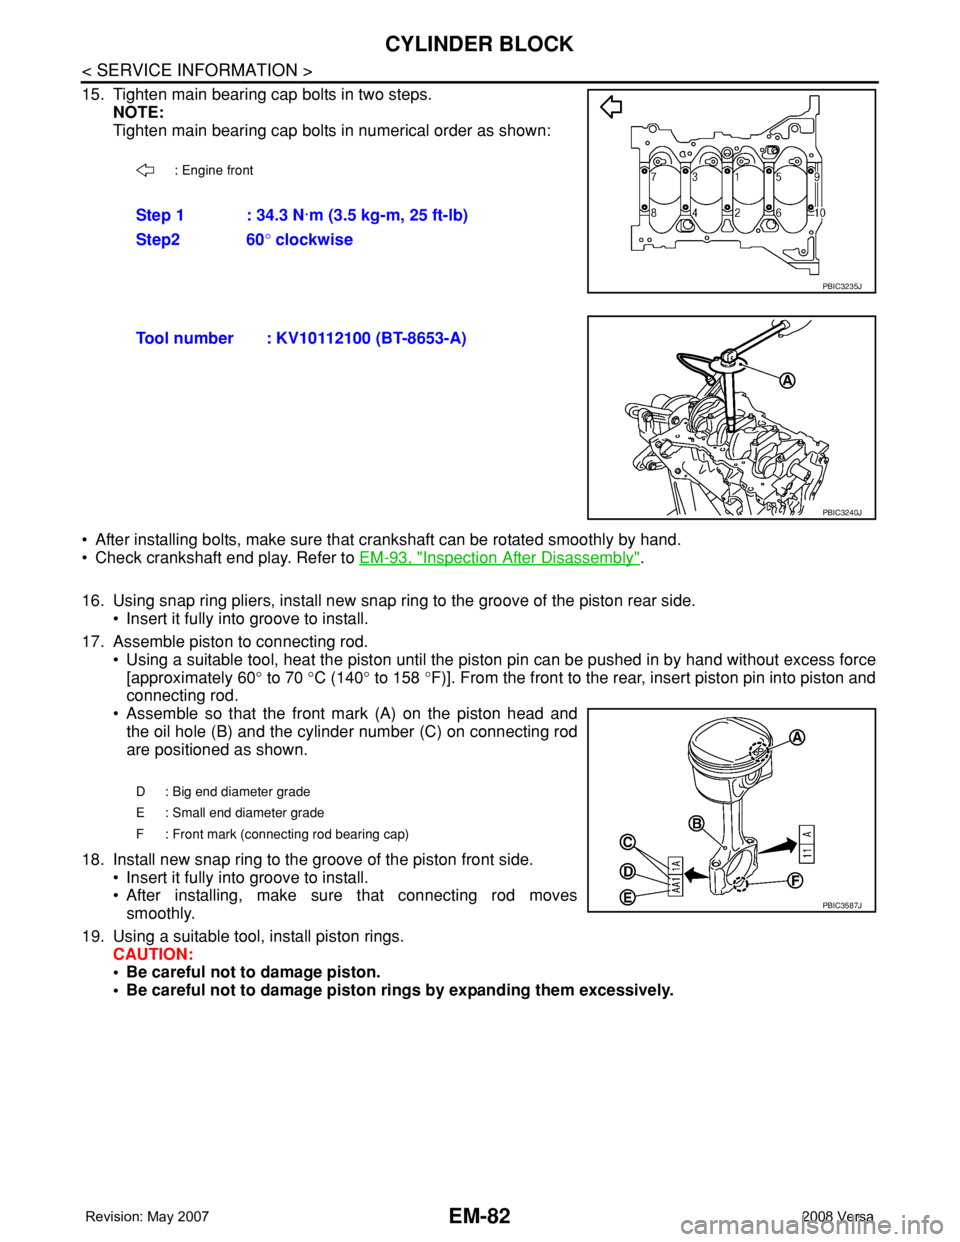
15. Tighten main bearing cap bolts in two steps.
NOTE:
Tighten main bearing cap bolts in numerical order as shown:
• After installing bolts, make sure that crankshaft can be rotated smoothly by hand.
• Check crankshaft end play. Refer to EM-93, "
Inspection After Disassembly".
16. Using snap ring pliers, install new snap ring to the groove of the piston rear side.
• Insert it fully into groove to install.
17. Assemble piston to connecting rod.
• Using a suitable tool, heat the piston until the piston pin can be pushed in by hand without excess force
[approximately 60° to 70 °C (140° to 158 °F)]. From the front to the rear, insert piston pin into piston and
connecting rod.
• Assemble so that the front mark (A) on the piston head and
the oil hole (B) and the cylinder number (C) on connecting rod
are positioned as shown.
18. Install new snap ring to the groove of the piston front side.
• Insert it fully into groove to install.
• After installing, make sure that connecting rod moves
smoothly.
19. Using a suitable tool, install piston rings.
CAUTION:
• Be careful not to damage piston.
• Be careful not to damage piston rings by expanding them excessively.
: Engine front
Step 1 : 34.3 N·m (3.5 kg-m, 25 ft-lb)
Step2 60° clockwise
PBIC3235J
Tool number : KV10112100 (BT-8653-A)
PBIC3240J
D : Big end diameter grade
E : Small end diameter grade
F : Front mark (connecting rod bearing cap)
PBIC3587J
Page 1760 of 2771
CYLINDER BLOCK
EM-83
< SERVICE INFORMATION >
C
D
E
F
G
H
I
J
K
L
MA
EM
N
P O
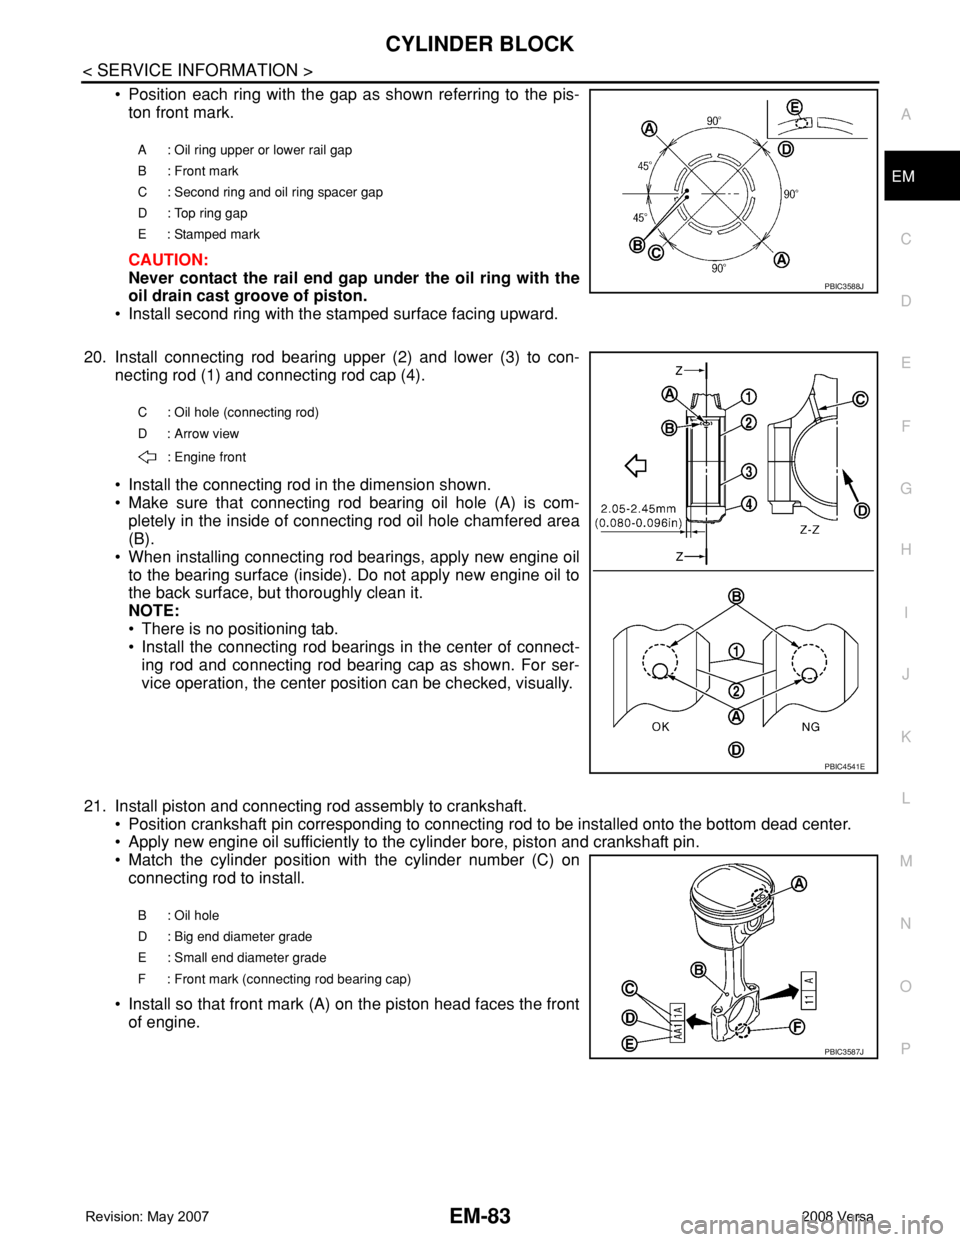
• Position each ring with the gap as shown referring to the pis-
ton front mark.
CAUTION:
Never contact the rail end gap under the oil ring with the
oil drain cast groove of piston.
• Install second ring with the stamped surface facing upward.
20. Install connecting rod bearing upper (2) and lower (3) to con-
necting rod (1) and connecting rod cap (4).
• Install the connecting rod in the dimension shown.
• Make sure that connecting rod bearing oil hole (A) is com-
pletely in the inside of connecting rod oil hole chamfered area
(B).
• When installing connecting rod bearings, apply new engine oil
to the bearing surface (inside). Do not apply new engine oil to
the back surface, but thoroughly clean it.
NOTE:
• There is no positioning tab.
• Install the connecting rod bearings in the center of connect-
ing rod and connecting rod bearing cap as shown. For ser-
vice operation, the center position can be checked, visually.
21. Install piston and connecting rod assembly to crankshaft.
• Position crankshaft pin corresponding to connecting rod to be installed onto the bottom dead center.
• Apply new engine oil sufficiently to the cylinder bore, piston and crankshaft pin.
• Match the cylinder position with the cylinder number (C) on
connecting rod to install.
• Install so that front mark (A) on the piston head faces the front
of engine.
A : Oil ring upper or lower rail gap
B : Front mark
C : Second ring and oil ring spacer gap
D : Top ring gap
E : Stamped mark
PBIC3588J
C : Oil hole (connecting rod)
D : Arrow view
: Engine front
PBIC4541E
B : Oil hole
D : Big end diameter grade
E : Small end diameter grade
F : Front mark (connecting rod bearing cap)
PBIC3587J
Page 1761 of 2771
![NISSAN TIIDA 2008 Service Repair Manual EM-84
< SERVICE INFORMATION >
CYLINDER BLOCK
• Using a piston ring compressor [SST: EM03470000 (J-8037)]
(A) or suitable tool, install piston with the front mark on the pis-
ton head facing the fron NISSAN TIIDA 2008 Service Repair Manual EM-84
< SERVICE INFORMATION >
CYLINDER BLOCK
• Using a piston ring compressor [SST: EM03470000 (J-8037)]
(A) or suitable tool, install piston with the front mark on the pis-
ton head facing the fron](/manual-img/5/57399/w960_57399-1760.png)
EM-84
< SERVICE INFORMATION >
CYLINDER BLOCK
• Using a piston ring compressor [SST: EM03470000 (J-8037)]
(A) or suitable tool, install piston with the front mark on the pis-
ton head facing the front of the engine.
CAUTION:
Be careful not to damage the cylinder wall and crankshaft
pin, resulting from an interference of the connecting rod
big end.
22. Install connecting rod cap.
• Match the stamped cylinder number marks (C) on connecting
rod with those on connecting rod cap to install.
23. Tighten connecting rod bolt with the following procedure:
CAUTION:
• Make sure that there is no gap in the thrust surface (A) of
the joint between connecting rod (1) and connecting rod
bearing cap (2) and that these parts are in the correct
position. And then, tighten the connecting rod bolts.
• If the connecting rod bolts are reused, measure the outer
diameter. Refer to EM-93, "
Inspection After Disassembly".
24. Apply new engine oil to the threads and seats of connecting rod
bolts.
25. Tighten bolts in three steps
• After tightening connecting rod bolt, make sure that crankshaft rotates smoothly.
• Check the connecting rod side clearance. Refer to EM-93, "
Inspection After Disassembly".
26. Install oil pan (upper). Refer to EM-24
.
NOTE:
Install the rear oil seal after installing the oil pan (upper).
27. Install rear oil seal. Refer to EM-24
.
28. Install flywheel (M/T models) or drive plate (1) (A/T or CVT mod-
els).
• Secure crankshaft using Tool. (A), and tighten bolts crosswise
over several times.
NOTE:
A/T model shown CVT and M/T similar.
PBIC3244J
A : Front mark (piston)
B : Oil hole
D : Big end diameter grade
E : Small end diameter grade
F : Front mark (connecting rod bearing cap)
PBIC3587J
Step 1 : 27.4 N·m (2.8 kg-m, 20 ft-lb)
Step 2 : 0 N·m (0 kg-m, 0 ft-lb)
Step 3 : 19.6 N·m (2.0 kg-m, 14 ft-lb)
Tool number : KV11105210 (J-44716)PBIC3510J
PBIC3998E
Page 1763 of 2771
EM-86
< SERVICE INFORMATION >
CYLINDER BLOCK
• The identification grade stamped on each part is the grade for the dimension measured in new condition.
This grade cannot apply to reused parts.
• For reused or repaired parts, measure the dimension accurately. Determine the grade by comparing the
measurement with the values of each selection table.
• For details of the measurement method of each part, the reuse standards and the selection method of the
selective fitting parts, follow the applicable procedures.
HOW TO SELECT PISTON
When New Cylinder Block is Used
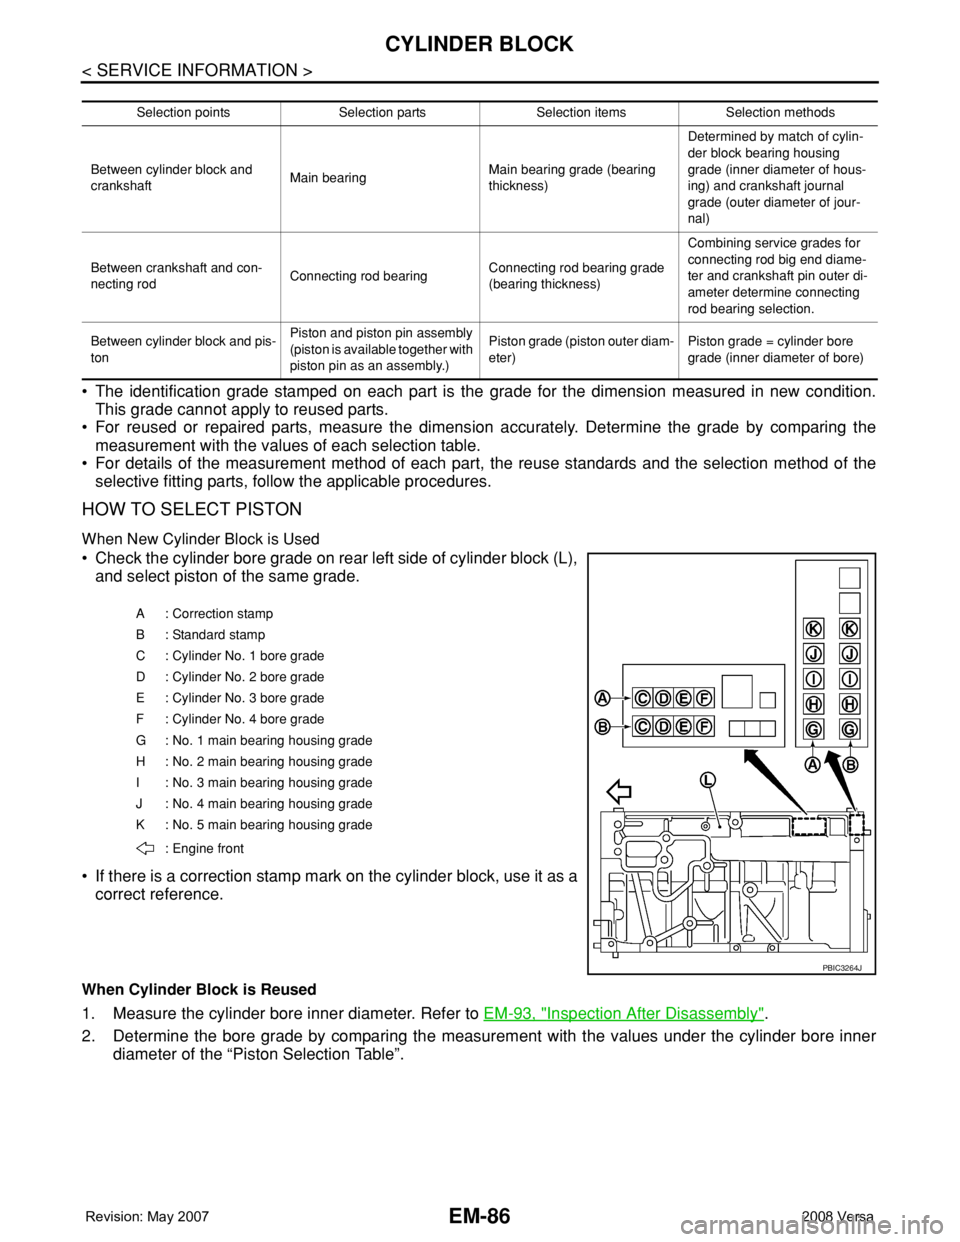
• Check the cylinder bore grade on rear left side of cylinder block (L),
and select piston of the same grade.
• If there is a correction stamp mark on the cylinder block, use it as a
correct reference.
When Cylinder Block is Reused
1. Measure the cylinder bore inner diameter. Refer to EM-93, "Inspection After Disassembly".
2. Determine the bore grade by comparing the measurement with the values under the cylinder bore inner
diameter of the “Piston Selection Table”.
Selection points Selection parts Selection items Selection methods
Between cylinder block and
crankshaftMain bearingMain bearing grade (bearing
thickness)Determined by match of cylin-
der block bearing housing
grade (inner diameter of hous-
ing) and crankshaft journal
grade (outer diameter of jour-
nal)
Between crankshaft and con-
necting rodConnecting rod bearingConnecting rod bearing grade
(bearing thickness)Combining service grades for
connecting rod big end diame-
ter and crankshaft pin outer di-
ameter determine connecting
rod bearing selection.
Between cylinder block and pis-
tonPiston and piston pin assembly
(piston is available together with
piston pin as an assembly.)Piston grade (piston outer diam-
eter)Piston grade = cylinder bore
grade (inner diameter of bore)
A : Correction stamp
B : Standard stamp
C : Cylinder No. 1 bore grade
D : Cylinder No. 2 bore grade
E : Cylinder No. 3 bore grade
F : Cylinder No. 4 bore grade
G : No. 1 main bearing housing grade
H : No. 2 main bearing housing grade
I : No. 3 main bearing housing grade
J : No. 4 main bearing housing grade
K : No. 5 main bearing housing grade
: Engine front
PBIC3264J
Page 1792 of 2771
EX-1
ENGINE
C
D
E
F
G
H
I
J
K
L
M
SECTION EX
A
EX
N
O
P
CONTENTS
EXHAUST SYSTEM
SERVICE INFORMATION ............................2
PRECAUTIONS ...................................................2
Precaution for Supplemental Restraint System
(SRS) "AIR BAG" and "SEAT BELT PRE-TEN-
SIONER" ...................................................................
2
PREPARATION ...................................................3
Special Service Tool .................................................3
Commercial Service Tool .........................................3
EXHAUST SYSTEM ...........................................4
Checking Exhaust System ........................................4
Component ...............................................................4
Removal and Installation ..........................................4
Page 1796 of 2771
EXHAUST SYSTEM
EX-5
< SERVICE INFORMATION >
C
D
E
F
G
H
I
J
K
L
MA
EX
N
P O
• Be sure to use genuine NISSAN exhaust system parts or equivalents which are specially designed
for heat resistance, corrosion resistance and shape.
• Perform the operation with the exhaust system fully cooled down because the system will be hot
just after the engine stops.
• Be careful not to cut your hand on heat insulator edge.
1. Disconnect harness connector of heated oxygen sensor 2.
• Using Tool, remove heated oxygen sensor 2.
CAUTION:
Be careful not to damage heated oxygen sensor 2.
a.2. Disconnect each joint and mounting rubber.
INSTALLATION
Installation is in the reverse order of removal.
CAUTION:
• Always replace exhaust gaskets and seal bearings with new ones when installing.
• Discard any heated oxygen sensor 2 which has been dropped from a height of more than 0.5 m (19.7
in) onto a hard surface such as a concrete floor; use a new one.
• Before installing a new heated oxygen sensor 2, clean exhaust system threads using the heated oxy-
gen sensor thread cleaner and apply anti-seize lubricant (commercial service tool).
• Do not over tighten heated oxygen sensor 2. Doing so may cause damage to the heated oxygen sen-
sor 2, resulting in the “MIL” coming on.
• Remove deposits from the sealing surface of each connection. Connect them securely to avoid
exhaust leakage.
• Temporarily tighten nuts on the exhaust manifold side and bolts on the vehicle side. Check each part
for unusual interference, and then tighten them to the specified torque.
• When installing each mounting rubber, avoid twisting or unusual extension in up/down and right/left
directions.
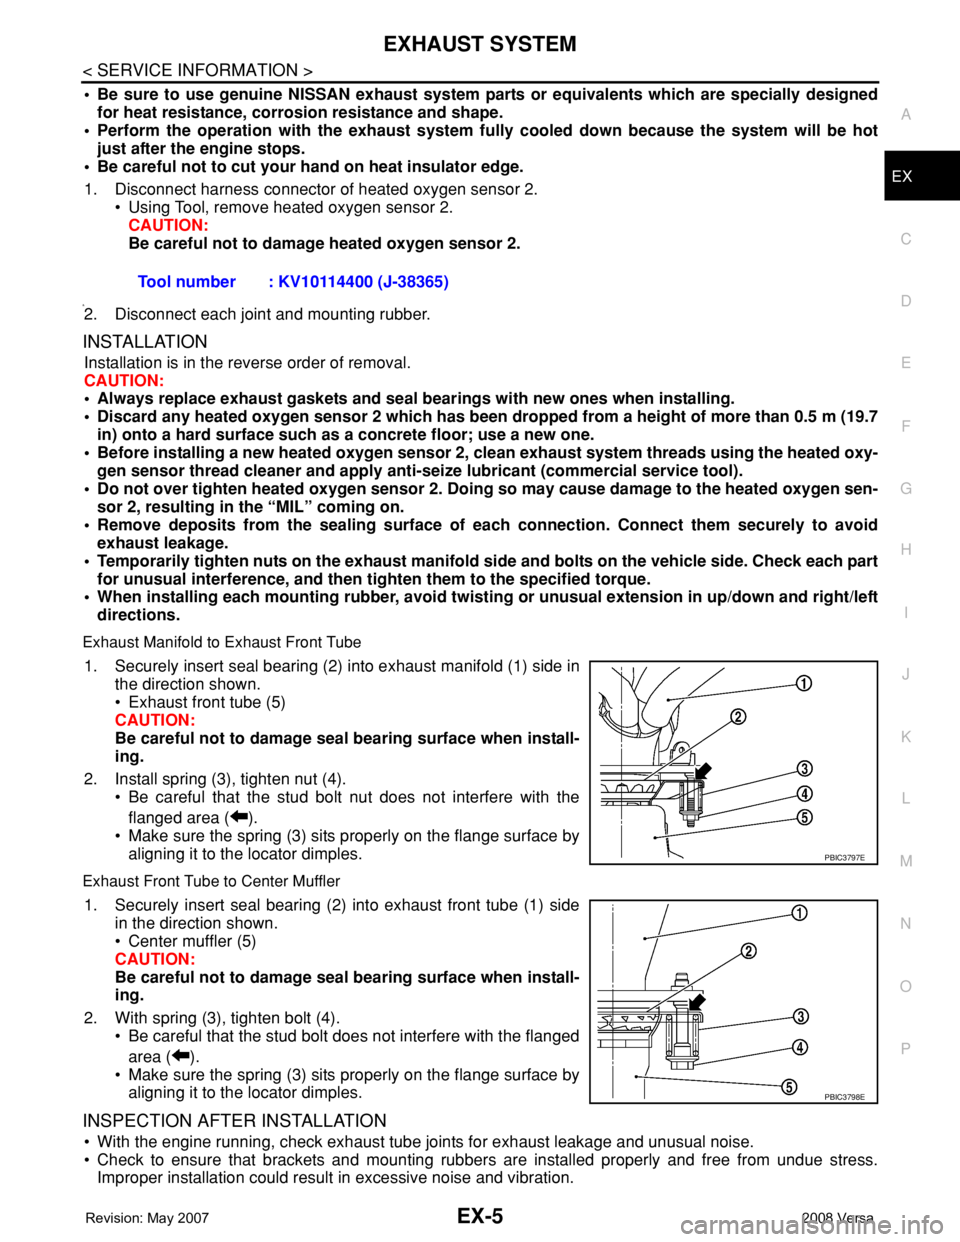
Exhaust Manifold to Exhaust Front Tube
1. Securely insert seal bearing (2) into exhaust manifold (1) side in
the direction shown.
• Exhaust front tube (5)
CAUTION:
Be careful not to damage seal bearing surface when install-
ing.
2. Install spring (3), tighten nut (4).
• Be careful that the stud bolt nut does not interfere with the
flanged area ( ).
• Make sure the spring (3) sits properly on the flange surface by
aligning it to the locator dimples.
Exhaust Front Tube to Center Muffler
1. Securely insert seal bearing (2) into exhaust front tube (1) side
in the direction shown.
• Center muffler (5)
CAUTION:
Be careful not to damage seal bearing surface when install-
ing.
2. With spring (3), tighten bolt (4).
• Be careful that the stud bolt does not interfere with the flanged
area ( ).
• Make sure the spring (3) sits properly on the flange surface by
aligning it to the locator dimples.
INSPECTION AFTER INSTALLATION
• With the engine running, check exhaust tube joints for exhaust leakage and unusual noise.
• Check to ensure that brackets and mounting rubbers are installed properly and free from undue stress.
Improper installation could result in excessive noise and vibration.Tool number : KV10114400 (J-38365)
PBIC3797E
PBIC3798E
Page 1821 of 2771
FL-1
ENGINE
C
D
E
F
G
H
I
J
K
L
M
SECTION FL
A
FL
N
O
P
CONTENTS
FUEL SYSTEM
SERVICE INFORMATION ............................2
PRECAUTIONS ...................................................2
Precaution for Supplemental Restraint System
(SRS) "AIR BAG" and "SEAT BELT PRE-TEN-
SIONER" ...................................................................
2
PREPARATION ...................................................3
Special Service Tool .................................................3
Commercial Service Tool ..........................................3
FUEL SYSTEM ....................................................4
Checking Fuel Line ...................................................4
General Precaution ...................................................4
FUEL LEVEL SENSOR UNIT, FUEL FILTER
AND FUEL PUMP ASSEMBLY .........................
5
Component ...............................................................5
Removal and Installation ..........................................5
FUEL TANK .......................................................9
Component ...............................................................9
Removal and Installation ..........................................9
SERVICE DATA AND SPECIFICATIONS
(SDS) .................................................................
14
Standard and Limit ..................................................14
Page 1824 of 2771
FL-4
< SERVICE INFORMATION >
FUEL SYSTEM
FUEL SYSTEM
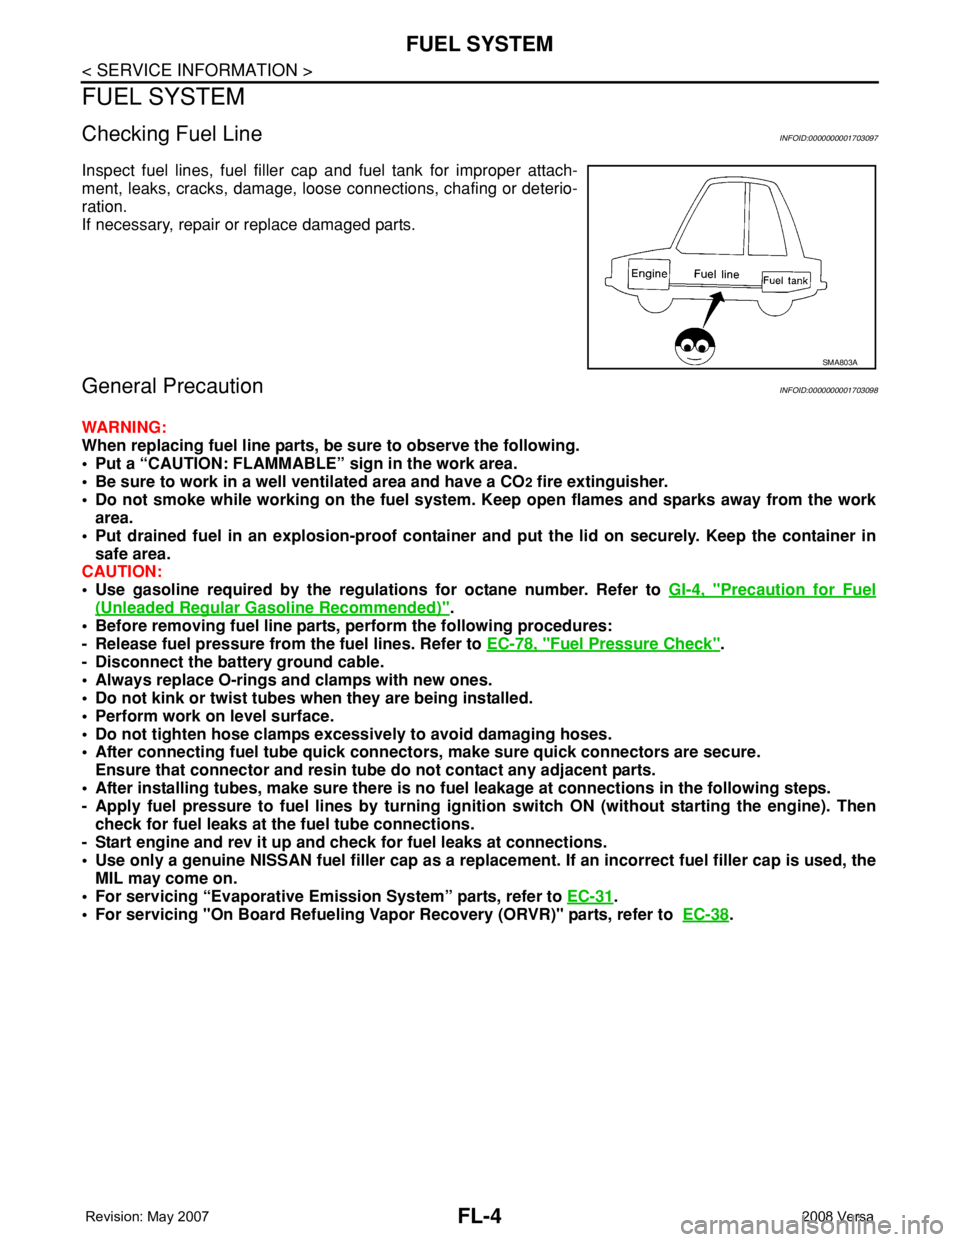
Checking Fuel LineINFOID:0000000001703097
Inspect fuel lines, fuel filler cap and fuel tank for improper attach-
ment, leaks, cracks, damage, loose connections, chafing or deterio-
ration.
If necessary, repair or replace damaged parts.
General PrecautionINFOID:0000000001703098
WARNING:
When replacing fuel line parts, be sure to observe the following.
• Put a “CAUTION: FLAMMABLE” sign in the work area.
• Be sure to work in a well ventilated area and have a CO
2 fire extinguisher.
• Do not smoke while working on the fuel system. Keep open flames and sparks away from the work
area.
• Put drained fuel in an explosion-proof container and put the lid on securely. Keep the container in
safe area.
CAUTION:
• Use gasoline required by the regulations for octane number. Refer to GI-4, "
Precaution for Fuel
(Unleaded Regular Gasoline Recommended)".
• Before removing fuel line parts, perform the following procedures:
- Release fuel pressure from the fuel lines. Refer to EC-78, "
Fuel Pressure Check".
- Disconnect the battery ground cable.
• Always replace O-rings and clamps with new ones.
• Do not kink or twist tubes when they are being installed.
• Perform work on level surface.
• Do not tighten hose clamps excessively to avoid damaging hoses.
• After connecting fuel tube quick connectors, make sure quick connectors are secure.
Ensure that connector and resin tube do not contact any adjacent parts.
• After installing tubes, make sure there is no fuel leakage at connections in the following steps.
- Apply fuel pressure to fuel lines by turning ignition switch ON (without starting the engine). Then
check for fuel leaks at the fuel tube connections.
- Start engine and rev it up and check for fuel leaks at connections.
• Use only a genuine NISSAN fuel filler cap as a replacement. If an incorrect fuel filler cap is used, the
MIL may come on.
• For servicing “Evaporative Emission System” parts, refer to EC-31
.
• For servicing "On Board Refueling Vapor Recovery (ORVR)" parts, refer to EC-38
.
SMA803A