Page 3683 of 5121
BCM (BODY CONTROL MODULE)
PWC-53
< ECU DIAGNOSIS >
C
D
E
F
G
H
I
J
L
MA
B
PWC
N
O
P
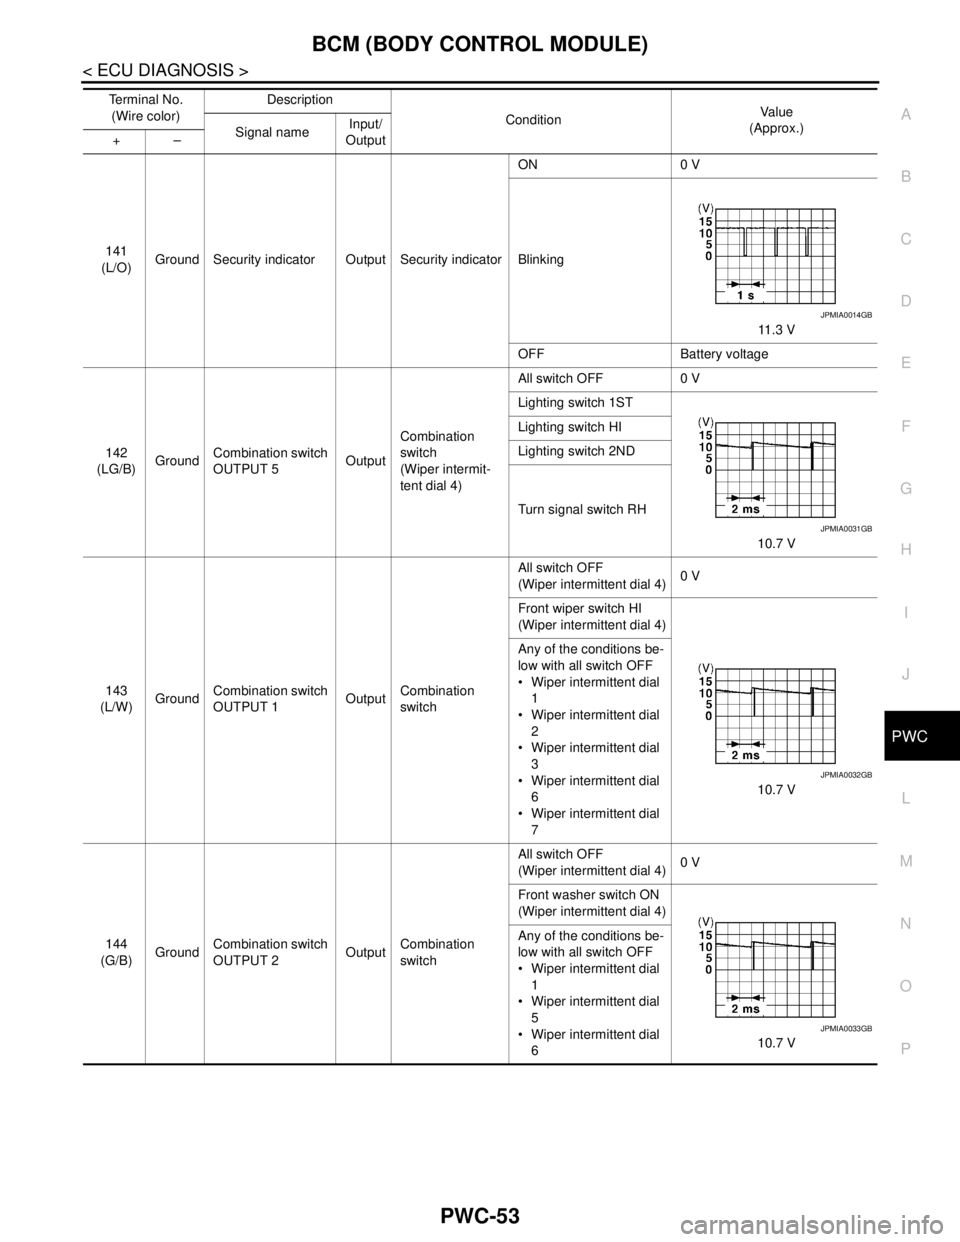
141
(L/O)Ground Security indicator Output Security indicatorON 0 V
Blinking
11.3 V
OFF Battery voltage
142
(LG/B)GroundCombination switch
OUTPUT 5OutputCombination
switch
(Wiper intermit-
tent dial 4)All switch OFF 0 V
Lighting switch 1ST
10.7 V Lighting switch HI
Lighting switch 2ND
Turn signal switch RH
143
(L/W)GroundCombination switch
OUTPUT 1OutputCombination
switchAll switch OFF
(Wiper intermittent dial 4)0 V
Front wiper switch HI
(Wiper intermittent dial 4)
10.7 V Any of the conditions be-
low with all switch OFF
Wiper intermittent dial
1
Wiper intermittent dial
2
Wiper intermittent dial
3
Wiper intermittent dial
6
Wiper intermittent dial
7
144
(G/B)GroundCombination switch
OUTPUT 2OutputCombination
switchAll switch OFF
(Wiper intermittent dial 4)0 V
Front washer switch ON
(Wiper intermittent dial 4)
10.7 V Any of the conditions be-
low with all switch OFF
Wiper intermittent dial
1
Wiper intermittent dial
5
Wiper intermittent dial
6 Te r m i n a l N o .
(Wire color)Description
ConditionVa l u e
(Approx.)
Signal nameInput/
Output +–
JPMIA0014GB
JPMIA0031GB
JPMIA0032GB
JPMIA0033GB
Page 3740 of 5121
DIAGNOSIS SYSTEM (BCM)
RF-9
< FUNCTION DIAGNOSIS >
C
D
E
F
G
H
I
J
L
MA
B
RF
N
O
P
DIAGNOSIS SYSTEM (BCM)
COMMON ITEM
COMMON ITEM : CONSULT-III Function (BCM - COMMON ITEM)INFOID:0000000003812848
APPLICATION ITEM
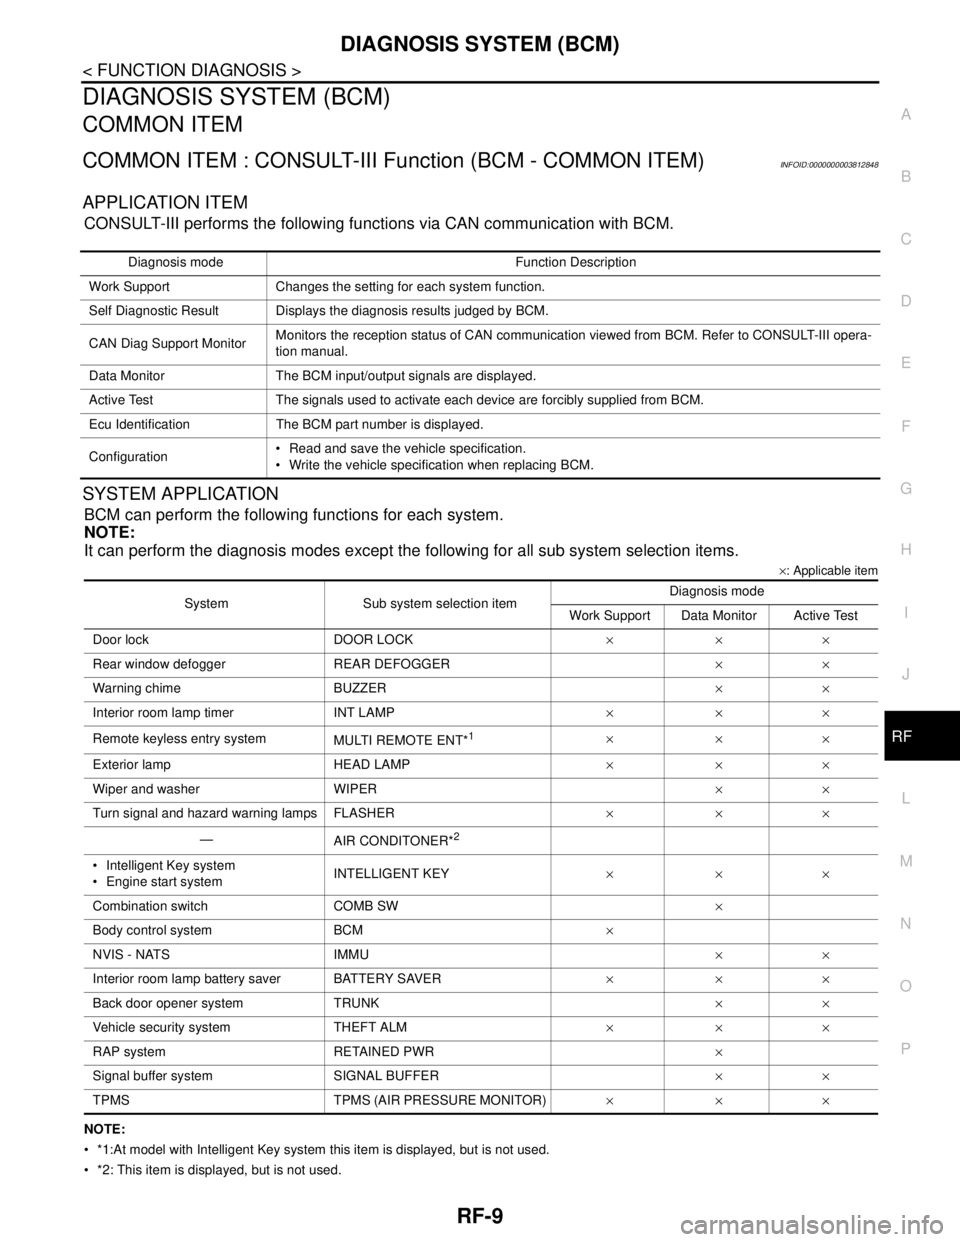
CONSULT-III performs the following functions via CAN communication with BCM.
SYSTEM APPLICATION
BCM can perform the following functions for each system.
NOTE:
It can perform the diagnosis modes except the following for all sub system selection items.
×: Applicable item
NOTE:
*1:At model with Intelligent Key system this item is displayed, but is not used.
*2: This item is displayed, but is not used. Diagnosis mode Function Description
Work Support Changes the setting for each system function.
Self Diagnostic Result Displays the diagnosis results judged by BCM.
CAN Diag Support MonitorMonitors the reception status of CAN communication viewed from BCM. Refer to CONSULT-III opera-
tion manual.
Data Monitor The BCM input/output signals are displayed.
Active Test The signals used to activate each device are forcibly supplied from BCM.
Ecu Identification The BCM part number is displayed.
Configuration Read and save the vehicle specification.
Write the vehicle specification when replacing BCM.
System Sub system selection itemDiagnosis mode
Work Support Data Monitor Active Test
Door lock DOOR LOCK×××
Rear window defogger REAR DEFOGGER××
Warning chime BUZZER××
Interior room lamp timer INT LAMP×××
Remote keyless entry system
MULTI REMOTE ENT*
1×××
Exterior lamp HEAD LAMP×××
Wiper and washer WIPER××
Turn signal and hazard warning lamps FLASHER×××
—
AIR CONDITONER*
2
Intelligent Key system
Engine start systemINTELLIGENT KEY×××
Combination switch COMB SW×
Body control system BCM×
NVIS - NATS IMMU××
Interior room lamp battery saver BATTERY SAVER×××
Back door opener system TRUNK××
Vehicle security system THEFT ALM×××
RAP system RETAINED PWR×
Signal buffer system SIGNAL BUFFER××
TPMS TPMS (AIR PRESSURE MONITOR)×××
Page 3751 of 5121

RF-20
< ECU DIAGNOSIS >
BCM (BODY CONTROL MODULE)
ECU DIAGNOSIS
BCM (BODY CONTROL MODULE)
Reference ValueINFOID:0000000003888227
VALUES ON THE DIAGNOSIS TOOL
CONSULT-III MONITOR ITEM
Monitor Item Condition Value/Status
FR WIPER HIOther than front wiper switch HI Off
Front wiper switch HI On
FR WIPER LOWOther than front wiper switch LO Off
Front wiper switch LO On
FR WASHER SWFront washer switch OFF Off
Front washer switch ON On
FR WIPER INTOther than front wiper switch INT Off
Front wiper switch INT On
FR WIPER STOPFront wiper is not in STOP position Off
Front wiper is in STOP position On
INT VOLUME Wiper intermittent dial is in a dial position 1 - 7 Wiper intermittent dial position
TURN SIGNAL ROther than turn signal switch RH Off
Turn signal switch RH On
TURN SIGNAL LOther than turn signal switch LH Off
Turn signal switch LH On
TAIL LAMP SWOther than lighting switch 1ST and 2ND Off
Lighting switch 1ST or 2ND On
HI BEAM SWOther than lighting switch HI Off
Lighting switch HI On
HEAD LAMP SW 1Other than lighting switch 2ND Off
Lighting switch 2ND On
HEAD LAMP SW 2Other than lighting switch 2ND Off
Lighting switch 2ND On
PASSING SWOther than lighting switch PASS Off
Lighting switch PASS On
AUTO LIGHT SWOther than lighting switch AUTO Off
Lighting switch AUTO On
FR FOG SWFront fog lamp switch OFF Off
Front fog lamp switch ON On
RR FOG SWRear fog lamp switch OFF Off
Rear fog lamp switch ON On
DOOR SW-DRDriver door closed Off
Driver door opened On
DOOR SW-ASPassenger door closed Off
Passenger door opened On
DOOR SW-RRRear RH door closed Off
Rear RH door opened On
Page 3767 of 5121
RF-36
< ECU DIAGNOSIS >
BCM (BODY CONTROL MODULE)
107
(R/W)GroundCombination switch
INPUT 1InputCombination
switch
(Wiper intermit-
tent dial 4)All switch OFF
1.4 V
Turn signal switch LH
1.3 V
Turn signal switch RH
1.3 V
Front wiper switch LO
1.3 V
Front washer switch ON
1.3 V Te r m i n a l N o .
(Wire color)Description
ConditionVa l u e
(Approx.)
Signal nameInput/
Output +–
JPMIA0041GB
JPMIA0037GB
JPMIA0036GB
JPMIA0038GB
JPMIA0039GB
Page 3772 of 5121
BCM (BODY CONTROL MODULE)
RF-41
< ECU DIAGNOSIS >
C
D
E
F
G
H
I
J
L
MA
B
RF
N
O
P
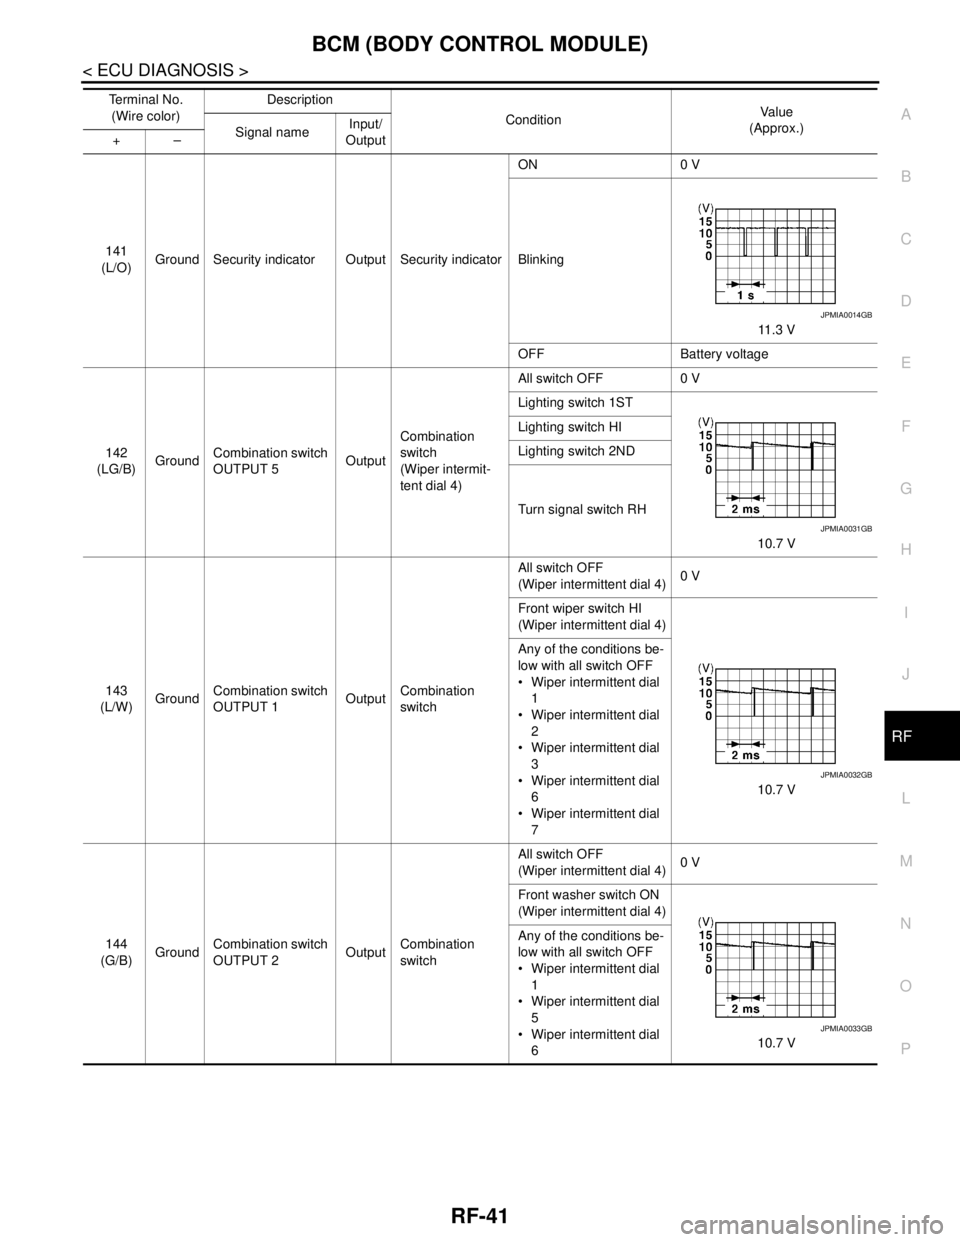
141
(L/O)Ground Security indicator Output Security indicatorON 0 V
Blinking
11.3 V
OFF Battery voltage
142
(LG/B)GroundCombination switch
OUTPUT 5OutputCombination
switch
(Wiper intermit-
tent dial 4)All switch OFF 0 V
Lighting switch 1ST
10.7 V Lighting switch HI
Lighting switch 2ND
Turn signal switch RH
143
(L/W)GroundCombination switch
OUTPUT 1OutputCombination
switchAll switch OFF
(Wiper intermittent dial 4)0 V
Front wiper switch HI
(Wiper intermittent dial 4)
10.7 V Any of the conditions be-
low with all switch OFF
Wiper intermittent dial
1
Wiper intermittent dial
2
Wiper intermittent dial
3
Wiper intermittent dial
6
Wiper intermittent dial
7
144
(G/B)GroundCombination switch
OUTPUT 2OutputCombination
switchAll switch OFF
(Wiper intermittent dial 4)0 V
Front washer switch ON
(Wiper intermittent dial 4)
10.7 V Any of the conditions be-
low with all switch OFF
Wiper intermittent dial
1
Wiper intermittent dial
5
Wiper intermittent dial
6 Te r m i n a l N o .
(Wire color)Description
ConditionVa l u e
(Approx.)
Signal nameInput/
Output +–
JPMIA0014GB
JPMIA0031GB
JPMIA0032GB
JPMIA0033GB
Page 3857 of 5121
FRONT SEAT BELT
SB-5
< ON-VEHICLE REPAIR >
C
D
E
F
G
I
J
K
L
MA
B
SB
N
O
P
The webbing can be pulled out when the angle (A) is 15
degrees or more.
The webbing cannot be pulled out when the angle (B) is 27
degrees or more.
3. If the seat belt assembly dose not operate normally, replace the seat belt assembly.
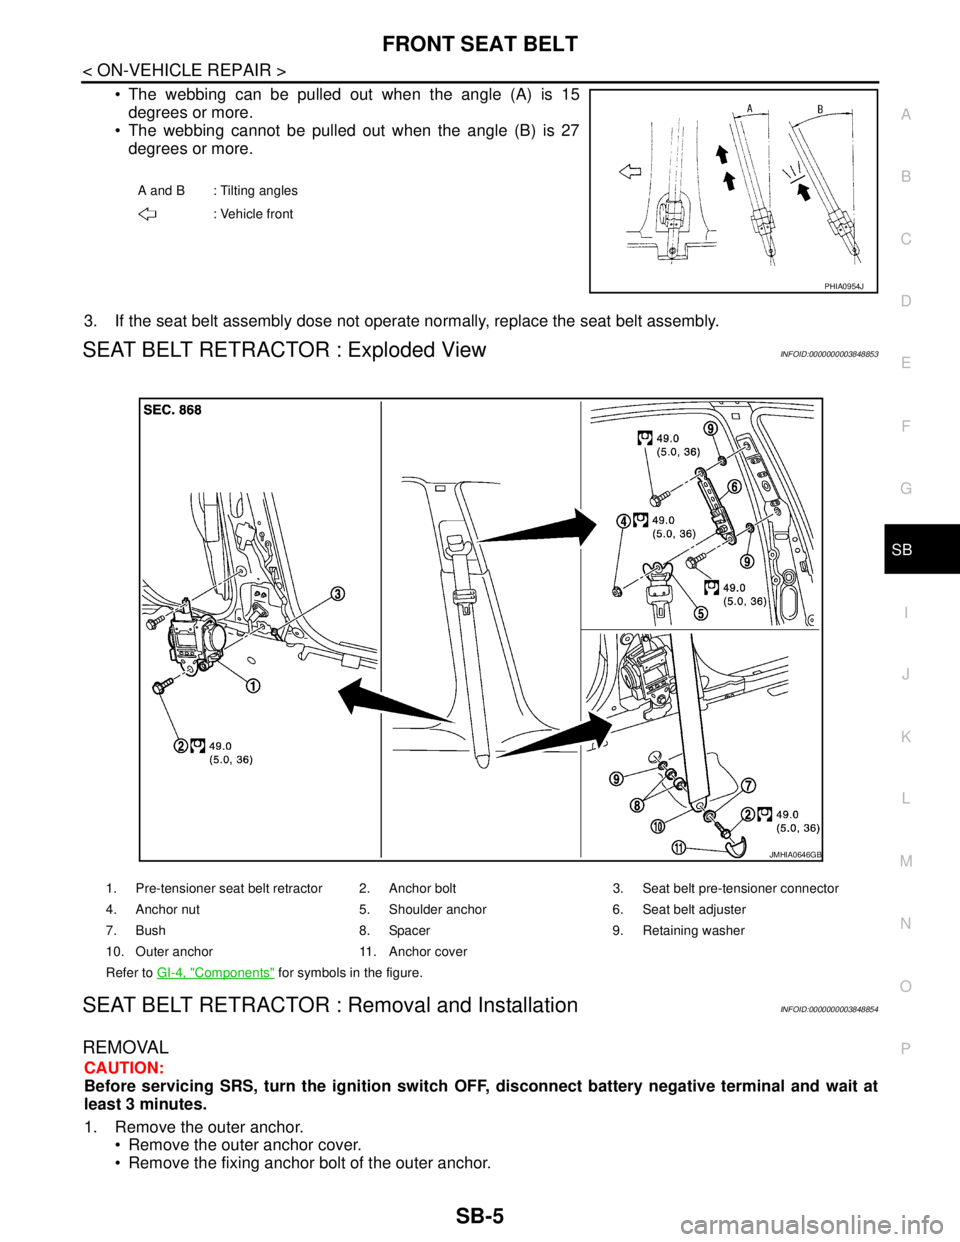
SEAT BELT RETRACTOR : Exploded ViewINFOID:0000000003848853
SEAT BELT RETRACTOR : Removal and InstallationINFOID:0000000003848854
REMOVAL
CAUTION:
Before servicing SRS, turn the ignition switch OFF, disconnect battery negative terminal and wait at
least 3 minutes.
1. Remove the outer anchor.
Remove the outer anchor cover.
Remove the fixing anchor bolt of the outer anchor.
A and B : Tilting angles
: Vehicle front
PHIA0954J
1. Pre-tensioner seat belt retractor 2. Anchor bolt 3. Seat belt pre-tensioner connector
4. Anchor nut 5. Shoulder anchor 6. Seat belt adjuster
7. Bush 8. Spacer 9. Retaining washer
10. Outer anchor 11. Anchor cover
Refer to GI-4, "
Components" for symbols in the figure.
JMHIA0646GB
Page 3859 of 5121
FRONT SEAT BELT
SB-7
< ON-VEHICLE REPAIR >
C
D
E
F
G
I
J
K
L
MA
B
SB
N
O
P
SEAT BELT BUCKLE : Exploded ViewINFOID:0000000003848856
SEAT BELT BUCKLE : Removal and InstallationINFOID:0000000003848857
REMOVAL
Remove the seat belt buckle.
Remove the front seat from vehicle. Refer to SE-92, "
Removal and Installation" (for ease of tool operation in
narrow space).
Disconnect the seat belt buckle harness connector.
Remove the seat belt buckle fixing anchor nut.
INSTALLATION
Install in the reverse order of removal.
1. Seat belt buckle 2. Anchor nut 3. Seat belt buckle harness connector
4. Washer
Refer to GI-4, "
Components" for symbols in the figure.
JMHIA0648GB
Page 3862 of 5121
SB-10
< ON-VEHICLE REPAIR >
REAR SEAT BELT
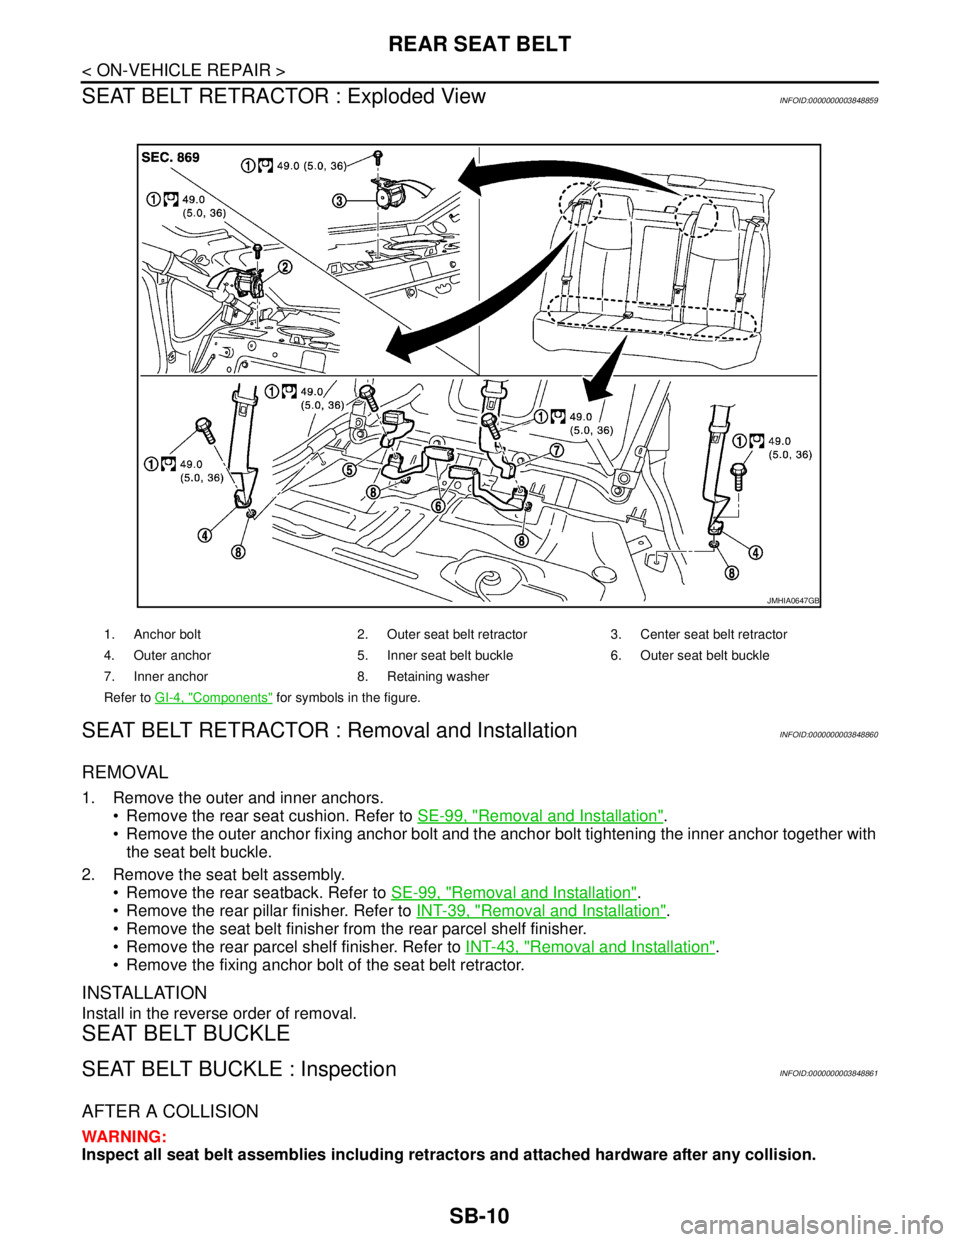
SEAT BELT RETRACTOR : Exploded View
INFOID:0000000003848859
SEAT BELT RETRACTOR : Removal and InstallationINFOID:0000000003848860
REMOVAL
1. Remove the outer and inner anchors.
Remove the rear seat cushion. Refer to SE-99, "
Removal and Installation".
Remove the outer anchor fixing anchor bolt and the anchor bolt tightening the inner anchor together with
the seat belt buckle.
2. Remove the seat belt assembly.
Remove the rear seatback. Refer to SE-99, "
Removal and Installation".
Remove the rear pillar finisher. Refer to INT-39, "
Removal and Installation".
Remove the seat belt finisher from the rear parcel shelf finisher.
Remove the rear parcel shelf finisher. Refer to INT-43, "
Removal and Installation".
Remove the fixing anchor bolt of the seat belt retractor.
INSTALLATION
Install in the reverse order of removal.
SEAT BELT BUCKLE
SEAT BELT BUCKLE : InspectionINFOID:0000000003848861
AFTER A COLLISION
WARNING:
Inspect all seat belt assemblies including retractors and attached hardware after any collision.
1. Anchor bolt 2. Outer seat belt retractor 3. Center seat belt retractor
4. Outer anchor 5. Inner seat belt buckle 6. Outer seat belt buckle
7. Inner anchor 8. Retaining washer
Refer to GI-4, "
Components" for symbols in the figure.
JMHIA0647GB