2008 MERCEDES-BENZ SL ROADSTER lights
[x] Cancel search: lightsPage 46 of 317
Occupant safety
43
R
in the event of ahead-on or rear-en dcolli-
sion if the vehicle decelerates or acceler-
ates rapidly in alongitudinal direction
during the initial stages of the impact
R in certain situation sifthe vehicle over-
turns, and the system determines that it
can provide additional protection
R on the front-passenger side only if the
front-passenger seat is occupied and the
belt tongue is engaged in the buckle
If the belt tensioners are triggered you will
hear abang, which will not cause any harm to
your hearing, and asmall amount of powder
may also be released. The 1warning lamp
lights up. G
Risk of injury
If the seat belt tensioners have been trig-
gered, they provide no additional protec-
tion in the event of another accident.
Therefore, have belt tensioners which have
been triggered replaced at aqualified spe-
cialist workshop.
Comply with safety regulations when dis-
posing of belt tensioners .Any Mercedes-
Ben zService Centr ecan provide details of
these regulations. Airbags Airbag deployment slows down and restricts
the movement of the vehicle occupant.
If the airbags are deployed you will hear a
bang, which will not cause any harm to your
hearing, and
asmall amount of powder may
also be released. The 1warning lamp
lights up.
The SRS/AIRBAG identification indicates the
location of the airbags. G
Risk of injury
Airbags provide additional protection ;they
are not ,however, asubstitute for the seat
belts.
Observe the following notes to reduce the
risk of serious or even fatal injury if an air-
bag is deployed:
R all vehicle occupants —inparticular preg-
nant women —must wear their seat belt
correctly at all times and lean back
against the backrest, which should be
positioned as close to the vertical as pos-
sible. The head restraint must support
the back of the head at about eye level.
R alway ssecure children less than 1.5 0m
tall or under 12 years of age in suitable
child restraint systems. R
all vehicle occupants must select aseat
position that is as far away from the air-
bag as possible. The driver's seat posi-
tion must allow the vehicle to be driven
safely. The driver's chest should be as far
away from the middle of the driver's front
airbag cover as possible.
R move the front-passenger seat as far
back as possible, in particular, if achild
is secured in achild restraint system on
the seat.
R vehicle occupants –inparticular, chil-
dren –must not lean their head on the
area of the window from which ahead/
thorax airbag is deployed.
R rearward-facing child restraint systems
must not be fitted to the front-passenger
seat unless the front-passenger fron tair-
bag has been disabled. The front-
passenger fron tairbag is disabled if a
child restraint system with automatic
child seat recognition is fitted to the
front-passenger seat. The
5 PASSENGER AIRBAG OFF warning
lamp must be constantly lit.
If you secure aforward-facin gchild
restraint system to the front-passenger Safety
230_AKB
;5;4,en-GB
bjanott, Version:2.9.6
2008-04-08T15:09:54+02:0
0-Seite 43 ZDateiname: 6515_3089_02_buchblock.pdf; preflight
Page 52 of 317
Occupant safety
49child in
aforward-facin gchild restraint
system on the front-passenger seat.
The front-passenger fron tairbag is not dis-
abled:
R no child restraint system with automatic
child seat recognition is fitted
R if the 5 PASSENGER AIRBA GOFF
warning lamp on the centre console is
not lit
To draw attention to this danger, ther eisan
appropriate warning sticker on the dash-
board as well as on both sides of the sun
visor on the front-passenger side.
Information about recommended child
restraint systems is available at any
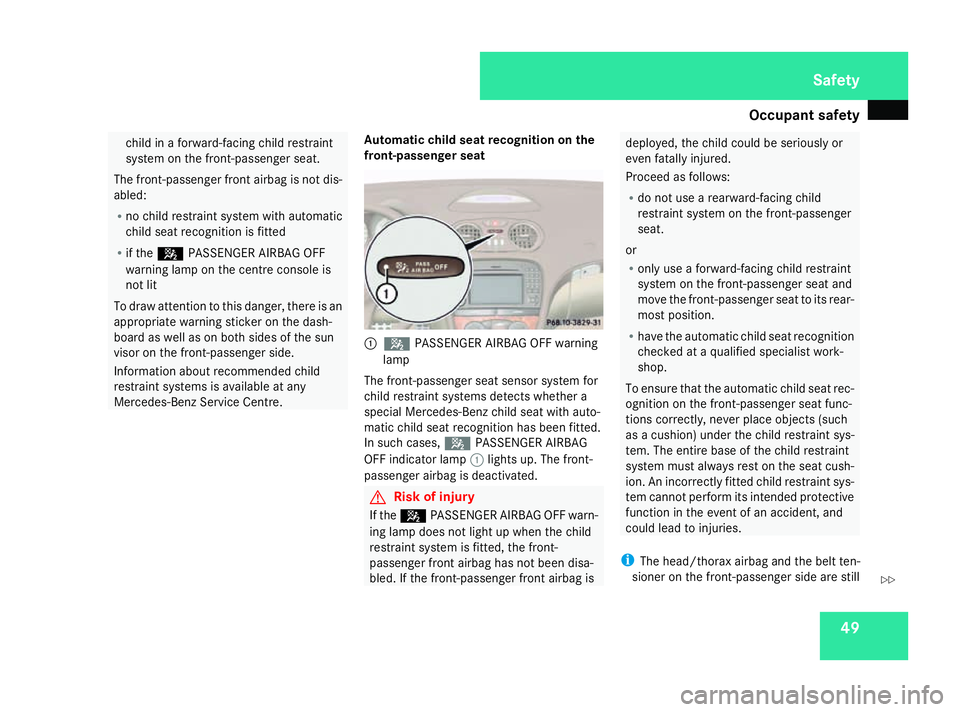
Mercedes-Benz Service Centre. Automatic child seat recognition on the
front-passenger seat 1
5 PASSENGER AIRBAG OFF warning
lamp
The front-passenger seat sensor system for
child restraint systems detectsw hether a
special Mercedes-Benzc hild seat with auto-
matic child seat recognition has been fitted.
In such cases, 5PASSENGER AIRBAG
OFF indicator lamp 1lights up. The front-
passenger airbag is deactivated. G
Risk of injury
If the 5 PASSENGER AIRBAG OFF warn-
ing lamp does not light up when the child
restraint system is fitted, the front-
passenger front airbag has not been disa-
bled. If the front-passenger front airbag is deployed, the child could be seriously or
even fatally injured.
Proceed as follows:
R
do not use arearward-facing child
restraint system on the front-passenger
seat.
or
R only use aforward-facing child restraint
system on the front-passenger seat and
move the front-passenger seat to its rear-
most position.
R have the automatic child seat recognition
checked at aqualified specialist work-
shop.
To ensure that the automatic child seat rec-
ognition on the front-passenger seat func-
tions correctly, never place objects( such
as ac ushion) under the child restraint sys-
tem. The entire base of the child restraint
system must always rest on the seat cush-
ion. An incorrectly fitted child restraint sys-
tem cannot perform its intended protective
function in the event of an accident, and
could lead to injuries.
i The head/thorax airbag and the belt ten-
sioner on the front-passenger side are still Safety
230_AKB; 5; 4, en-GB
bjanott ,V ersion: 2.9.6
2008-04-08T15:09:54+02:00
-Seite 49 ZDateiname: 6515_3089_02_buchblock.pdf; preflight
Page 63 of 317
Anti-thef
tsyste ms 60button on the door handle/boo
tlid ca na lso
be used.
Indicato rlamp 1flashes. Th ealarm sys-
tem is primed after approximatel y15sec-
onds.
X To deactivate: unlock the vehicl eusing the
key .Onv ehicle swithK EYLESS GO *, you
can also unlock the vehicle by opening the
door/boot lid.
Switchin goff the alarm X
With the key: insert the key into the igni-
tion lock.
The alarm is switched off.
or
X Press the Œor‹ button on the key.
The alarm is switched off.
X With KEYLES SGO*: grasp the outside
doo rhandle. The key mus tbeo utsid ethe
vehicle.
The alarm is switched off.
or
X Press the KEYLESS GO button on the selec-
tor lever. The key mus tbeinside the vehi-
cle.
The alarm is switched off. Tow-awa
yprotection
An audibl eand visua lalarm is triggered if your
vehicle's angle of inclination is altered while
tow-awa yprotectio nisp rimed .Thish appens
if the vehicle is jacked up on one side, for
example.
Priming tow-awa yprotection X
Lock the vehicle using the key .Onvehicles
with KEYLESS GO*, the locking button on
the doo rhandle/boot li dcan also be used.
Tow-away protectio nisp rimed after
approximately 30 seconds.
To deactivate tow-awa yprotection Whe
nyou unlock your vehicle using the key
or KEYLESS GO *,tow-away protection is
automaticall ydeactivated.
Deactivate tow-away protection manuall yto
prevent afalse alarmify ourv ehicle:
R is being transported
R is being loaded ,e.g.o nto aferry or car
transporter
R is being parked on amovable surface, e.g.
split-level garages 1
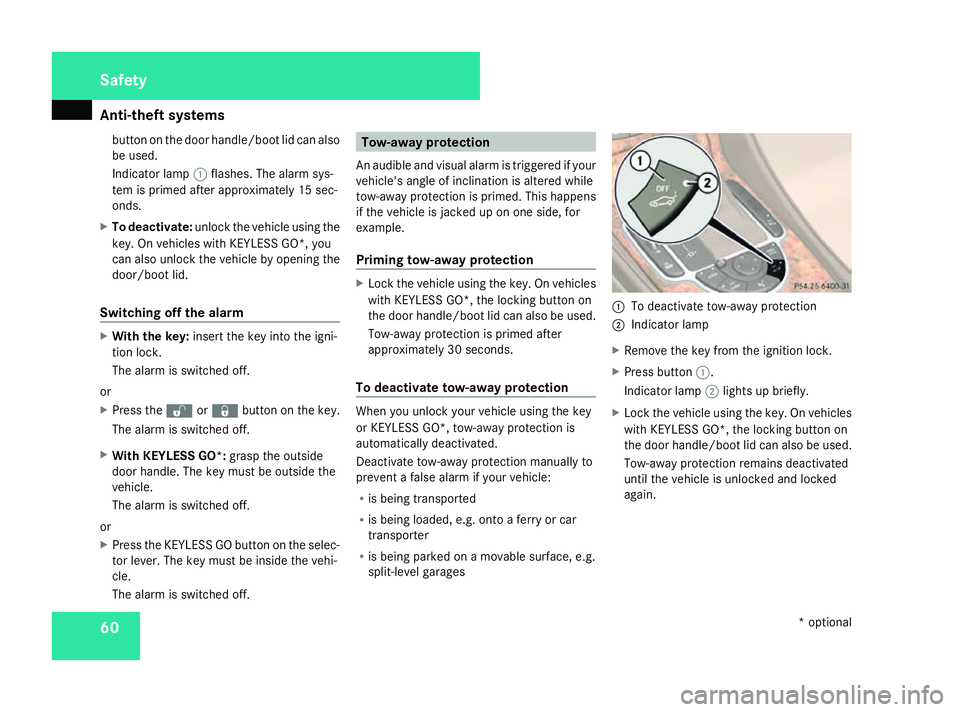
To deactivate tow-away protection
2 Indicator lamp
X Remov ethe key fro mthe ignition lock.
X Press button 1.
Indicator lamp 2lights up briefly.
X Loc kthe vehicl eusing the key .Onvehicles
with KEYLESS GO*, the locking button on
the door handle/boo tlid can also be used.
Tow-awa yprotection remains deactivated
unti lthe vehicl eisunlocke dand locked
again. Safety
*optional
230_AKB; 5; 4, en-GB
bjanott,
Version: 2.9.6 2008-04-08T15:09:54+02:00-Seite 60 Dateiname: 6515_3089_02_buchblock.pdf; preflight
Page 66 of 317
63
Opening and closing
...........................64
Key positions ....................................... 73
Seats .................................................... 74
Steering wheel .................................... 78
Mirrors ................................................. 80
Memor yfunctions ............................... 82
Seat belts ............................................. 83
Lights ................................................... 87
Windscreen wipers .............................92
Side windows ...................................... 93Driving and parking
............................95
Automatic transmission .....................98
Instrument cluster ............................105
On-boar dcomputer .......................... 106
Driving systems ................................ 124
Air conditioning ................................. 144
Opening/closing the roof .................154
Loading and stowing ........................159
Features ............................................. 165 Controls
230_AKB
;5;4,en-GB
bjanott, Version:2.9.6
2008-04-08T15:09:54+02:0
0-Seite 63 Dateiname: 6515_3089_02_buchblock.pdf; preflight
Page 73 of 317
Opening and closing
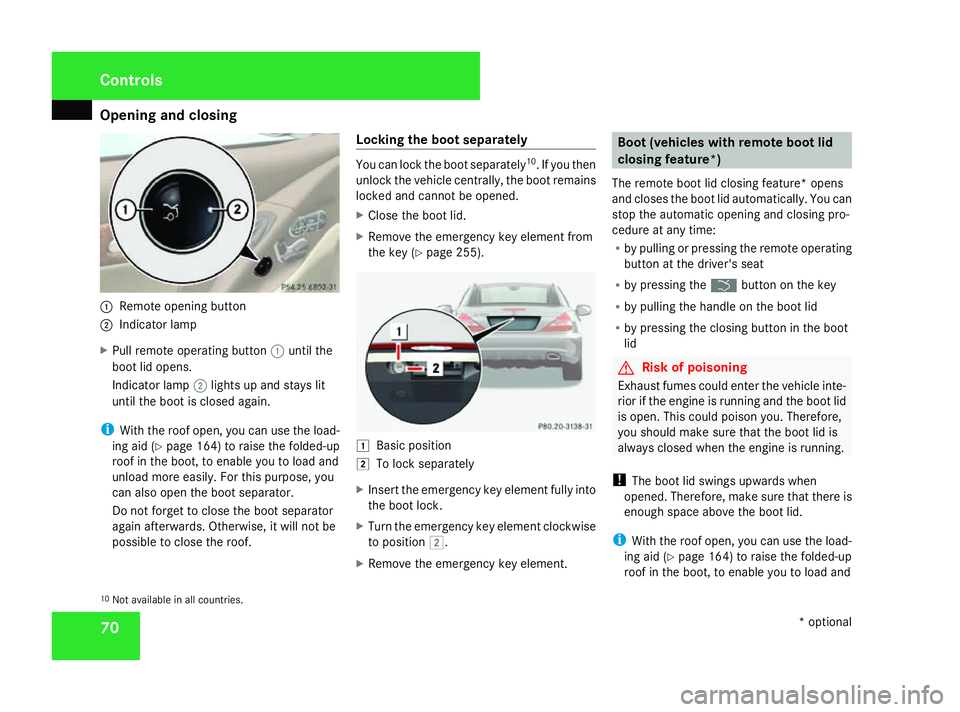
701
Remote opening button
2 Indicator lamp
X Pull remote operating button 1until the
boot lid opens.
Indicator lamp 2lights up and stays lit
until the boot is closed again.
i With the roof open, you can use the load-
ing aid (Y page 164) to raise the folded-up
roof in the boot, to enable you to load and
unload more easily.F or this purpose, you
can also open the boot separator.
Do not forget to close the boot separator
again afterwards. Otherwise, it will not be
possible to close the roof. Locking the boot separately You can lock the boot separately
10
.Ify ou then
unlock the vehicle centrally, the boot remains
locked and cannot be opened.
X Close the boot lid.
X Remove the emergency key element from
the key (Y page 255). $
Basic position
% To lock separately
X Insert the emergency key element fully into
the boot lock.
X Turn the emergency key element clockwise
to position %.
X Remove the emergency key element. Boot (vehicles with remote boot lid
closing feature*)
The remote boot lid closing feature* opens
and closes the boot lid automatically. You can
stop the automatic opening and closing pro-
cedure at any time:
R by pulling or pressing the remote operating
button at the driver's seat
R by pressing the ibutton on the key
R by pulling the handle on the boot lid
R by pressing the closing button in the boot
lid G
Risk of poisoning
Exhaust fumes could enter the vehicle inte-
rior if the engine is running and the boot lid
is open. This could poison you. Therefore,
you should make sure that the boot lid is
always closed when the engine is running.
! The boot lid swings upwards when
opened. Therefore, make sure that there is
enough space above the boot lid.
i With the roof open, you can use the load-
ing aid (Y page 164) to raise the folded-up
roof in the boot, to enable you to load and
10 Not availabl einall countries. Controls
*optional
230_AKB; 5; 4, en-GB
bjanott
,V ersion: 2.9.6
2008-04-08T15:09:54+02:00
-Seite 70 Dateiname: 6515_3089_02_buchblock.pdf; preflight
Page 75 of 317
Opening and closing
72
i
Do not leave the key in the boot. You
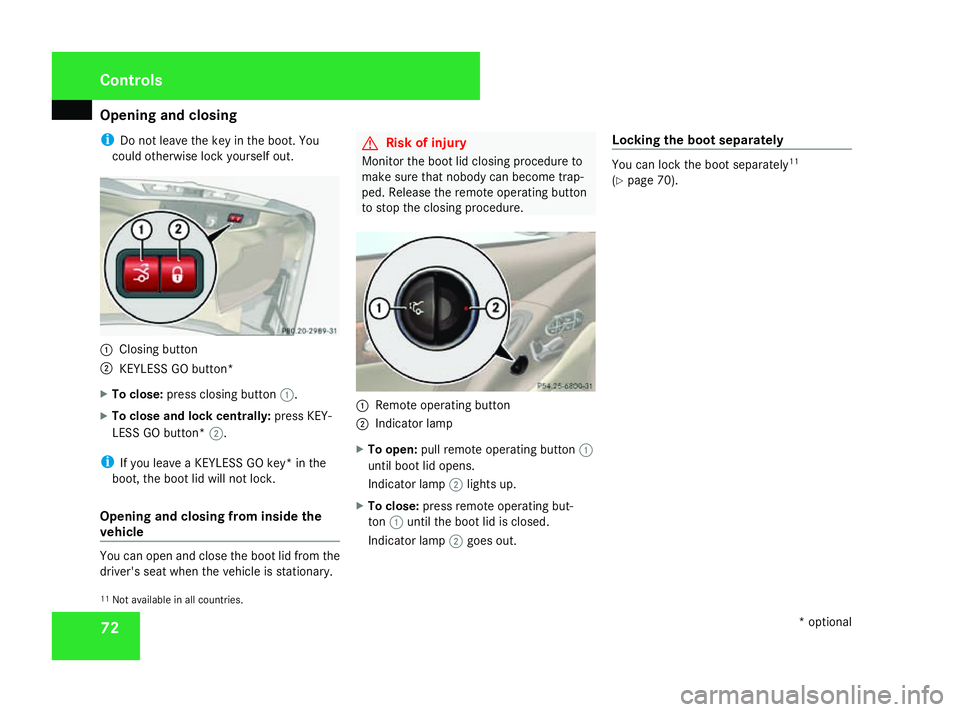
could otherwise lock yourself out. 1
Closing button
2 KEYLESSGOb utton*
X To close: press closing button 1.
X To close and lock centrally: press KEY-
LESS GO button* 2.
i If you leave aKEYLESSGOk ey* in the
boot, the boot lid will not lock.
Opening and closing from inside the
vehicle You can open and close the boot lid from the
driver's seat when the vehicle is stationary. G
Risk of injury
Monitor the boot lid closing procedure to
make sure that nobody can become trap-
ped. Release the remote operating button
to stop the closing procedure. 1
Remote operating button
2 Indicator lamp
X To open: pull remote operating button 1
until boot lid opens.
Indicator lamp 2lights up.
X To close: press remote operating but-
ton 1until the boot lid is closed.
Indicator lamp 2goes out. Locking the boot separately You can lock the boot separately
11
(Y page 70).
11 Not availabl einall countries. Controls
*optional
230_AKB; 5; 4, en-GB
bjanott
,V ersion: 2.9.6
2008-04-08T15:09:54+02:00
-Seite 72 Dateiname: 6515_3089_02_buchblock.pdf; preflight
Page 88 of 317
Seat belts
851
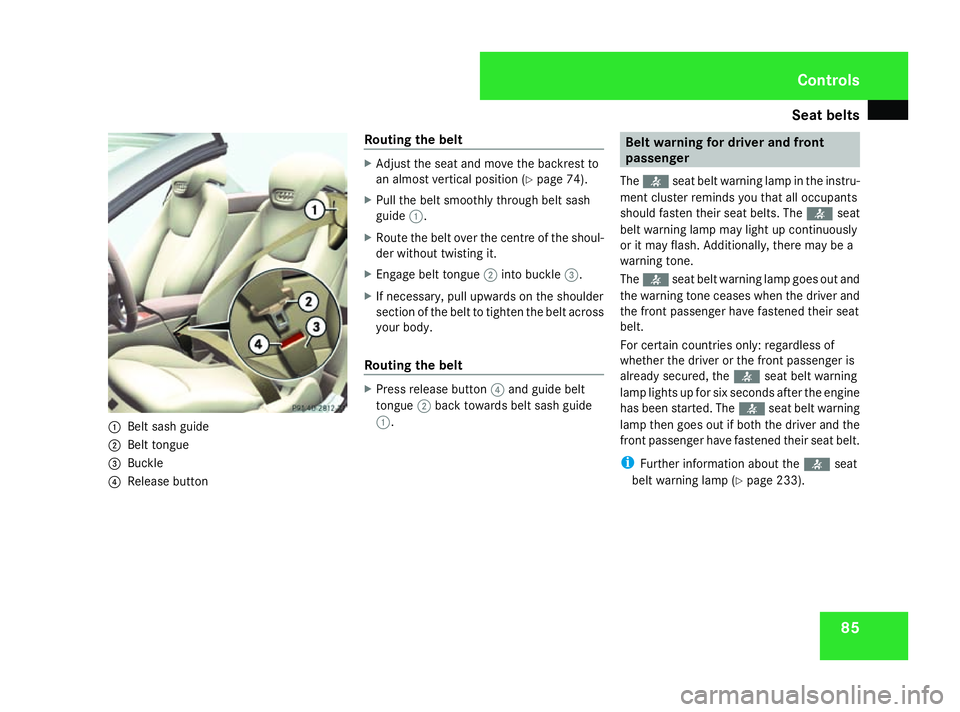
Belt sash guide
2 Belt tongue
3 Buckle
4 Release button Routing the belt X
Adjust the seat and move the backrest to
an almost vertical position (Y page 74).
X Pull the belt smoothly through belt sash
guide 1.
X Route the belt over the centreoft he shoul-
der without twisting it.
X Engage belt tongue 2into buckle 3.
X If necessary, pull upwards on the shoulder
section of the belt to tighten the belt across
yourb ody.
Routing the belt X
Press release button 4and guideb elt
tongue 2back towards belt sash guide
1. Belt warning for driver and front
passenger
The < seat belt warning lamp in the instru-
ment cluster reminds you that all occupants
should fasten their seat belts. The
or it may flash. Additionally,t here may be a
warning tone.
The < seat belt warning lamp goes out and
the warning tone ceases when the driver and
the front passenger have fastened their seat
belt.
For certain countries only: regardless of
whether the driver or the front passenger is
already secured, the
has been started. The
front passenger have fastened their seat belt.
i Further information aboutt he< seat
belt warning lamp (Y page 233). Controls
230_AKB; 5; 4, en-GB
bjanott,
Version: 2.9.6
2008-04-08T15:09:54+02:00
-Seite 85 ZDateiname: 6515_3089_02_buchblock.pdf; preflight
Page 90 of 317
Lights
87Lights
Light switch
For reason sofsafety, Mercedes-Ben zrecom-
mends that you driv ewith th elight sswitched
on eve ndurin gthe daytime. In som ecoun-
tries, daytime operatio nofheadlamps varies
due to legal requirements and self-imposed
obligations .Inthese countries, th edipped-
beam headlamps are automaticall yswitched
on when th eengineiss tarted.
i If you driv eincountries in whic htraffic
drives on th eopposit eside of th eroad to
th ec ountr ywher ethe vehicle is registered,
oncomin gtraffic may be dazzle dbythe
asymmetrical dipped-beam headlamps.
Hav ethe headlamps changed to symmet-
rical dipped beam when driving in these
countries. You can obtain information
about this from any Mercedes-Ben zService
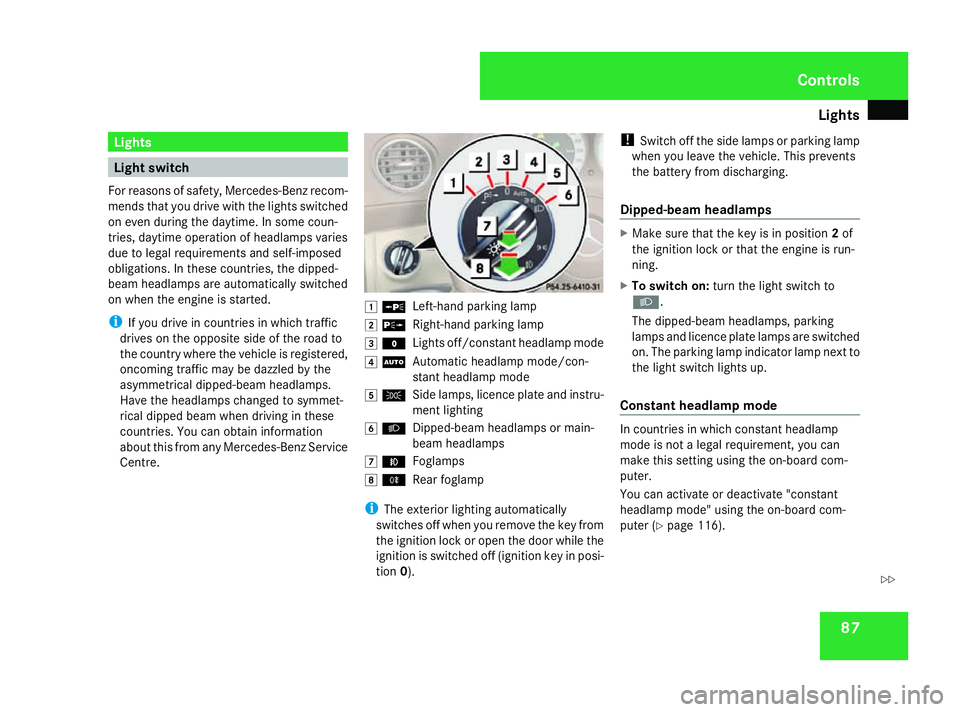
Centre. $
a
Left-han dparking lamp
% g
Right-hand parking lamp
& M
Lightsoff/constan theadlamp mode
( U
Automatic headlamp mode/con-
stant headlamp mode
) C
Side lamps, licence plate and instru-
mentlighting
* B
Dipped-beam headlamps or main-
beam headlamps
, ¥
Foglamps
. †
Rear foglamp
i The exterior lighting automatically
switches off when you remove the key from
the ignition lock or open the door while the
ignition is switched off (ignition key in posi-
tion 0). !
Switch off the side lamps or parking lamp
when you leave the vehicle. This prevents
the battery fro mdischarging.
Dipped-beam headlamps X
Make sure that the key is in position 2of
the ignition lock or that the engin eisrun-
ning.
X To switch on: turnthe light switc hto
B .
The dipped-beam headlamps, parking
lamps and licence plate lamps are switched
on. The parking lamp indicator lamp nex tto
the light switc hlight sup.
Constant headlam pmode In countries in which constant headlamp
mode is not
alegal requirement, you can
make thi ssettin gusing the on-board com-
puter.
You can activat eordeactivat e"constant
headlamp mode" using the on-board com-
puter (Y page 116). Controls
230_AKB; 5; 4, en-GB
bjanott
,V ersion: 2.9.6
2008-04-08T15:09:54+02:00
-Seite 87 ZDateiname: 6515_3089_02_buchblock.pdf; preflight