2008 MERCEDES-BENZ SL ROADSTER lights
[x] Cancel search: lightsPage 262 of 317
Changing th
ebulbs 259Key or KEYLESS GO key*
Checking th ebatteries X
Press the jork button.
The batteries are in order if th ebattery
charge indicator lamp lights up briefly.
Changing th ebatteries You require two CR 2025
3Vcellb atteries.
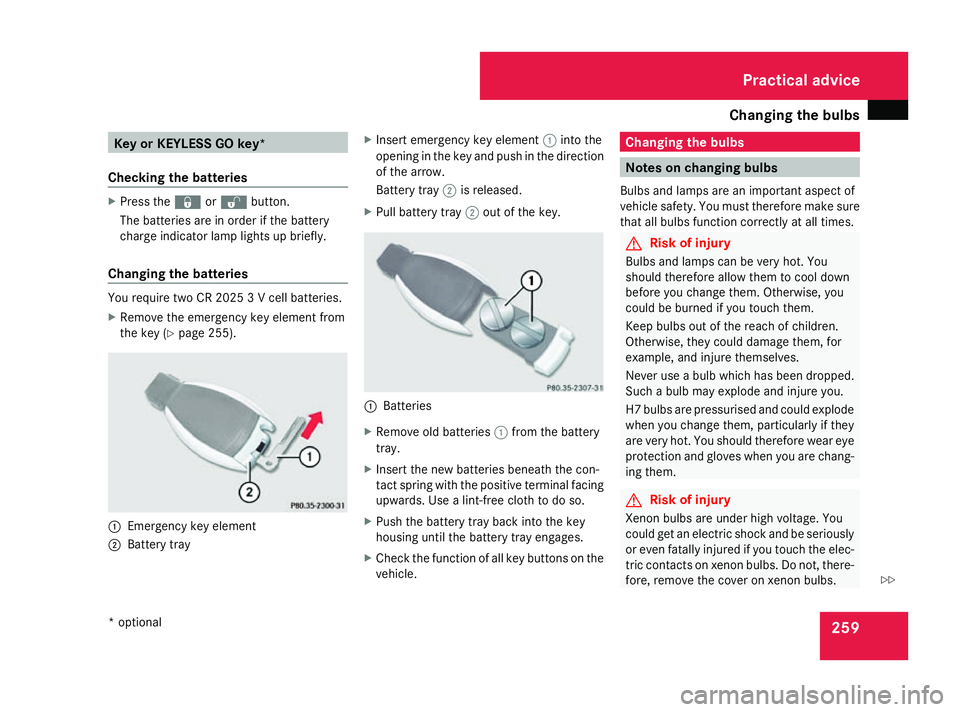
X Remove th eemergenc ykey elemen tfrom
th ek ey ( Ypage 255). 1
Emergency ke yelement
2 Battery tray X
Inser temergenc ykey element 1intot he
opening in th ekeyand push in th edirection
of th earrow.
Battery tray 2is released.
X Pull battery tray 2out of th ekey. 1
Batteries
X Remove old batteries 1from th ebattery
tray.
X Inser tthe newb atteries beneat hthe con-
tac tspring wit hthe positive termina lfacing
upwards. Use alint-free cloth to do so.
X Push th ebattery tray bac kintot he key
housing until th ebattery tray engages.
X Chec kthe function of all ke ybuttons on the
vehicle. Changing th
ebulbs Notes on changing bulbs
Bulb sand lamps are an important aspec tof
vehicl esafety. You must therefor emakes ure
that all bulbs function correctl yatall times. G
Ris
kofi njury
Bulb sand lamps can be ver yhot.Y ou
should therefor eallow them to cool down
before you chang ethem. Otherwise, you
could be burned if you touch them.
Kee pbulbs out of th ereac hofc hildren.
Otherwise, they could damag ethem, for
example, and injure themselves.
Never use abulb whic hhas been dropped.
Suc hab ulb may explode and injure you.
H7 bulbs are pressurised and could explode
when you chang ethem, particularly if they
are ver yhot.Y ou should therefor ewear eye
protection and gloves when you are chang-
ing them. G
Ris
kofi njury
Xenon bulbs are under high voltage. You
could get an electric shock and be seriously
or eve nfatally injured if you touch th eelec-
tric contact sonxenonbulbs.Don ot,the re-
fore, remove th ecover on xeno nbulbs. Practical advice
*o ptional
230_AKB; 5; 4, en-GB
bjanott
,V ersion: 2.9.6
2008-04-08T15:09:54+02:00
-Seite 259 ZDateiname: 6515_3089_02_buchblock.pdf; preflight
Page 264 of 317
Changing th
ebulbs 261
Rea
rbulbs Bulb Type
6 Rear foglamp P21W
7 Thir
dbrak elamp LED
23 8 Reversing lamp P21W
9 Brake/tail lamp
LED
23 a Licence plate
lamp C5W
b Turn signal PY 21 W
Before changing bulbs
You can replace th
efollowin gbulbs:
R Main-beam headlamp
R Sid elamp and parking lamp
R Replacing th ebulb in th ecorner ingl ight*
(vehicles wit hIntel ligent Light System*)
R Reversing lamp
R Rear foglamp R
Turn signal (rear)
R Licence plat elamp
Observ ethe followin gpoints:
R Use only th ebulb types specifie dhere.
R To preven tashort-circuit ,switch off the
lights before changing abulb.
R Only hold bulbs wit haclean, lint-free cloth.
R Do no tworkw ithw et or greasy fingers.
R If th enew bulb still does no tligh tup, con-
sult aqualified specialist workshop, e.g. a
Mercedes-Benz Service Centre.
i Hav ethe headlamp setting checke dreg-
ularly at aqualified specialist workshop,
e.g. aMercedes-Benz Service Centre. Changing th
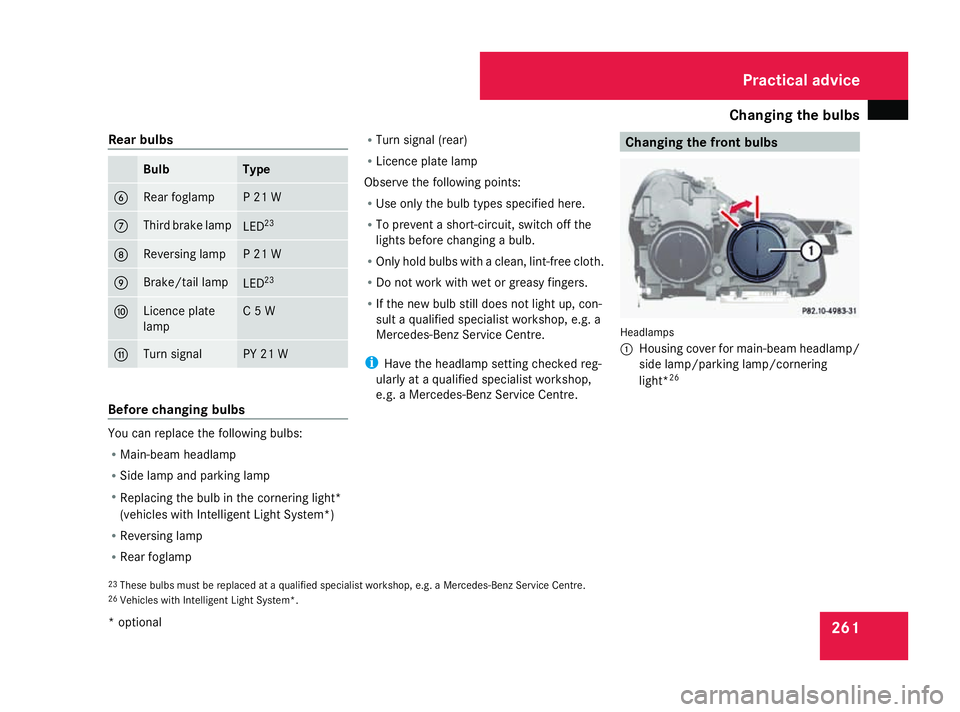
efront bulbs Headlamps
1
Housin gcover for main-beam headlamp/
side lamp/parking lamp/cornering
light* 26
23 These bulbs mus tbereplace dataq ualified specialist workshop ,e.g.aM ercedes-Ben zServic eCentre.
26 Vehicles wit hIntel ligent Light System*. Practical advice
*o ptional
230_AKB; 5; 4, en-GB
bjanott
,V ersion: 2.9.6
2008-04-08T15:09:54+02:00
-Seite 261 ZDateiname: 6515_3089_02_buchblock.pdf; preflight
Page 265 of 317
Changing th
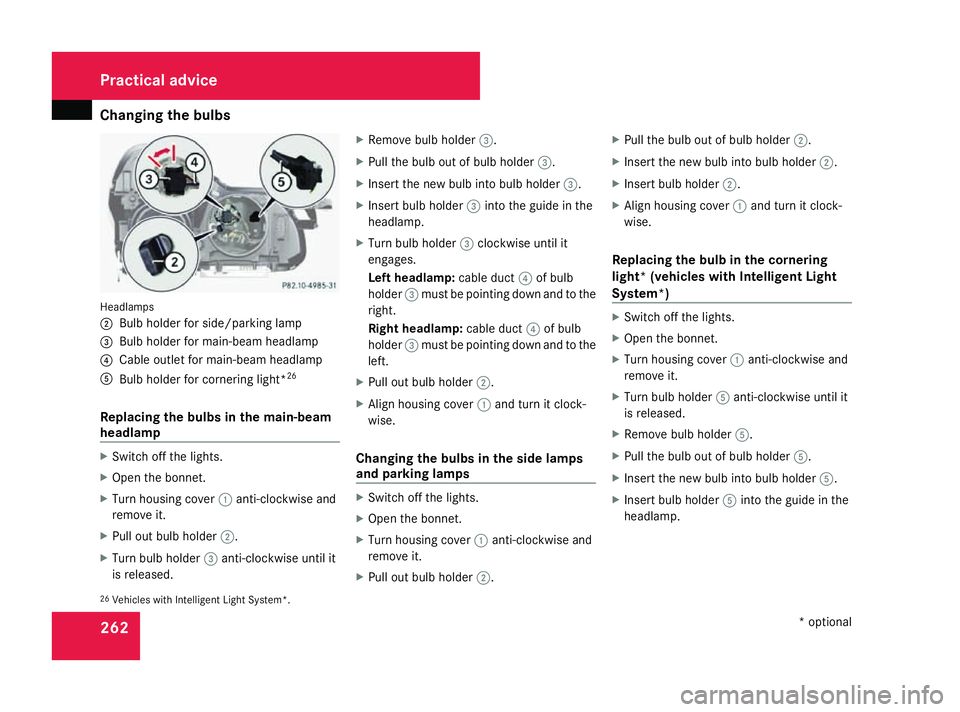
ebulbs 262Headlamps
2
Bulb holder for side/parking lamp
3 Bulb holder for main-beam headlamp
4 Cable outle tfor main-beam headlamp
5 Bulb holder for cornering light* 26
Replacing th ebulbs in th emain-beam
headlamp X
Switch off th elights.
X Open th ebonnet.
X Turn housin gcover 1anti-clockwise and
remove it.
X Pull out bulb holder 2.
X Turn bulb holder 3anti-clockwise until it
is released. X
Remov ebulb holder 3.
X Pull th ebulb out of bulb holder 3.
X Insert th enew bulb int obulb holder 3.
X Insert bulb holder 3intot he guide in the
headlamp.
X Turn bulb holder 3clockwis euntil it
engages.
Left headlamp: cable duct4of bulb
holder 3must be pointin gdown and to the
right.
Righ theadlamp: cable duct 4of bulb
holder 3must be pointin gdown and to the
left.
X Pull out bulb holder 2.
X Alig nhousin gcover 1and tur nitclock-
wise.
Changing th ebulbs in th eside lamps
and parking lamps X
Switch off th elights.
X Open th ebonnet.
X Turn housin gcover 1anti-clockwise and
remove it.
X Pull out bulb holder 2. X
Pull th ebulb out of bulb holder 2.
X Insert th enew bulb int obulb holder 2.
X Insert bulb holder 2.
X Alig nhousin gcover 1and tur nitclock-
wise.
Replacing th ebulb in th ecornering
light *(vehicles with Intelligent Light
System*) X
Switch off th elights.
X Open th ebonnet.
X Turn housin gcover 1anti-clockwise and
remove it.
X Turn bulb holder 5anti-clockwise until it
is released.
X Remov ebulb holder 5.
X Pull th ebulb out of bulb holder 5.
X Insert th enew bulb int obulb holder 5.
X Insert bulb holder 5intot he guide in the
headlamp.
26 Vehicles with Intelligen tLigh tSystem*. Practical advice
*optional
230_AKB; 5; 4, en-GB
bjanott
,V ersion: 2.9.6
2008-04-08T15:09:54+02:00
-Seite 262 Dateiname: 6515_3089_02_buchblock.pdf; preflight
Page 266 of 317
Changing th
ebulbs 263
X
Turn bulb holder 5clockwise until it
engages.
The handle of bulb holder 5must be hor-
izontal.
X Align housing cover 1and tur nitclock-
wise. Changing th
erearb ulbs
Opening and closin gthe sidetrimp an-
els You must open th
ecorre sponding side trim
panel in th eboot to chang ethe bulbs.
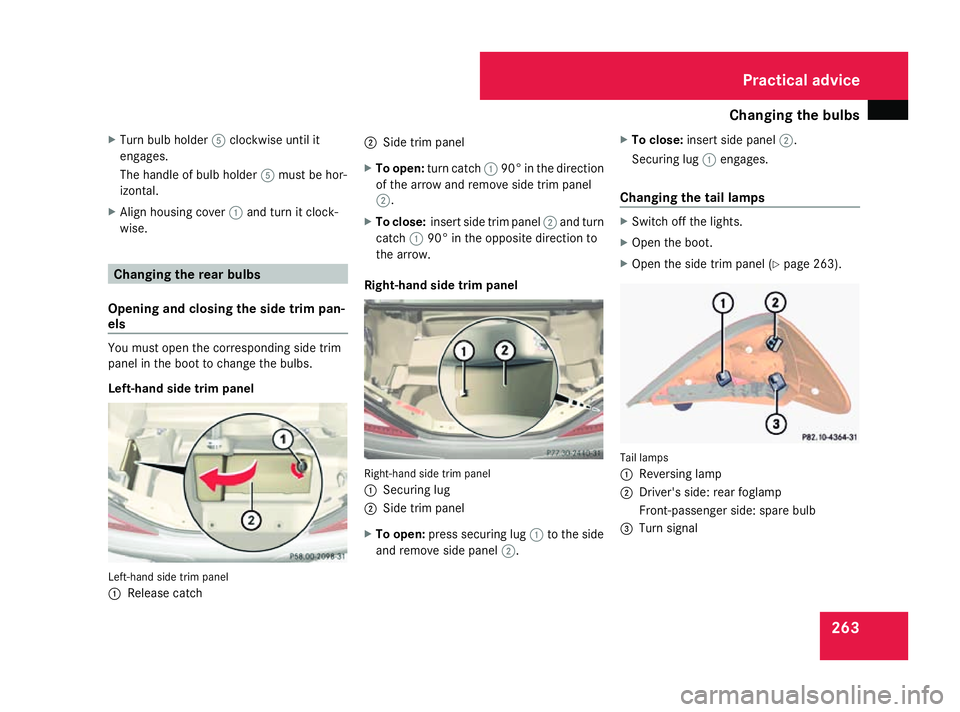
Left-hand sid etrimp anel Left-han
dside trim panel
1 Releas ecatch 2
Sidetrimp anel
X To open: turnc atch 190°int he direction
of the arrow and remove side trim panel
2.
X To close: insert side trim panel 2and turn
catch 190° in the opposite direction to
the arrow.
Right-han dsidet rim panel Right-hand side trim panel
1
Securing lug
2 Sidetrim panel
X To open: press securing lug 1to the side
and remove side panel 2.X
To close: insert side panel 2.
Securing lug 1engages.
Changin gthe tail lamps X
Switch off the lights.
X Ope nthe boot.
X Ope nthe side trim panel (Y page 263). Tail lamps
1
Reversing lamp
2 Driver' sside: rearfoglamp
Front-passenger side :spare bulb
3 Turn signal Practical advice
230_AKB; 5; 4, en-GB
bjanott,
Version: 2.9.6 2008-04-08T15:09:54+02:00-Seite 263 ZDateiname: 6515_3089_02_buchblock.pdf; preflight
Page 267 of 317
Replacing the wiper blades
264
X
Turn the corresponding bulb holde ranti-
clockwise and remove it.
X Pull the corresponding bulb ou tofthe bulb
holder.
X Insert the appropriate new bulb into the
bulb holder.
X Insert the corresponding bulb holde rand
turn it clockwise.
X Close the side trim panel (Y page 263).
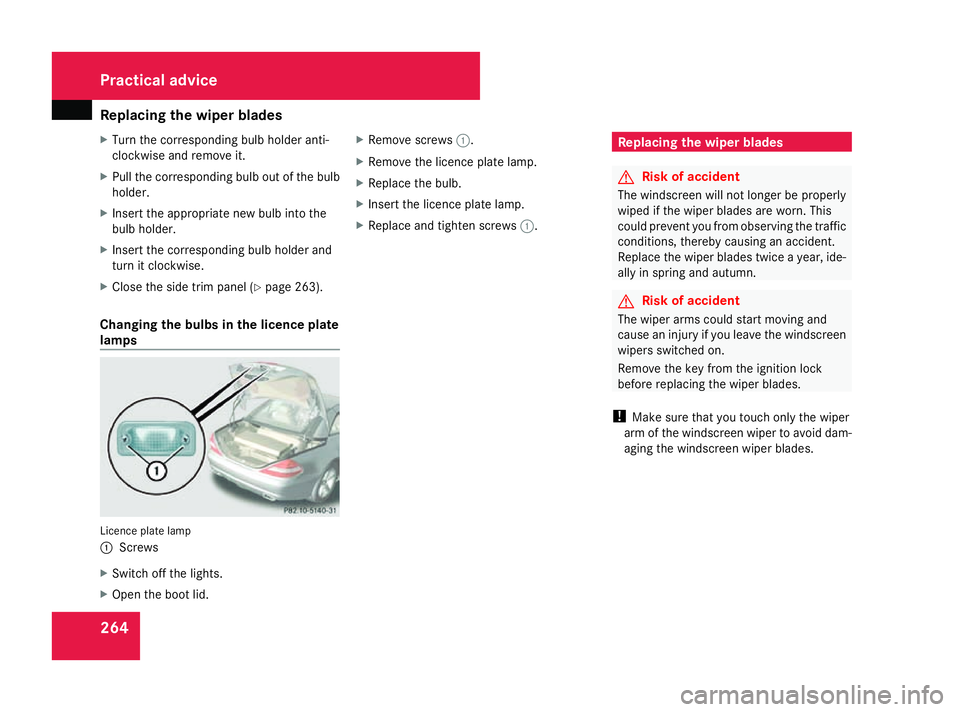
Changin gthe bulbs in the licenc eplate
lamps Licence plate lamp
1
Screws
X Switch off the lights.
X Ope nthe boo tlid. X
Remove screws 1.
X Remove the licence plate lamp.
X Replace the bulb.
X Insert the licence plate lamp.
X Replace and tighten screws 1. Replacing the wiper blades
G
Ris
kofa ccident
The windscree nwilln ot longer be properly
wipe difthe wipe rblade sare worn. This
could prevent yo ufrom observing the traffic
conditions, thereb ycausing an accident.
Replace the wipe rblade stwice ayear, ide-
ally in spring and autumn. G
Ris
kofa ccident
The wipe rarm sc ould start moving and
cause an injury if yo ulea ve the windscreen
wipers switched on.
Remove the key from the ignition lock
before replacing the wipe rblade s.
! Make sure tha tyou touch onl ythe wiper
arm of the windscree nwiper to avoid dam-
aging the windscree nwiper blades. Practical advice
230_AKB; 5; 4, en-GB
bjanott,
Version: 2.9.6 2008-04-08T15:09:54+02:00-Seite 264 Dateiname: 6515_3089_02_buchblock.pdf; preflight
Page 283 of 317
Towin
gand tow-starting 280
X
Connect negative terminal 3of the donor
battery to negative terminal 4of your
vehicle' sbattery using the jum plead, con-
necting the jum pleadtot he donor battery
first.
X Star tthe engine.
X Electrical consumers can be switched on
again. Do not switch the lights on, however,
as thi swillo verloa dthe battery.
X Remov ethe jum pleadf rome arth
point 4and negative terminal 3first,
the nfromp ositivet erminals 1and 2,
each tim edisconnecting fro mthe battery
on your ow nvehicl efirst.
X Have the battery checked at aqualified
specialis tworkshop ,e.g.aM ercedes-Benz
Service Centre. Towin
gand tow-starting Points to remember
G
Ris
kofa ccident
If yo utow the vehicle, yo umustu se arigid
towing ba rif:
R the engine is not running
R there is abrake syste mmalfunction
R the voltag esuppl yort he vehicle' selec-
trica lsystemisd amaged
Th ee lectric powe rsteering and the brake
force booster do not work when the engine
is not running .Greate rbraking force will
the nberequired and the brake peda ltravel
will be longer. If necessary ,depress the
brake peda lwithm aximum force.
Do not tow the vehicl eifthe key cannot be
turned in the ignition lock. If thi sisthe case,
the steering is locked and the vehicl ecan-
not be steered.
If yo utow or tow-start anothe rvehicle, its
weight must not exceed the maximum per-
missibl egross vehicl eweigh tofy ourv ehi-
cle. G
Ris
kofa ccident
Th eS BC®
brake syste mrequires electrical
power. Th eSBC®
brake syste menters
emergency mod eifthere ar efaults in the
powe rsuppl yort he vehicle' selectrica lsys-
tem. Greater braking force will the nbe
required and the brake peda ltravel and
braking distance will be longer. If neces-
sary ,depress the brake peda lwithm axi-
mu mf orce.
Th ev ehicl eisb raked if SBC ®
HOL Disa cti-
vated .The refore, deactivate SBC ®
HOL Dif
the vehicl eistobet owed.
If yo utow or tow-start anothe rvehicle, its
weight must not exceed the maximum per-
missibl egross vehicl eweigh tofy ourv ehi-
cle.
It is better to have the vehicl etransported
tha ntoh aveitt owed.
When towing ,obser ve the lega lrequirements
in al lcountries concerned.
! When towing ,pulla wa yslowl yand with-
ou tjerking. If the tractiv epower is too high,
the vehicles could be damaged. Do not use
the towing ey efor recovery. Practical advice
230_AKB; 5; 4, en-GB
bjanott,
Version: 2.9.6 2008-04-08T15:09:54+02:00-Seite 280 Dateiname: 6515_3089_02_buchblock.pdf; preflight