2008 MERCEDES-BENZ E-CLASS ESTATE engine
[x] Cancel search: enginePage 224 of 401
Refuelling
221
R
Vegetable oil
R Petrol
R Petroleum
R Kerosene
Do not add such fuels to diesel fuel and do
not use any special additives (exception:
flow improvers – see "Low outside temper-
atures").
Damage caused by the use of unapproved
fuels or additives is not covered by the war-
ranty.
E 300 BLUETEC !
When refuelling vehicles with a diesel par-
ticle filter in countries outside the EU, only
low-sulphur Euro diesel with less than
0.005 percent sulphur content by weight (<
50 ppm) should be used.
Low outside temperatures The flow properties of diesel may be insuffi-
cient at low ambient temperatures.
To prevent operating problems, diesel fuel
with improved cold flow qualities is available
during the winter months. Your vehicle must be refuelled with this winter diesel at temper-
atures of -5 °C or below.
You can use this winter diesel at tempera-
tures down to about -20 °C without problems.
If only summer diesel fuel or less cold-resist-
ant winter diesel fuel (e.g. in Mediterranean
regions) is available, you should add an
amount of flow improver to the fuel corre-
sponding to the outside temperature.
Mix the additive with the diesel in good time,
before the flow properties of the diesel
become insufficient. Otherwise, malfunctions
can only be rectified by heating the entire fuel
system, e.g. by parking the vehicle in a heated
garage.
G
Risk of fire
Do not use petrol to refuel vehicles with a
diesel engine. Never mix diesel with petrol.
This would damage the fuel system and
engine and could result in a vehicle fire.
Flow improver
The effectiveness of a flow improver is not
guaranteed with every fuel. Observe the infor-
mation provided by the manufacturer when
using a flow improver. Only use flow improv-
ers that have been tested and approved by
Mercedes-Benz. Information about flow improvers that have been tested and
approved by Mercedes-Benz can be obtained
from any Mercedes-Benz Service Centre. Operation
211_AKB; 2; 5, en-GB
mkalafa
,V ersion: 2.9.4
2008-02-29T16:57:07+01:00 - Seite 221 ZDateiname: 6515_3416_02_buchblock.pdf; preflight
Page 225 of 401

Engine compartment
222 Engine compartment
Bonnet
G
Risk of accident
Do not pull the release lever while the vehi-
cle is in motion. If you do so, the bonnet
may open up and block your view.
Opening G
Risk of injury
There is a risk of injury if the bonnet is open,
even if the engine is not running.
Some engine components can become
very hot.
To avoid the risk of burns, only touch those
components described in the Owner’s Man-
ual and observe the relevant safety notes. G
Risk of injury
The radiator fan between the radiator and
the engine can start automatically, even if
the key has been removed from the ignition
lock. For this reason you must not reach
into the turning area of the fan. You can
otherwise be injured. Vehicles with a petrol engine:
the electronic ignition system uses high
voltage. For this reason you must never
touch components of the ignition system
(ignition coil, ignition cable, spark plug con-
nector or test socket) when:
R the engine is running
R the engine is being started
R the ignition is switched on and the engine
is being cranked by hand
Vehicles with a diesel engine:
the electronic injection control uses high
voltage. Therefore, never touch fuel injec-
tion system components when:
R the engine is running
R the engine is being started
R the ignition is switched on
X Make sure that the windscreen wipers are
switched off. G
Risk of injury
The windscreen wipers and wiper linkage
could be set in motion.
When the bonnet is open, you or others
could be injured by the wiper rods. Make sure that the windscreen wipers are
switched off and that the key has been
pulled out of the ignition lock before open-
ing the bonnet.
The bonnet release lever is located in the
driver's footwell. 1
Bonnet release lever
X Pull release lever 1.
The bonnet is released.
! Make sure that the windscreen wipers
are not folded out away from the wind-
screen. You can otherwise damage the
windscreen wipers or the bonnet. Operation
211_AKB; 2; 5, en-GB
mkalafa,
Version: 2.9.4 2008-02-29T16:57:07+01:00 - Seite 222Dateiname: 6515_3416_02_buchblock.pdf; preflight
Page 226 of 401
Engine compartment
223
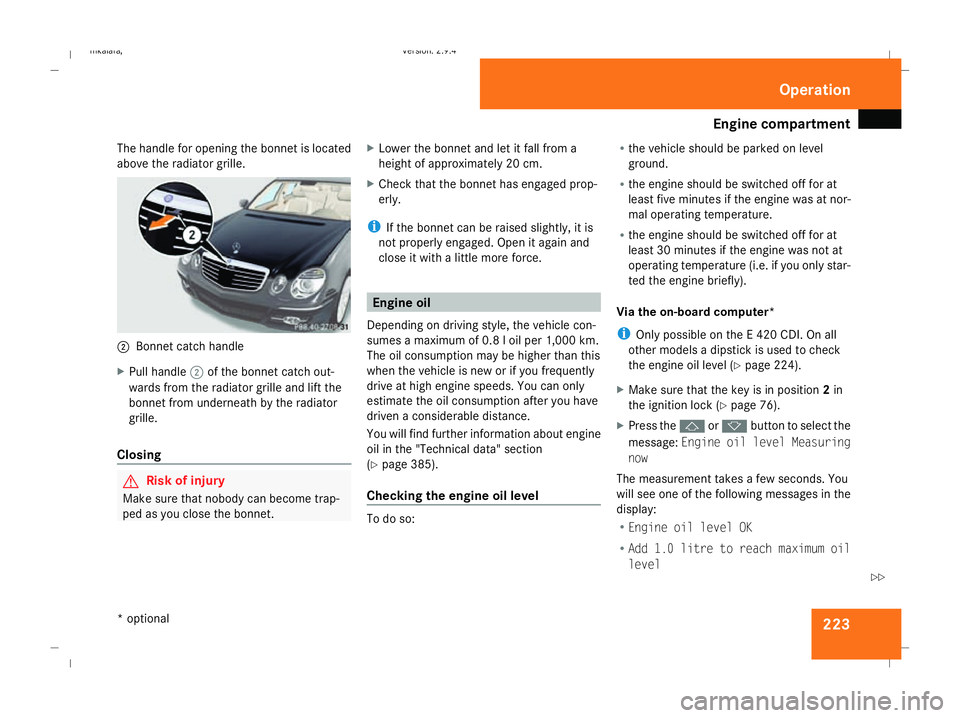
The handle for opening the bonnet is located
above the radiator grille. 2
Bonnet catch handle
X Pull handle 2of the bonnet catch out-
wards from the radiator grille and lift the
bonnet from underneath by the radiator
grille.
Closing G
Risk of injury
Make sure that nobody can become trap-
ped as you close the bonnet. X
Lower the bonnet and let it fall from a
height of approximately 20 cm.
X Check that the bonnet has engaged prop-
erly.
i If the bonnet can be raised slightly, it is
not properly engaged. Open it again and
close it with a little more force. Engine oil
Depending on driving style, the vehicle con-
sumes a maximum of 0.8 l oil per 1,000 km.
The oil consumption may be higher than this
when the vehicle is new or if you frequently
drive at high engine speeds. You can only
estimate the oil consumption after you have
driven a considerable distance.
You will find further information about engine
oil in the "Technical data" section
(Y page 385).
Checking the engine oil level To do so:R
the vehicle should be parked on level
ground.
R the engine should be switched off for at
least five minutes if the engine was at nor-
mal operating temperature.
R the engine should be switched off for at
least 30 minutes if the engine was not at
operating temperature (i.e. if you only star-
ted the engine briefly).
Via the on-board computer*
i Only possible on the E 420 CDI. On all
other models a dipstick is used to check
the engine oil level (Y page 224).
X Make sure that the key is in position 2in
the ignition lock (Y page 76).
X Press the jork button to select the
message: Engine oil level Measuring
now
The measurement takes a few seconds. You
will see one of the following messages in the
display:
R Engine oil level OK
R Add 1.0 litre to reach maximum oil
level Operation
* optional
211_AKB; 2; 5, en-GB
mkalafa,
Version: 2.9.4 2008-02-29T16:57:07+01:00 - Seite 223 ZDateiname: 6515_3416_02_buchblock.pdf; preflight
Page 227 of 401

Engine compartment
224
R
Add 1.5 litres to reach maximum oil
level
R Add 2.0 litres to reach maximum oil
level
X Top up the oil if necessary ( Ypage 225).
Other messages in the multi-function dis-
play
If the engine is at normal operating tempera-
ture and there is too much oil, you will see the
following message:
Eng. oil level
Reduce oil level
X Have excess oil siphoned off.
! There is a risk of damage to the engine or
the catalytic converter if there is excess oil
in the engine.
If the Switch ignition on to check
engine oil level message appears:
X Turn the key to position 2in the ignition
lock (Y page 76).
You will see the following message if you did
not observe the required waiting time:
Observe waiting period X
Repeat the measurement after about five
minutes if the engine is at normal operating
temperature.
X Repeat the measurement after about
30 minutes if the engine is not at normal
operating temperature (if the engine was
only started briefly).
The following message appears if the engine
is running:
Engine oil level Not when engine on
X Switch off the engine and wait for five
minutes if the engine is at normal operating
temperature, or for about 30 minutes if the
engine is not at normal operating temper-
ature (if the engine was only started
briefly), before measuring.
i If you wish to cancel the measurement,
press the korj button on the multi-
function steering wheel. Using the oil dipstick Illustration: vehicle with a petrol engine (E 350)
1
Oil dipstick
2 Maximum mark
3 Minimum mark
X Pull oil dipstick 1out of the oil dipstick
tube.
X Wipe off oil dipstick 1.
X Insert oil dipstick 1into the oil dipstick
tube to the stop, and take it out again.
The oil level is correct if the level is between
minimum mark 3and maximum mark
2.
X Top up the oil if necessary. Operation
211_AKB; 2; 5, en-GB
mkalafa,
Version: 2.9.4
2008-02-29T16:57:07+01:00 - Seite 224 Dateiname: 6515_3416_02_buchblock.pdf; preflight
Page 228 of 401
Engine compartment
225
i
The difference in quantity between mini-
mum mark 3and maximum mark 2is
approximately 2 litres.
i On vehicles with a 4-cylinder petrol
engine and vehicles with an 8-cylinder pet-
rol engine, the difference between MIN
mark 3and MAX mark 2is approxi-
mately 1.5 litres.
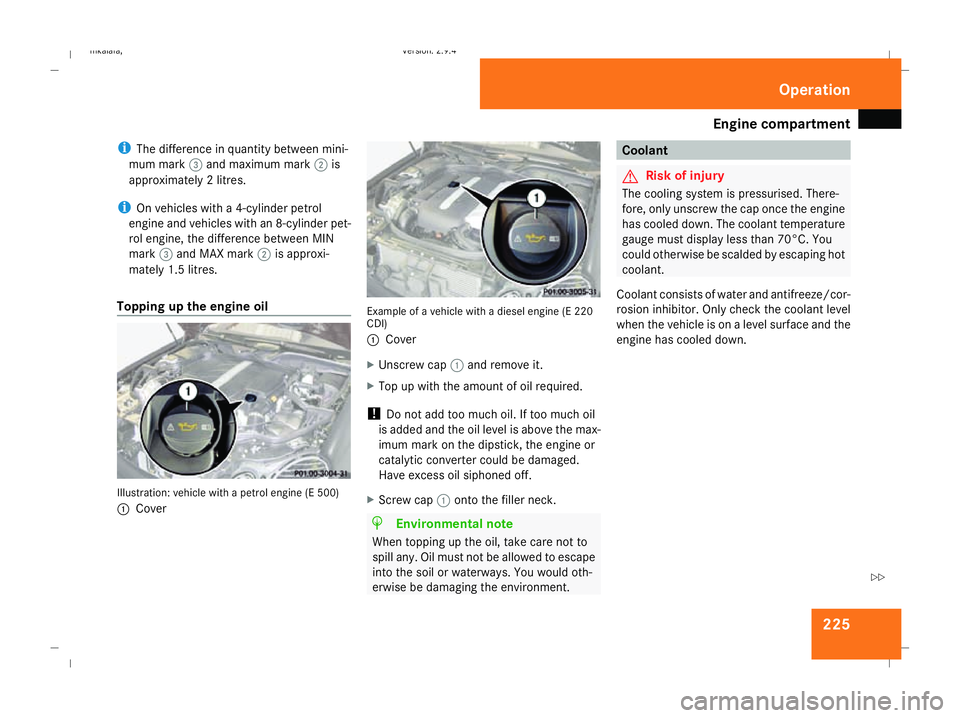
Topping up the engine oil Illustration: vehicle with a petrol engine (E 500)
1
Cover Example of a vehicle with a diesel engine (E 220
CDI)
1 Cover
X Unscrew cap 1and remove it.
X Top up with the amount of oil required.
! Do not add too much oil. If too much oil
is added and the oil level is above the max-
imum mark on the dipstick, the engine or
catalytic converter could be damaged.
Have excess oil siphoned off.
X Screw cap 1onto the filler neck. H
Environmental note
When topping up the oil, take care not to
spill any. Oil must not be allowed to escape
into the soil or waterways. You would oth-
erwise be damaging the environment. Coolant
G
Risk of injury
The cooling system is pressurised. There-
fore, only unscrew the cap once the engine
has cooled down. The coolant temperature
gauge must display less than 70°C. You
could otherwise be scalded by escaping hot
coolant.
Coolant consists of water and antifreeze/cor-
rosion inhibitor. Only check the coolant level
when the vehicle is on a level surface and the
engine has cooled down. Operation
211_AKB; 2; 5, en-GB
mkalafa,
Version: 2.9.4
2008-02-29T16:57:07+01:00 - Seite 225 ZDateiname: 6515_3416_02_buchblock.pdf; preflight
Page 229 of 401
Engine compartment
226
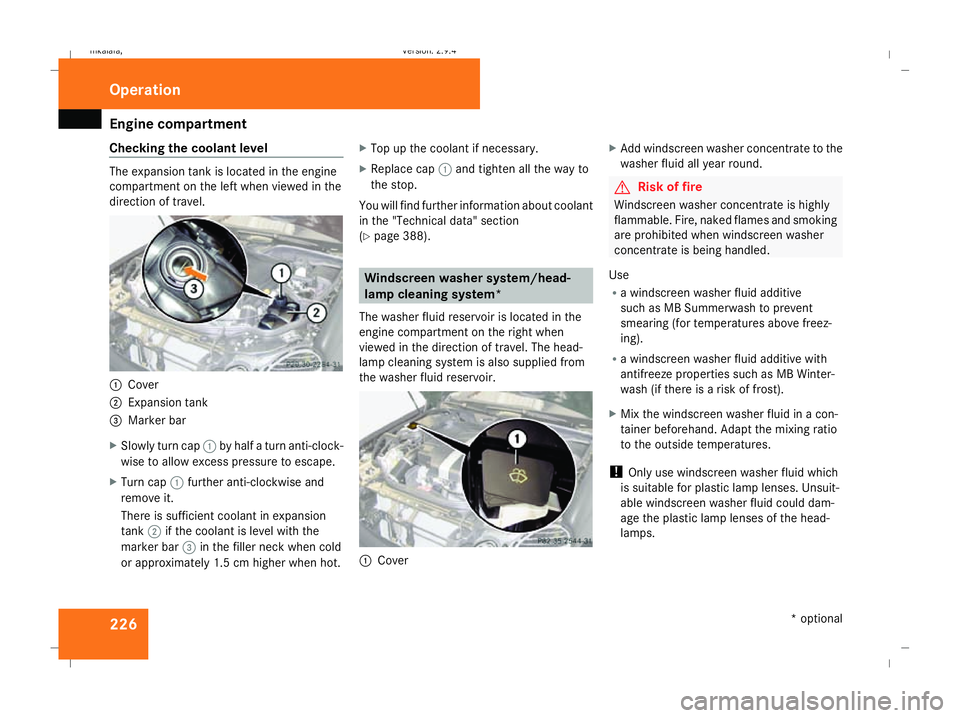
Checking the coolant level The expansion tank is located in the engine
compartment on the left when viewed in the
direction of travel. 1
Cover
2 Expansion tank
3 Marker bar
X Slowly turn cap 1by half a turn anti-clock-
wise to allow excess pressure to escape.
X Turn cap 1further anti-clockwise and
remove it.
There is sufficient coolant in expansion
tank 2if the coolant is level with the
marker bar 3in the filler neck when cold
or approximately 1.5 cm higher when hot. X
Top up the coolant if necessary.
X Replace cap 1and tighten all the way to
the stop.
You will find further information about coolant
in the "Technical data" section
(Y page 388). Windscreen washer system/head-
lamp cleaning system*
The washer fluid reservoir is located in the
engine compartment on the right when
viewed in the direction of travel. The head-
lamp cleaning system is also supplied from
the washer fluid reservoir. 1
Cover X
Add windscreen washer concentrate to the
washer fluid all year round. G
Risk of fire
Windscreen washer concentrate is highly
flammable. Fire, naked flames and smoking
are prohibited when windscreen washer
concentrate is being handled.
Use
R a windscreen washer fluid additive
such as MB Summerwash to prevent
smearing (for temperatures above freez-
ing).
R a windscreen washer fluid additive with
antifreeze properties such as MB Winter-
wash (if there is a risk of frost).
X Mix the windscreen washer fluid in a con-
tainer beforehand. Adapt the mixing ratio
to the outside temperatures.
! Only use windscreen washer fluid which
is suitable for plastic lamp lenses. Unsuit-
able windscreen washer fluid could dam-
age the plastic lamp lenses of the head-
lamps. Operation
* optional
211_AKB; 2; 5, en-GB
mkalafa,
Version: 2.9.4 2008-02-29T16:57:07+01:00 - Seite 226Dateiname: 6515_3416_02_buchblock.pdf; preflight
Page 238 of 401
Winter driving
235that you use a Mercedes-Benz Service
Centre for this purpose. In particular, work
relevant to safety or on safety-related sys-
tems must be carried out at a qualified
specialist workshop.
Snow chains
For safety reasons, Mercedes-Benz recom-
mends that you only use snow chains which
have been specially approved for your vehicle
by Mercedes-Benz or are of a corresponding
standard of quality.
! Information about the use of snow chain-
compatible AMG winter tyres is applicable
for AMG tyres. Use of snow chains is only
permissible with these tyres.
If you intend to fit snow chains, please bear
the following points in mind:
R Snow chains cannot be fitted to all wheel/
tyre combinations.
R Snow chains must not be fitted to emer-
gency spare wheels, e.g. the "Minispare" or
collapsible emergency spare wheel.
R Always fit snow chains to both rear wheels,
even on vehicles with 4MATIC*. Comply with the manufacturer's installation
instructions.
! If snow chains are fitted to the front
wheels, they may come into contact with
the bodywork and axle components when
the vehicle is in motion and damage the
tyre or the vehicle.
On vehicles with AIRMATIC DC*, you must
only drive at raised vehicle level if snow
chains have been fitted (Y page 156).
Do not exceed the maximum permissible
speed of 50 km/h.
i You may wish to deactivate ESP ®
when
pulling away with snow chains fitted
(Y page 60). This way you can allow the
wheels to spin in a controlled manner, ach-
ieving an increased driving force (cutting
action). Winter driving
G
Risk of accident
Do not shift down for additional engine
braking on a slippery road surface. This
could cause the drive wheels to lose their
grip and the vehicle could skid.
You should drive particularly carefully on slip-
pery road surfaces. Avoid sudden accelera-
tion, steering and braking manoeuvres.
If the vehicle threatens to skid or cannot be
stopped when moving at low speed:
X Vehicles with manual transmission: engage
neutral.
X Vehicles with automatic transmission*:
shift the selector lever to N.
X Try to bring the vehicle under control using
corrective steering. Operation
* optional
211_AKB; 2; 5, en-GB
mkalafa,
Version: 2.9.4
2008-02-29T16:57:07+01:00 - Seite 235 ZDateiname: 6515_3416_02_buchblock.pdf; preflight
Page 239 of 401
Driving
tips 236 Driving tips
Rolling with the engine switched off
G
Risk of accident
Do not switch off the engine while the vehi-
cle is in motion.
There is no power assistance for the steer-
ing or the service brake when the engine is
not running.
Steering and braking require significantly
more effort and you could lose control of
the vehicle and cause an accident as a
result. Braking
G
Risk of accident
Do not change down for additional engine
braking on a slippery road surface. This
could cause the drive wheels to lose their
grip and the vehicle could skid. G
Risk of accident
Make sure that other road users are not
endangered by your braking. Downhill gradients On long and steep downhill stretches, espe-
cially if the vehicle is laden or towing a trailer,
you must shift to a lower gear in good time or,
on vehicles with automatic transmission*,
select shift range
1,2or 3.
i This also applies if you have activated
cruise control, Speedtronic or Distronic*.
This uses the braking effect of the engine and
you will not have to brake to such an extent
to maintain the same speed. This relieves the
load on the brake system and prevents the
brakes from overheating and wearing too
quickly. If you need additional braking,
depress the brake pedal repeatedly rather
than continuously.
Heavy and light loads If the brakes have been subjected to a heavy
load, do not stop the vehicle immediately, but
drive on for a short while. This allows the air-
flow to cool the brakes more quickly.
G
Risk of accident
Never depress the brake pedal continu-
ously while the vehicle is in motion, e.g.
never cause the brakes to rub by applying constant slight pedal pressure. This causes
the brake system to overheat, increases
the braking distance and can lead to the
brakes failing completely.
If the brakes have been used only moderately,
you should occasionally test their effective-
ness. To do this, brake more firmly from a
higher speed. This improves the grip of the
brakes.
Wet roads If driving in heavy rain for a prolonged period
of time without braking, there may be a
delayed reaction from the brakes, when brak-
ing for the first time. You must brake harder.
You must therefore maintain a greater dis-
tance from the vehicle in front.
Brake firmly after driving on a wet road. This
way the brake discs will become warm, drying
more quickly, which will protect them against
corrosion. Operation
* optional
211_AKB; 2; 5, en-GB
mkalafa
,V ersion: 2.9.4
2008-02-29T16:57:07+01:00 - Seite 236 Dateiname: 6515_3416_02_buchblock.pdf; preflight