2008 MERCEDES-BENZ E-CLASS ESTATE change key battery
[x] Cancel search: change key batteryPage 69 of 401
Opening and closing
66 Opening and closing
Key
The vehicle's equipment includes two keys
with remote control. Each key contains an
emergency key element.
The key is configured at the factory to cen-
trally lock and unlock the following:
R the doors
R the boot lid/tailgate
R the fuel filler flap G
Risk of accident
If children are left unsupervised in the vehi-
cle, they could:
R open a door from the inside at any time,
even if it has been locked
R start the vehicle using a key which has
been left in the vehicle
R release the parking brake
They could endanger themselves and oth-
ers. Never leave children unsupervised in
the vehicle. Always take the key with you
when leaving the vehicle, even if you are
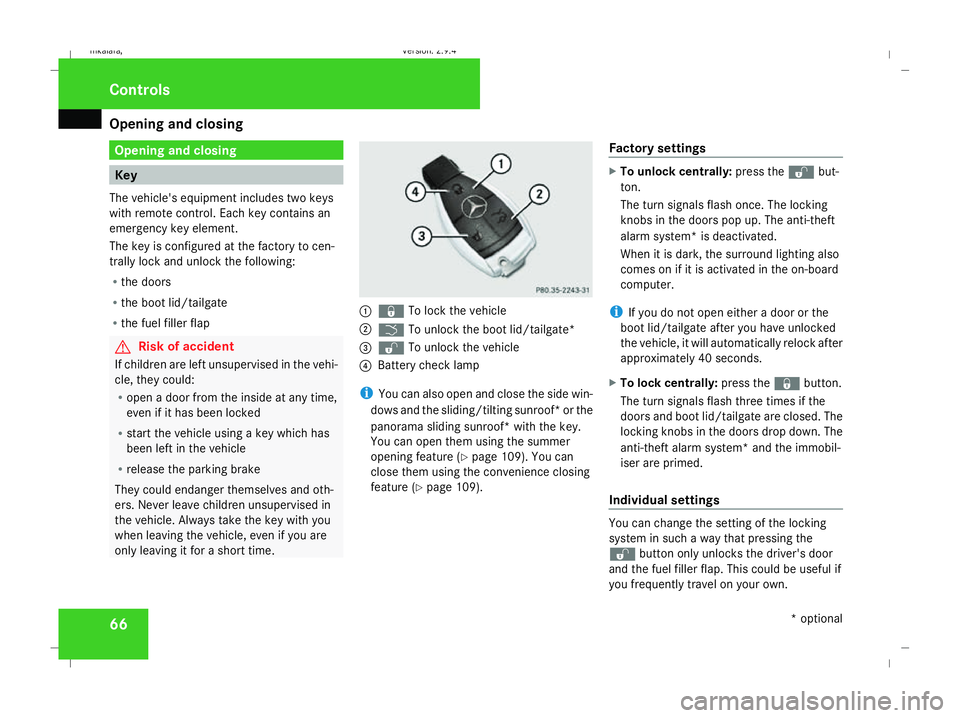
only leaving it for a short time. 1
j To lock the vehicle
2 i To unlock the boot lid/tailgate*
3 k To unlock the vehicle
4 Battery check lamp
i You can also open and close the side win-
dows and the sliding/tilting sunroof* or the
panorama sliding sunroof *with the key.
You can open them using the summer
opening feature (Y page 109). You can
close them using the convenience closing
feature (Y page 109). Factory settings X
To unlock centrally: press thekbut-
ton.
The turn signals flash once. The locking
knobs in the doors pop up. The anti-theft
alarm system* is deactivated.
When it is dark, the surround lighting also
comes on if it is activated in the on-board
computer.
i If you do not open either a door or the
boot lid/tailgate after you have unlocked
the vehicle, it will automatically relock after
approximately 40 seconds.
X To lock centrally: press thejbutton.
The turn signals flash three times if the
doors and boot lid/tailgate are closed. The
locking knobs in the doors drop down. The
anti-theft alarm system* and the immobil-
iser are primed.
Individual settings You can change the setting of the locking
system in such a way that pressing the
k
button only unlocks the driver's door
and the fuel filler flap. This could be useful if
you frequently travel on your own. Controls
* optional
211_AKB; 2; 5, en-GB
mkalafa, Version: 2.9.4 2008-02-29T16:57:07+01:00 - Seite 66Dateiname: 6515_3416_02_buchblock.pdf; preflight
Page 70 of 401
Opening and closing
67
X
To change the setting: press thek
and j buttons simultaneously for
approximately six seconds until the battery
check lamp flashes twice.
The key now functions as follows:
X To unlock the driver's door: press the
k button once.
X To unlock centrally: press thekbut-
ton twice.
X To lock centrally: press thejbutton.
Restoring the factory settings X
Press the kandj buttons simulta-
neously for approximately six seconds until
the battery check lamp flashes twice. KEYLESS GO key*
The optional equipment supplied with your
vehicle includes two KEYLESS GO keys. KEY-
LESS GO allows you to lock/unlock and start
the vehicle simply by carrying the KEYLESS
GO key with you. When you touch the surface
of the sensors on the vehicle's door handles,
KEYLESS GO establishes a radio connection
between the vehicle and the key.
When you touch the inner surface of the door
handle or press the button on the tailgate
handle (Estate), your vehicle unlocks cen-
trally if the factory settings have not been
changed:
R the doors
R the boot lid/tailgate
R the fuel filler flap
When starting the engine and whilst driving,
KEYLESS GO also checks whether a valid
KEYLESS GO key is in the vehicle by periodi-
cally establishing radio contact. G
Risk of accident
If children are left unsupervised in the vehi-
cle, they could open a door from the inside,
even if it has been locked. Or they could
start the vehicle if a valid KEYLESS GO key is in the vehicle and they press the KEY-
LESS GO button on the gear selector lever.
They could endanger themselves and oth-
ers. Never leave children unsupervised in
the vehicle. Switch off the engine and take
the KEYLESS GO key with you, even if you
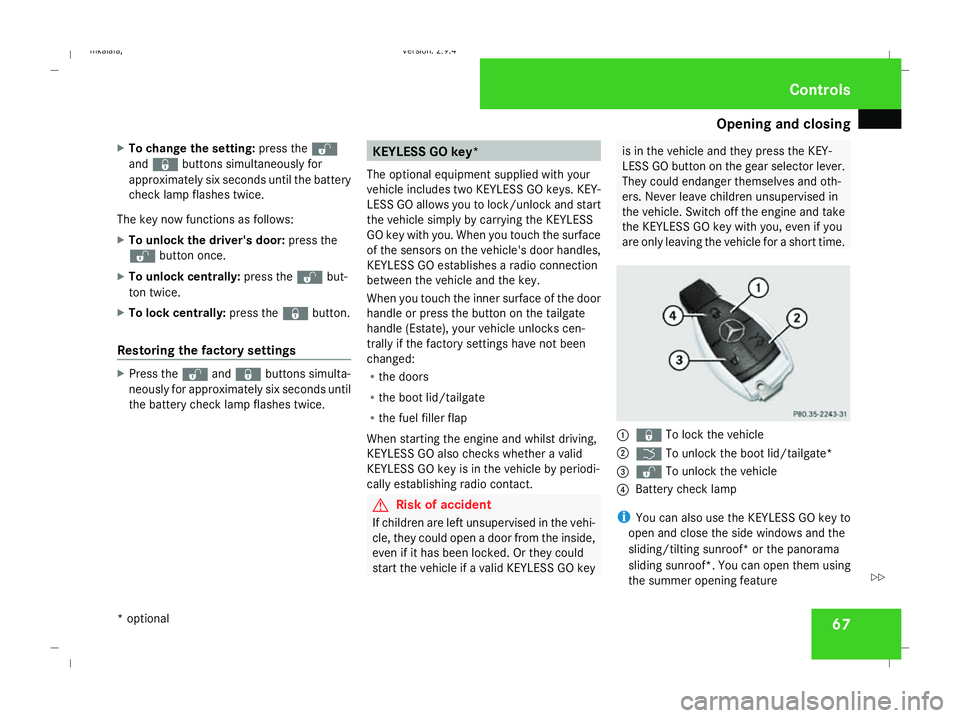
are only leaving the vehicle for a short time. 1
j To lock the vehicle
2 i To unlock the boot lid/tailgate*
3 k To unlock the vehicle
4 Battery check lamp
i You can also use the KEYLESS GO key to
open and close the side windows and the
sliding/tilting sunroof* or the panorama
sliding sunroof *.You can open them using
the summer opening feature Controls
* optional
211_AKB; 2; 5, en-GB
mkalafa,
Version: 2.9.4
2008-02-29T16:57:07+01:00 - Seite 67 ZDateiname: 6515_3416_02_buchblock.pdf; preflight
Page 72 of 401
Opening and closing
69
X
To change the setting: press thek
and j buttons simultaneously for
approximately six seconds until the battery
check lamp flashes twice.
The KEYLESS GO key will now function as fol-
lows:
X To unlock the driver's door: pull the door
handle on the driver's door.
X To unlock centrally: pull the door handle
on the front-passenger door or on the rear
doors.
X To lock centrally (Saloon): press locking
button 1on the door handle, without
touching the inside of the handle.
X To lock centrally (Estate): press the lock-
ing button on the door handle or the tail-
gate.
Restoring the factory settings X
Press the kandj buttons simulta-
neously for approximately six seconds until
the battery check lamp flashes twice. Locking centrally from the luggage
compartment* (Estate) i
If the vehicle is locked centrally while the
tailgate is open, the tailgate will be locked
automatically when it is closed.
i If you leave the KEYLESS GO key in the
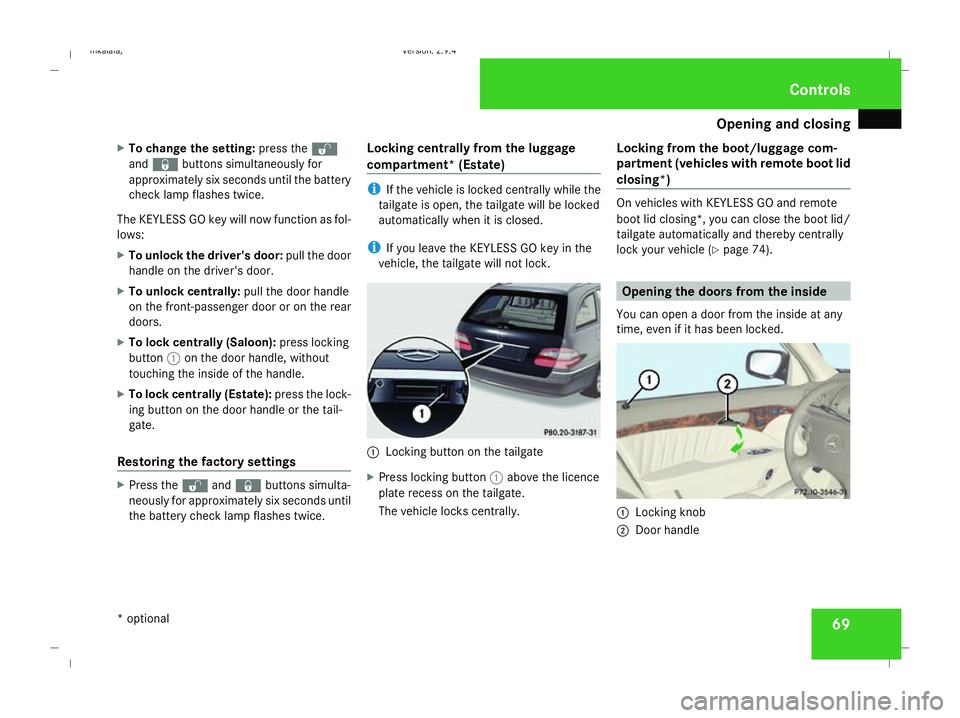
vehicle, the tailgate will not lock. 1
Locking button on the tailgate
X Press locking button 1above the licence
plate recess on the tailgate.
The vehicle locks centrally. Locking from the boot/luggage com-
partment (vehicles with remote boot lid
closing*) On vehicles with KEYLESS GO and remote
boot lid closing*, you can close the boot lid/
tailgate automatically and thereby centrally
lock your vehicle (
Ypage 74). Opening the doors from the inside
You can open a door from the inside at any
time, even if it has been locked. 1
Locking knob
2 Door handle Controls
* optional
211_AKB; 2; 5, en-GB
mkalafa,
Version: 2.9.4 2008-02-29T16:57:07+01:00 - Seite 69 ZDateiname: 6515_3416_02_buchblock.pdf; preflight
Page 89 of 401
Seats
861
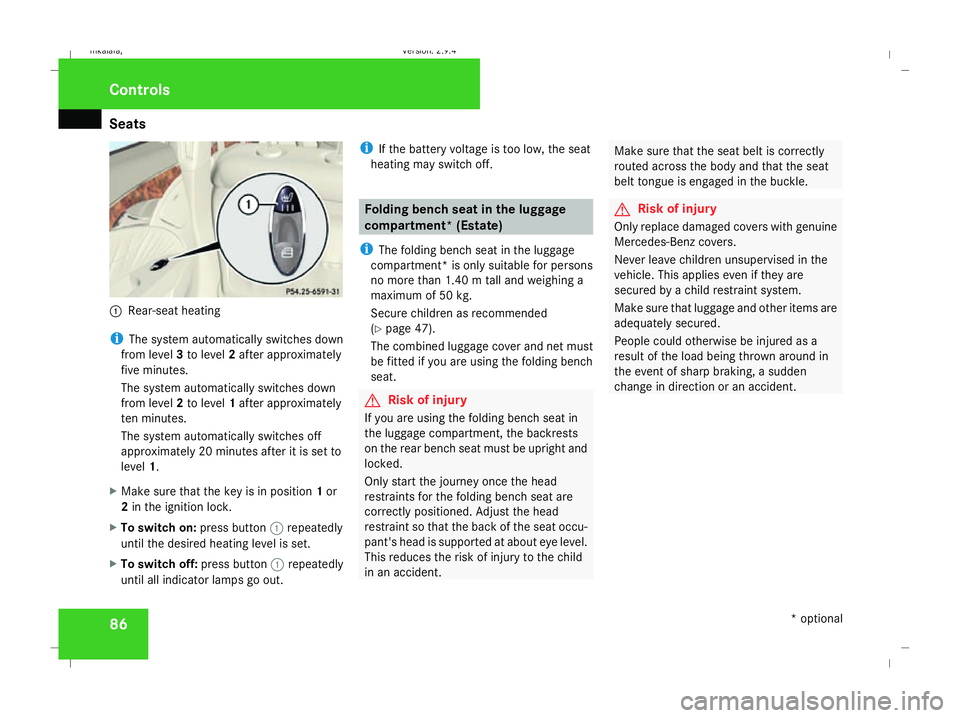
Rear-seat heating
i The system automatically switches down
from level 3to level 2after approximately
five minutes.
The system automatically switches down
from level 2to level 1after approximately
ten minutes.
The system automatically switches off
approximately 20 minutes after it is set to
level 1.
X Make sure that the key is in position 1or
2 in the ignition lock.
X To switch on: press button1repeatedly
until the desired heating level is set.
X To switch off: press button1repeatedly
until all indicator lamps go out. i
If the battery voltage is too low, the seat
heating may switch off. Folding bench seat in the luggage
compartment* (Estate)
i The folding bench seat in the luggage
compartment* is only suitable for persons
no more than 1.40 m tall and weighing a
maximum of 50 kg.
Secure children as recommended
(Y page 47).
The combined luggage cover and net must
be fitted if you are using the folding bench
seat. G
Risk of injury
If you are using the folding bench seat in
the luggage compartment, the backrests
on the rear bench seat must be upright and
locked.
Only start the journey once the head
restraints for the folding bench seat are
correctly positioned. Adjust the head
restraint so that the back of the seat occu-
pant's head is supported at about eye level.
This reduces the risk of injury to the child
in an accident. Make sure that the seat belt is correctly
routed across the body and that the seat
belt tongue is engaged in the buckle. G
Risk of injury
Only replace damaged covers with genuine
Mercedes-Benz covers.
Never leave children unsupervised in the
vehicle. This applies even if they are
secured by a child restraint system.
Make sure that luggage and other items are
adequately secured.
People could otherwise be injured as a
result of the load being thrown around in
the event of sharp braking, a sudden
change in direction or an accident. Controls
* optional
211_AKB; 2; 5, en-GB
mkalafa,
Version: 2.9.4 2008-02-29T16:57:07+01:00 - Seite 86Dateiname: 6515_3416_02_buchblock.pdf; preflight
Page 102 of 401
Lights
99Lights
Light switch
For reasons of safety, Mercedes-Benz recom-
mends that you drive with the lights switched
on even during the daytime. In some coun-
tries, daytime operation of headlamps varies
due to legal requirements and self-imposed
obligations. In these countries, the dipped-
beam headlamps are automatically switched
on when the engine is started.
i If you drive in countries in which traffic
drives on the opposite side of the road to
the country where the vehicle is registered,
oncoming traffic may be dazzled by the
asymmetrical dipped-beam headlamps.
Have the headlamps changed to symmet-
rical dipped beam when driving in these
countries. You can obtain information
about this from any Mercedes-Benz Service
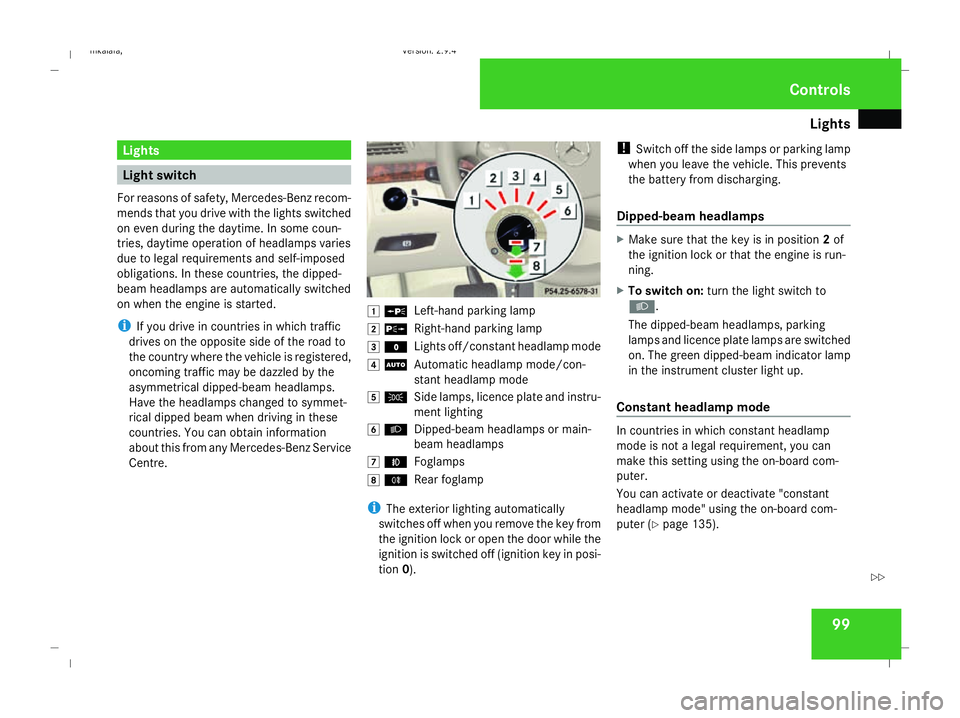
Centre. $
a
Left-hand parking lamp
% g
Right-hand parking lamp
& M
Lights off/constant headlamp mode
( U
Automatic headlamp mode/con-
stant headlamp mode
) C
Side lamps, licence plate and instru-
ment lighting
* B
Dipped-beam headlamps or main-
beam headlamps
, ¥
Foglamps
. †
Rear foglamp
i The exterior lighting automatically
switches off when you remove the key from
the ignition lock or open the door while the
ignition is switched off (ignition key in posi-
tion 0). !
Switch off the side lamps or parking lamp
when you leave the vehicle. This prevents
the battery from discharging.
Dipped-beam headlamps X
Make sure that the key is in position 2of
the ignition lock or that the engine is run-
ning.
X To switch on: turn the light switch to
B.
The dipped-beam headlamps, parking
lamps and licence plate lamps are switched
on. The green dipped-beam indicator lamp
in the instrument cluster light up.
Constant headlamp mode In countries in which constant headlamp
mode is not a legal requirement, you can
make this setting using the on-board com-
puter.
You can activate or deactivate "constant
headlamp mode" using the on-board com-
puter (Y page 135). Controls
211_AKB; 2; 5, en-GB
mkalafa,
Version: 2.9.4 2008-02-29T16:57:07+01:00 - Seite 99 ZDateiname: 6515_3416_02_buchblock.pdf; preflight
Page 180 of 401
Air conditioning
177
X
To deactivate: press theTbutton.
REST is no longer shown in the display.
i The residual heat automatically switches
off after around 30 minutes or if:
R the ignition is switched on
R the battery voltage drops Switching auxiliary heating/ventila-
tion* on/off
G
Risk of poisoning
Exhaust fumes are produced when the aux-
iliary heating is in operation. Inhaling these
exhaust fumes can be poisonous. You
should therefore switch off the auxiliary
heating in confined spaces without an
extraction system, e.g. a garage. G
Risk of fire
When operating the auxiliary heating, parts
of the vehicle may become very hot, and
highly inflammable material such as fuels
could be ignited. Operating the auxiliary
heating is thus prohibited at filling stations
or when your vehicle is being refuelled. You must therefore switch off the auxiliary heat-
ing at filling stations.
The auxiliary heating heats the air in the vehi-
cle interior to a temperature between 20 †
and 24 †, without depending on heat emitted
by the running engine. The auxiliary heating
is operated using fuel directly from the vehi-
cle's fuel tank. For this reason, the tank con-
tent must be at least at reserve fuel level to
ensure that the auxiliary heating functions.
The auxiliary heating/ventilation automati-
cally adjusts to changes in temperature and
weather conditions. For this reason, the aux-
iliary heating could switch from ventilation
mode to heating mode or from heating mode
to ventilation mode.
You cannot use the auxiliary ventilation to
cool the vehicle interior to a temperature
lower than the outside temperature.
Before activating X
Make sure that the key is in position 2in
the ignition lock.
X Set the temperature to a value between
20 † and 24 †.
The auxiliary heating/ventilation can be acti-
vated even when the air conditioning is being controlled manually. Optimum comfort can
be attained when the system is set to auto-
matic mode. Set the desired temperature
within this range. If a higher temperature is
set, the vehicle is heated to 24 †. If a lower
temperature is set, the vehicle is heated to
20 †.
Activating/deactivating the auxiliary
heating/ventilation
The auxiliary heating/ventilation can be acti-
vated or deactivated using the remote control
or the button on the centre console.
The on-board computer can be used to spec-
ify up to three departure times, one of which
may be preselected (Y
page 138). Cont
rols
* optional
211_AKB; 2; 5, en-GB
mkalafa ,V ersion: 2.9.4
2008-02-29T16:57:07+01:00 - Seite 177 ZDateiname: 6515_3416_02_buchblock.pdf; preflight
Page 215 of 401
Features
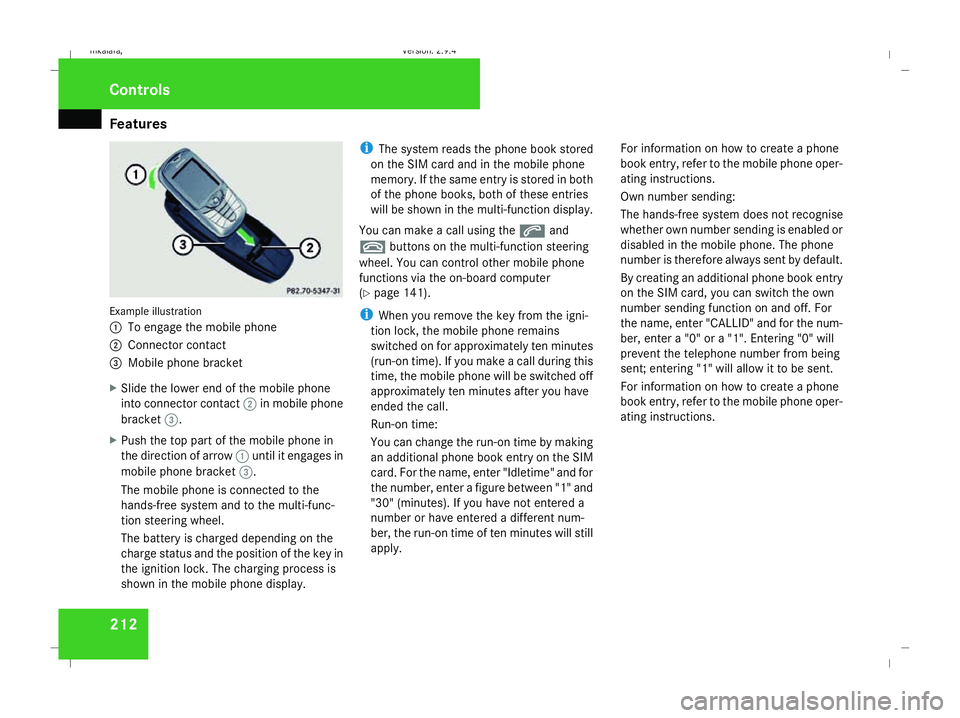
212Example illustration
1
To engage the mobile phone
2 Connector contact
3 Mobile phone bracket
X Slide the lower end of the mobile phone
into connector contact 2in mobile phone
bracket 3.
X Push the top part of the mobile phone in
the direction of arrow 1until it engages in
mobile phone bracket 3.
The mobile phone is connected to the
hands-free system and to the multi-func-
tion steering wheel.
The battery is charged depending on the
charge status and the position of the key in
the ignition lock. The charging process is
shown in the mobile phone display. i
The system reads the phone book stored
on the SIM card and in the mobile phone
memory. If the same entry is stored in both
of the phone books, both of these entries
will be shown in the multi-function display.
You can make a call using the sand
t buttons on the multi-function steering
wheel. You can control other mobile phone
functions via the on-board computer
(Y page 141).
i When you remove the key from the igni-
tion lock, the mobile phone remains
switched on for approximately ten minutes
(run-on time). If you make a call during this
time, the mobile phone will be switched off
approximately ten minutes after you have
ended the call.
Run-on time:
You can change the run-on time by making
an additional phone book entry on the SIM
card. For the name, enter "Idletime" and for
the number, enter a figure between "1" and
"30" (minutes). If you have not entered a
number or have entered a different num-
ber, the run-on time of ten minutes will still
apply. For information on how to create a phone
book entry, refer to the mobile phone oper-
ating instructions.
Own number sending:
The hands-free system does not recognise
whether own number sending is enabled or
disabled in the mobile phone. The phone
number is therefore always sent by default.
By creating an additional phone book entry
on the SIM card, you can switch the own
number sending function on and off. For
the name, enter "CALLID" and for the num-
ber, enter a "0" or a "1". Entering "0" will
prevent the telephone number from being
sent; entering "1" will allow it to be sent.
For information on how to create a phone
book entry, refer to the mobile phone oper-
ating instructions.Controls
211_AKB; 2; 5, en-GB
mkalafa,
Version: 2.9.4 2008-02-29T16:57:07+01:00 - Seite 212Dateiname: 6515_3416_02_buchblock.pdf; preflight
Page 283 of 401
Display
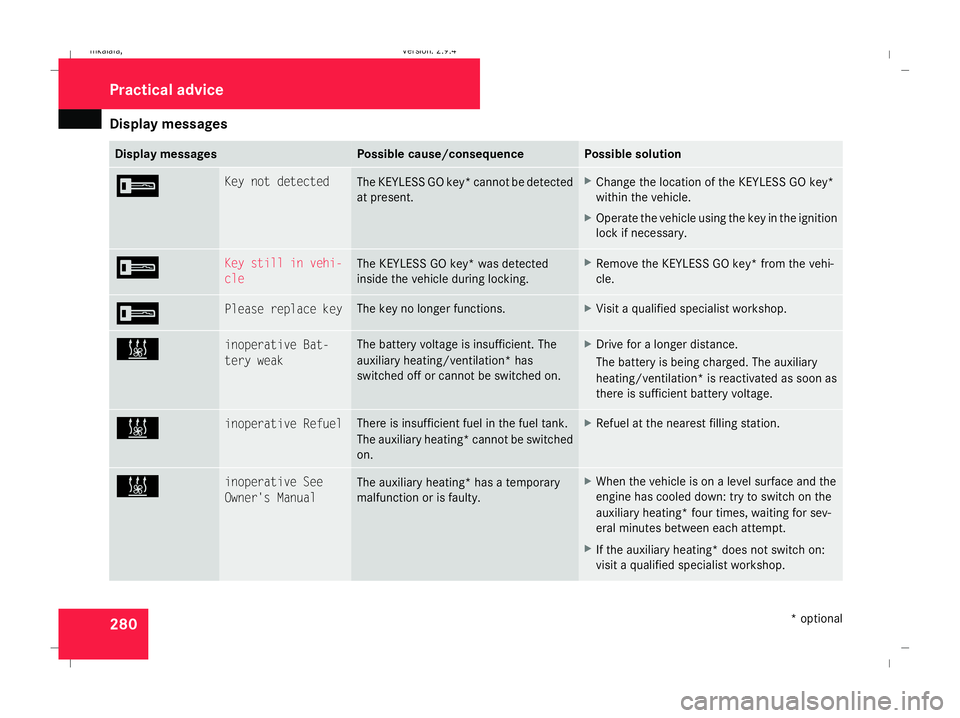
messages 280 Display messages Possible cause/consequence Possible solution
I Key not detected
The KEYLESS GO key* cannot be detected
at present. X
Change the location of the KEYLESS GO key*
within the vehicle.
X Operate the vehicle using the key in the ignition
lock if necessary. I Key still in vehi-
cle
The KEYLESS GO key* was detected
inside the vehicle during locking. X
Remove the KEYLESS GO key* from the vehi-
cle. I Please replace key The key no longer functions. X
Visit a qualified specialist workshop. X inoperative Bat-
tery weak The battery voltage is insufficient. The
auxiliary heating/ventilation* has
switched off or cannot be switched on. X
Drive for a longer distance.
The battery is being charged. The auxiliary
heating/ventilation* is reactivated as soon as
there is sufficient battery voltage. X inoperative Refuel There is insufficient fuel in the fuel tank.
The auxiliary heating* cannot be switched
on. X
Refuel at the nearest filling station. X inoperative See
Owner's Manual
The auxiliary heating* has a temporary
malfunction or is faulty. X
When the vehicle is on a level surface and the
engine has cooled down: try to switch on the
auxiliary heating* four times, waiting for sev-
eral minutes between each attempt.
X If the auxiliary heating* does not switch on:
visit a qualified specialist workshop. Practical advi
ce
* optional
211_AKB; 2; 5, en-GB
mkalafa,
Version: 2.9.4 2008-02-29T16:57:07+01:00 - Seite 280Dateiname: 6515_3416_02_buchblock.pdf; preflight