Page 299 of 401
Troubleshooting
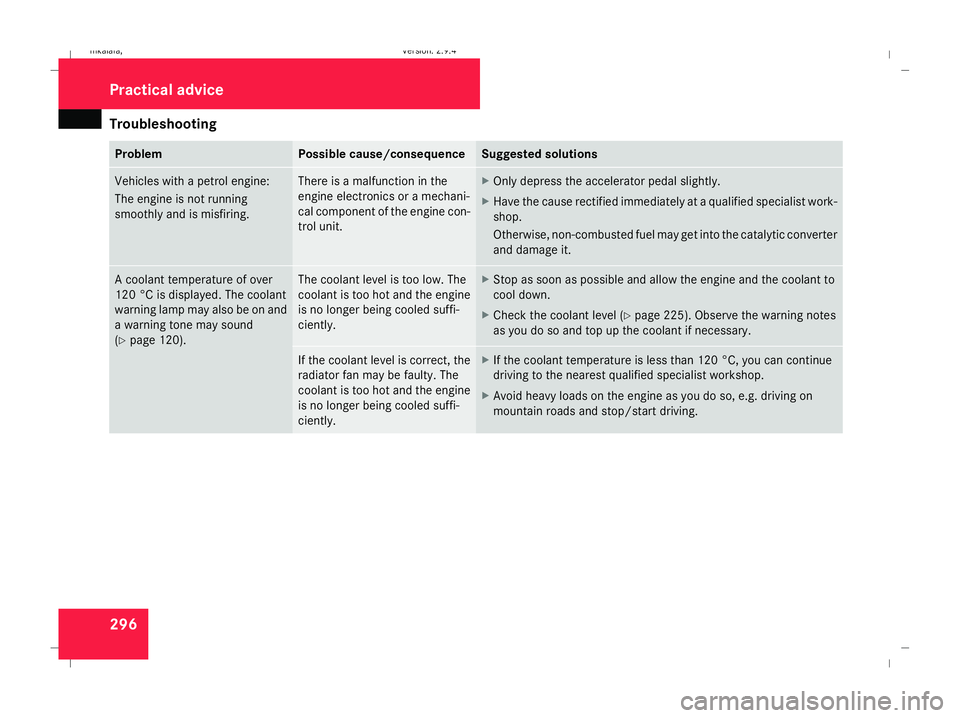
296 Problem Possible cause/consequence Suggested solutions
Vehicles with a petrol engine:
The engine is not running
smoothly and is misfiring. There is a malfunction in the
engine electronics or a mechani-
cal component of the engine con-
trol unit. X
Only depress the accelerator pedal slightly.
X Have the cause rectified immediately at a qualified specialist work-
shop.
Otherwise, non-combusted fuel may get into the catalytic converter
and damage it. A coolant temperature of over
120 °C is displayed. The coolant
warning lamp may also be on and
a warning tone may sound
(Y
page 120). The coolant level is too low. The
coolant is too hot and the engine
is no longer being cooled suffi-
ciently. X
Stop as soon as possible and allow the engine and the coolant to
cool down.
X Check the coolant level (Y page 225). Observe the warning notes
as you do so and top up the coolant if necessary. If the coolant level is correct, the
radiator fan may be faulty. The
coolant is too hot and the engine
is no longer being cooled suffi-
ciently. X
If the coolant temperature is less than 120 °C, you can continue
driving to the nearest qualified specialist workshop.
X Avoid heavy loads on the engine as you do so, e.g. driving on
mountain roads and stop/start driving. Practical advice
211_AKB; 2; 5, en-GB
mkalafa
,V ersion: 2.9.4
2008-02-29T16:57:07+01:00 - Seite 296 Dateiname: 6515_3416_02_buchblock.pdf; preflight
Page 300 of 401
Troubleshooting
297Automatic transmission*
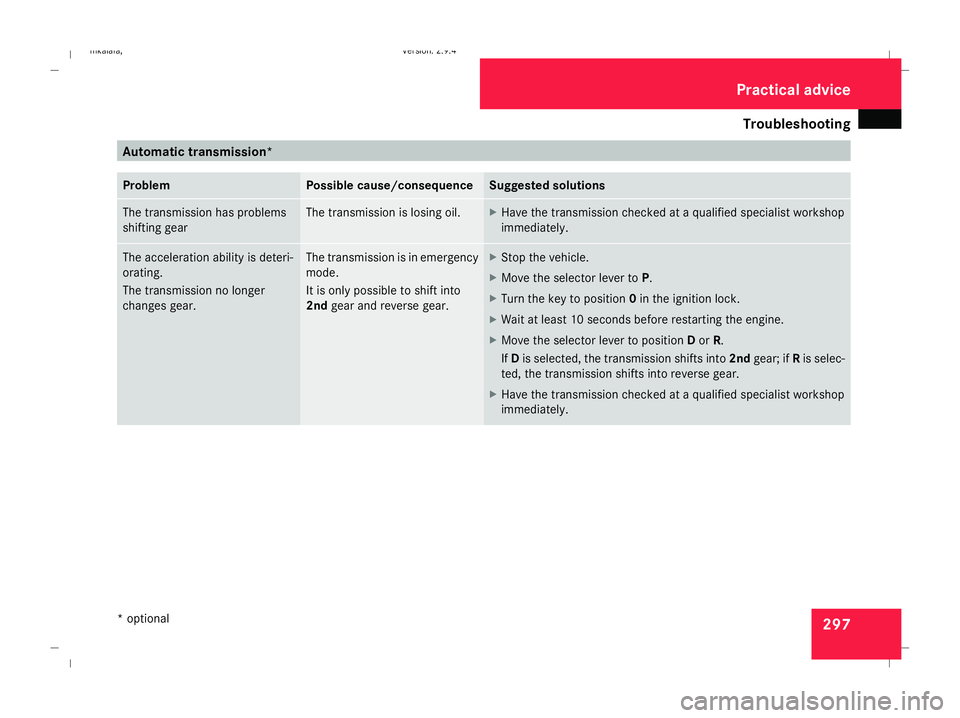
Problem Possible cause/consequence Suggested solutions
The transmission has problems
shifting gear The transmission is losing oil. X
Have the transmission checked at a qualified specialist workshop
immediately. The acceleration ability is deteri-
orating.
The transmission no longer
changes gear. The transmission is in emergency
mode.
It is only possible to shift into
2nd
gear and reverse gear. X
Stop the vehicle.
X Move the selector lever to P.
X Turn the key to position 0in the ignition lock.
X Wait at least 10 seconds before restarting the engine.
X Move the selector lever to position Dor R.
If D is selected, the transmission shifts into 2ndgear; if Ris selec-
ted, the transmission shifts into reverse gear.
X Have the transmission checked at a qualified specialist workshop
immediately. Practical advice
* optional
211_AKB; 2; 5, en-GB
mkalafa
,V ersion: 2.9.4
2008-02-29T16:57:07+01:00 - Seite 297 ZDateiname: 6515_3416_02_buchblock.pdf; preflight
Page 305 of 401
Troubleshooting
302 Problem Possible cause/consequence Suggested solutions
The key cannot be turned in the
ignition lock. The key has been in position
0for
a considerable time. X
Remove the key and reinsert it into the ignition lock.
X Check the starter battery and recharge it if necessary
(Y page 329).
X Start the engine. The on-board voltage is too low. X
Switch off non-essential consumers, e.g. seat heating* or interior
lighting, and try to turn the key again.
If this does not work:
X Check the starter battery and recharge it if necessary
(Y page 329).
or
X Jump-start the vehicle (Y page 333).
or
X Consult a qualified specialist workshop. Practical advice
* optional
211_AKB; 2; 5, en-GB
mkalafa
,V ersion: 2.9.4
2008-02-29T16:57:07+01:00 - Seite 302 Dateiname: 6515_3416_02_buchblock.pdf; preflight
Page 307 of 401
Troubleshooting
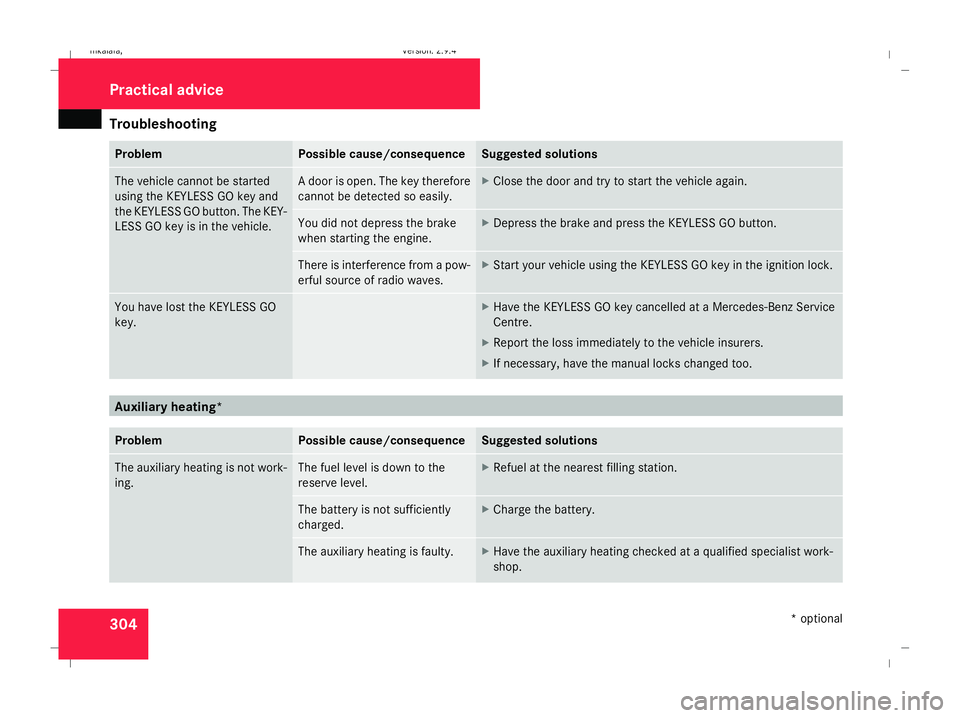
304 Problem Possible cause/consequence Suggested solutions
The vehicle cannot be started
using the KEYLESS GO key and
the KEYLESS GO button. The KEY-
LESS GO key is in the vehicle. A door is open. The key therefore
cannot be detected so easily. X
Close the door and try to start the vehicle again. You did not depress the brake
when starting the engine. X
Depress the brake and press the KEYLESS GO button. There is interference from a pow-
erful source of radio waves. X
Start your vehicle using the KEYLESS GO key in the ignition lock. You have lost the KEYLESS GO
key. X
Have the KEYLESS GO key cancelled at a Mercedes-Benz Service
Centre.
X Report the loss immediately to the vehicle insurers.
X If necessary, have the manual locks changed too. Auxiliary heating*
Problem Possible cause/consequence Suggested solutions
The auxiliary heating is not work-
ing. The fuel level is down to the
reserve level. X
Refuel at the nearest filling station. The battery is not sufficiently
charged. X
Charge the battery. The auxiliary heating is faulty. X
Have the auxiliary heating checked at a qualified specialist work-
shop. Practical advice
* optional
211_AKB; 2; 5, en-GB
mkalafa
,V ersion: 2.9.4
2008-02-29T16:57:07+01:00 - Seite 304 Dateiname: 6515_3416_02_buchblock.pdf; preflight
Page 319 of 401
Replacing the wiper blades
316
X
Fold the wiper arm away from the wind-
screen until it engages.
X Set the wiper blade at right angles to the
wiper arm.
Vehicles with KEYLESS GO*
X Switch off the engine.
X Take your foot off the brake pedal.
X Set the windscreen wipers to posi-
tion u (Ypage 106) on the combination
switch.
X Press the KEYLESS GO button repeatedly
until the windscreen wipers start.
X When the wiper arms have reached a ver-
tical position, press the KEYLESS GO but-
ton.
X Fold the wiper arm away from the wind-
screen until it engages.
X Set the wiper blade at right angles to the
wiper arm. Removing the wiper blades X
Remove the wiper blade from the retainer
on the wiper arm in the direction of the
arrow.
Fitting X
Slide the new wiper blade into the retainer
on the wiper arm in the opposite direction
to the arrow.
X Turn the wiper blade parallel to the wiper
arm.
X Fold the wiper arm back onto the wind-
screen. Rear window wiper blade (Estate)
G
Risk of injury
The wiper arm could be set in motion and
injure you if the windscreen wipers are
switched on.
Remove the key from the ignition lock
before replacing the wiper blade.
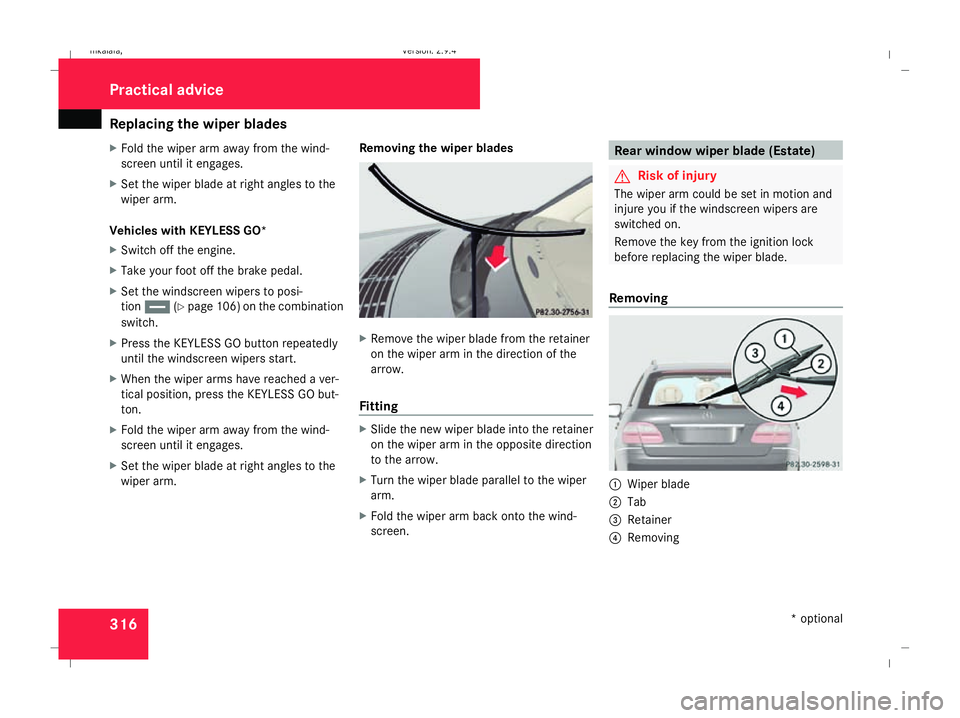
Removing 1
Wiper blade
2 Tab
3 Retainer
4 Removing Practical advice
* optional
211_AKB; 2; 5, en-GB
mkalafa
, Version: 2.9.4 2008-02-29T16:57:07+01:00 - Seite 316Dateiname: 6515_3416_02_buchblock.pdf; preflight
Page 320 of 401
Flat tyre
317
X
Remove the key from the ignition lock.
X Fold the wiper arm away from the rear win-
dow until it engages.
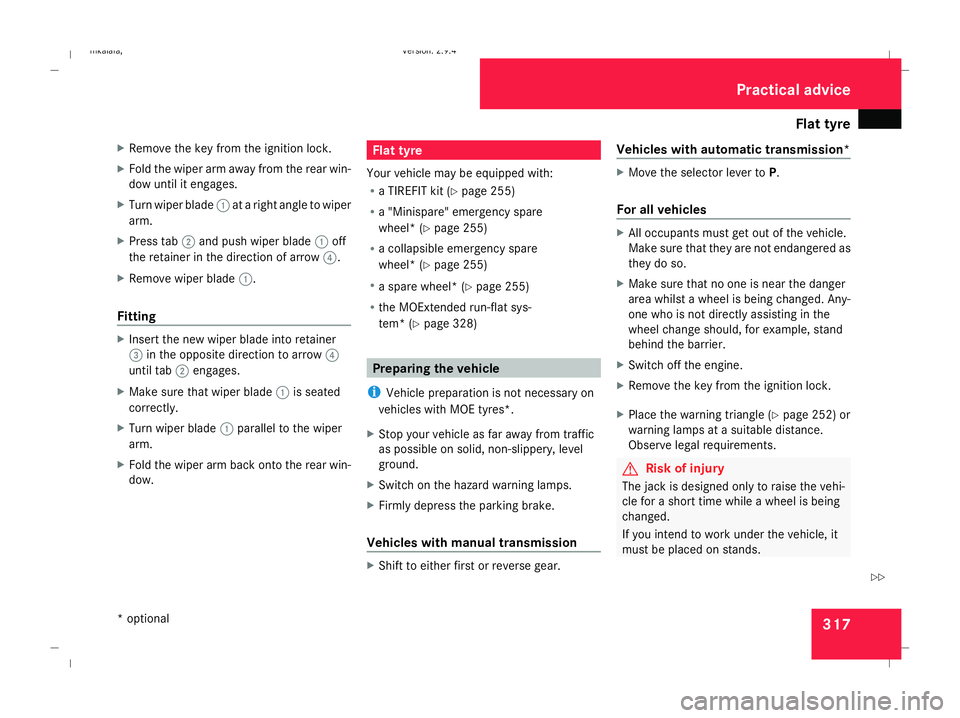
X Turn wiper blade 1at a right angle to wiper
arm.
X Press tab 2and push wiper blade 1off
the retainer in the direction of arrow 4.
X Remove wiper blade 1.
Fitting X
Insert the new wiper blade into retainer
3 in the opposite direction to arrow 4
until tab 2engages.
X Make sure that wiper blade 1is seated
correctly.
X Turn wiper blade 1parallel to the wiper
arm.
X Fold the wiper arm back onto the rear win-
dow. Flat tyre
Your vehicle may be equipped with:
R a TIREFIT kit (Y page 255)
R a "Minispare" emergency spare
wheel* (Y page 255)
R a collapsible emergency spare
wheel* (Y page 255)
R a spare wheel* (Y page 255)
R the MOExtended run-flat sys-
tem* (Y page 328) Preparing the vehicle
i Vehicle preparation is not necessary on
vehicles with MOE tyres*.
X Stop your vehicle as far away from traffic
as possible on solid, non-slippery, level
ground.
X Switch on the hazard warning lamps.
X Firmly depress the parking brake.
Vehicles with manual transmission X
Shift to either first or reverse gear. Vehicles with automatic transmission* X
Move the selector lever to P.
For all vehicles X
All occupants must get out of the vehicle.
Make sure that they are not endangered as
they do so.
X Make sure that no one is near the danger
area whilst a wheel is being changed. Any-
one who is not directly assisting in the
wheel change should, for example, stand
behind the barrier.
X Switch off the engine.
X Remove the key from the ignition lock.
X Place the warning triangle ( Ypage 252) or
warning lamps at a suitable distance.
Observe legal requirements. G
Risk of injury
The jack is designed only to raise the vehi-
cle for a short time while a wheel is being
changed.
If you intend to work under the vehicle, it
must be placed on stands. Practical advice
* optional
211_AKB; 2; 5, en-GB
mkalafa,
Version: 2.9.4
2008-02-29T16:57:07+01:00 - Seite 317 ZDateiname: 6515_3416_02_buchblock.pdf; preflight
Page 321 of 401
Flat tyre
318 Make sure that the jack is placed on a firm,
non-slip, level surface. Do not use wooden
blocks or similar as jacking supports. Oth-
erwise, the jack will not be able to achieve
its load-bearing capacity due to the restric-
ted height.
Do not start the engine at any time while
the wheel is being changed.
Do not lie under the vehicle when it is being
supported by the jack. If you do not raise
the vehicle as described, it could slip off the
jack (e.g. if the engine is started or a door
or the boot lid/tailgate is opened or closed)
and you could sustain serious injuries. Using the TIREFIT kit
You can use the TIREFIT kit to seal small
punctures, particularly those in the tyre tread.
You can use TIREFIT in outdoor temperatures
down to -20 °C. G
Risk of accident
In the following situations, your safety is at
particular risk and TIREFIT is unable to pro-
vide breakdown assistance: R
if there are cuts or punctures in the tyre
greater than 4 mm
R if the wheel rim is damaged
R if you have driven at very low tyre pres-
sures or on a flat tyre
Do not drive any further. Consult a qualified
specialist workshop which has the neces-
sary specialist knowledge and tools to carry
out the work required.
Mercedes-Benz recommends that you use
a Mercedes-Benz Service Centre for this
purpose. In particular, work relevant to
safety or on safety-related systems must be
carried out at a qualified specialist work-
shop.
X Do not remove any foreign objects which
have penetrated the tyre, e.g. screws or
nails.
X Remove TIREFIT, the accompanying "max.
80 km/h "sticker and the electric air pump
from the stowage well underneath the
boot/luggage compartment floor
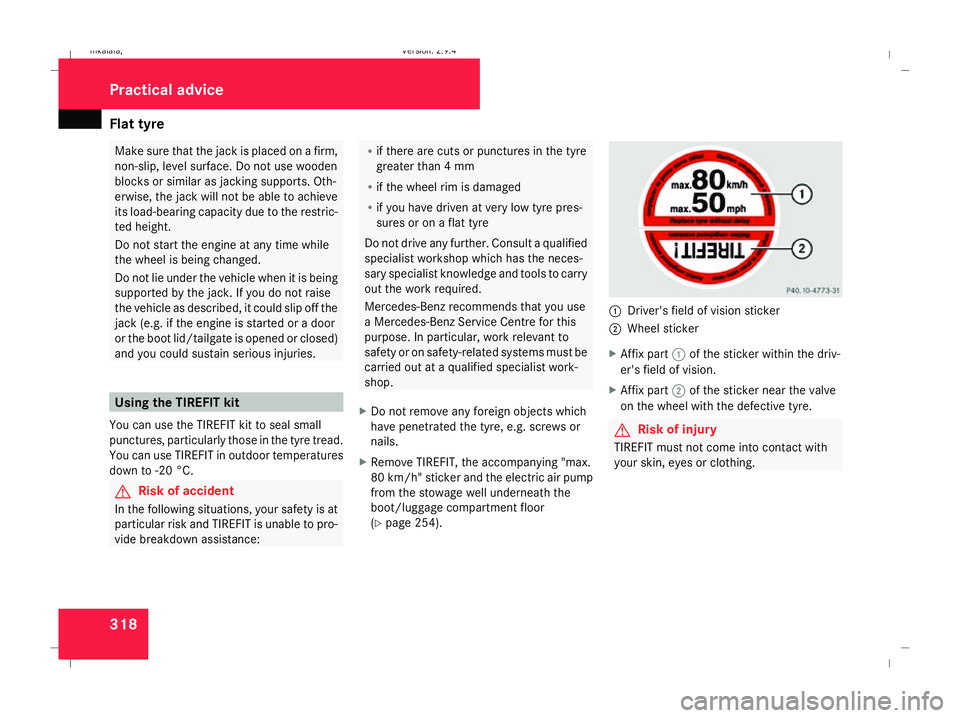
(Y page 254). 1
Driver's field of vision sticker
2 Wheel sticker
X Affix part 1of the sticker within the driv-
er's field of vision.
X Affix part 2of the sticker near the valve
on the wheel with the defective tyre. G
Risk of injury
TIREFIT must not come into contact with
your skin, eyes or clothing. Practical advice
211_AKB; 2; 5, en-GB
mkalafa
, Version: 2.9.4 2008-02-29T16:57:07+01:00 - Seite 318Dateiname: 6515_3416_02_buchblock.pdf; preflight
Page 333 of 401
Battery
330 step out of the vehicle first and touch the
bodywork.
R Do not wipe the battery using a cloth. The
battery may explode as a result of elec-
trostatic charge or due to flying sparks.
! Switch the engine off and remove the key
before unscrewing or disconnecting the
terminal clamps from the battery. You may
otherwise destroy electronic components
such as the alternator.
i Mercedes-Benz recommends that you
have all work involving the battery, e.g.
removing, charging and replacing, carried
out at a qualified specialist workshop, e.g.
a Mercedes-Benz Service Centre.
Installation location of the battery Your vehicle is equipped with a battery in the
boot. It is located under the cover in the spare
wheel well.
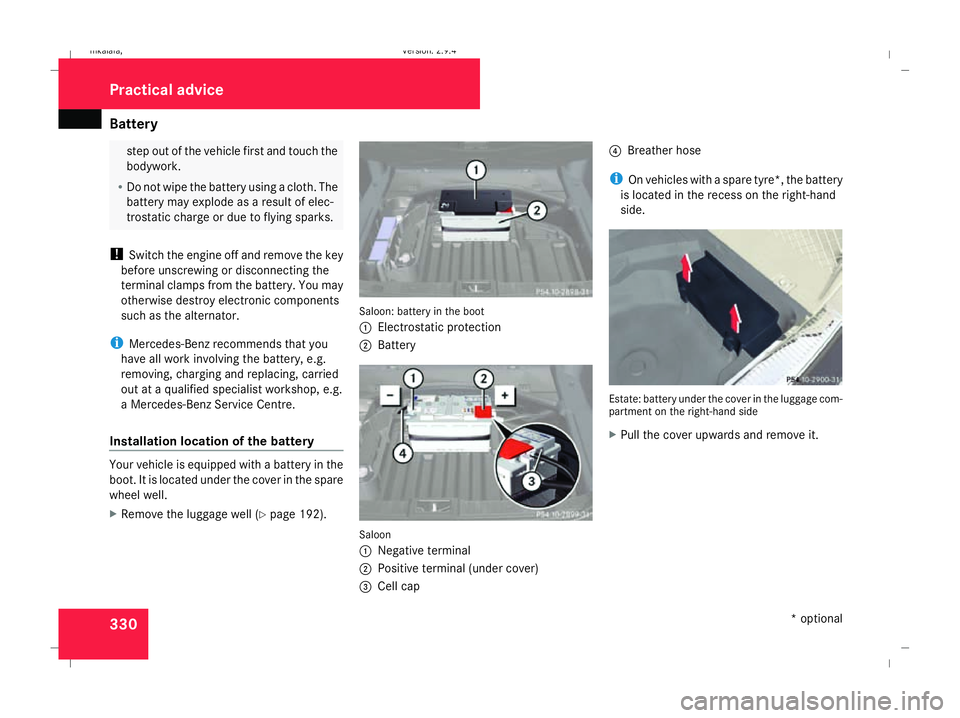
X Remove the luggage well (Y page 192). Saloon: battery in the boot
1
Electrostatic protection
2 Battery Saloon
1
Negative terminal
2 Positive terminal (under cover)
3 Cell cap 4
Breather hose
i On vehicles with a spare tyre*, the battery
is located in the recess on the right-hand
side. Estate: battery under the cover in the luggage com-
partment on the right-hand side
X
Pull the cover upwards and remove it. Practical advice
* optional
211_AKB; 2; 5, en-GB
mkalafa,
Version: 2.9.4 2008-02-29T16:57:07+01:00 - Seite 330Dateiname: 6515_3416_02_buchblock.pdf; preflight