2008 MERCEDES-BENZ E-CLASS ESTATE engine
[x] Cancel search: enginePage 129 of 401
On-board computer
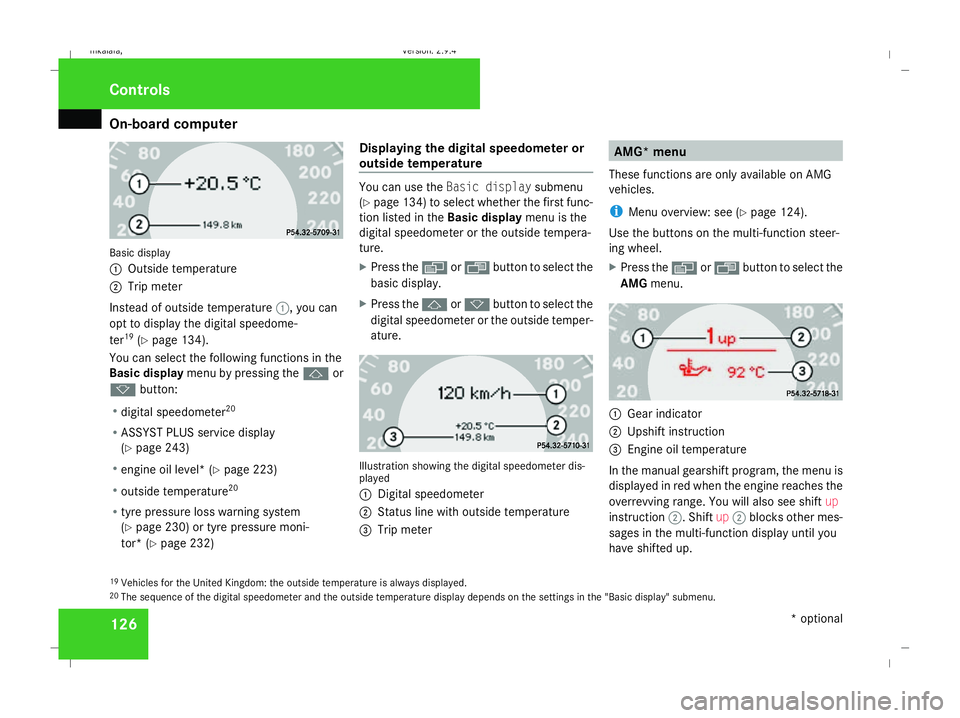
126Basic display
1
Outside temperature
2 Trip meter
Instead of outside temperature 1, you can
opt to display the digital speedome-
ter 19
(Y page 134).
You can select the following functions in the
Basic display menu by pressing the jor
k button:
R digital speedometer 20
R ASSYST PLUS service display
(Y page 243)
R engine oil level* (Y page 223)
R outside temperature 20
R tyre pressure loss warning system
(Y page 230) or tyre pressure moni-
tor* (Y page 232) Displaying the digital speedometer or
outside temperature You can use the
Basic display submenu
(Y page 134) to select whether the first func-
tion listed in the Basic displaymenu is the
digital speedometer or the outside tempera-
ture.
X Press the èor· button to select the
basic display.
X Press the jork button to select the
digital speedometer or the outside temper-
ature. Illustration showing the digital speedometer dis-
played
1
Digital speedometer
2 Status line with outside temperature
3 Trip meter AMG* menu
These functions are only available on AMG
vehicles.
i Menu overview: see (Y page 124).
Use the buttons on the multi-function steer-
ing wheel.
X Press the èor· button to select the
AMG menu. 1
Gear indicator
2 Upshift instruction
3 Engine oil temperature
In the manual gearshift program, the menu is
displayed in red when the engine reaches the
overrevving range. You will also see shift up
instruction 2. Shiftup2 blocks other mes-
sages in the multi-function display until you
have shifted up.
19 Vehicles for the United Kingdom: the outside temperature is always displayed.
20 The sequence of the digital speedometer and the outside temperature display depends on the settings in the "Basic display" submenu. Controls
* optional
211_AKB; 2; 5, en-GB
mkalafa,
Version: 2.9.4 2008-02-29T16:57:07+01:00 - Seite 126Dateiname: 6515_3416_02_buchblock.pdf; preflight
Page 130 of 401
On-board computer
127
The engine oil temperature gauge flashes if
the engine oil temperature has not reached
80 †. Avoid driving at full engine output dur-
ing this time.
Displaying the on-board voltage X
Press the èor· button to select the
AMG menu.
X Press the jbutton repeatedly until the
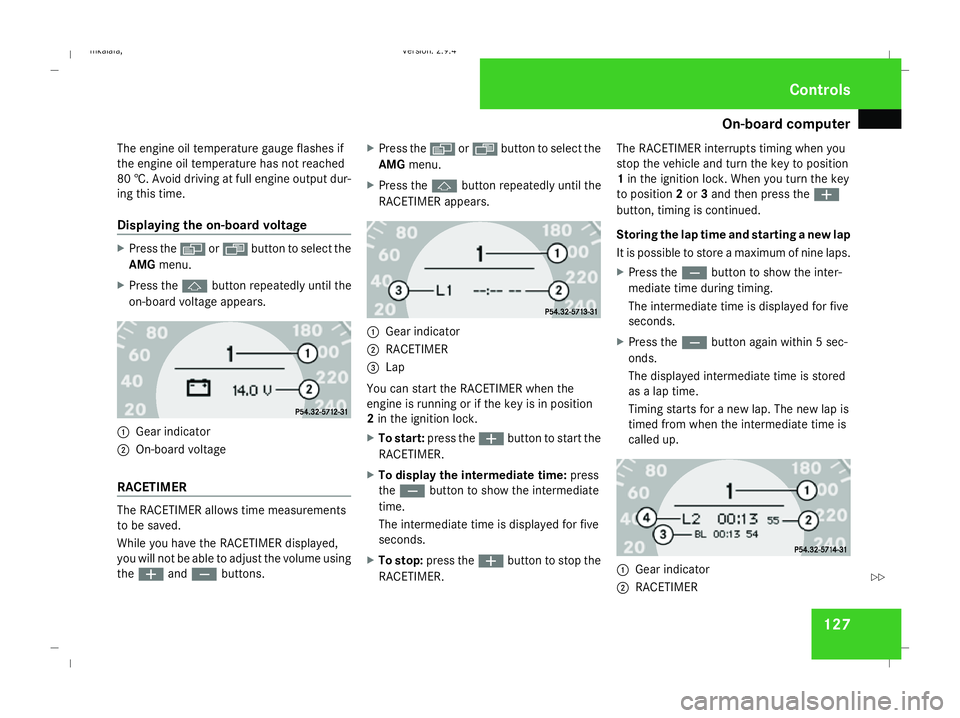
on-board voltage appears. 1
Gear indicator
2 On-board voltage
RACETIMER The RACETIMER allows time measurements
to be saved.
While you have the RACETIMER displayed,
you will not be able to adjust the volume using
the æ andç buttons. X
Press the èor· button to select the
AMG menu.
X Press the jbutton repeatedly until the
RACETIMER appears. 1
Gear indicator
2 RACETIMER
3 Lap
You can start the RACETIMER when the
engine is running or if the key is in position
2 in the ignition lock.
X To start: press the æbutton to start the
RACETIMER.
X To display the intermediate time: press
the ç button to show the intermediate
time.
The intermediate time is displayed for five
seconds.
X To stop: press the æbutton to stop the
RACETIMER. The RACETIMER interrupts timing when you
stop the vehicle and turn the key to position
1
in the ignition lock. When you turn the key
to position 2or 3and then press the æ
button, timing is continued.
Storing the lap time and starting a new lap
It is possible to store a maximum of nine laps.
X Press the çbutton to show the inter-
mediate time during timing.
The intermediate time is displayed for five
seconds.
X Press the çbutton again within 5 sec-
onds.
The displayed intermediate time is stored
as a lap time.
Timing starts for a new lap. The new lap is
timed from when the intermediate time is
called up. 1
Gear indicator
2 RACETIMER Controls
211_AKB; 2; 5, en-GB
mkalafa,
Version: 2.9.4
2008-02-29T16:57:07+01:00 - Seite 127 ZDateiname: 6515_3416_02_buchblock.pdf; preflight
Page 131 of 401
On-board computer
128
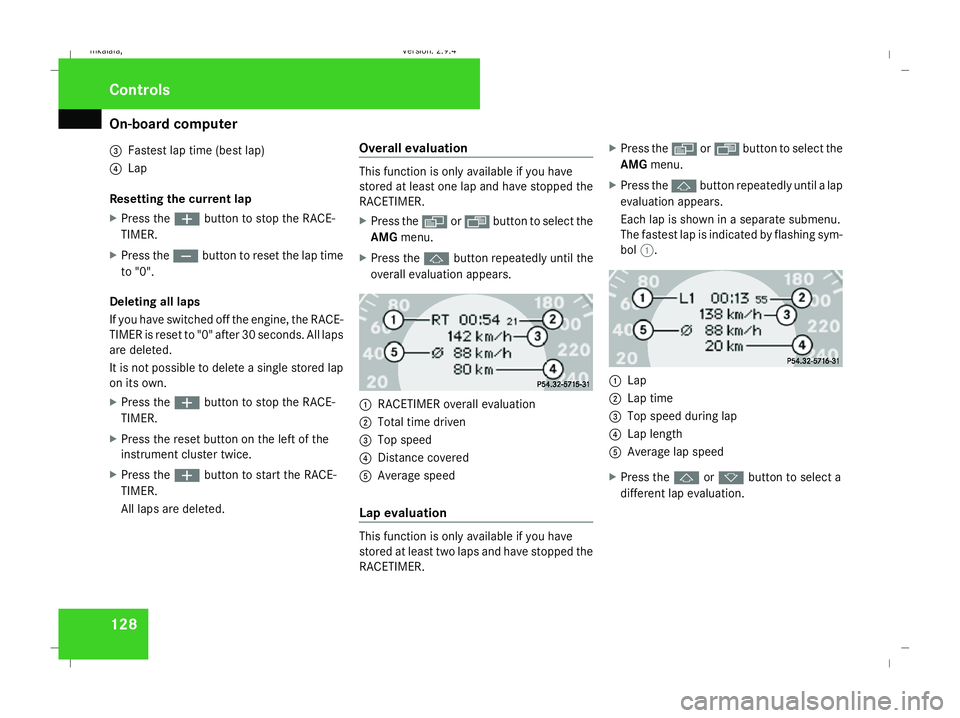
3
Fastest lap time (best lap)
4 Lap
Resetting the current lap
X Press the æbutton to stop the RACE-
TIMER.
X Press the çbutton to reset the lap time
to "0".
Deleting all laps
If you have switched off the engine, the RACE-
TIMER is reset to "0" after 30 seconds. All laps
are deleted.
It is not possible to delete a single stored lap
on its own.
X Press the æbutton to stop the RACE-
TIMER.
X Press the reset button on the left of the
instrument cluster twice.
X Press the æbutton to start the RACE-
TIMER.
All laps are deleted. Overall evaluation This function is only available if you have
stored at least one lap and have stopped the
RACETIMER.
X
Press the èor· button to select the
AMG menu.
X Press the jbutton repeatedly until the
overall evaluation appears. 1
RACETIMER overall evaluation
2 Total time driven
3 Top speed
4 Distance covered
5 Average speed
Lap evaluation This function is only available if you have
stored at least two laps and have stopped the
RACETIMER.X
Press the èor· button to select the
AMG menu.
X Press the jbutton repeatedly until a lap
evaluation appears.
Each lap is shown in a separate submenu.
The fastest lap is indicated by flashing sym-
bol 1. 1
Lap
2 Lap time
3 Top speed during lap
4 Lap length
5 Average lap speed
X Press the jork button to select a
different lap evaluation. Controls
211_AKB; 2; 5, en-GB
mkalafa, Version: 2.9.4 2008-02-29T16:57:07+01:00 - Seite 128Dateiname: 6515_3416_02_buchblock.pdf; preflight
Page 138 of 401
On-board computer
135
X
Press the èor· button to select the
Settings... menu.
X Press the jbutton to call up the selec-
tion of submenus.
X Press the æorç button to select the
Time/Date submenu.
Setting the time
X Use the jbutton to select Clock,
hours Press R to confirm (orClock,
minutes Press R to confirm ).
X Press the æorç button to set a
value.
X Press the reset button on the left of the
instrument cluster.
The set time is stored.
Setting the date
X Press the jbutton to select Set date
Day (orSet date Month orSet date
Year).
X Press the æorç button to set the
values.
X Press the j,èorÿ button to
select a different display. Setting constant headlamp mode If you have set constant headlamp mode and
the light switch is in position MorU,
the side lamps, dipped-beam headlamps and
licence plate lighting are switched on auto-
matically when the engine is running. Turning
the light switch to a different position
switches on the corresponding lights. Make
sure that the light switch is turned to Bor
U if you switch off constant headlamp
mode while driving in the dark.
In countries in which constant headlamp
mode is a legal requirement, Constantis the
factory setting.
X Press the èor· button to select the
Settings... menu.
X Press the jbutton to call up the selec-
tion of submenus.
X Press the æorç button to select the
Lighting submenu.
X Press the jbutton to select Headlamp
mode. X
Press the æorç button to set the
mode for the headlamps to ManualorCon-
stant (constant headlamp mode).
X Press the j,èorÿ button to
select a different display.
Switching the surround lighting on or
off If the surround lighting is switched on, the
following lights will be switched on automat-
ically in the dark after you have unlocked the
vehicle using the key:
R
the side lamps
R the tail lamps
R the licence plate lighting
R the front foglamps
The surround lighting switches off automati-
cally if you open the driver's door or after 40
seconds.
X Press èor· to select the Set-
tings... menu.
X Press the jbutton to call up the selec-
tion of submenus.
X Press the æorç button to select the
Lighting submenu. Controls
211_AKB; 2; 5, en-GB
mkalafa,
Version: 2.9.4
2008-02-29T16:57:07+01:00 - Seite 135 ZDateiname: 6515_3416_02_buchblock.pdf; preflight
Page 139 of 401
On-board computer
136
X
Press the jbutton to select the Sur-
round lighting function.
X Press the æorç button to switch
the Surround lighting function on or
off.
X Press the j,èorÿ button to
select a different display.
Setting the ambient lighting* X
Press the èor· button to select the
Settings... menu.
X Press the jbutton to call up the selec-
tion of submenus.
X Press the æorç button to select the
Lighting submenu.
X Press the jbutton to select Ambient
light.
X Press the æorç button to adjust the
brightness to any level from 0(off) to 5
(bright).
X Press the j,èorÿ button to
select a different display. Activating/deactivating the exterior
lighting delayed switch-off You can set whether the exterior lighting
should remain on for 15 seconds after the
doors are closed when it is dark using the
Headlamps delayed switch-off function.
If none of the doors are opened after the
engine is switched off or if an open door is not
closed, the exterior lighting goes out after
60 seconds.
When you have set a delayed switch-off time
and then switch off the engine, the following
remain lit:
R the side lamps
R the tail lamps
R the licence plate lighting
R the front foglamps
X Press èor· to select the Set-
tings... menu.
X Press the jbutton to call up the selec-
tion of submenus.
X Press the æorç button to select the
Lighting submenu.
X Press the jbutton to select Headlamps
delayed switch-off. X
Press the æorç button to activate
or deactivate the Headlamps delayed
switch-off feature.
X Press the j,èorÿ button to
select a different display.
To temporarily deactivate the delayed switch-
off:
X Before leaving the vehicle, turn the key to
position 0in the ignition lock.
X Turn the key to position 2in the ignition
lock and back to position 0.
Delayed switch-off is deactivated. It is reac-
tivated as soon as you start the engine
again.
Activating/deactivating the interior
lighting delayed switch-off The
Interior lighting delayed switch-
off function allows you to set whether the
interior lighting should remain on for 10 sec-
onds after the key is removed from the igni-
tion lock when it is dark.
X Press the èor· button to select the
Settings... menu.
X Press the jbutton to call up the selec-
tion of submenus. Controls
* optional
211_AKB; 2; 5, en-GB
mkalafa,
Version: 2.9.4 2008-02-29T16:57:07+01:00 - Seite 136Dateiname: 6515_3416_02_buchblock.pdf; preflight
Page 146 of 401
Driving sys
tems 143Cruise control
Cruise control maintains a constant road
speed for you. It brakes automatically in order
to avoid exceeding the set speed. On long and
steep downhill gradients, especially if the
vehicle is laden or towing a trailer, you must
shift to a lower gear in good time or select
shift range 1,2or 3in vehicles with automatic
transmission*. By doing so you will make use
of the braking effect of the engine, which
relieves the load on the brake system and
prevents the brakes from overheating and
wearing too quickly. G
Risk of accident
Do not change down for additional engine
braking on a slippery road surface. This
could cause the drive wheels to lose their
grip and the vehicle could skid.
Use cruise control only if road and traffic con-
ditions make it appropriate to maintain a
steady speed for a prolonged period. You can
store any road speed above 30 km/h. G
Risk of accident
Cruise control cannot take account of road
and traffic conditions.
Always pay attention to traffic conditions
even when cruise control is activated. Cruise control is only an aid designed to
assist driving. You are responsible for the
vehicle's speed and for braking in good
time. G
Risk of accident
Do not use cruise control:
R in road and traffic conditions which do
not allow you to maintain a constant
speed (e.g. heavy traffic or winding
roads). You could otherwise cause an
accident.
R on slippery roads. Braking or accelerat-
ing could cause the drive wheels to lose
traction and the vehicle could then skid.
R when there is poor visibility, e.g. due to
fog, heavy rain or snow
Cruise control display in the speedom-
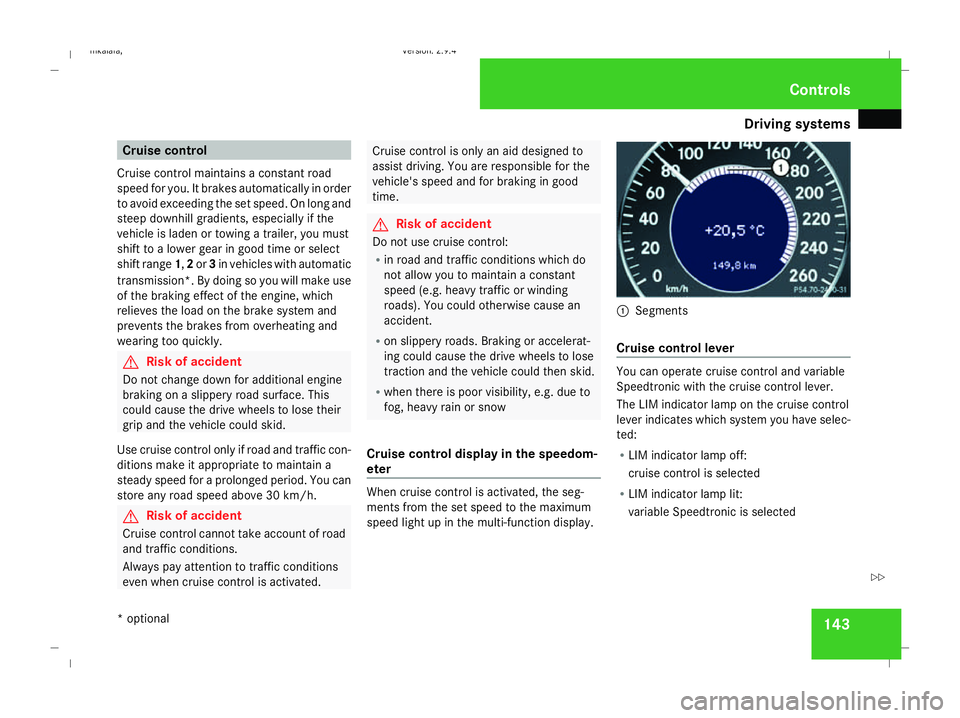
eter When cruise control is activated, the seg-
ments from the set speed to the maximum
speed light up in the multi-function display. 1
Segments
Cruise control lever You can operate cruise control and variable
Speedtronic with the cruise control lever.
The LIM indicator lamp on the cruise control
lever indicates which system you have selec-
ted:
R
LIM indicator lamp off:
cruise control is selected
R LIM indicator lamp lit:
variable Speedtronic is selected Controls
* optional
211_AKB; 2; 5, en-GB
mkalafa
,V ersion: 2.9.4
2008-02-29T16:57:07+01:00 - Seite 143 ZDateiname: 6515_3416_02_buchblock.pdf; preflight
Page 147 of 401
Driving sys
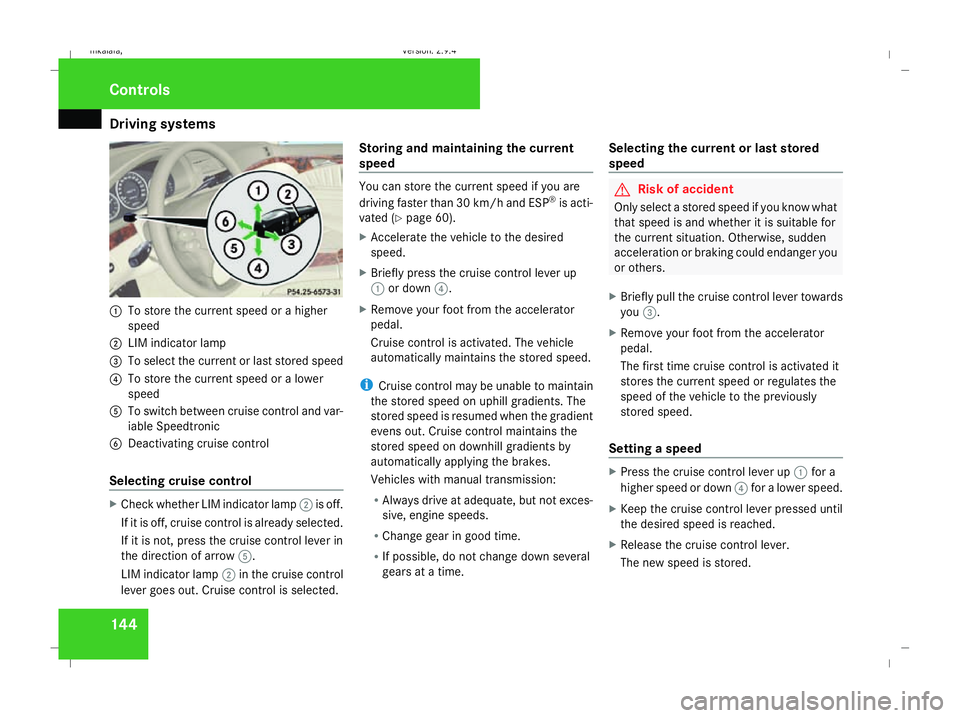
tems 1441
To store the current speed or a higher
speed
2 LIM indicator lamp
3 To select the current or last stored speed
4 To store the current speed or a lower
speed
5 To switch between cruise control and var-
iable Speedtronic
6 Deactivating cruise control
Selecting cruise control X
Check whether LIM indicator lamp 2is off.
If it is off, cruise control is already selected.
If it is not, press the cruise control lever in
the direction of arrow 5.
LIM indicator lamp 2in the cruise control
lever goes out. Cruise control is selected. Storing and maintaining the current
speed You can store the current speed if you are
driving faster than 30 km/h and ESP ®
is acti-
vated (Y page 60).
X Accelerate the vehicle to the desired
speed.
X Briefly press the cruise control lever up
1 or down 4.
X Remove your foot from the accelerator
pedal.
Cruise control is activated. The vehicle
automatically maintains the stored speed.
i Cruise control may be unable to maintain
the stored speed on uphill gradients. The
stored speed is resumed when the gradient
evens out. Cruise control maintains the
stored speed on downhill gradients by
automatically applying the brakes.
Vehicles with manual transmission:
R Always drive at adequate, but not exces-
sive, engine speeds.
R Change gear in good time.
R If possible, do not change down several
gears at a time. Selecting the current or last stored
speed G
Risk of accident
Only select a stored speed if you know what
that speed is and whether it is suitable for
the current situation. Otherwise, sudden
acceleration or braking could endanger you
or others.
X Briefly pull the cruise control lever towards
you 3.
X Remove your foot from the accelerator
pedal.
The first time cruise control is activated it
stores the current speed or regulates the
speed of the vehicle to the previously
stored speed.
Setting a speed X
Press the cruise control lever up 1for a
higher speed or down 4for a lower speed.
X Keep the cruise control lever pressed until
the desired speed is reached.
X Release the cruise control lever.
The new speed is stored. Controls
211_AKB; 2; 5, en-GB
mkalafa
,V ersion: 2.9.4
2008-02-29T16:57:07+01:00 - Seite 144 Dateiname: 6515_3416_02_buchblock.pdf; preflight
Page 148 of 401
Driving sys
tems 145
i
Cruise control is not deactivated if you
depress the accelerator pedal. For exam-
ple, if you accelerate briefly to overtake,
cruise control adjusts the vehicle's speed
to the last speed stored after you have fin-
ished overtaking.
i Deceleration of the vehicle by means of
the cruise control lever is assisted by auto-
matic application of the brakes.
Vehicles with automatic transmission*:
On long downhill gradients, the automatic
transmission shifts down as a further meas-
ure.
Making fine adjustments in 1 km/h
increments X
Briefly press the cruise control lever up
1 for a higher speed or down 4for a
lower speed.
The last speed stored is increased or
reduced.
Deactivating cruise control There are several ways to deactivate cruise
control: X
Briefly press the cruise control lever for-
wards 6.
or
X Brake.
or
X Briefly press the cruise control lever in the
direction of arrow 5.
Variable Speedtronic is selected. LIM indi-
cator lamp 2in the cruise control lever
lights up.
Cruise control is automatically deactivated if,
for example:
R you depress the parking brake
R you are driving at less than 30 km/h
R ESP ®
is intervening or you deactivate
ESP ®
R you move the selector lever to Nin vehicles
with automatic transmission* while driving
If cruise control is deactivated, you will hear
a warning tone. You will see the Cruise con-
trol off message in the multi-function dis-
play for approximately five seconds.
i The last speed stored is cleared when you
switch off the engine. Distronic*
Distronic regulates the speed and automati-
cally maintains the distance to the vehicle in
front. It brakes automatically in order to avoid
exceeding the set speed. On long and steep
downhill gradients, especially if the vehicle is
laden or towing a trailer, you must select shift
range 1,2or 3. By doing so,you will make use
of the braking effect of the engine, which
relieves the load on the brake system and
prevents the brakes from overheating and
wearing too quickly. G
Risk of accident
Do not change down for additional engine
braking on a slippery road surface. This
could cause the drive wheels to lose their
grip and the vehicle could skid. G
Risk of accident
Distronic is only an aid designed to assist
driving. The driver remains fully responsible
for the vehicle's distance from other vehi-
cles, the vehicle's speed and braking in
good time. Controls
* optional
211_AKB; 2; 5, en-GB
mkalafa
,V ersion: 2.9.4
2008-02-29T16:57:07+01:00 - Seite 145 ZDateiname: 6515_3416_02_buchblock.pdf; preflight