2008 MERCEDES-BENZ CLS COUPE display
[x] Cancel search: displayPage 130 of 329
On-board computer
127
X
Press the æ or ç button to select the
Lighting submenu.
X Press the j button to select Interior
lighting delayed switch-off.
X Press the æ or ç button to activate
or deactivate the Interior lighting
delayed switch-off feature.
X Press the j, è or ÿ button to
select a different display.
Activating/deactivating the automatic
door locking feature The Automatic door locking feature
allows you to set whether your vehicle will
lock centrally from a speed of about
15 km/h
upwards.
i For more information on the automatic
locking feature, see ( Y page 69).
X Press the è
or · button to select the
Settings... menu.
X Press the j
button to call up the selec-
tion of submenus.
X Press the æ
or ç button to select the
Vehicle submenu. X
Press the j
button to select Automatic
door locking.
X Press the æ or ç button to switch
the Automatic door locking feature on
or off.
X Press the j, è or ÿ button to
select a different display.
Selecting the switch-on time for the
auxiliary heating* This function is only available if the vehicle
has an auxiliary heating system.
The
Auxiliary
heat. function allows you to
select three switch-on times. You can set the
exact switch-on time using the other func-
tions in the Heater submenu.
The auxiliary heating adopts the Thermatic or
4-zone Thermotronic* temperature setting.
The minimum and maximum temperature set-
tings for the auxiliary heating are 20 † and
24 † respectively.
You can switch off the auxiliary heating by
using the remote control or the auxiliary heat-
ing button on the centre console.
The auxiliary heating is switched off automat-
ically after 50 minutes. This time can be
changed. To do this, visit a qualified specialist workshop, e.g. a Mercedes-Benz Service
Centre. G
Risk of fire and poisoning
The operation of the auxiliary heating pro-
duces hot, toxic exhaust fumes. The fuel
vapours produced during refuelling could
ignite on the hot exhaust system.
Do not switch on the auxiliary heating at
filling stations or in enclosed spaces, for
instance,
a garage, if there is no air extrac-
tion system.
You could otherwise endanger yourself and
others.
The Auxiliary heat. function can be called
up directly.
X Turn the key to position 1
or 2 in the ignition
lock.
X Press the button for the auxiliary heating on
the centre console
(Y page 166).
or
X Press the è
or · button to select the
Settings... menu.
X Press the j
button to call up the selec-
tion of submenus.
X Press the æ
or ç button to select the
Heater submenu. Controls
* optional
219_AKB; 2; 4, en-GB
mkalafa,
2007-11-13T09:28:36+01:00 - Seite 127 Z
Page 131 of 329
On-board computer
128
X
Press the j button to select Auxiliary
heat..
X Press the æ or ç button to select
one of the three switch-on times or Timer
off (auxiliary heating switched off).
When
a switch-on time is selected, the yel-
low indicator lamp lights up in the auxiliary
heating button.
X Press the j, è or ÿ button to
select a different display.
Changing the switch-on time for the
auxiliary heating* This function is only displayed if you have
selected
a switch-on time. Here you can enter
the time at which the auxiliary heating is to
be switched on.
X Press the è
or · button to select the
Settings... menu.
X Press the j
button to call up the selec-
tion of submenus.
X Press the æ
or ç button to select the
Heater submenu.
X Press the j
button to select Switch-on
time X Set hours. X
Press the æ or ç button to set the
hour.
X Press the j
button to select Switch-on
time X Set minutes.
X Press the æ or ç button to set the
minutes.
After changing from one menu to another
the new time setting is stored. The yellow
indicator lamp lights up on the button for
the
auxiliary heating on the centre console.
X Press the j, è or ÿ button to
select a different display.
Activating or deactivating the easy-
entry/exit feature* i
For more information on the easy-entry/
exit feature, see ( Y page 83). G
Risk of injury
When the easy-entry/exit feature is active,
the
steering wheel moves. There is a risk of
occupants becoming trapped. Before acti-
vating the easy-entry/exit feature, make
sure that nobody can become trapped.
Do not leave children unsupervised in the
vehicle, even if they are secured in a child restraint system. The children could open
the driver's door and thereby unintention-
ally activate the easy-entry/exit feature
and become trapped.
X Press the è
or · button to select the
Settings... menu.
X Press the j
button to call up the selec-
tion of submenus.
X Press the æ
or ç button to select the
Convenience submenu.
X Press the j button to select the EASY-
ENTRY system.
X Press the æ or ç button to activate
or deactivate the EASY-ENTRY system.
X Press the j, è or ÿ button to
select a different display.
Activating or deactivating the fold-in
mirrors when locking*
function The
Fold
in mirrors when locking func-
tion allows you to determine whether the
exterior mirrors should fold in when you lock
the vehicle. When you switch on the ignition,
the exterior mirrors fold out again. Controls
* optional
219_AKB; 2; 4, en-GB
mkalafa,
2007-11-13T09:28:36+01:00 - Seite 128
Page 132 of 329
On-board computer
129
If you have switched the function on and you
fold in the exterior mirrors using the button
on the door (Y page 85), they will not fold out
automatically. The exterior mirrors can then
only be folded out using the button on the
door.
X Press the è or · button to select the
Settings... menu.
X Press the j button to call up the selec-
tion of submenus.
X Press the æ or ç button to select the
Convenience submenu.
X Press the j button to select Fold in
mirrors when locking.
X Press the æ or ç button to activate
or deactivate the Fold in mirrors when
locking feature.
X Press the j, è or ÿ button to
select a different display.
Selecting a setting for the dynamic driv-
ing seat* i
For more information on the dynamic driv-
ing seat, see ( Y page 79). X
Press the è or · button to select the
Settings... menu.
X Press the j button to call up the selec-
tion of submenus.
X Press the æ or ç button to select the
Driving dynamics seat adjustment
submenu.
X Press the j button to select Driving
dyn. seat adjust., driver or Driving
dyn. seat adjust., front-pass..
X Press the æ or ç button to select the
desired seat setting: Gentle for a soft seat
setting or Vigorous for a hard seat setting.
X Press the j, è or ÿ button to
select a different display. Trip computer menu
You can use the Trip computer menu to call
up or reset statistical data for your vehicle.
i You can select km or miles as the unit of
measurement for distance (Y page 123).
i Menu overview: see ( Y page 114).
Use the buttons on the multi-function steer-
ing wheel.
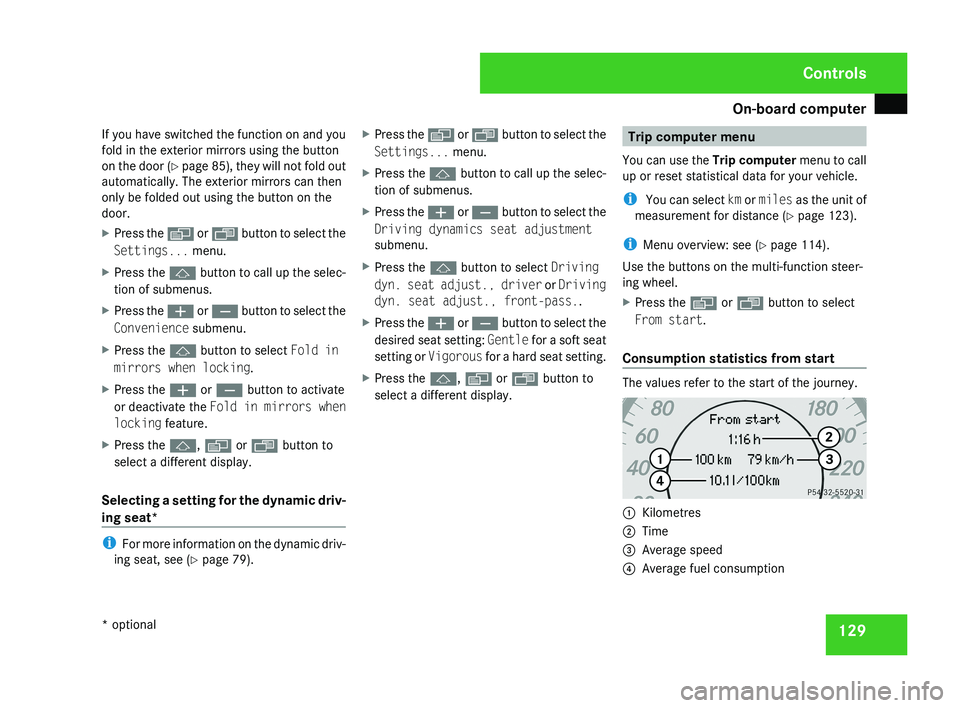
X Press the è or · button to select
From start.
Consumption statistics from start The values refer to the start of the journey.
1
Kilometres
2 Time
3 Average speed
4 Average fuel consumption Controls
* optional
219_AKB; 2; 4, en-GB
mkalafa,
2007-11-13T09:28:36+01:00 - Seite 129
Page 133 of 329
On-board computer
130
If the vehicle is parked for more than 4 hours,
the From start consumption statistics are
reset (key in position
0 of the ignition lock or
removed).
The values will not be reset if you turn the key
to position 1 or 2 during this time.
Consumption statistics from the last
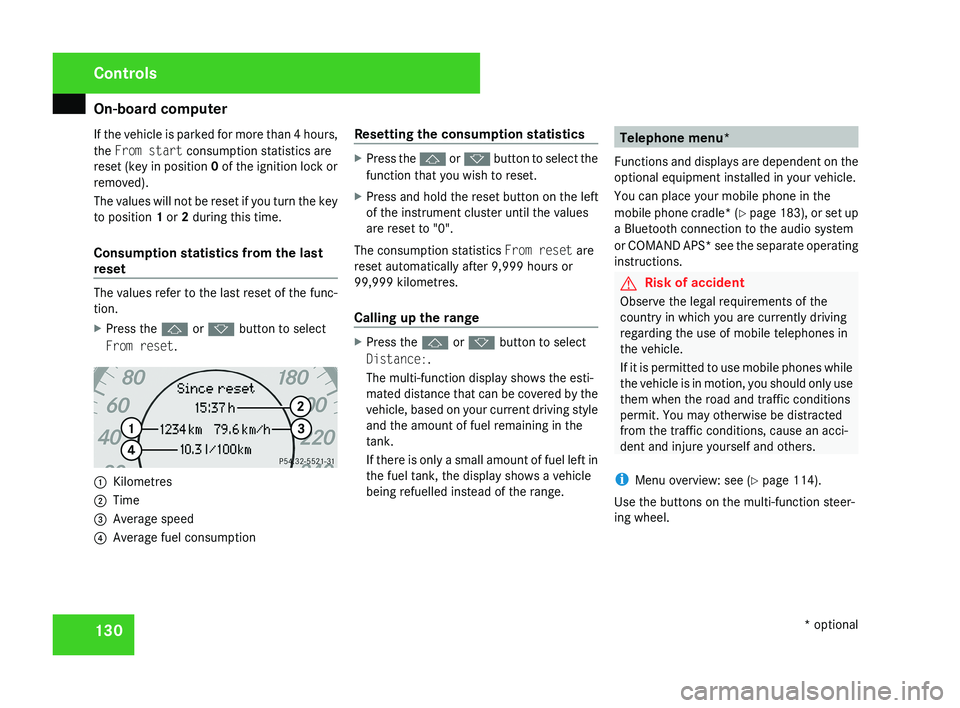
reset The values refer to the last reset of the func-
tion.
X
Press the j or k button to select
From reset. 1
Kilometres
2 Time
3 Average speed
4 Average fuel consumption Resetting the consumption statistics X
Press the j or k button to select the
function that you wish to reset.
X Press and hold the reset button on the left
of the instrument cluster until the values
are reset to "0".
The consumption statistics From reset are
reset automatically after 9,999 hours or
99,999 kilometres.
Calling up the range X
Press the j or k button to select
Distance:.
The multi-function display shows the esti-
mated distance that can be covered by the
vehicle, based on your current driving style
and the amount of fuel remaining in the
tank.
If there is only a small amount of fuel left in
the fuel tank, the display shows a vehicle
being refuelled instead of the range. Telephone menu*
Functions and displays are dependent on the
optional equipment installed in your vehicle.
You can place your mobile phone in the
mobile phone cradle* (Y page 183), or set up
a Bluetooth connection to the audio system
or COMAND APS* see the separate operating
instructions. G
Risk of accident
Observe the legal requirements of the
country in which you are currently driving
regarding the use of mobile telephones in
the vehicle.
If it is permitted to use mobile phones while
the vehicle is in motion, you should only use
them when the road and traffic conditions
permit. You may otherwise be distracted
from the traffic conditions, cause an acci-
dent and injure yourself and others.
i Menu overview: see ( Y page 114).
Use the buttons on the multi-function steer-
ing wheel. Controls
* optional
219_AKB; 2; 4, en-GB
mkalafa,
2007-11-13T09:28:36+01:00 - Seite 130
Page 134 of 329
On-board computer
131
X
Switch on the mobile phone and audio sys-
tem or COMAND APS* see the separate
operating instructions.
X Press the è or · button to select the
Telephone menu.
Mobile phone on PIN code not yet entered
Once you have inserted the mobile phone into
the mobile phone cradle* the multi-function
display shows the
Please enter PIN:mes-
sage.
X Enter the PIN using the mobile phone, Lin-
guatronic*, the audio systemor COMAND
APS*.
The mobile phone will search for a network.
Mobile phone operational
The multi-function display shows the Ready
message or the name of the GSM network
provider. If the operational readiness symbol
goes out, your vehicle is outside the trans-
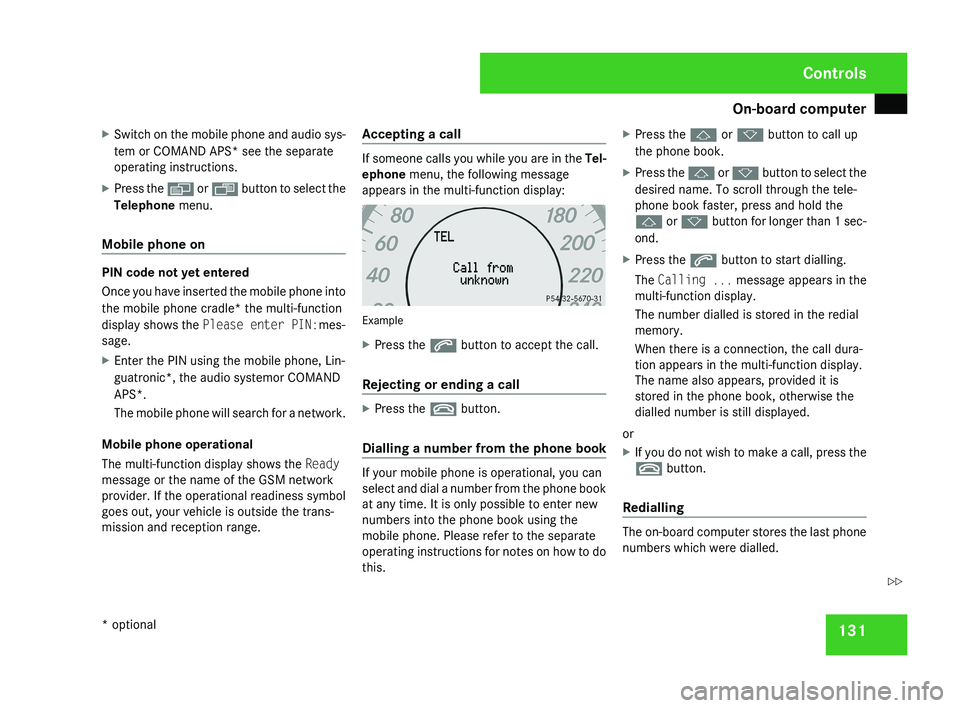
mission and reception range. Accepting a call If someone calls you while you are in the
Tel-
ephone menu, the following message
appears in the multi-function display: Example
X
Press the s button to accept the call.
Rejecting or ending a call X
Press the t button.
Dialling a number from the phone book If your mobile phone is operational, you can
select and dial a number from the phone book
at any time. It is only possible to enter new
numbers into the phone book using the
mobile phone. Please refer to the separate
operating instructions for notes on how to do
this.X
Press the j or k button to call up
the phone book.
X Press the j or k button to select the
desired name. To scroll through the tele-
phone book faster, press and hold the
j or k button for longer than 1 sec-
ond.
X Press the s button to start dialling.
The Calling ... message appears in the
multi-function display.
The number dialled is stored in the redial
memory.
When there is a connection, the call dura-
tion appears in the multi-function display.
The name also appears, provided it is
stored in the phone book, otherwise the
dialled number is still displayed.
or
X If you do not wish to make a call, press the
t button.
Redialling The on-board computer stores the last phone
numbers which were dialled. Controls
* optional
219_AKB; 2; 4, en-GB
mkalafa,
2007-11-13T09:28:36+01:00 - Seite 131 Z
Page 136 of 329
Driving systems
133Cruise control is only an aid designed to
assist driving. You are responsible for the
vehicle's speed and for braking in good
time.
G
Risk of accident
Do not use cruise control:
R in road and traffic conditions which do
not allow you to maintain a constant
speed (e.g. heavy traffic or winding
roads). You could otherwise cause an
accident.
R on slippery roads. Braking or accelerat-
ing could cause the drive wheels to lose
traction and the vehicle could then skid.
R when there is poor visibility, e.g. due to
fog, heavy rain or snow
Cruise control display in the speedom-
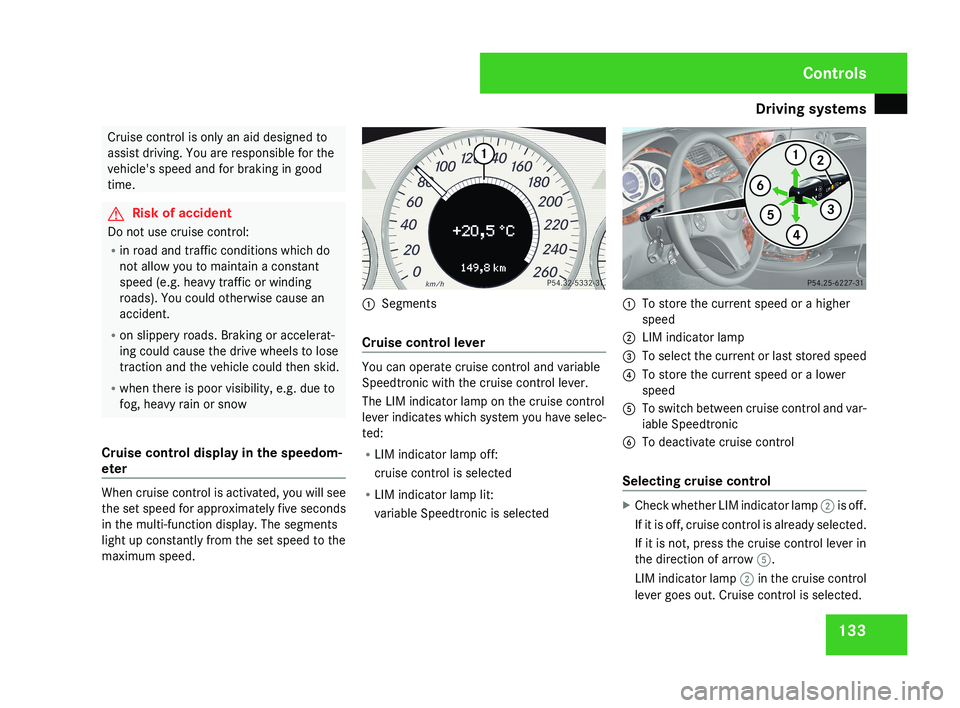
eter When cruise control is activated, you will see
the set speed for approximately five seconds
in the multi-function display. The segments
light up constantly from the set speed to the
maximum speed. 1
Segments
Cruise control lever You can operate cruise control and variable
Speedtronic with the cruise control lever.
The LIM indicator lamp on the cruise control
lever indicates which system you have selec-
ted:
R
LIM indicator lamp off:
cruise control is selected
R LIM indicator lamp lit:
variable Speedtronic is selected 1
To store the current speed or a higher
speed
2 LIM indicator lamp
3 To select the current or last stored speed
4 To store the current speed or a lower
speed
5 To switch between cruise control and var-
iable Speedtronic
6 To deactivate cruise control
Selecting cruise control X
Check whether LIM indicator lamp 2 is off.
If it is off, cruise control is already selected.
If it is not, press the cruise control lever in
the direction of arrow 5.
LIM indicator lamp 2 in the cruise control
lever goes out. Cruise control is selected. Controls
219_AKB; 2; 4, en-GB
mkalafa,
2007-11-13T09:28:36+01:00 - Seite 133
Page 140 of 329
Driving systems
137
Switching on Distronic, storing the cur-
rent speed and maintaining it If Distronic is not activated after the cruise
control
lever is pressed, you will see the mes-
sage - - - in the multi-function display.
You cannot activate Distronic under the fol-
lowing circumstances:
R if you are driving slower than 30 km/h or
faster than 180 km/h
R when braking
R when you have applied the parking brake
R If ESP ®
is deactivated
R when the selector lever is in position P, R
or N
R for two minutes after the engine is started
X Accelerate the vehicle to the desired
speed.
X Briefly press the cruise control lever up
1 or down 4.
X Remove your foot from the accelerator
pedal.
Distronic is activated. The vehicle main-
tains
the stored speed until the distance to
the vehicle in front becomes too small. i
If
you do not fully release the accelerator
pedal, the DISTRONIC override message
appears in the multi-function display. The
distance to a slower-moving vehicle in front
will not then be governed. You will be driv-
ing at the speed you determine by the posi-
tion of the accelerator pedal.
Setting a speed X
Press the cruise control lever up 1 for a
higher
speed or down 4 for a lower speed.
X Keep the cruise control lever pressed until
the desired speed is reached.
X Release the cruise control lever.
The new speed is stored.
i Distronic
is not deactivated if you depress
the accelerator pedal. If you accelerate
briefly to overtake, Distronic adjusts the
vehicle's speed to the last speed stored
after you have finished overtaking.
i Deceleration of the vehicle by means of
the cruise control lever is assisted by auto-
matic application of the brakes. On long
downhill gradients, the automatic trans-
mission shifts down as a further measure. Making adjustments in 1 km/h incre-
ments X
For a higher speed: briefly pull the cruise
control lever towards you 3.
or
X Keep the cruise control lever pulled
towards you 3 until the desired speed is
reached.
Adjustment in 10 km/h increments X
Briefly press the cruise control lever up
1 for a higher speed or down 4 for a
lower speed.
The last speed stored is increased or
reduced.
Selecting the current or last stored
speed G
Risk of accident
Only select a stored speed if you know what
that speed is and whether it is suitable for
the current situation. Otherwise, sudden
acceleration
or braking could endanger you
or others. Controls
219_AKB; 2; 4, en-GB
mkalafa,
2007-11-13T09:28:36+01:00 - Seite 137
Page 141 of 329
Driving systems
138
X
Briefly pull the cruise control lever towards
you 3.
X Remove your foot from the accelerator
pedal.
Distronic is activated and adjusts the vehi-
cle's speed to the last speed stored.
Setting the specified minimum distance
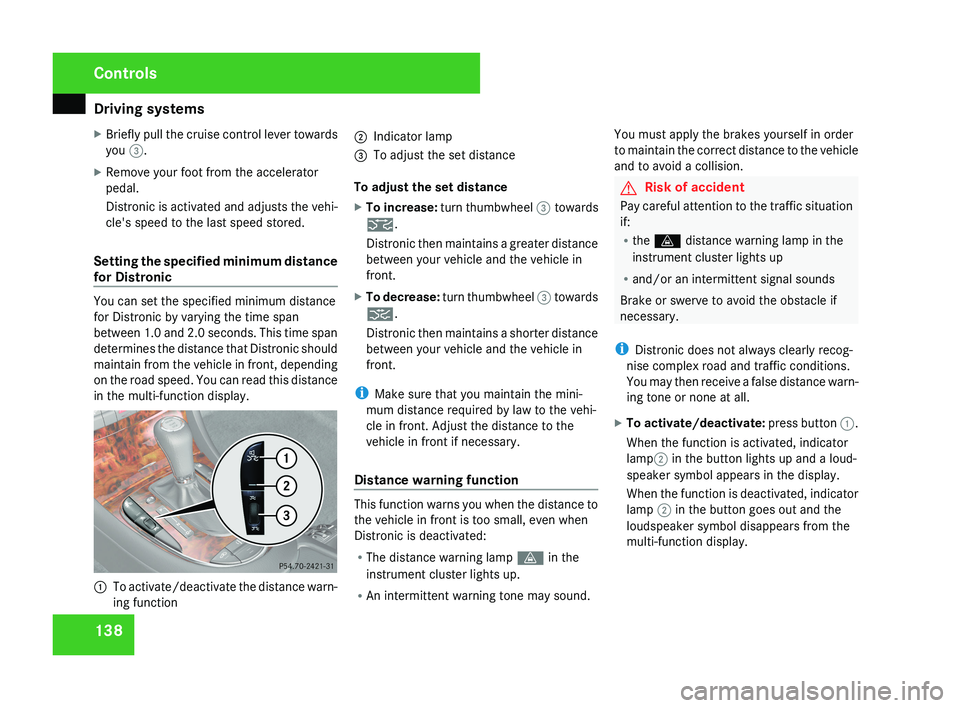
for Distronic You can set the specified minimum distance
for Distronic by varying the time span
between 1.0 and 2.0 seconds. This time span
determines the distance that Distronic should
maintain from the vehicle in front, depending
on the road speed. You can read this distance
in the multi-function display.
1
To activate/deactivate the distance warn-
ing function 2
Indicator lamp
3 To adjust the set distance
To adjust the set distance
X To increase: turn thumbwheel 3 towards
¯.
Distronic then maintains a greater distance
between your vehicle and the vehicle in
front.
X To decrease: turn thumbwheel 3 towards
®.
Distronic then maintains a shorter distance
between your vehicle and the vehicle in
front.
i Make sure that you maintain the mini-
mum distance required by law to the vehi-
cle in front. Adjust the distance to the
vehicle in front if necessary.
Distance warning function This function warns you when the distance to
the vehicle in front is too small, even when
Distronic is deactivated:
R
The distance warning lamp l in the
instrument cluster lights up.
R An intermittent warning tone may sound. You must apply the brakes yourself in order
to maintain the correct distance to the vehicle
and to avoid a collision. G
Risk of accident
Pay careful attention to the traffic situation
if:
R the l distance warning lamp in the
instrument cluster lights up
R and/or an intermittent signal sounds
Brake or swerve to avoid the obstacle if
necessary.
i Distronic does not always clearly recog-
nise complex road and traffic conditions.
You may then receive a false distance warn-
ing tone or none at all.
X To activate/deactivate: press button 1.
When the function is activated, indicator
lamp 2 in the button lights up and a loud-
speaker symbol appears in the display.
When the function is deactivated, indicator
lamp 2 in the button goes out and the
loudspeaker symbol disappears from the
multi-function display. Controls
219_AKB; 2; 4, en-GB
mkalafa,
2007-11-13T09:28:36+01:00 - Seite 138