2008 MERCEDES-BENZ CLS COUPE display
[x] Cancel search: displayPage 165 of 329
Air conditioning
162
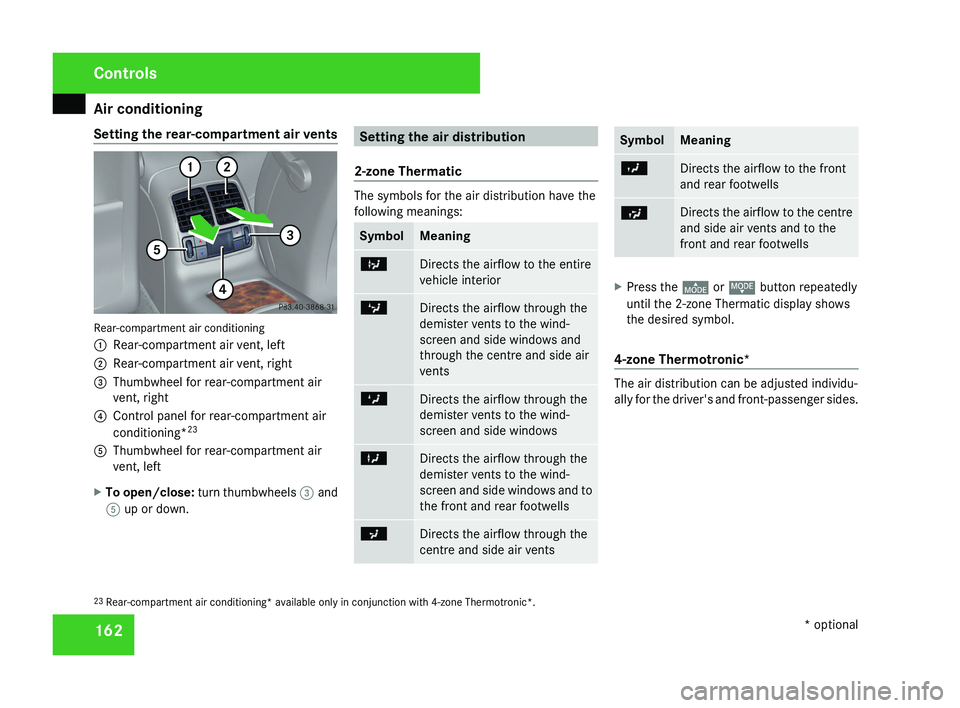
Setting the rear-compartment air vents
Rear-compartment air conditioning
1
Rear-compartment air vent, left
2 Rear-compartment air vent, right
3 Thumbwheel for rear-compartment air
vent, right
4 Control panel for rear-compartment air
conditioning* 23
5 Thumbwheel for rear-compartment air
vent, left
X To open/close: turn thumbwheels 3 and
5 up or down. Setting the air distribution
2-zone Thermatic The symbols for the air distribution have the
following meanings:
Symbol Meaning
b
Directs the airflow to the entire
vehicle interior
c
Directs the airflow through the
demister vents to the wind-
screen and side windows and
through the centre and side air
vents
Z
Directs the airflow through the
demister vents to the wind-
screen and side windows
X
Directs the airflow through the
demister vents to the wind-
screen and side windows and to
the front and rear footwells
a
Directs the airflow through the
centre and side air vents Symbol Meaning
Y
Directs the airflow to the front
and rear footwells
Ú Directs the airflow to the centre
and side air vents and to the
front and rear footwells
X
Press the © or ª button repeatedly
until the 2-zone Thermatic display shows
the desired symbol.
4-zone Thermotronic* The air distribution can be adjusted individu-
ally for the driver's and front-passenger sides.
23 Rear-compartment air conditioning* available only in conjunction with 4-zone Thermotronic*. Controls
* optional
219_AKB; 2; 4, en-GB
mkalafa,
2007-11-13T09:28:36+01:00 - Seite 162
Page 167 of 329
Air conditioning
164 Windows misted up
Windows misted up on the inside X
Activate the "cooling function with air-
dehumidification" function.
X Activate the automatic mode.
X If the windows continue to mist up, activate
the "demisting" function.
Windows misted up on the outside X
Activate the windscreen wipers.
X 2-zone Thermatic: press and hold the
© or ª button until the a, Ú
or Y symbol is shown in the display.
X 4-zone Thermotronic*: turn the thumb-
wheel for air distribution to the Y or
a symbol.
i You should only select this setting until
the windscreen is clear again. Switching the rear window heating
on/off
G
Risk of accident
Clear all windows of ice or snow before set-
ting off. Impaired visibility could otherwise
endanger yourself and others.
i At very low temperatures, the rear win-
dow heating is only switched on once the
vehicle interior has warmed up.
i The rear window heating has a high cur-
rent draw. You should therefore switch it
off
as soon as the window is clear, as it only
switches itself off automatically after
between six and twenty minutes.
i If the battery voltage is too low, the rear
window heating may switch off.
X Make sure that the key is in position 2 in
the ignition lock.
X Press the ¯ button.
The
indicator lamp in the ¯ switch lights
up or goes out. Activating/deactivating air-recircula-
tion mode
You can deactivate the flow of fresh air if
unpleasant odours are entering the vehicle
from outside. The air already inside the vehi-
cle will then be recirculated. G
Risk of accident
Only switch over to air-recirculation mode
briefly
at low outside temperatures. Other-
wise, the windows could mist up, thus
impairing visibility and endangering your-
self and others. This may prevent you from
observing the traffic conditions, thereby
causing an accident.
X To activate: press the , button.
The indicator lamp in the , button
comes on.
i Air-recirculation mode is activated auto-
matically at high outside temperatures.
When air-recirculation mode is activated
automatically, the indicator lamp in
the , button is not lit.
Outside air is added after about 30
minutes. Controls
* optional
219_AKB; 2; 4, en-GB
mkalafa,
2007-11-13T09:28:36+01:00 - Seite 164
Page 168 of 329
Air conditioning
165
X
To deactivate: press the , button.
The indicator lamp in the , button goes
out.
i Air-recirculation mode switches off auto-
matically:
R after approximately five minutes at out-
side temperatures below approximately
5 †
R after
approximately five minutes if the air
dehumidification is deactivated
R after approximately 30 minutes at out-
side temperatures above approximately
5 †
Air-recirculation mode with the conve-
nience opening/closing feature G
Risk of injury
Make sure that nobody can become trap-
ped
between the side window and the door
frame as the side windows are opened and
closed. Do not place objects or lean against
the side window when it is being opened or
closed. You or the objects could be drawn
in or become trapped between the side
window and the door frame as the window moves. If there is a risk of entrapment,
press the , button again. If necessary,
press
the switch that stops, opens or closes
the side window in the opposite direction.
Make sure that nobody can become trap-
ped when you are opening or closing the
sliding/tilting sunroof*. If there is a risk of
entrapment, press the , button again.
If necessary, press the switch to stop, open
or close the sliding/tilting sunroof* in the
opposite direction.
X Convenience closing: press and hold
the ,
button until the side windows and
the sliding/tilting sunroof* have closed.
The indicator lamp in the , button
comes on. Air-recirculation mode is activa-
ted.
X Convenience opening: press and hold
the ,
button until the side windows and
the sliding/tilting sunroof* have reached
their original position.
The indicator lamp in the , button goes
out. Air-recirculation mode is deactivated.
i If you open the side windows or the slid-
ing/tilting sunroof* manually after closing
using the convenience closing feature, it will remain in this position when opened
using the convenience opening feature. Switching the residual heat/auxiliary
ventilation on/off
It
is possible to make use of the residual heat
of the engine to continue heating the station-
ary vehicle for up to 30 minutes after the
engine has been switched off. The heating
time depends on the set interior temperature.
i The blower will run at a low speed regard-
less of the airflow setting.
i If you activate the "residual heat" function
at high temperatures, only the ventilation
will be activated. The blower runs at
medium speed.
X Make sure that the key is in position 0 in
the ignition lock or that it has been
removed.
X To switch on: press the T button.
REST appears in the display.
X To deactivate: press the T button.
REST is no longer shown in the display. Controls
* optional
219_AKB; 2; 4, en-GB
mkalafa,
2007-11-13T09:28:36+01:00 - Seite 165
Page 170 of 329
Air conditioning
167
Activating the auxiliary heating/ventila-
tion
If the key is in position 1 or 2:
X
Press and hold button 1 for at least two
seconds.
The red or blue indicator lamp in the button
lights up.
If the key is removed or in position 0:
X Briefly press button 1.
The red or blue indicator lamp in the button
lights up.
Deactivating the auxiliary heating/venti-
lation
X Briefly press button 1.
The red or blue indicator lamp in the button
goes out.
Remote control
Your vehicle comes with one remote control.
You may use two additional remote controls
for your vehicle. For further information, con-
sult a qualified specialist workshop, e.g. a
Mercedes-Benz Service Centre. The remote control has a maximum range of
approximately 300 metres. This range may be
reduced by:
R
sources of radio interference
R solid objects between the remote control
and the vehicle
R the remote control being in an unfavoura-
ble position in relation to the vehicle
R transmitting from an enclosed space
i The optimum range can be achieved if you
hold the remote control vertically, pointing
upwards when you press one of the but-
tons.
i A battery symbol appears in the display
when the batteries in the remote control
are low. Replace the remote control bat-
teries (Y page 270).
i More information about the auxiliary
heating can be found in the "Practical
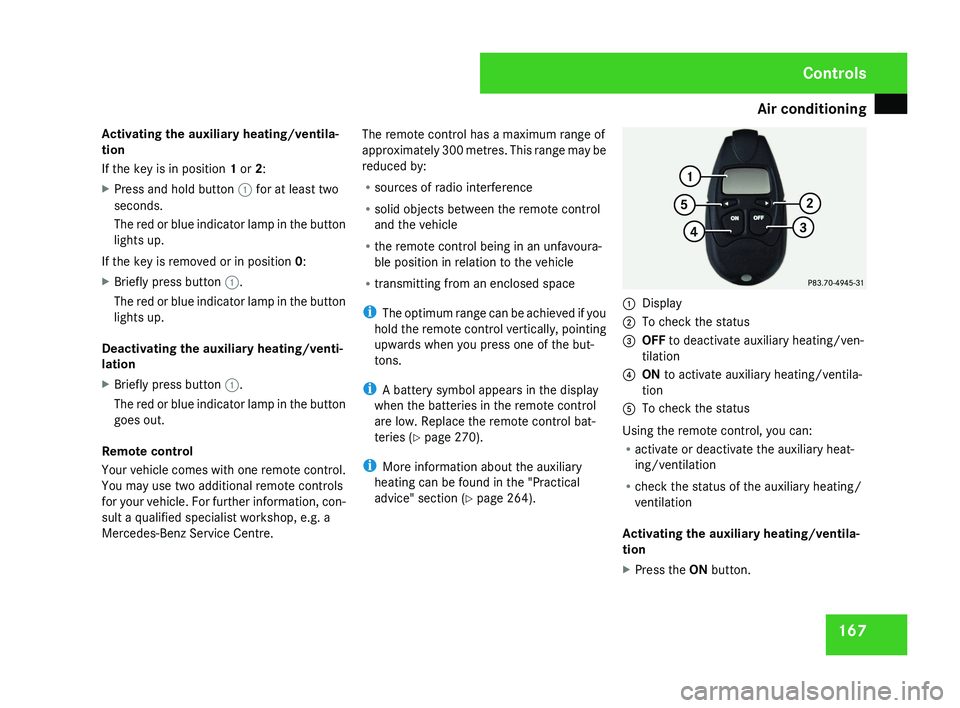
advice" section ( Y page 264).1
Display
2 To check the status
3 OFF to deactivate auxiliary heating/ven-
tilation
4 ON to activate auxiliary heating/ventila-
tion
5 To check the status
Using the remote control, you can:
R activate or deactivate the auxiliary heat-
ing/ventilation
R check the status of the auxiliary heating/
ventilation
Activating the auxiliary heating/ventila-
tion
X Press the ON button.
Controls
219_AKB; 2; 4, en-GB
mkalafa,
2007-11-13T09:28:36+01:00 - Seite 167
Page 171 of 329
Air conditioning
168
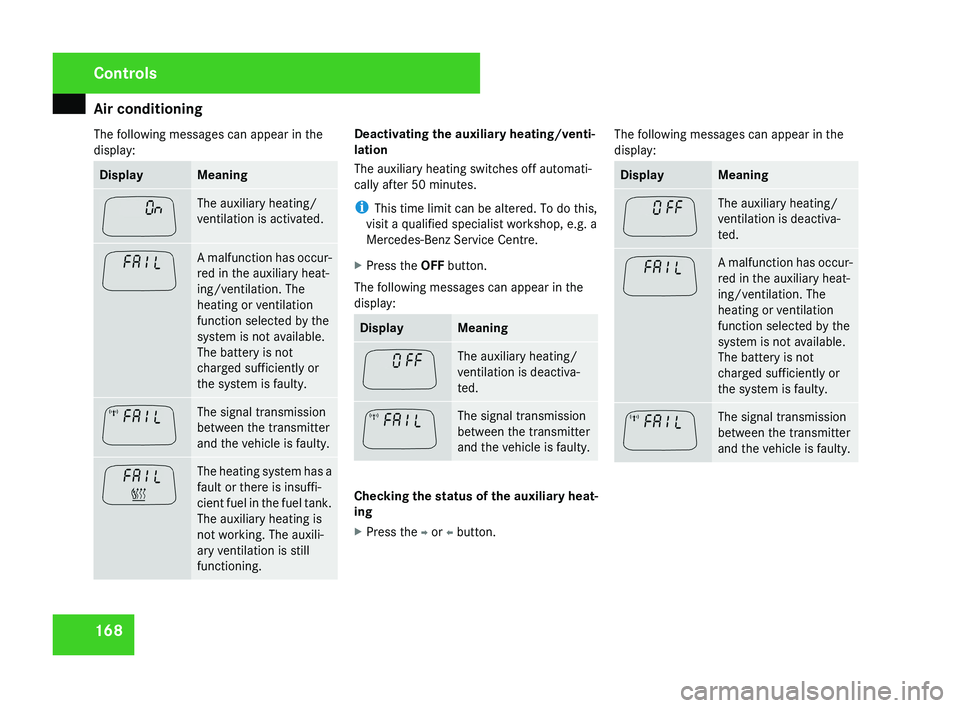
The following messages can appear in the
display: Display Meaning
The auxiliary heating/
ventilation is activated.
A malfunction has occur-
red in the auxiliary heat-
ing/ventilation. The
heating or ventilation
function selected by the
system is not available.
The battery is not
charged sufficiently or
the system is faulty.
The signal transmission
between the transmitter
and the vehicle is faulty.
The heating system has a
fault or there is insuffi-
cient fuel in the fuel tank.
The auxiliary heating is
not working. The auxili-
ary ventilation is still
functioning. Deactivating the auxiliary heating/venti-
lation
The auxiliary heating switches off automati-
cally after 50 minutes.
i
This time limit can be altered. To do this,
visit a qualified specialist workshop, e.g. a
Mercedes-Benz Service Centre.
X Press the OFF button.
The following messages can appear in the
display: Display Meaning
The auxiliary heating/
ventilation is deactiva-
ted.
The signal transmission
between the transmitter
and the vehicle is faulty.
Checking the status of the auxiliary heat-
ing
X
Press the p or o button. The following messages can appear in the
display: Display Meaning
The auxiliary heating/
ventilation is deactiva-
ted.
A malfunction has occur-
red in the auxiliary heat-
ing/ventilation. The
heating or ventilation
function selected by the
system is not available.
The battery is not
charged sufficiently or
the system is faulty.
The signal transmission
between the transmitter
and the vehicle is faulty.Controls
219_AKB; 2; 4, en-GB
mkalafa,
2007-11-13T09:28:36+01:00 - Seite 168
Page 172 of 329
Sliding sunroof
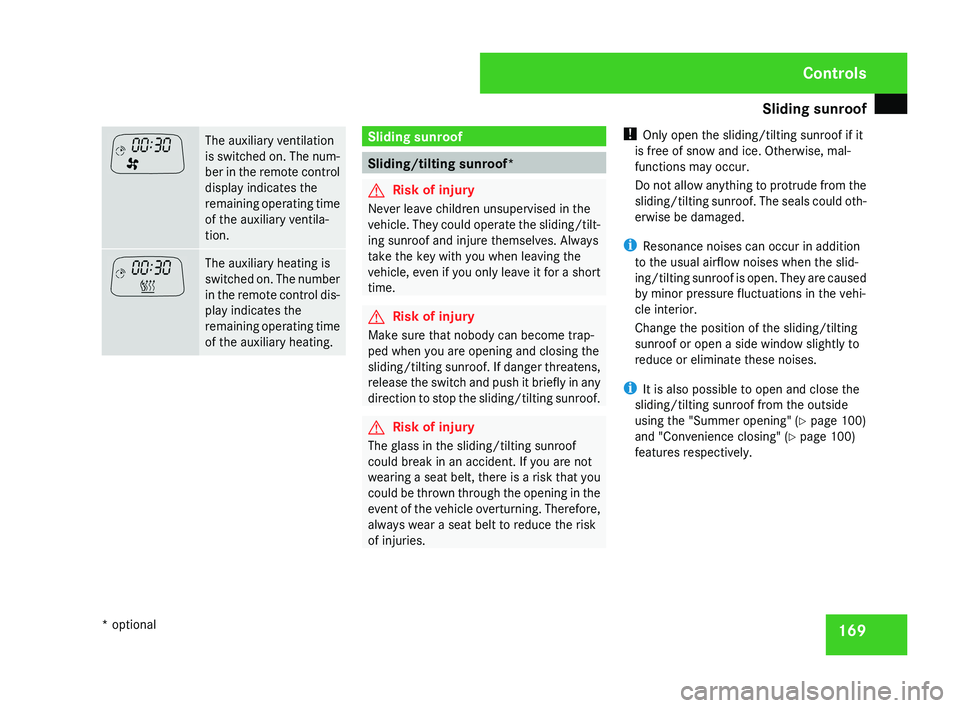
169The auxiliary ventilation
is switched on. The num-
ber in the remote control
display indicates the
remaining operating time
of the auxiliary ventila-
tion.
The auxiliary heating is
switched on. The number
in the remote control dis-
play indicates the
remaining operating time
of the auxiliary heating. Sliding sunroof
Sliding/tilting sunroof*
G
Risk of injury
Never leave children unsupervised in the
vehicle. They could operate the sliding/tilt-
ing sunroof and injure themselves. Always
take the key with you when leaving the
vehicle, even if you only leave it for a short
time. G
Risk of injury
Make sure that nobody can become trap-
ped when you are opening and closing the
sliding/tilting sunroof. If danger threatens,
release the switch and push it briefly in any
direction to stop the sliding/tilting sunroof. G
Risk of injury
The glass in the sliding/tilting sunroof
could break in an accident. If you are not
wearing a seat belt, there is a risk that you
could be thrown through the opening in the
event of the vehicle overturning. Therefore,
always wear a seat belt to reduce the risk
of injuries. !
Only open the sliding/tilting sunroof if it
is free of snow and ice. Otherwise, mal-
functions may occur.
Do not allow anything to protrude from the
sliding/tilting sunroof. The seals could oth-
erwise be damaged.
i Resonance noises can occur in addition
to the usual airflow noises when the slid-
ing/tilting sunroof is open. They are caused
by minor pressure fluctuations in the vehi-
cle interior.
Change the position of the sliding/tilting
sunroof or open a side window slightly to
reduce or eliminate these noises.
i It is also possible to open and close the
sliding/tilting sunroof from the outside
using the "Summer opening" ( Y page 100)
and "Convenience closing" ( Y page 100)
features respectively. Controls
* optional
219_AKB; 2; 4, en-GB
mkalafa,
2007-11-13T09:28:36+01:00 - Seite 169
Page 187 of 329
Features
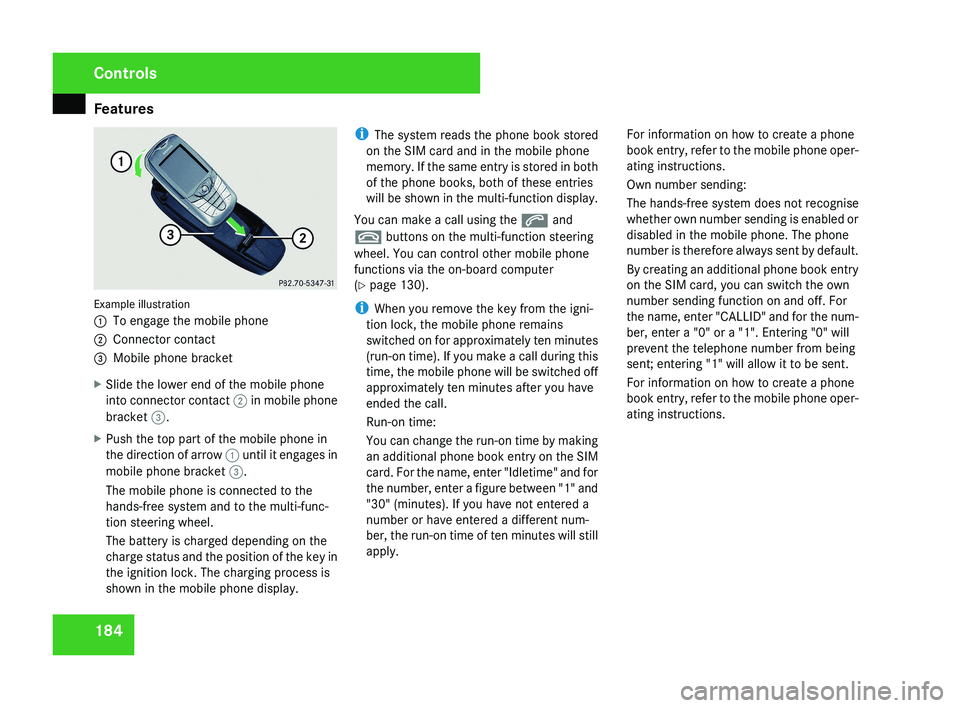
184Example illustration
1
To engage the mobile phone
2 Connector contact
3 Mobile phone bracket
X Slide the lower end of the mobile phone
into connector contact 2 in mobile phone
bracket 3.
X Push the top part of the mobile phone in
the direction of arrow 1 until it engages in
mobile phone bracket 3.
The mobile phone is connected to the
hands-free system and to the multi-func-
tion steering wheel.
The battery is charged depending on the
charge status and the position of the key in
the ignition lock. The charging process is
shown in the mobile phone display. i
The system reads the phone book stored
on the SIM card and in the mobile phone
memory. If the same entry is stored in both
of the phone books, both of these entries
will be shown in the multi-function display.
You can make a call using the s and
t buttons on the multi-function steering
wheel. You can control other mobile phone
functions via the on-board computer
(Y page 130).
i When you remove the key from the igni-
tion lock, the mobile phone remains
switched on for approximately ten minutes
(run-on time). If you make a call during this
time, the mobile phone will be switched off
approximately ten minutes after you have
ended the call.
Run-on time:
You can change the run-on time by making
an additional phone book entry on the SIM
card. For the name, enter "Idletime" and for
the number, enter a figure between "1" and
"30" (minutes). If you have not entered a
number or have entered a different num-
ber, the run-on time of ten minutes will still
apply. For information on how to create a phone
book entry, refer to the mobile phone oper-
ating instructions.
Own number sending:
The hands-free system does not recognise
whether own number sending is enabled or
disabled in the mobile phone. The phone
number is therefore always sent by default.
By creating an additional phone book entry
on the SIM card, you can switch the own
number sending function on and off. For
the name, enter "CALLID" and for the num-
ber, enter a "0" or a "1". Entering "0" will
prevent the telephone number from being
sent; entering "1" will allow it to be sent.
For information on how to create a phone
book entry, refer to the mobile phone oper-
ating instructions.
Controls
219_AKB; 2; 4, en-GB
mkalafa,
2007-11-13T09:28:36+01:00 - Seite 184
Page 199 of 329
Engine compartment
196Example of a vehicle with a diesel engine (CLS 320
CDI)
1
Cover
X Unscrew cap 1 and remove it.
X Top up by the amount of oil required.
! Do not add too much oil. If too much oil
is added, there is a risk of damage to the
engine or the catalytic converter.
X Screw cap 1 onto the filler neck.
H Environmental note
When topping up the oil, take care not to
spill any. Oil must not be allowed to escape
into the soil or waterways. You would oth-
erwise be damaging the environment.
Coolant
G Risk of injury
The cooling system is pressurised. There-
fore, only unscrew the cap once the engine
has cooled down. The coolant temperature
gauge must display less than 70°C. You
could otherwise be scalded by escaping hot
coolant.
Coolant consists of water and antifreeze/cor-
rosion inhibitor. Only check the coolant level
when the vehicle is on a level surface and the
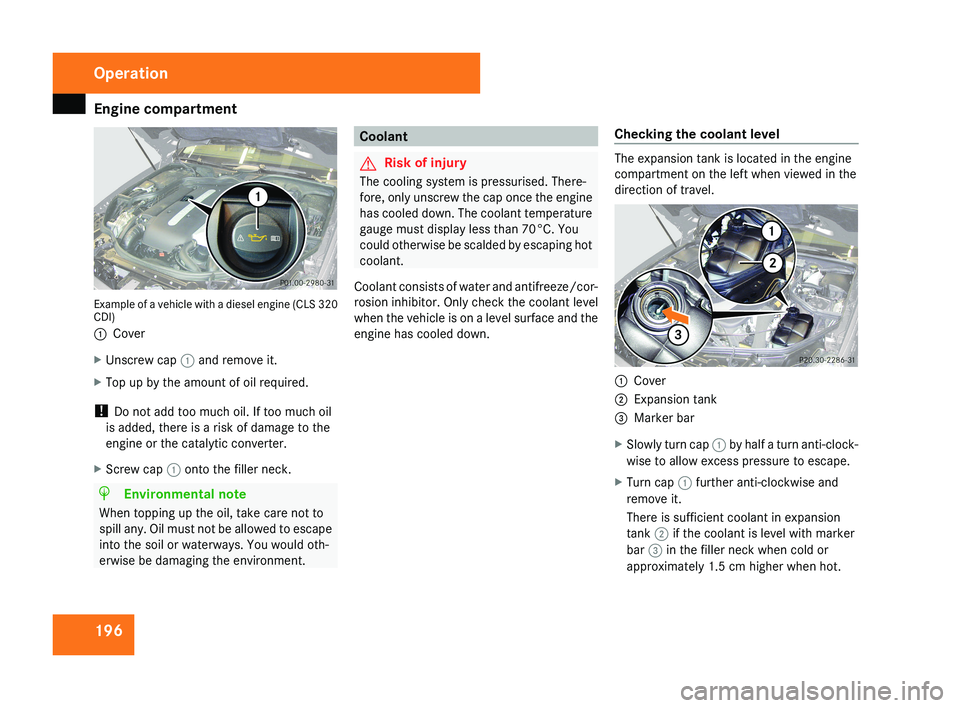
engine has cooled down. Checking the coolant levelThe expansion tank is located in the engine
compartment on the left when viewed in the
direction of travel.
1
Cover
2 Expansion tank
3 Marker bar
X Slowly turn cap 1 by half a turn anti-clock-
wise to allow excess pressure to escape.
X Turn cap 1 further anti-clockwise and
remove it.
There is sufficient coolant in expansion
tank 2 if the coolant is level with marker
bar 3 in the filler neck when cold or
approximately 1.5 cm higher when hot.
Operation
219_AKB; 2; 4, en-GB
mkalafa,
2007-11-13T09:28:36+01:00 - Seite 196