Page 180 of 329

Loading and stowing
177Stowage compartments
G
Risk of injury
The stowage compartments must be closed
when items are stored in them. Luggage
nets are not designed to secure heavy
items of luggage.
You or other vehicle occupants could be
injured by objects being thrown around if
you:
R brake sharply
R change direction suddenly
R have an accident
Sharp-edged and fragile objects must not
be carried in the luggage net.
Do not carry hard objects in the ruffled
pockets. Objects must not protrude over
the top of the ruffled pockets.
i You will find an overview of the stowage
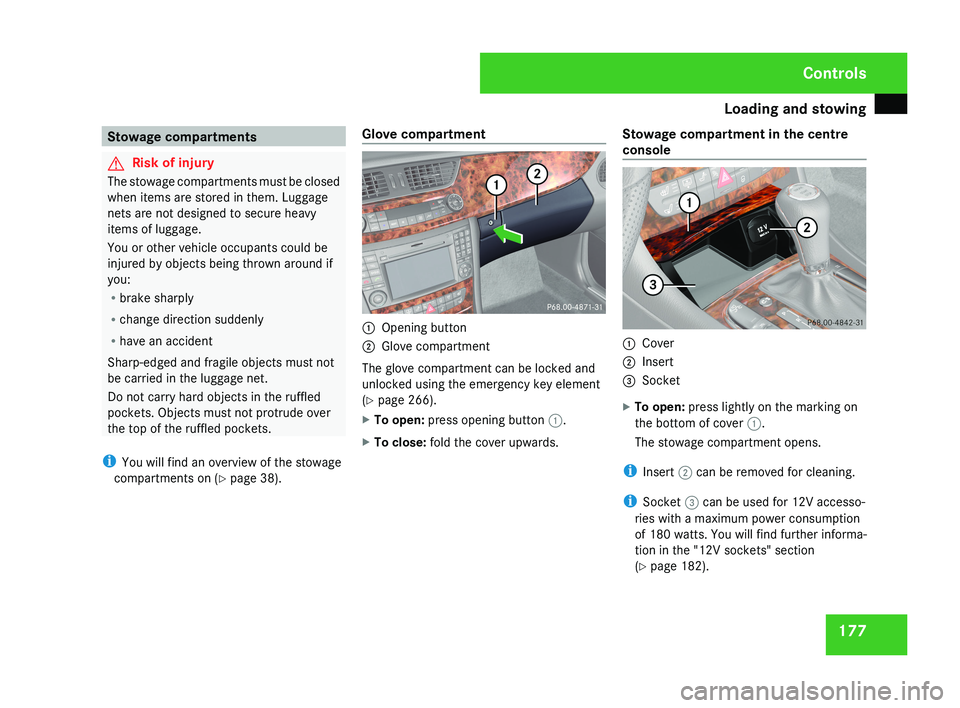
compartments on (Y page 38). Glove compartment 1
Opening button
2 Glove compartment
The glove compartment can be locked and
unlocked using the emergency key element
(Y page 266).
X To open: press opening button 1.
X To close: fold the cover upwards. Stowage compartment in the centre
console 1
Cover
2 Insert
3 Socket
X To open: press lightly on the marking on
the bottom of cover 1.
The stowage compartment opens.
i Insert 2 can be removed for cleaning.
i Socket 3 can be used for 12V accesso-
ries with a maximum power consumption
of 180 watts. You will find further informa-
tion in the "12V sockets" section
(Y page 182). Controls
219_AKB; 2; 4, en-GB
mkalafa,
2007-11-13T09:28:36+01:00 - Seite 177
Page 181 of 329
Loading and stowing
178
Stowage compartment in front of the
armrest
1
Marking on cover
X To open: press lightly on the cover behind
the marking.
The cover opens. 1
Handle
X To remove the insert: pull out the insert
by handle 1.
Stowage compartment/telephone
compartment under the armrest 1
Press 2
Cover
X To open: press the left-hand or right-hand
side of button 1 and fold cover 2 to one
side.
Ventilating the stowage compartment
The stowage compartment under the armrest
can be ventilated (Y page 161).
Front stowage compartment in the rear
centre console 1
Cover
X To open: slide cover 1 forwards.
i The insert can be removed for cleaning. Controls
219_AKB; 2; 4, en-GB
mkalafa,
2007-11-13T09:28:36+01:00 - Seite 178
Page 182 of 329
Loading and stowing
179
Rear stowage compartment in the rear
centre console
1
Socket
2 Cover
X To open: slide cover 2 back.
i Socket 1 can be used for 12V accesso-
ries with a maximum power consumption
of 180 watts. You will find further informa-
tion in the "12V sockets" section
(Y page 182). Stowage compartment in the rear seat
armrest X
To open: push the handle upwards and
raise the armrest. Stowage compartment under the driv-
er's seat 1
Tab
X To open: pull tab 1 upwards.
X Fold the cover out. Controls
219_AKB; 2; 4, en-GB
mkalafa,
2007-11-13T09:28:36+01:00 - Seite 179
Page 185 of 329
Features
182
X
Make sure that the key is in position 2 in
the ignition lock.
X Press lightly on the marking at the bottom
of the cover.
The ashtray opens.
X Press in cigarette lighter 1.
Cigarette lighter 1 will pop out automati-
cally when the heating element is red-hot. 12V socket
The socket can be used for accessories with
a maximum power consumption of 180 watts.
X Make sure that the key is in position 2 in
the ignition lock. Socket in the cockpit A socket is fitted in the centre console on
vehicles with the non-smoker's package.
1
Cover
2 Socket
3 Insert
X Press lightly on the marking at the bottom
of cover 1.
The stowage compartment opens.
X Fold cover of socket 2 out to the right. Socket in the rear passenger compart-
ment The rear socket is located in the stowage
compartment of the centre console.
1
Socket
2 Cover
X Slide cover 2 to the rear.
X Fold cover of socket 1 upwards.Controls
219_AKB; 2; 4, en-GB
mkalafa,
2007-11-13T09:28:36+01:00 - Seite 182
Page 189 of 329

Features
186 Garage door opener*
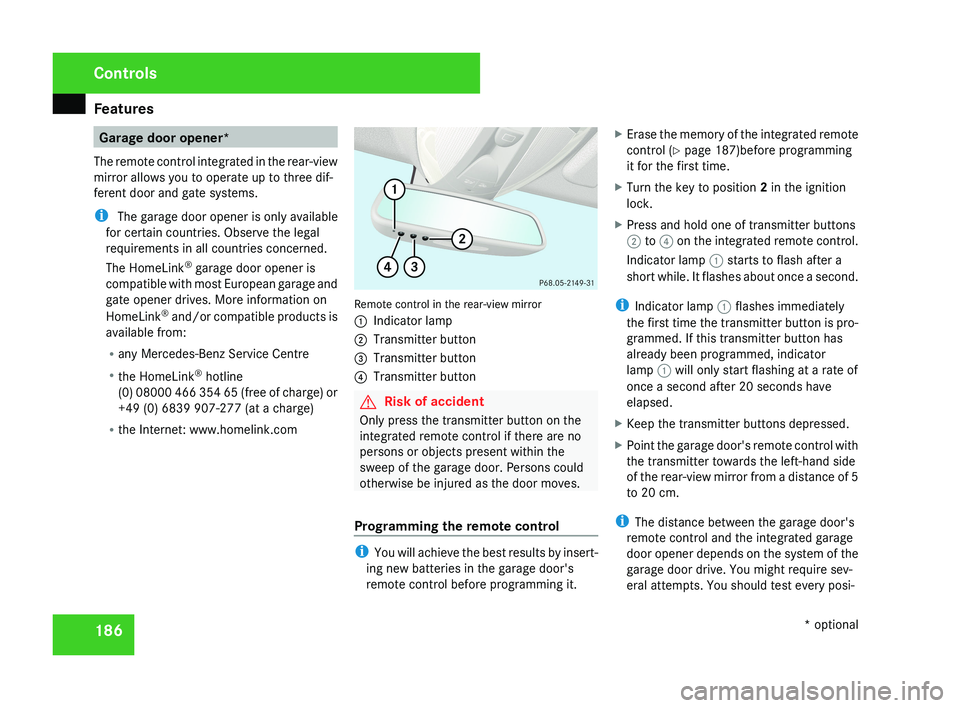
The remote control integrated in the rear-view
mirror allows you to operate up to three dif-
ferent door and gate systems.
i The garage door opener is only available
for certain countries. Observe the legal
requirements in all countries concerned.
The HomeLink ®
garage door opener is
compatible with most European garage and
gate opener drives. More information on
HomeLink ®
and/or compatible products is
available from:
R any Mercedes-Benz Service Centre
R the HomeLink ®
hotline
(0) 08000 466 354 65 (free of charge) or
+49 (0) 6839 907-277 (at a charge)
R the Internet: www.homelink.comRemote control in the rear-view mirror
1 Indicator lamp
2 Transmitter button
3 Transmitter button
4 Transmitter button
G Risk of accident
Only press the transmitter button on the
integrated remote control if there are no
persons or objects present within the
sweep of the garage door. Persons could
otherwise be injured as the door moves.
Programming the remote control
i You will achieve the best results by insert-
ing new batteries in the garage door's
remote control before programming it. X
Erase the memory of the integrated remote
control ( Y page 187)before programming
it for the first time.
X Turn the key to position 2 in the ignition
lock.
X Press and hold one of transmitter buttons
2 to 4 on the integrated remote control.
Indicator lamp 1 starts to flash after a
short while. It flashes about once a second.
i Indicator lamp 1 flashes immediately
the first time the transmitter button is pro-
grammed. If this transmitter button has
already been programmed, indicator
lamp 1 will only start flashing at a rate of
once a second after 20 seconds have
elapsed.
X Keep the transmitter buttons depressed.
X Point the garage door's remote control with
the transmitter towards the left-hand side
of the rear-view mirror from a distance of 5
to 20 cm.
i The distance between the garage door's
remote control and the integrated garage
door opener depends on the system of the
garage door drive. You might require sev-
eral attempts. You should test every posi-
Controls
* optional
219_AKB; 2; 4, en-GB
mkalafa,
2007-11-13T09:28:36+01:00 - Seite 186
Page 218 of 329
215
Where will I find...? ...........................
216
Display messages ............................. 219
Troubleshooting ................................ 241
Locking/unlocking in an emer-
gency ................................................. 266
Resetting triggered NECK-PRO
head restraints .................................. 269
Changing the batteries .....................269
Changing the bulbs ...........................271
Replacing the wiper blades ..............275
Flat tyre ............................................. 276
Battery ............................................... 288
Jump-starting .................................... 291
Towing and tow-starting .................. 293
Fuses .................................................. 295
Practical advice
219_AKB; 2; 4, en-GB
mkalafa,
2007-11-13T09:28:36+01:00 - Seite 215
Page 219 of 329
Where will I find...?
216 Where will I find...?
Warning triangle
The warning triangle is located in the luggage
well under the boot floor.1 Warning triangle
X Remove warning triangle 1.Setting up the warning triangle
1
Retainer
2 Side reflectors
3 Feet
X Fold feet 3 down and out to the side.
X Pull side reflectors 2 upwards to form a
triangle and lock them at the top using
retainer 1.
First-aid kit
i Check the expiry date of the first-aid kit
annually, and replace the contents if nec-
essary.
The first-aid kit is located in the stowage com-
partment under the front-passenger seat.
1 Handle
X To open: pull handle 1 up.
X Fold the cover forwards.
X Remove the first-aid kit.
Practical advice
219_AKB; 2; 4, en-GB
mkalafa,
2007-11-13T09:28:36+01:00 - Seite 216
Page 220 of 329

Where will I find...?
217Fire extinguisher*
i Have the fire extinguisher refilled after
each use and checked every one or two
years. Otherwise, it may fail in an emer-
gency.
Observe the legal requirements in all coun-
tries concerned.
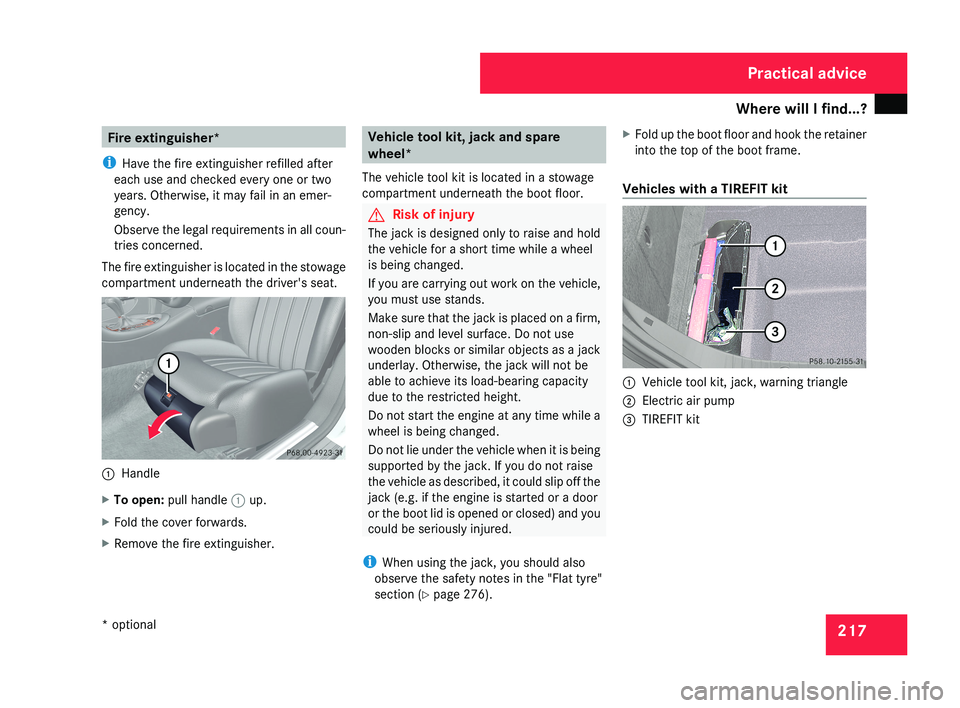
The fire extinguisher is located in the stowage
compartment underneath the driver's seat.1 Handle
X To open: pull handle 1 up.
X Fold the cover forwards.
X Remove the fire extinguisher.
Vehicle tool kit, jack and spare
wheel*
The vehicle tool kit is located in a stowage
compartment underneath the boot floor.
G Risk of injury
The jack is designed only to raise and hold
the vehicle for a short time while a wheel
is being changed.
If you are carrying out work on the vehicle,
you must use stands.
Make sure that the jack is placed on a firm,
non-slip and level surface. Do not use
wooden blocks or similar objects as a jack
underlay. Otherwise, the jack will not be
able to achieve its load-bearing capacity
due to the restricted height.
Do not start the engine at any time while a
wheel is being changed.
Do not lie under the vehicle when it is being
supported by the jack. If you do not raise
the vehicle as described, it could slip off the
jack (e.g. if the engine is started or a door
or the boot lid is opened or closed) and you
could be seriously injured.
i When using the jack, you should also
observe the safety notes in the "Flat tyre"
section ( Y page 276). X
Fold up the boot floor and hook the retainer
into the top of the boot frame.
Vehicles with a TIREFIT kit
1 Vehicle tool kit, jack, warning triangle
2 Electric air pump
3 TIREFIT kit
Practical advice
* optional
219_AKB; 2; 4, en-GB
mkalafa,
2007-11-13T09:28:36+01:00 - Seite 217