2008 MERCEDES-BENZ CLS COUPE change time
[x] Cancel search: change timePage 4 of 329
Thank you for choosing Mercedes-Benz.
Before you drive off, familiarise yourself with
your vehicle and read the Owner's Manual.
This will help you to obtain the maximum
pleasure from your vehicle and to avoid
endangering yourself and others.
Items
of optional equipment are marked with
an asterisk *.
The equipment in your vehicle may vary,
depending on the model, the ordered items,
the country specifications and availability.
The illustrations in this Owner's Manual show
a left-hand-drive vehicle. The arrangement of
the switches, levers, stowage compartments,
etc. will differ accordingly in a right-hand-
drive vehicle.
Mercedes-Benz is constantly updating its
vehicles to the state of the art and therefore
reserves the right to introduce changes in
design, equipment and technical features at
any time. You cannot, therefore, base any
claims on the data, illustrations or descrip-
tions in this Owner's Manual.
Please consult a Mercedes-Benz Service
Centre if you have any questions.
The Owner’s Manual, Brief Instructions,
service booklet and supplements related to
vehicle equipment belong with the vehicle.
You should always keep them in the vehicle and pass them on to the new owner if you sell
the vehicle.
The technical documentation team at Daim-
ler AG wishes you safe and pleasant motor-
ing.
i
You can get to know the important fea-
tures of your vehicle in German and in
English in the interactive Owner's Manual
on the Internet at:
www.mercedes-benz.de/betriebsanlei-
tung
219_AKB; 2; 4, en-GB
mkalafa,
2007-11-13T09:28:36+01:00 - Seite 1
Page 18 of 329
Protection of the environment
15Protection of the environment
H
Environmental note
Daimler's declared policy is one of integra-
ted environmental protection.
The
objectives are for the natural resources
which form the basis of our existence on
this planet to be used sparingly and in a
manner which takes the requirements of
both nature and humanity into account.
You too can help to protect the environ-
ment by operating your vehicle in an envi-
ronmentally-responsible manner.
Fuel consumption and the rate of engine,
transmission, brake and tyre wear depend
on the following factors:
R Operating conditions of your vehicle
R Your personal driving style
You can influence both factors.
You should bear the following in mind:
Operating conditions
R Avoid short trips as these increase fuel
consumption.
R Make sure that the tyre pressures are
always correct.
R Do not carry any unnecessary weight. R
Keep an eye on the vehicle's fuel con-
sumption.
R Remove roof racks once you no longer
need them.
R A regularly serviced vehicle will contrib-
ute to environmental protection. You
should therefore adhere to the service
intervals.
R Always have maintenance work carried
out at a qualified specialist workshop,
e.g. a Mercedes-Benz Service Centre.
Personal driving style
R Do not depress the accelerator pedal
when starting the engine.
R Do
not warm up the engine with the vehi-
cle stationary.
R Drive carefully and maintain a safe dis-
tance from the vehicle in front.
R Avoid frequent, sudden acceleration.
R Change gear in good time and use each
gear only up to 2
/ 3 of its maximum engine
speed.
R Switch off the engine in stationary traffic. Returning used vehicles
Mercedes-Benz will take back your
Mercedes-Benz
to dispose of it in an environ-
mentally-responsible manner, in accordance
with the European Union (EU) End of Life
Vehicles Directive.
The End of Life Vehicles Directive applies to
vehicles of up to 3.5 t gross vehicle weight, in
accordance with national regulations. For
several years, Mercedes-Benz has been
meeting all the legal requirements for a
design which allows for recycling and re-use.
There is a network of return points and dis-
assembly plants which can recycle your vehi-
cle in an environmentally-responsible man-
ner. The options for recycling vehicles and
parts are constantly being developed and
improved. This means that your Mercedes-
Benz will also continue to meet even the
increased recycling quotas in the future in
good time. You can obtain further information
from your national Mercedes-Benz homepage
or your national hotline number. Introduction
219_AKB; 2; 4, en-GB
mkalafa,
2007-11-13T09:28:36+01:00 - Seite 15
Page 69 of 329
Opening and closing
66 Opening and closing
Key
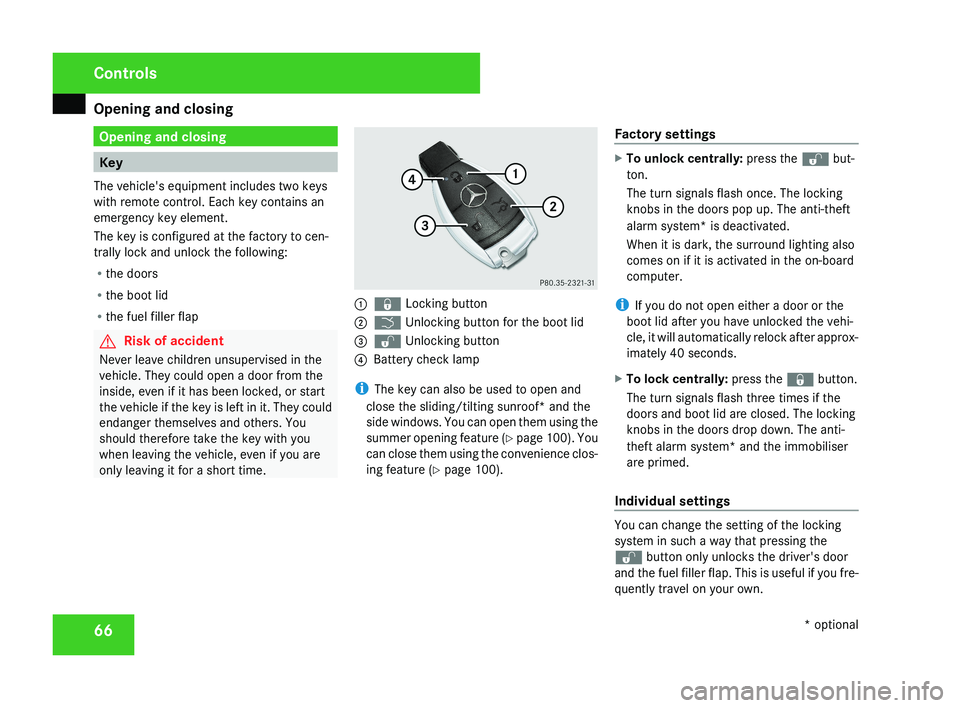
The vehicle's equipment includes two keys
with remote control. Each key contains an
emergency key element.
The key is configured at the factory to cen-
trally lock and unlock the following:
R the doors
R the boot lid
R the fuel filler flap G
Risk of accident
Never leave children unsupervised in the
vehicle. They could open a door from the
inside, even if it has been locked, or start
the vehicle if the key is left in it. They could
endanger themselves and others. You
should therefore take the key with you
when leaving the vehicle, even if you are
only leaving it for a short time.1 j Locking button
2 i Unlocking button for the boot lid
3 k Unlocking button
4 Battery check lamp
i The key can also be used to open and
close the sliding/tilting sunroof* and the
side windows. You can open them using the
summer opening feature (Y page 100). You
can close them using the convenience clos-
ing feature ( Y page 100). Factory settings
X
To unlock centrally: press the k but-
ton.
The turn signals flash once. The locking
knobs in the doors pop up. The anti-theft
alarm system* is deactivated.
When it is dark, the surround lighting also
comes on if it is activated in the on-board
computer.
i If you do not open either a door or the
boot lid after you have unlocked the vehi-
cle, it will automatically relock after approx-
imately 40 seconds.
X To lock centrally: press the j button.
The turn signals flash three times if the
doors and boot lid are closed. The locking
knobs in the doors drop down. The anti-
theft alarm system* and the immobiliser
are primed.
Individual settings
You can change the setting of the locking
system in such a way that pressing the
k button only unlocks the driver's door
and the fuel filler flap. This is useful if you fre-
quently travel on your own.
Controls
* optional
219_AKB; 2; 4, en-GB
mkalafa,
2007-11-13T09:28:36+01:00 - Seite 66
Page 70 of 329

Opening and closing
67
X
To change the setting: press the k
and j buttons simultaneously for
approximately six seconds until the battery
check lamp flashes twice.
The key now functions as follows:
X To unlock the driver's door: press the
k button once.
X To unlock centrally: press the k but-
ton twice.
X To lock centrally: press the j button.
Restoring the factory settings X
Press the k and j buttons simulta-
neously for approximately six seconds until
the battery check lamp flashes twice. KEYLESS GO*
If you are carrying the KEYLESS GO key on
your person, you can use the KEYLESS GO
functions of your vehicle. The KEYLESS GO
key should not be more than one metre away
from the vehicle. However, you can also use
the KEYLESS GO key like a normal key with
remote control.
When you pull the door handle, the following
unlock centrally if the factory settings have
not been changed:
R the doors
R the boot lid
R the fuel filler flap G
Risk of accident
Never leave children unsupervised in the
vehicle. They could open a door from the
inside at any time, even if it has been
locked. Or they could start the vehicle if a
valid KEYLESS GO key is in the vehicle and
they press the KEYLESS GO button on the
gear selector lever. They could endanger
themselves and others. Switch off the
engine and take the KEYLESS GO key with
you, even if you are only leaving the vehicle
for a short time. 1
j Locking button
2 i Unlocking button for the boot lid
3 k Unlocking button
4 Battery check lamp
i You can also use the KEYLESS GO key to
open and close the side windows and slid-
ing/tilting sunroof* . You can open them
using the summer opening feature
(Y page 100). You can close them using
the convenience closing feature
(Y page 100).
i If the vehicle has been parked for a long
time, you must pull the door handle to acti-
vate the KEYLESS GO functions. Controls
* optional
219_AKB; 2; 4, en-GB
mkalafa,
2007-11-13T09:28:36+01:00 - Seite 67
Page 71 of 329
Opening and closing
68
Important notes R
If the KEYLESS GO key is removed from the
vehicle (in luggage or an article of clothing,
for instance), it will no longer be possible
to lock or start the vehicle.
R If the KEYLESS GO key is removed from the
vehicle while the engine is running, e.g. if
the front passenger leaves the vehicle with
the KEYLESS GO key, the following mes-
sage will appear in the multi-function dis-
play as you pull away: Key not detec-
ted.
R If the KEYLESS GO key is in the vehicle, the
vehicle can be started at any time. If you
have left the KEYLESS GO key in the vehi-
cle, you will see the following message in
the multi-function display when you lock
the vehicle: Key still in vehicle.
Factory settings X
To unlock centrally: pull the door handle.
The turn signals flash once. The locking
knobs in the doors pop up. The anti-theft
alarm system* is deactivated.
When it is dark, the surround lighting also
comes on if it is activated in the on-board
computer. i
If you do not open either a door or the
boot lid after you have unlocked the vehi-
cle, it will automatically relock after approx-
imately 40 seconds.
i When a door is opened, the side window
on that side opens slightly. When the door
is closed, the side window closes again.
! The side windows will not open or close
if the battery is discharged or if the side
windows have iced up. It will not be possi-
ble to close the door. Do not attempt to
force the door closed. You could otherwise
damage the door or the window.
i There is a danger of the vehicle being
unlocked accidentally. This could happen if
the KEYLESS GO key is within one metre of
the vehicle and the door handle is splashed
by water. This could also happen when you
are cleaning the door handle. 1
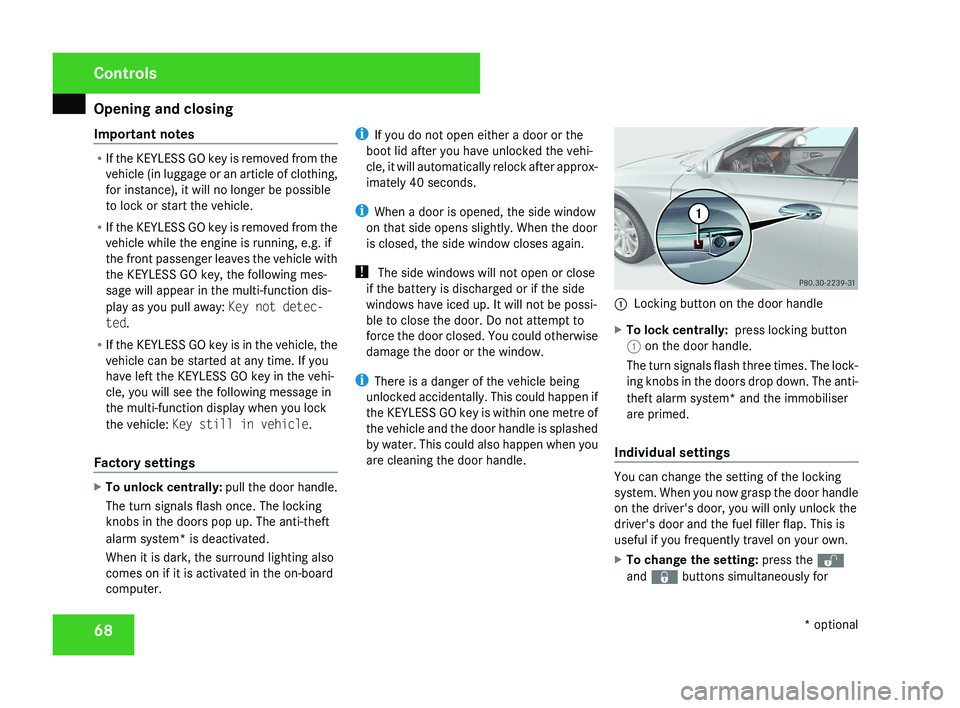
Locking button on the door handle
X To lock centrally: press locking button
1 on the door handle.
The turn signals flash three times. The lock-
ing knobs in the doors drop down. The anti-
theft alarm system* and the immobiliser
are primed.
Individual settings You can change the setting of the locking
system. When you now grasp the door handle
on the driver's door, you will only unlock the
driver's door and the fuel filler flap. This is
useful if you frequently travel on your own.
X
To change the setting: press the k
and j buttons simultaneously for Controls
* optional
219_AKB; 2; 4, en-GB
mkalafa,
2007-11-13T09:28:36+01:00 - Seite 68
Page 91 of 329
Seat belts
88 Seat belts
Seat belts are the most effective means of
restraining the movement of vehicle occu-
pants in the event of an accident. This
reduces
the risk of vehicle occupants coming
into contact with the vehicle interior. Wearing seat belts
G
Risk of injury
A seat belt which is not worn correctly, or
which
has not been engaged in the seat belt
buckle correctly, cannot perform its inten-
ded protective function. Under certain cir-
cumstances this could cause severe or
even fatal injuries.
Make sure that all occupants – in particular,
pregnant women – wear their seat belt cor-
rectly at all times.
R The seat belt must pass closely over your
body and must not be twisted. You
should therefore avoid wearing bulky
clothing (e.g. a winter coat). The shoulder
belt section must be routed across the
middle of your shoulder – on no account
across your neck or under your arm – and
pulled tight against your upper body. The
lap belt must always pass across your lap as low down as possible, i.e. over your
hip joints – not across your abdomen. If
necessary, push down the belt strap
slightly
and then retighten it in the roll-up
direction.
R Do not route the belt strap across sharp
or fragile objects, especially if these are
located on or in your clothing, e.g. spec-
tacles, pencils, keys, etc. The seat belt
strap could be damaged and tear in an
accident and you or other vehicle occu-
pants could be injured.
R Only one person should use each seat
belt at any one time. Children must never
travel sitting on the lap of other occu-
pants. It would not be possible to restrain
the child in the event of a sudden change
in direction, braking or an accident. This
could result in severe or even fatal inju-
ries to the child and other occupants.
R Persons less than 1.50 m tall cannot
wear the seat belts correctly. For this
reason, secure persons less than 1.50 m
tall in specially designed, suitable
restraint systems.
R Children less than 1.50 m tall or under
12 years of age cannot wear the seat
belts properly. Therefore, always secure these children in suitable child restraint
systems on suitable vehicle seats. You
can find more information under "Chil-
dren in the vehicle" in the "Safety" sec-
tion of the Owner's Manual. Follow the
manufacturer's installation instructions
when fitting the child restraint system.
R Do
not secure any objects with a seat belt
if the seat belt is also being used by one
of the vehicle's occupants. G
Risk of injury
The seat belt does not offer the intended
level of protection unless the backrest is
almost vertical. Under certain circumstan-
ces this could cause severe or even fatal
injuries.
Before starting a journey, make sure that
the seat is properly adjusted and that the
backrest is almost vertical. G
Risk of injury
A dirty or damaged seat belt or a seat belt
that has been subjected to a load in an
accident or modified no longer offers the
intended level of protection. Under certain
circumstances this could cause severe or
even fatal injuries. Controls
219_AKB; 2; 4, en-GB
mkalafa,
2007-11-13T09:28:36+01:00 - Seite 88
Page 94 of 329
Lights
91a result of the seat moving. This could
cause an accident.
G
Risk of accident
Only adjust the steering wheel when the
vehicle is stationary and do not pull away
until the steering wheel adjustment mech-
anism is locked in position. You might oth-
erwise drive without the steering wheel
adjustment mechanism being locked in
position.
As a result you could be distracted
from road and traffic conditions by an unex-
pected movement of the steering wheel
and thereby cause an accident.
However, the steerability of the vehicle is
not affected.
X Check whether seat 3 and the head
restraint are adjusted properly
(Y page 75).
Make sure that:
R
you
are as far away from the driver's front
airbag as possible
R you are sitting in a normal upright posi-
tion
R you can fasten the seat belt properly
R you have moved the backrest to an
almost vertical position R
you have set the seat angle so that your
thighs are gently supported
R you can depress the pedals properly
R you have adjusted the head restraint so
that the back of your head is supported
at eye level by the central area of the
head restraint
X Check whether steering wheel 1
is adjus-
ted properly (Y page 81).
Make sure that:
R you can hold the steering wheel with your
arms slightly bent
R you can move your legs freely
R you can see all the displays in the instru-
ment cluster clearly
X Check whether you have fastened seat belt
2 properly
(Y page 88).
It should:
R fit snugly across your body
R be routed across the middle of your
shoulder
R routed in your pelvic area across the hip
joints Lights
Light switch
For
reasons of safety, Mercedes-Benz recom-
mends that you drive with the lights switched
on even during the daytime. In some coun-
tries, daytime use of headlamps varies due to
legal requirements and self-imposed obliga-
tions. In these countries, dipped-beam head-
lamps are switched on when the ignition is
switched on.
i If you drive in countries in which traffic
drives on the opposite side of the road to
the country where the vehicle is registered,
oncoming traffic may be dazzled by the
asymmetrical dipped-beam headlamps.
Have the headlamps changed to symmet-
rical dipped beam when driving in these
countries. You can obtain information
about this from any Mercedes-Benz Service
Centre. Controls
219_AKB; 2; 4, en-GB
mkalafa,
2007-11-13T09:28:36+01:00 - Seite 91
Page 97 of 329
Lights
94 Combination switch (turn signals,
main-beam headlamps and headlamp
flasher)
Turn signals Combination switch
1
To indicate a right turn
2 To indicate a left turn
X To switch on: press the combination
switch in the direction of arrow 1 or 2.
The corresponding turn signal indicator
lamp in the instrument cluster flashes.
i If you only wish to indicate a minor change
of direction, press the combination switch
briefly in the appropriate direction. The cor-
responding turn signal flashes three times. Main-beam headlamps/headlamp flas-
her
Combination switch
1
Main-beam headlamp
2 Headlamp flasher
Main-beam headlamp
X Turn the light switch to B or U.
X To switch on: press the combination
switch in the direction of arrow 1.
The main-beam indicator lamp in the instru-
ment cluster lights up.
X To switch off: move the combination
switch back to its normal position.
The main-beam indicator lamp in the instru-
ment cluster goes out. Headlamp flasher
X
To switch on: briefly pull the combination
switch in the direction of arrow 2. Hazard warning lamps
1
Hazard warning lamp button
X To activate: press hazard warning lamp
button 1.
All turn signals flash. If you now activate a
turn signal, only those turn signal lamps on
the corresponding side of the vehicle will
flash.
X To deactivate: press hazard warning lamp
button 1. Controls
219_AKB; 2; 4, en-GB
mkalafa,
2007-11-13T09:28:36+01:00 - Seite 94