2008 MERCEDES-BENZ CLS COUPE change time
[x] Cancel search: change timePage 190 of 329
Features
187
tion for at least 20 seconds before trying
another position.
X Keep the transmitter button on the garage
door's
remote control depressed until indi-
cator lamp 1 starts to flash rapidly.
The programming was successful if indica-
tor lamp 1 flashes rapidly.
X Release the transmitter buttons on the
garage
door's remote control and the inte-
grated remote control.
If indicator lamp 1 goes out after approxi-
mately 20 seconds and did not flash rapidly
before this:
X Release the transmitter buttons on the
integrated and portable remote controls.
X Repeat the programming procedure. At the
same time change the distance between
the garage door's remote control and the
transmitter
buttons in the rear-view mirror.
i If the garage door system works with a
rolling code, after programming you must
synchronise the remote control integrated
in
the rear-view mirror with the garage door
system receiver.
You will find further information in the
garage door opening system's operating instructions, e.g. the sections on “Synchro-
nising the transmitter” or “Registering a
new
transmitter”. You can also call the hot-
line mentioned above.
Opening or closing the garage door Once programmed, the integrated remote
control
will assume the function of the garage
door system's remote control. Please read
the operating instructions for the garage door
system.
X Turn the key to position 2 in the ignition
lock.
X Press the transmitter button on the rear-
view mirror that you have programmed to
operate the garage door.
Garage door system with fixed code: indi-
cator lamp 1 lights up continuously.
Garage
door system with rolling code: indi-
cator lamp 1 flashes briefly and then lights
up for approximately two seconds. This is
repeated for up to 20 seconds.
i The transmitter will transmit a signal for
as long as the transmitter button is being
pressed. The transmission will be halted
after a maximum of 20 seconds and indi- cator lamp 1 will flash. Press the trans-
mitter button again if necessary.
Clearing the remote control memory X
Turn the key to position 2 in the ignition
lock.
X Press and hold transmitter buttons 2 and
4
for approximately 20 seconds until indi-
cator lamp 1 flashes rapidly.
The memory is cleared.
i You
should clear the remote control mem-
ory before selling the vehicle. Floormat* on the driver's side
G
Risk of accident
Make sure that there is sufficient clearance
around the pedals when floormats are
used, and that the floormats are properly
secured.
The
floormats must be secured at all times
using retainers and studs.
Before you drive off, make sure that the
floormats are secure and rectify if neces-
sary. A floormat which is not properly Controls
* optional
219_AKB; 2; 4, en-GB
mkalafa,
2007-11-13T09:28:36+01:00 - Seite 187 Z
Page 193 of 329
Refuelling
190 Running-in notes
The first 1,500 km
If you treat the engine with sufficient care
from the very start, it will reward you with
excellent performance for a very long period
afterwards.
R You should therefore drive at varying road
and engine speeds for the first 1,500 km
.
R Avoid heavy loads, e.g. driving at full throt-
tle, during this time. Do not exceed 2
/ 3 of
the maximum permissible engine speed for
each gear.
R Change gear in good time.
R Do not shift down a gear manually in order
to brake.
R Try to avoid depressing the accelerator
pedal beyond the pressure point (kick-
down).
R Only use ranges 3, 2 or 1 for slow driving,
e.g. in mountainous terrain.
After 1,500 km you may gradually bring the
vehicle up to full road and engine speeds.
Additional driving tips for AMG vehicles: R
Do not drive faster than
140 km/h for the
first 1,500 km.
R Only bring the engine up to a maximum
speed of 4,500 rpm for a brief period.
i You should also observe these notes if the
engine or rear axle transmission on your
vehicle has been replaced. AMG vehicles with a rear axle differ-
ential lock*
Your vehicle is equipped with a self-locking
differential
on the rear axle. To better protect
the differential gear on the rear axle, you
should perform an oil change after a running-
in phase of 3,000 km. This oil change will
increase the service life of your differential.
Have the oil change performed at a qualified
specialist workshop. Mercedes-Benz recom-
mends that you use a Mercedes-Benz Service
Centre for this purpose. Refuelling
Refuelling
G
Risk of explosion
Fuel is highly flammable. Fire, naked flames
and
smoking are therefore prohibited when
handling fuels.
Before refuelling, turn off the engine and
the auxiliary heating*. G
Risk of injury
Avoid any contact with fuels.
You can damage your health if your skin
comes
into direct contact with fuel or if you
inhale the vapour. G
Risk of fire
Do not use petrol to refuel vehicles with a
diesel
engine. Never mix diesel with petrol.
This would damage the fuel system and
engine and could result in a vehicle fire.
! Do not use petrol to refuel vehicles with a
diesel engine. Do not use diesel to refuel
vehicles with a petrol engine. Even small
amounts of the wrong fuel will damage the
injection system. Damage resulting from
adding the wrong fuel is not covered by the
warranty. Operation
* optional
219_AKB; 2; 4, en-GB
mkalafa,
2007-11-13T09:28:36+01:00 - Seite 190
Page 204 of 329
Tyres and wheels
201
The pressure of warm tyres should only be
corrected
if it is too low for the current oper-
ating conditions.
You will find a table of tyre pressures for var-
ious operating conditions on the inside of
your vehicle's fuel filler flap.
Driving with tyre pressure that is too high or
too low can:
R shorten the service life of the tyres
R cause increased tyre damage
R have a negative effect on handling charac-
teristics (e.g. by causing aquaplaning)
i The tyre pressure values given for low
loads are minimum values which offer you
good ride comfort characteristics.
You can, however, also use the values given
for higher loads. These are permissible and
will not adversely affect the running of the
vehicle.
Also check the tyre pressure of the spare
wheel*. H
Environmental note
Check the tyre pressure regularly, and at
least every 14 days. Tyre pressure loss warning system
G
Risk of accident
The tyre pressure loss warning system does
not
warn you of an incorrectly set tyre pres-
sure. The table on the inside of the fuel filler
flap will help you decide whether the tyre
pressures should be corrected.
The tyre pressure loss warning system does
not replace the need to regularly check
your vehicle's tyre pressures, since an even
loss of pressure on several tyres at the
same time cannot be detected by the tyre
pressure loss warning system.
The tyre pressure loss warning system is
not able to warn you of a sudden loss of
pressure, e.g. if the tyre is penetrated by a
foreign object.
In the event of a sudden loss of pressure,
bring the vehicle to a halt by braking care-
fully. Do not make any sudden steering
movements when doing so.
While the vehicle is in motion, the tyre pres-
sure loss warning system monitors the set
tyre pressure using the rotational speed of
the wheels. This enables the system to detect
significant pressure loss in a tyre. If the speed
of rotation of a wheel changes as a result of
a loss of pressure, a corresponding warning message will appear in the multi-function dis-
play.
The
function of the tyre pressure loss warning
system is limited or delayed if:
R snow chains are fitted to your vehicle's
tyres
R road conditions are wintry
R you are driving on sand or gravel
R you adopt a very sporty driving style (cor-
nering at high speeds or driving with high
rates of acceleration)
R you are driving with a heavy load (in the
vehicle or on the roof)
Restarting the tyre pressure loss warn-
ing system Restart the tyre pressure loss warning system
if you have:
R
changed the tyre pressure
R changed the wheels or tyres
R fitted new wheels or tyres
X Before restarting, consult the table of tyre
pressures
on the inside of the fuel filler flap
to ensure that the tyre pressure in all four Operation
* optional
219_AKB; 2; 4, en-GB
mkalafa,
2007-11-13T09:28:36+01:00 - Seite 201 Z
Page 209 of 329
Driving tips
206 Driving tips
Rolling with the engine switched off
G
Risk of accident
Never switch the engine off while the vehi-
cle is in motion.
There
is no power assistance for the steer-
ing and the service brake when the engine
is not running.
You will require considerably more effort to
steer and brake and you could therefore
lose control of the vehicle and cause an
accident. Braking
G
Risk of accident
Do not change down for additional engine
braking on a slippery road surface. This
could cause the drive wheels to lose their
grip and the vehicle could skid. G
Risk of accident
Make sure that other road users are not
endangered by your braking. Downhill gradients On long and steep downhill gradients, espe-
cially if the vehicle is laden, you must select
shift range 1, 2 or 3 in good time.
i
This also applies if you have activated
cruise control, Speedtronic or Distronic*
.
This uses the braking effect of the engine and
you will not have to brake to such an extent
to maintain the same speed. This relieves the
load on the brake system and prevents the
brakes from overheating and wearing too
quickly. If you need additional braking,
depress the brake pedal repeatedly rather
than continuously.
Heavy and light loads If the brakes have been subjected to a heavy
load,
do not stop the vehicle immediately, but
drive on for a short while. This allows the air-
flow to cool the brakes more quickly. G
Risk of accident
Never depress the brake pedal continu-
ously while the vehicle is in motion, e.g.
never cause the brakes to rub by applying
constant
slight pedal pressure. This causes
the brake system to overheat, increases the braking distance and can lead to the
brakes failing completely.
If
the brakes have been used only moderately,
you should occasionally test their effective-
ness. To do this, brake more firmly from a
higher speed. This improves the grip of the
brakes.
Wet roads If driving in heavy rain for a prolonged period
of time without braking, there may be a
delayed
reaction from the brakes, when brak-
ing for the first time. You must brake harder.
You must therefore maintain a greater dis-
tance from the vehicle in front.
Brake firmly after driving on a wet road. This
way the brake discs will become warm, drying
more quickly, which will protect them against
corrosion.
Limited braking performance on salted
roads G
Risk of accident
The layer of salt on the brake discs and the
brake pads/linings may cause a delay in
the braking effect, resulting in a signifi- Operation
* optional
219_AKB; 2; 4, en-GB
mkalafa,
2007-11-13T09:28:36+01:00 - Seite 206
Page 220 of 329
Where will I find...?
217Fire extinguisher*
i Have the fire extinguisher refilled after
each use and checked every one or two
years. Otherwise, it may fail in an emer-
gency.
Observe the legal requirements in all coun-
tries concerned.
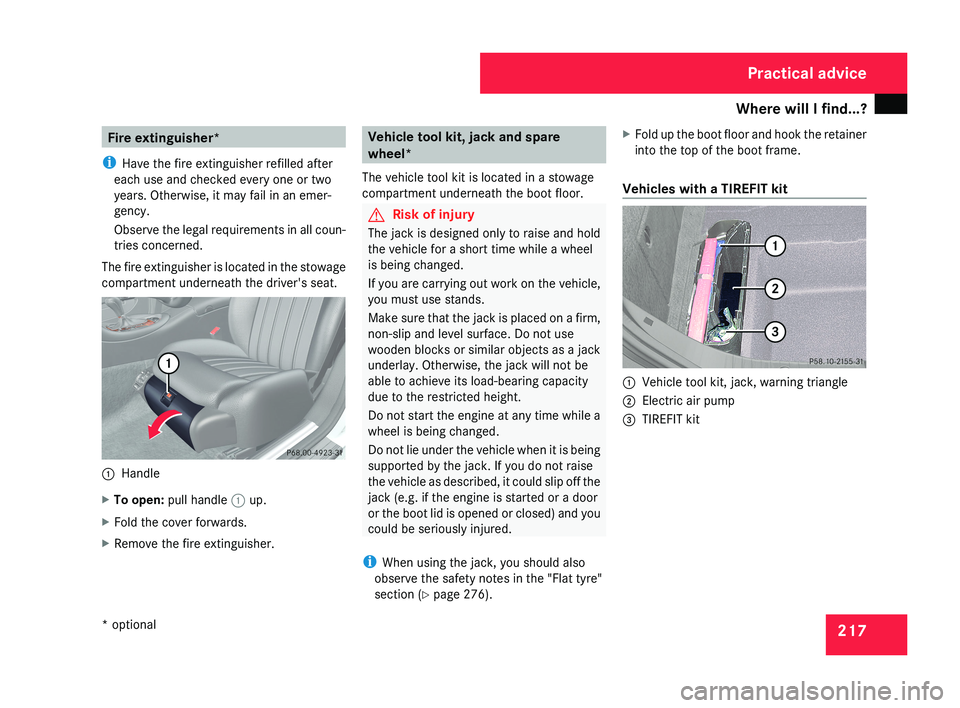
The fire extinguisher is located in the stowage
compartment underneath the driver's seat.1 Handle
X To open: pull handle 1 up.
X Fold the cover forwards.
X Remove the fire extinguisher.
Vehicle tool kit, jack and spare
wheel*
The vehicle tool kit is located in a stowage
compartment underneath the boot floor.
G Risk of injury
The jack is designed only to raise and hold
the vehicle for a short time while a wheel
is being changed.
If you are carrying out work on the vehicle,
you must use stands.
Make sure that the jack is placed on a firm,
non-slip and level surface. Do not use
wooden blocks or similar objects as a jack
underlay. Otherwise, the jack will not be
able to achieve its load-bearing capacity
due to the restricted height.
Do not start the engine at any time while a
wheel is being changed.
Do not lie under the vehicle when it is being
supported by the jack. If you do not raise
the vehicle as described, it could slip off the
jack (e.g. if the engine is started or a door
or the boot lid is opened or closed) and you
could be seriously injured.
i When using the jack, you should also
observe the safety notes in the "Flat tyre"
section ( Y page 276). X
Fold up the boot floor and hook the retainer
into the top of the boot frame.
Vehicles with a TIREFIT kit
1 Vehicle tool kit, jack, warning triangle
2 Electric air pump
3 TIREFIT kit
Practical advice
* optional
219_AKB; 2; 4, en-GB
mkalafa,
2007-11-13T09:28:36+01:00 - Seite 217
Page 242 of 329
Display messages
239Display messages Possible cause/consequence Possible solution
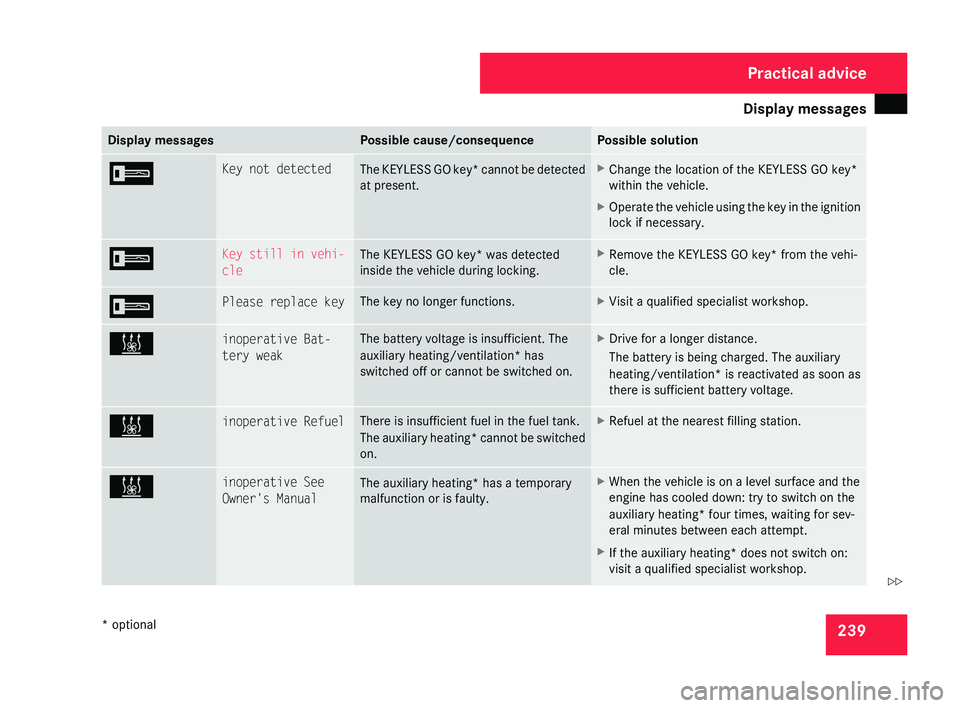
I Key not detected
The KEYLESS GO key* cannot be detected
at present. X
Change the location of the KEYLESS GO key*
within the vehicle.
X Operate the vehicle using the key in the ignition
lock if necessary. I Key still in vehi-
cle
The KEYLESS GO key* was detected
inside the vehicle during locking. X
Remove the KEYLESS GO key* from the vehi-
cle. I Please replace key The key no longer functions. X
Visit a qualified specialist workshop. X inoperative Bat-
tery weak The battery voltage is insufficient. The
auxiliary heating/ventilation*
has
switched off or cannot be switched on. X
Drive for a longer distance.
The battery is being charged. The auxiliary
heating/ventilation* is reactivated as soon as
there is sufficient battery voltage. X inoperative Refuel There is insufficient fuel in the fuel tank.
The
auxiliary heating* cannot be switched
on. X
Refuel at the nearest filling station. X inoperative See
Owner's Manual
The auxiliary heating* has a temporary
malfunction or is faulty. X
When the vehicle is on a level surface and the
engine has cooled down: try to switch on the
auxiliary heating*
four times, waiting for sev-
eral minutes between each attempt.
X If the auxiliary heating* does not switch on:
visit a qualified specialist workshop. Practical advice
* optional
219_AKB; 2; 4, en-GB
mkalafa,
2007-11-13T09:28:36+01:00 - Seite 239 Z
Page 274 of 329
Changing the bulbs
271Changing the bulbs
Notes on changing bulbs
Bulbs and lamps are an important aspect of
vehicle safety. You must therefore make sure
that all bulbs function correctly at all times. G
Risk of injury
Bulbs and lamps can be very hot. You
should therefore allow them to cool down
before you change them. Otherwise, you
could be burned if you touch them.
Keep bulbs out of the reach of children.
Otherwise, they could damage them, for
example, and injure themselves.
Never use a bulb which has been dropped.
Such a bulb may explode and injure you.
H7 bulbs are pressurised and could explode
when you change them, particularly if they
are very hot. You should therefore wear eye
protection and gloves when you are chang-
ing them. G
Risk of injury
Xenon bulbs carry a high voltage. You could
get an electric shock and be seriously or
even fatally injured if you touch the electric
contacts on xenon bulbs. Therefore, never
remove the cover from xenon bulbs. Do not change xenon bulbs yourself, but
have them replaced at a qualified specialist
workshop which has the necessary special-
ist knowledge and tools to carry out the
work required.
Mercedes-Benz recommends that you use
a Mercedes-Benz Service Centre for this
purpose. In particular, work relevant to
safety or on safety-related systems must be
carried out at a qualified specialist work-
shop.
G
Risk of injury
HiP bulbs are pressurised and may explode
when you change them, thereby injuring
you.
Do not change HiP bulbs yourself; have
them replaced at a qualified specialist
workshop which has the necessary special-
ist knowledge and tools to carry out the
work required.
Mercedes-Benz recommends that you use
a Mercedes-Benz Service Centre for this
purpose. In particular, work relevant to
safety or on safety-related systems must be
carried out at a qualified specialist work-
shop. !
Do not change the LEDs yourself. You
could otherwise damage the LEDs or parts
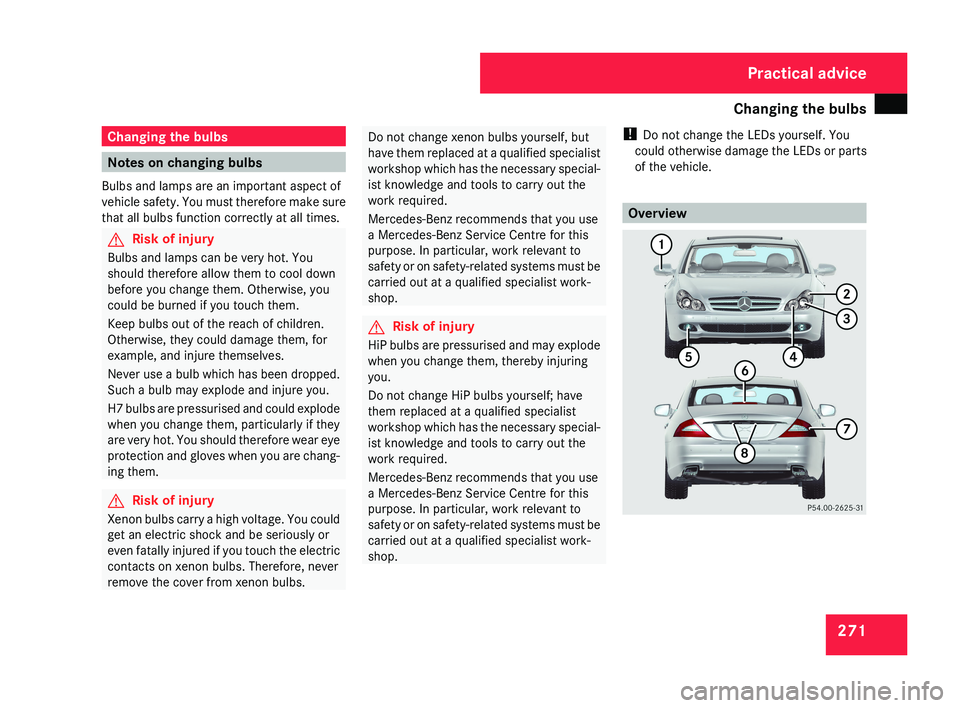
of the vehicle. OverviewPractical advice
219_AKB; 2; 4, en-GB
mkalafa,
2007-11-13T09:28:36+01:00 - Seite 271
Page 279 of 329
Flat tyre
276 Fitting
X Slide the new wiper blade into the retainer
on the wiper arm in the opposite direction
to the arrow.
X Turn the wiper blade parallel to the wiper
arm.
X Fold the wiper arm back onto the wind-
screen. Flat tyre
Your vehicle may be equipped with:
R a TIREFIT kit (Y page 217)
R a "Minispare" emergency spare
wheel*
(Y page 218)
R a collapsible emergency spare
wheel* (Y page 218)
R a spare wheel* (Y page 218)
R the MOExtended run-flat sys-
tem* (Y page 287) Preparing the vehicle
i Vehicle preparation is not necessary on
vehicles with MOE tyres*.
X Stop your vehicle as far away from traffic
as possible on solid, non-slippery, level
ground.
X Switch on the hazard warning lamps.
X Firmly depress the parking brake.
X Move the selector lever to P. X
All occupants must get out of the vehicle.
Make
sure that they are not endangered as
they do so.
X Make sure that no one is near the danger
area whilst a wheel is being changed. Any-
one who is not directly assisting in the
wheel change should, for example, stand
behind the barrier.
X Switch off the engine.
X Remove the key from the ignition lock.
X Place the warning triangle ( Y page 216) or
warning lamps at a suitable distance.
Observe legal requirements. G
Risk of injury
The jack is designed only to raise the vehi-
cle for a short time while a wheel is being
changed.
If you intend to work under the vehicle, it
must be placed on stands.
Make
sure that the jack is placed on a firm,
non-slip, level surface. Do not use wooden
blocks or similar as jacking supports. Oth-
erwise, the jack will not be able to achieve
its load-bearing capacity due to the restric-
ted height. Practical advice
* optional
219_AKB; 2; 4, en-GB
mkalafa,
2007-11-13T09:28:36+01:00 - Seite 276