2008 MERCEDES-BENZ CLS COUPE door lock
[x] Cancel search: door lockPage 148 of 329
Driving systems
145
Activating HOLD X
Make sure that the activation conditions
are met.
X Depress the brake.
X Depress the brake again quickly until
HOLD appears in the display.
HOLD is activated. You can release the
brake pedal.
i If depressing the brake pedal the first
time does not activate HOLD, wait briefly
and then try again. G
Risk of accident
The vehicle's brakes are applied when
HOLD is activated. For this reason, deacti-
vate HOLD if the vehicle is to be set in
motion by other means (e.g. in a car wash
or by towing).
Deactivating HOLD HOLD is deactivated if:
R
you
accelerate when the selector lever is in
position D or R
R you move the selector lever to position P
R you release the brakes completely and
apply them again with a certain amount of pressure until the
HOLD message in the
multi-function display goes out G
Risk of accident
Never get out of the vehicle when HOLD is
activated.
HOLD
must never be operated or deactiva-
ted by a passenger or from outside the
vehicle.
HOLD does not replace the parking brake
and must not be used for parking.
The HOLD braking effect is cancelled and
the vehicle can start moving if:
R HOLD is deactivated by depressing the
accelerator pedal or the brake pedal
R there is a malfunction in the system or an
interruption in the power supply, e.g. bat-
tery failure
R the electrical system in the engine com-
partment, the battery or the fuses are
tampered with
R the battery is disconnected G
Risk of accident
If you wish to leave the vehicle or park it,
deactivate HOLD and secure the vehicle
against rolling away. You will see a warning message in the multi-
function display if HOLD is activated and:
R
the
driver's door is opened and you release
the seat belt
R the ignition is switched off
R the bonnet is opened
Selector lever in park position
X Move the selector lever to P
to prevent the
vehicle from rolling away.
HOLD is deactivated. The warning message
in the multi-function display goes out.
A horn will also sound at regular intervals if
HOLD is activated and you:
R stop
the engine and open the driver's door
R open the bonnet
The horn draws your attention to the fact that
the vehicle has been parked while HOLD is
still activated. The sound becomes louder if
you attempt to lock the vehicle. The vehicle
is not locked until HOLD is deactivated.
i If the ignition has been switched off, the
engine cannot be restarted until HOLD is
deactivated.
If there is a fault in the system or power supply
while HOLD is activated, the Brake immedi-
ately message appears in the multi-function Controls
219_AKB; 2; 4, en-GB
mkalafa,
2007-11-13T09:28:36+01:00 - Seite 145 Z
Page 168 of 329
Air conditioning
165
X
To deactivate: press the , button.
The indicator lamp in the , button goes
out.
i Air-recirculation mode switches off auto-
matically:
R after approximately five minutes at out-
side temperatures below approximately
5 †
R after
approximately five minutes if the air
dehumidification is deactivated
R after approximately 30 minutes at out-
side temperatures above approximately
5 †
Air-recirculation mode with the conve-
nience opening/closing feature G
Risk of injury
Make sure that nobody can become trap-
ped
between the side window and the door
frame as the side windows are opened and
closed. Do not place objects or lean against
the side window when it is being opened or
closed. You or the objects could be drawn
in or become trapped between the side
window and the door frame as the window moves. If there is a risk of entrapment,
press the , button again. If necessary,
press
the switch that stops, opens or closes
the side window in the opposite direction.
Make sure that nobody can become trap-
ped when you are opening or closing the
sliding/tilting sunroof*. If there is a risk of
entrapment, press the , button again.
If necessary, press the switch to stop, open
or close the sliding/tilting sunroof* in the
opposite direction.
X Convenience closing: press and hold
the ,
button until the side windows and
the sliding/tilting sunroof* have closed.
The indicator lamp in the , button
comes on. Air-recirculation mode is activa-
ted.
X Convenience opening: press and hold
the ,
button until the side windows and
the sliding/tilting sunroof* have reached
their original position.
The indicator lamp in the , button goes
out. Air-recirculation mode is deactivated.
i If you open the side windows or the slid-
ing/tilting sunroof* manually after closing
using the convenience closing feature, it will remain in this position when opened
using the convenience opening feature. Switching the residual heat/auxiliary
ventilation on/off
It
is possible to make use of the residual heat
of the engine to continue heating the station-
ary vehicle for up to 30 minutes after the
engine has been switched off. The heating
time depends on the set interior temperature.
i The blower will run at a low speed regard-
less of the airflow setting.
i If you activate the "residual heat" function
at high temperatures, only the ventilation
will be activated. The blower runs at
medium speed.
X Make sure that the key is in position 0 in
the ignition lock or that it has been
removed.
X To switch on: press the T button.
REST appears in the display.
X To deactivate: press the T button.
REST is no longer shown in the display. Controls
* optional
219_AKB; 2; 4, en-GB
mkalafa,
2007-11-13T09:28:36+01:00 - Seite 165
Page 189 of 329
Features
186 Garage door opener*
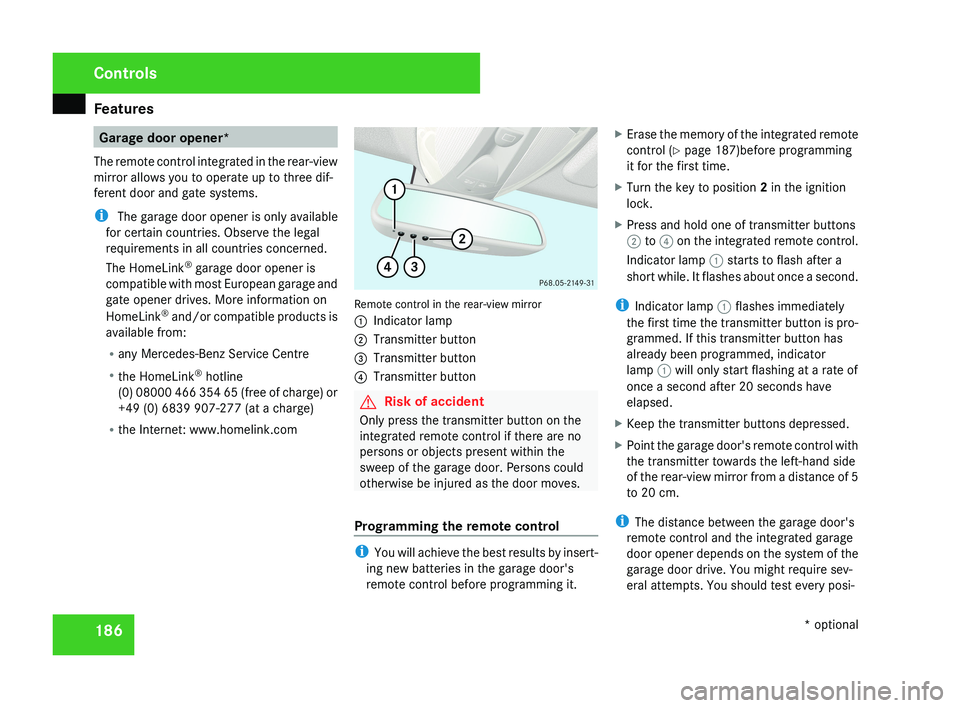
The remote control integrated in the rear-view
mirror allows you to operate up to three dif-
ferent door and gate systems.
i The garage door opener is only available
for certain countries. Observe the legal
requirements in all countries concerned.
The HomeLink ®
garage door opener is
compatible with most European garage and
gate opener drives. More information on
HomeLink ®
and/or compatible products is
available from:
R any Mercedes-Benz Service Centre
R the HomeLink ®
hotline
(0) 08000 466 354 65 (free of charge) or
+49 (0) 6839 907-277 (at a charge)
R the Internet: www.homelink.comRemote control in the rear-view mirror
1 Indicator lamp
2 Transmitter button
3 Transmitter button
4 Transmitter button
G Risk of accident
Only press the transmitter button on the
integrated remote control if there are no
persons or objects present within the
sweep of the garage door. Persons could
otherwise be injured as the door moves.
Programming the remote control
i You will achieve the best results by insert-
ing new batteries in the garage door's
remote control before programming it. X
Erase the memory of the integrated remote
control ( Y page 187)before programming
it for the first time.
X Turn the key to position 2 in the ignition
lock.
X Press and hold one of transmitter buttons
2 to 4 on the integrated remote control.
Indicator lamp 1 starts to flash after a
short while. It flashes about once a second.
i Indicator lamp 1 flashes immediately
the first time the transmitter button is pro-
grammed. If this transmitter button has
already been programmed, indicator
lamp 1 will only start flashing at a rate of
once a second after 20 seconds have
elapsed.
X Keep the transmitter buttons depressed.
X Point the garage door's remote control with
the transmitter towards the left-hand side
of the rear-view mirror from a distance of 5
to 20 cm.
i The distance between the garage door's
remote control and the integrated garage
door opener depends on the system of the
garage door drive. You might require sev-
eral attempts. You should test every posi-
Controls
* optional
219_AKB; 2; 4, en-GB
mkalafa,
2007-11-13T09:28:36+01:00 - Seite 186
Page 190 of 329
Features
187
tion for at least 20 seconds before trying
another position.
X Keep the transmitter button on the garage
door's
remote control depressed until indi-
cator lamp 1 starts to flash rapidly.
The programming was successful if indica-
tor lamp 1 flashes rapidly.
X Release the transmitter buttons on the
garage
door's remote control and the inte-
grated remote control.
If indicator lamp 1 goes out after approxi-
mately 20 seconds and did not flash rapidly
before this:
X Release the transmitter buttons on the
integrated and portable remote controls.
X Repeat the programming procedure. At the
same time change the distance between
the garage door's remote control and the
transmitter
buttons in the rear-view mirror.
i If the garage door system works with a
rolling code, after programming you must
synchronise the remote control integrated
in
the rear-view mirror with the garage door
system receiver.
You will find further information in the
garage door opening system's operating instructions, e.g. the sections on “Synchro-
nising the transmitter” or “Registering a
new
transmitter”. You can also call the hot-
line mentioned above.
Opening or closing the garage door Once programmed, the integrated remote
control
will assume the function of the garage
door system's remote control. Please read
the operating instructions for the garage door
system.
X Turn the key to position 2 in the ignition
lock.
X Press the transmitter button on the rear-
view mirror that you have programmed to
operate the garage door.
Garage door system with fixed code: indi-
cator lamp 1 lights up continuously.
Garage
door system with rolling code: indi-
cator lamp 1 flashes briefly and then lights
up for approximately two seconds. This is
repeated for up to 20 seconds.
i The transmitter will transmit a signal for
as long as the transmitter button is being
pressed. The transmission will be halted
after a maximum of 20 seconds and indi- cator lamp 1 will flash. Press the trans-
mitter button again if necessary.
Clearing the remote control memory X
Turn the key to position 2 in the ignition
lock.
X Press and hold transmitter buttons 2 and
4
for approximately 20 seconds until indi-
cator lamp 1 flashes rapidly.
The memory is cleared.
i You
should clear the remote control mem-
ory before selling the vehicle. Floormat* on the driver's side
G
Risk of accident
Make sure that there is sufficient clearance
around the pedals when floormats are
used, and that the floormats are properly
secured.
The
floormats must be secured at all times
using retainers and studs.
Before you drive off, make sure that the
floormats are secure and rectify if neces-
sary. A floormat which is not properly Controls
* optional
219_AKB; 2; 4, en-GB
mkalafa,
2007-11-13T09:28:36+01:00 - Seite 187 Z
Page 214 of 329
Care
211
Automatic car wash G
Risk of accident
The vehicle is braked when HOLD is activa-
ted. Therefore, deactivate HOLD before the
vehicle is washed in an automatic car wash.
You can wash the vehicle in an automatic car
wash from the very start.
! Do not use a touch-free automatic car
wash that uses chemical agents to wash
the vehicle.
Preferably use one with high-pressure jets for
prewashing.
If the vehicle is very dirty, prewash it before
cleaning it in an automatic car wash.
! Make sure that the automatic car wash is
suitable for the size of the vehicle. Fold in
the exterior mirrors before the vehicle is
washed. There is otherwise a risk of dam-
age to the exterior mirrors.
! Make sure the side windows are com-
pletely closed, the ventilation/heater
blower is fully turned off and the wind-
screen wiper switch is set to 0. The rain
sensor may otherwise be activated, for
instance, leading to inadvertent wiper sweeps being triggered. This could cause
damage to the vehicle.
After using an automatic car wash, wipe off
wax from the windscreen and the wiper
blades. This will prevent smears and reduce
wiping
noises caused by residue on the wind-
screen.
High-pressure cleaners G
Risk of accident
Do not use high-pressure cleaners with cir-
cular-jet nozzles (dirt grinders) to clean
your vehicle or - especially - the tyres. You
could otherwise damage the tyres and
cause an accident.
! Observe the instructions issued by the
equipment manufacturer concerning the
distance to be maintained between the
nozzle
of the high-pressure cleaner and the
vehicle (at least 30 cm).
Move the high-pressure cleaner nozzle
around when cleaning your vehicle.
Do not aim directly at any of the following:
R Tyres
R Door joint
R Electrical components R
Battery
R Connectors
R Bulbs
R Seals
Damaged seals or electrical components
can lead to failures or leaks.
Cleaning the wiper blades and the out-
side of the windscreen G
Risk of injury
Turn the key to position 0 in the ignition
lock
before cleaning the windscreen or the
wiper blades. There is otherwise a risk of
the windscreen wipers being set in motion
and causing injury.
X Turn the key to position 1 in the ignition
lock (Y page 74).
X Set the windscreen wipers to the u
position on the combination switch
(Y page 97).
X Turn the key to position 0
or remove it when
the wiper arms are vertical ( Y page 74). Operation
219_AKB; 2; 4, en-GB
mkalafa,
2007-11-13T09:28:36+01:00 - Seite 211
Page 220 of 329
Where will I find...?
217Fire extinguisher*
i Have the fire extinguisher refilled after
each use and checked every one or two
years. Otherwise, it may fail in an emer-
gency.
Observe the legal requirements in all coun-
tries concerned.
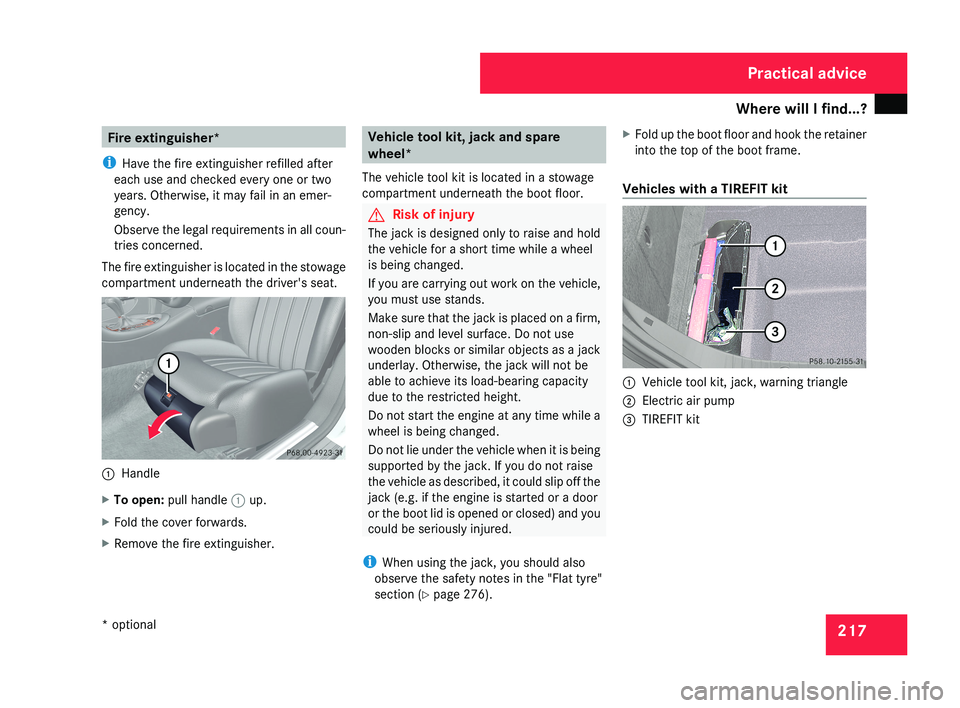
The fire extinguisher is located in the stowage
compartment underneath the driver's seat.1 Handle
X To open: pull handle 1 up.
X Fold the cover forwards.
X Remove the fire extinguisher.
Vehicle tool kit, jack and spare
wheel*
The vehicle tool kit is located in a stowage
compartment underneath the boot floor.
G Risk of injury
The jack is designed only to raise and hold
the vehicle for a short time while a wheel
is being changed.
If you are carrying out work on the vehicle,
you must use stands.
Make sure that the jack is placed on a firm,
non-slip and level surface. Do not use
wooden blocks or similar objects as a jack
underlay. Otherwise, the jack will not be
able to achieve its load-bearing capacity
due to the restricted height.
Do not start the engine at any time while a
wheel is being changed.
Do not lie under the vehicle when it is being
supported by the jack. If you do not raise
the vehicle as described, it could slip off the
jack (e.g. if the engine is started or a door
or the boot lid is opened or closed) and you
could be seriously injured.
i When using the jack, you should also
observe the safety notes in the "Flat tyre"
section ( Y page 276). X
Fold up the boot floor and hook the retainer
into the top of the boot frame.
Vehicles with a TIREFIT kit
1 Vehicle tool kit, jack, warning triangle
2 Electric air pump
3 TIREFIT kit
Practical advice
* optional
219_AKB; 2; 4, en-GB
mkalafa,
2007-11-13T09:28:36+01:00 - Seite 217
Page 226 of 329
Display messages
223Display messages Possible cause/consequence Possible solution
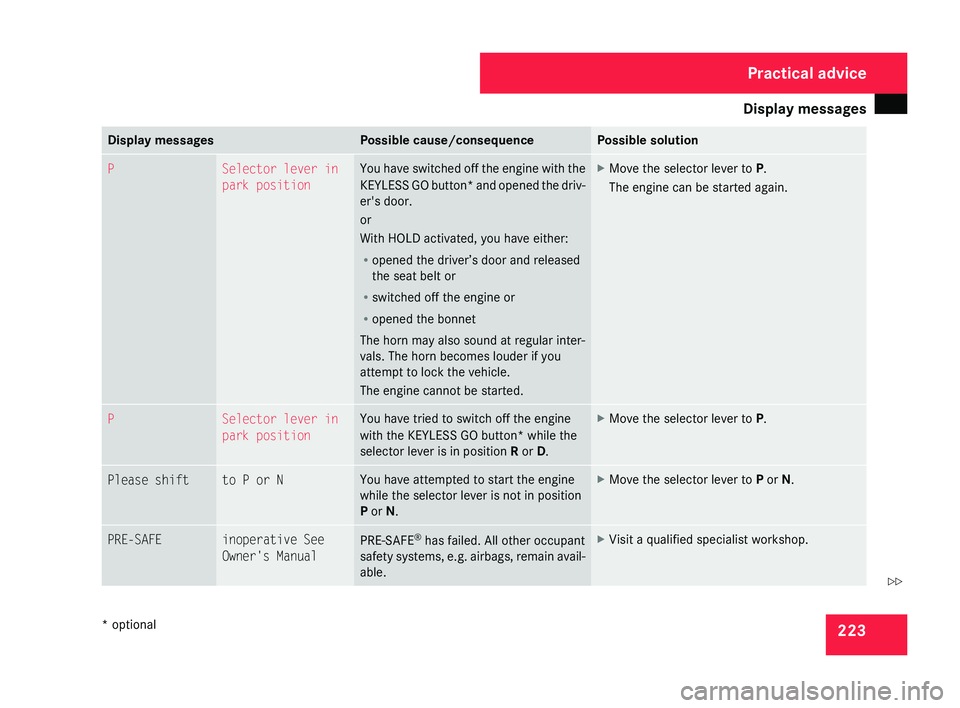
P Selector lever in
park position You have switched off the engine with the
KEYLESS
GO button* and opened the driv-
er's door.
or
With HOLD activated, you have either:
R opened the driver’s door and released
the seat belt or
R switched off the engine or
R opened the bonnet
The horn may also sound at regular inter-
vals. The horn becomes louder if you
attempt to lock the vehicle.
The engine cannot be started. X
Move the selector lever to P.
The engine can be started again. P Selector lever in
park position You have tried to switch off the engine
with the KEYLESS GO button*
while the
selector lever is in position R or D. X
Move the selector lever to P. Please shift to P or N You have attempted to start the engine
while the selector lever is not in position
P or N. X
Move the selector lever to P or N. PRE-SAFE inoperative See
Owner's Manual
PRE-SAFE
®
has failed. All other occupant
safety
systems, e.g. airbags, remain avail-
able. X
Visit a qualified specialist workshop. Practical advice
* optional
219_AKB; 2; 4, en-GB
mkalafa,
2007-11-13T09:28:36+01:00 - Seite 223 Z
Page 264 of 329
Troubleshooting
261Key
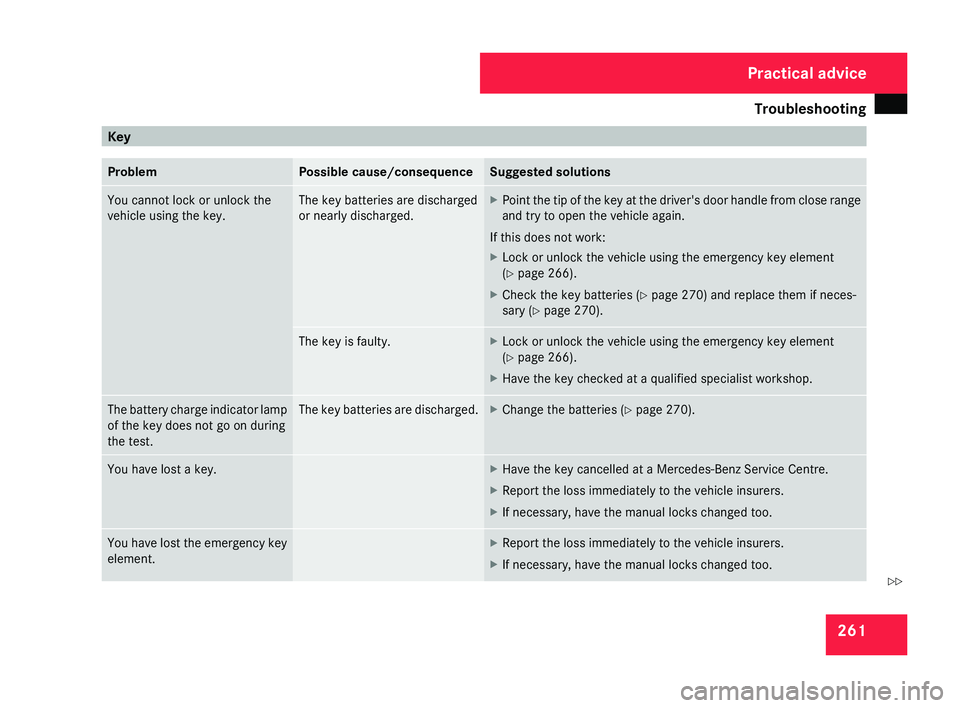
Problem Possible cause/consequence Suggested solutions
You cannot lock or unlock the
vehicle using the key. The key batteries are discharged
or nearly discharged. X
Point the tip of the key at the driver's door handle from close range
and try to open the vehicle again.
If this does not work:
X Lock or unlock the vehicle using the emergency key element
(Y page 266).
X Check the key batteries (Y page 270) and replace them if neces-
sary ( Y page 270). The key is faulty. X
Lock or unlock the vehicle using the emergency key element
(Y page 266).
X Have the key checked at a qualified specialist workshop. The battery charge indicator lamp
of the key does not go on during
the test. The key batteries are discharged. X
Change the batteries ( Y page 270).You have lost a key. X
Have the key cancelled at a Mercedes-Benz Service Centre.
X Report the loss immediately to the vehicle insurers.
X If necessary, have the manual locks changed too. You have lost the emergency key
element. X
Report the loss immediately to the vehicle insurers.
X If necessary, have the manual locks changed too. Practical advice
219_AKB; 2; 4, en-GB
mkalafa,
2007-11-13T09:28:36+01:00 - Seite 261 Z