2008 MERCEDES-BENZ CLS COUPE door lock
[x] Cancel search: door lockPage 104 of 329
Driving and parking
101With KEYLESS GO*
R
Release the locking button on the door
handle.
R Pull the door handle immediately and
hold it.
The side windows and the sliding/tilting
sunroof* open.
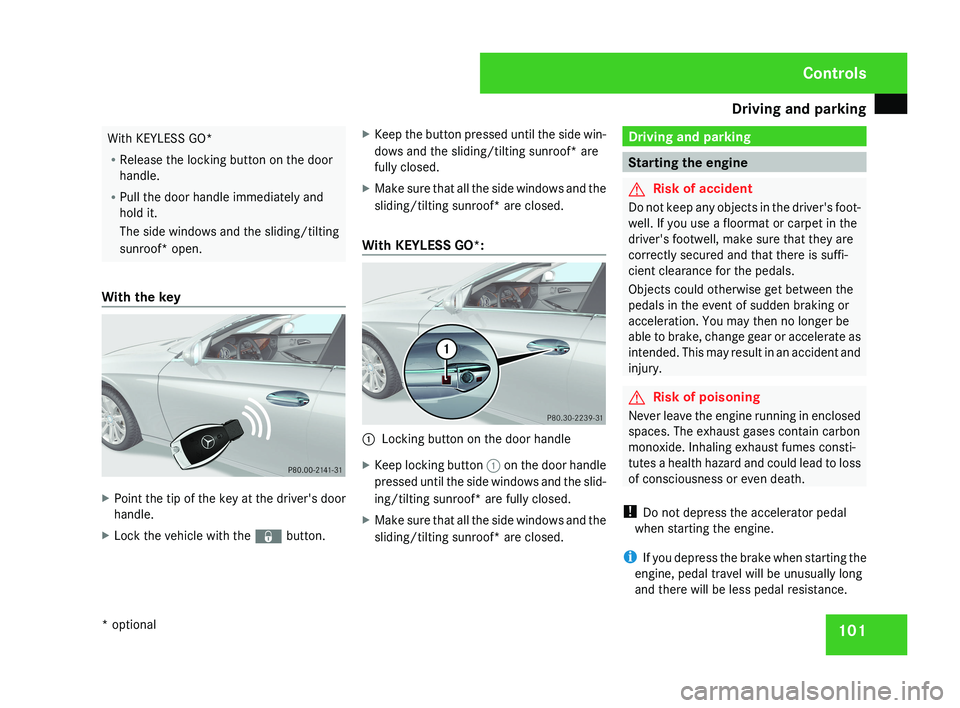
With the key X
Point the tip of the key at the driver's door
handle.
X Lock the vehicle with the j button.X
Keep the button pressed until the side win-
dows and the sliding/tilting sunroof* are
fully closed.
X Make sure that all the side windows and the
sliding/tilting sunroof* are closed.
With KEYLESS GO*: 1
Locking button on the door handle
X Keep locking button 1 on the door handle
pressed until the side windows and the slid-
ing/tilting sunroof* are fully closed.
X Make sure that all the side windows and the
sliding/tilting sunroof* are closed. Driving and parking
Starting the engine
G
Risk of accident
Do not keep any objects in the driver's foot-
well. If you use a floormat or carpet in the
driver's footwell, make sure that they are
correctly secured and that there is suffi-
cient clearance for the pedals.
Objects could otherwise get between the
pedals in the event of sudden braking or
acceleration. You may then no longer be
able to brake, change gear or accelerate as
intended. This may result in an accident and
injury. G
Risk of poisoning
Never leave the engine running in enclosed
spaces. The exhaust gases contain carbon
monoxide. Inhaling exhaust fumes consti-
tutes a health hazard and could lead to loss
of consciousness or even death.
! Do not depress the accelerator pedal
when starting the engine.
i If you depress the brake when starting the
engine, pedal travel will be unusually long
and there will be less pedal resistance. Controls
* optional
219_AKB; 2; 4, en-GB
mkalafa,
2007-11-13T09:28:36+01:00 - Seite 101
Page 106 of 329
Driving and parking
103
X
Depress the brake pedal.
The selector lever lock is released.
X Petrol engine: press KEYLESS GO button
1 once.
The engine starts automatically.
X Diesel engine: press KEYLESS GO button
1 once.
Preglow is activated and the engine starts
automatically.
i You can start the engine without preglow
if the engine is warm:
XPress and hold KEYLESS GO button
1 until the engine is running. Pulling away
! AMG vehicles: at low engine tempera-
tures
(below + 20° C), the maximum engine
speed is limited in order to protect the
engine. Avoid driving at full throttle when
the engine is cold in order to protect the
engine and avoid inconveniences.
! Do not select reverse gear unless the
vehicle is stationary, otherwise the trans-
mission will be damaged. Do not drive at high engine speeds until the
engine
has warmed up. This will protect the
engine.
i The vehicle will lock itself centrally once
you have pulled away. The locking knobs in
the doors drop down.
You can open the doors from the inside at
any time.
You can also deactivate the automatic lock-
ing feature ( Y page 127).
i It is only possible to move the selector
lever to the desired position if you depress
the brake pedal. Only then is the selector
lever lock released.
X Depress the brake pedal and hold it down.
X Pull the parking brake release handle to
release the parking brake.
X Move the selector lever to position D or R.
i Wait for the shift process to complete
before pulling away.
X Release the brake pedal.
X Carefully depress the accelerator pedal.
i Upshifts take place at higher engine
speeds after a cold start. This helps the catalytic converter to reach its operating
temperature more quickly. Parking
G
Risk of accident
Only remove the key from the ignition lock
when the vehicle is stationary since you
cannot steer the vehicle with the key
removed.
Never leave children unsupervised in the
vehicle. They could release the parking
brake. This could lead to a serious or fatal
accident. G
Risk of fire
Make sure that the exhaust system does
not under any circumstances come into
contact with easily ignitable material such
as dry grass or petrol. The material could
otherwise
ignite and set the vehicle on fire. Controls
219_AKB; 2; 4, en-GB
mkalafa,
2007-11-13T09:28:36+01:00 - Seite 103
Page 113 of 329
Instrument cluster
110 Activating the multi-function display
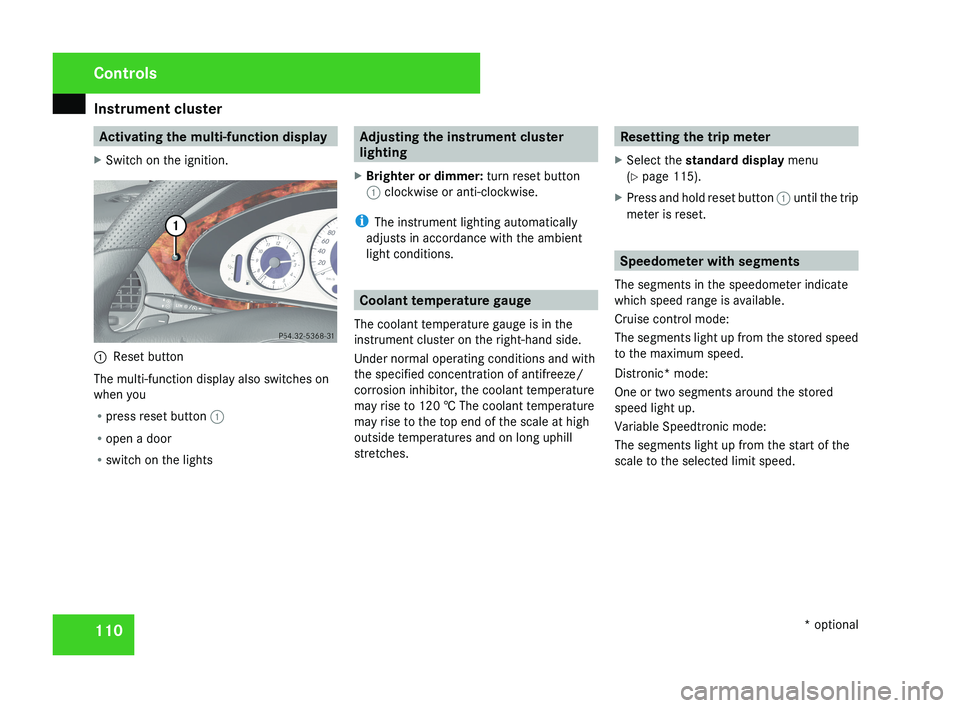
X Switch on the ignition.1 Reset button
The multi-function display also switches on
when you
R press reset button 1
R open a door
R switch on the lights
Adjusting the instrument cluster
lighting
X Brighter or dimmer: turn reset button
1 clockwise or anti-clockwise.
i The instrument lighting automatically
adjusts in accordance with the ambient
light conditions.
Coolant temperature gauge
The coolant temperature gauge is in the
instrument cluster on the right-hand side.
Under normal operating conditions and with
the specified concentration of antifreeze/
corrosion inhibitor, the coolant temperature
may rise to 120 † The coolant temperature
may rise to the top end of the scale at high
outside temperatures and on long uphill
stretches.
Resetting the trip meter
X Select the standard display menu
(Y page 115).
X Press and hold reset button 1 until the trip
meter is reset.
Speedometer with segments
The segments in the speedometer indicate
which speed range is available.
Cruise control mode:
The segments light up from the stored speed
to the maximum speed.
Distronic* mode:
One or two segments around the stored
speed light up.
Variable Speedtronic mode:
The segments light up from the start of the
scale to the selected limit speed.
Controls
* optional
219_AKB; 2; 4, en-GB
mkalafa,
2007-11-13T09:28:36+01:00 - Seite 110
Page 128 of 329
On-board computer
125
X
Press the è or · button to select the
Settings... menu.
X Press the j
button to call up the selec-
tion of submenus.
X Press the æ
or ç button to select the
Time/Date submenu.
Setting the time
X Use j to select Clock, hours Con-
firm by press. R (or Clock, minutes
Confirm by press. R).
X Press the æ or ç button to set a
value.
X Press the reset button on the left of the
instrument cluster.
The set time is stored.
Setting the date
X Press the j
button to select Set date
Day (or Set date Month or Set date
Year).
X Press the æ or ç button to set the
values.
X Press the j, è or ÿ button to
select a different display. Setting constant headlamp mode If you have set constant headlamp mode and
the light switch is in position M orU,
the
side lamps, dipped-beam headlamps and
licence plate lighting are switched on auto-
matically when the engine is running. Turning
the light switch to a different position
switches on the corresponding lights.
For safety reasons, it is only possible to set
this function when the vehicle is stationary.
In countries in which constant headlamp
mode is a legal requirement, Constant is the
factory setting.
X Press the è
or · button to select the
Settings... menu.
X Press the j
button to call up the selec-
tion of submenus.
X Press the æ
or ç button to select the
Lighting submenu.
X Press the j button to select Headlamp
mode.
X Press the æ or ç button to set the
mode
for the headlamps to Manual or Con-
stant (constant headlamp mode).
X Press the j, è or ÿ button to
select a different display. Switching the surround lighting on or
off If the surround lighting is switched on, the
following lights will be switched on automat-
ically
in the dark after you have unlocked the
vehicle using the key:
R the side lamps
R the tail lamps
R the licence plate lighting
R the front foglamps
R the lights* in the exterior mirrors
The surround lighting switches off automati-
cally if you open the driver's door or after 40
seconds.
X Press the è
or · button to select the
Settings... menu.
X Press the j
button to call up the selec-
tion of submenus.
X Press the æ
or ç button to select the
Lighting submenu.
X Press the j button to select the Sur-
round lighting function. Controls
* optional
219_AKB; 2; 4, en-GB
mkalafa,
2007-11-13T09:28:36+01:00 - Seite 125 Z
Page 129 of 329
On-board computer
126
X
Press the æ or ç button to switch
the Surround lighting function on or
off.
X Press the j, è or ÿ button to
select a different display.
Setting the ambient lighting X
Press the è or · button to select the
Settings... menu.
X Press the j
button to call up the selec-
tion of submenus.
X Press the æ
or ç button to select the
Lighting submenu.
X Press the j button to select Ambient
light.
X Press the æ
or ç button to adjust the
brightness to any level from 0 (off) to 5
(bright).
X Press the j, è or ÿ button to
select a different display.
Activating or deactivating the exterior
lighting delayed switch-off You can set whether the exterior lighting
should remain on for 15 seconds after the doors are closed when it is dark using the
Headlamps delayed switch-off function.
If none of the doors are opened after the
engine
is switched off or if an open door is not
closed, the exterior lighting goes out after
60 seconds.
When you have set a delayed switch-off time
and then switch off the engine, the following
remain lit:
R the side lamps
R the tail lamps
R the licence plate lighting
R the front foglamps
R the lights* in the exterior mirrors
X Press the è
or · button to select the
Settings... menu.
X Press the j
button to call up the selec-
tion of submenus.
X Press the æ
or ç button to select the
Lighting submenu.
X Press the j
button to select Headlamps
delayed switch-off. X
Press the æ or ç button to activate
or deactivate the Headlamps delayed
switch-off feature.
X Press the j, è or ÿ button to
select a different display.
To temporarily deactivate the delayed switch-
off:
X Before leaving the vehicle, turn the key to
position 0 in the ignition lock.
X Turn the key to position 2 in the ignition
lock and back to position 0.
Delayed
switch-off is deactivated. It is reac-
tivated as soon as you start the engine
again.
Activating or deactivating the interior
lighting delayed switch-off The
Interior
lighting delayed switch-
off function allows you to set whether the
interior lighting should remain on for 10 sec-
onds after the key is removed from the igni-
tion lock when it is dark.
X Press the è
or · button to select the
Settings... menu.
X Press the j
button to call up the selec-
tion of submenus. Controls
* optional
219_AKB; 2; 4, en-GB
mkalafa,
2007-11-13T09:28:36+01:00 - Seite 126
Page 130 of 329
On-board computer
127
X
Press the æ or ç button to select the
Lighting submenu.
X Press the j button to select Interior
lighting delayed switch-off.
X Press the æ or ç button to activate
or deactivate the Interior lighting
delayed switch-off feature.
X Press the j, è or ÿ button to
select a different display.
Activating/deactivating the automatic
door locking feature The Automatic door locking feature
allows you to set whether your vehicle will
lock centrally from a speed of about
15 km/h
upwards.
i For more information on the automatic
locking feature, see ( Y page 69).
X Press the è
or · button to select the
Settings... menu.
X Press the j
button to call up the selec-
tion of submenus.
X Press the æ
or ç button to select the
Vehicle submenu. X
Press the j
button to select Automatic
door locking.
X Press the æ or ç button to switch
the Automatic door locking feature on
or off.
X Press the j, è or ÿ button to
select a different display.
Selecting the switch-on time for the
auxiliary heating* This function is only available if the vehicle
has an auxiliary heating system.
The
Auxiliary
heat. function allows you to
select three switch-on times. You can set the
exact switch-on time using the other func-
tions in the Heater submenu.
The auxiliary heating adopts the Thermatic or
4-zone Thermotronic* temperature setting.
The minimum and maximum temperature set-
tings for the auxiliary heating are 20 † and
24 † respectively.
You can switch off the auxiliary heating by
using the remote control or the auxiliary heat-
ing button on the centre console.
The auxiliary heating is switched off automat-
ically after 50 minutes. This time can be
changed. To do this, visit a qualified specialist workshop, e.g. a Mercedes-Benz Service
Centre. G
Risk of fire and poisoning
The operation of the auxiliary heating pro-
duces hot, toxic exhaust fumes. The fuel
vapours produced during refuelling could
ignite on the hot exhaust system.
Do not switch on the auxiliary heating at
filling stations or in enclosed spaces, for
instance,
a garage, if there is no air extrac-
tion system.
You could otherwise endanger yourself and
others.
The Auxiliary heat. function can be called
up directly.
X Turn the key to position 1
or 2 in the ignition
lock.
X Press the button for the auxiliary heating on
the centre console
(Y page 166).
or
X Press the è
or · button to select the
Settings... menu.
X Press the j
button to call up the selec-
tion of submenus.
X Press the æ
or ç button to select the
Heater submenu. Controls
* optional
219_AKB; 2; 4, en-GB
mkalafa,
2007-11-13T09:28:36+01:00 - Seite 127 Z
Page 131 of 329
On-board computer
128
X
Press the j button to select Auxiliary
heat..
X Press the æ or ç button to select
one of the three switch-on times or Timer
off (auxiliary heating switched off).
When
a switch-on time is selected, the yel-
low indicator lamp lights up in the auxiliary
heating button.
X Press the j, è or ÿ button to
select a different display.
Changing the switch-on time for the
auxiliary heating* This function is only displayed if you have
selected
a switch-on time. Here you can enter
the time at which the auxiliary heating is to
be switched on.
X Press the è
or · button to select the
Settings... menu.
X Press the j
button to call up the selec-
tion of submenus.
X Press the æ
or ç button to select the
Heater submenu.
X Press the j
button to select Switch-on
time X Set hours. X
Press the æ or ç button to set the
hour.
X Press the j
button to select Switch-on
time X Set minutes.
X Press the æ or ç button to set the
minutes.
After changing from one menu to another
the new time setting is stored. The yellow
indicator lamp lights up on the button for
the
auxiliary heating on the centre console.
X Press the j, è or ÿ button to
select a different display.
Activating or deactivating the easy-
entry/exit feature* i
For more information on the easy-entry/
exit feature, see ( Y page 83). G
Risk of injury
When the easy-entry/exit feature is active,
the
steering wheel moves. There is a risk of
occupants becoming trapped. Before acti-
vating the easy-entry/exit feature, make
sure that nobody can become trapped.
Do not leave children unsupervised in the
vehicle, even if they are secured in a child restraint system. The children could open
the driver's door and thereby unintention-
ally activate the easy-entry/exit feature
and become trapped.
X Press the è
or · button to select the
Settings... menu.
X Press the j
button to call up the selec-
tion of submenus.
X Press the æ
or ç button to select the
Convenience submenu.
X Press the j button to select the EASY-
ENTRY system.
X Press the æ or ç button to activate
or deactivate the EASY-ENTRY system.
X Press the j, è or ÿ button to
select a different display.
Activating or deactivating the fold-in
mirrors when locking*
function The
Fold
in mirrors when locking func-
tion allows you to determine whether the
exterior mirrors should fold in when you lock
the vehicle. When you switch on the ignition,
the exterior mirrors fold out again. Controls
* optional
219_AKB; 2; 4, en-GB
mkalafa,
2007-11-13T09:28:36+01:00 - Seite 128
Page 132 of 329
On-board computer
129
If you have switched the function on and you
fold in the exterior mirrors using the button
on the door (Y page 85), they will not fold out
automatically. The exterior mirrors can then
only be folded out using the button on the
door.
X Press the è or · button to select the
Settings... menu.
X Press the j button to call up the selec-
tion of submenus.
X Press the æ or ç button to select the
Convenience submenu.
X Press the j button to select Fold in
mirrors when locking.
X Press the æ or ç button to activate
or deactivate the Fold in mirrors when
locking feature.
X Press the j, è or ÿ button to
select a different display.
Selecting a setting for the dynamic driv-
ing seat* i
For more information on the dynamic driv-
ing seat, see ( Y page 79). X
Press the è or · button to select the
Settings... menu.
X Press the j button to call up the selec-
tion of submenus.
X Press the æ or ç button to select the
Driving dynamics seat adjustment
submenu.
X Press the j button to select Driving
dyn. seat adjust., driver or Driving
dyn. seat adjust., front-pass..
X Press the æ or ç button to select the
desired seat setting: Gentle for a soft seat
setting or Vigorous for a hard seat setting.
X Press the j, è or ÿ button to
select a different display. Trip computer menu
You can use the Trip computer menu to call
up or reset statistical data for your vehicle.
i You can select km or miles as the unit of
measurement for distance (Y page 123).
i Menu overview: see ( Y page 114).
Use the buttons on the multi-function steer-
ing wheel.
X Press the è or · button to select
From start.
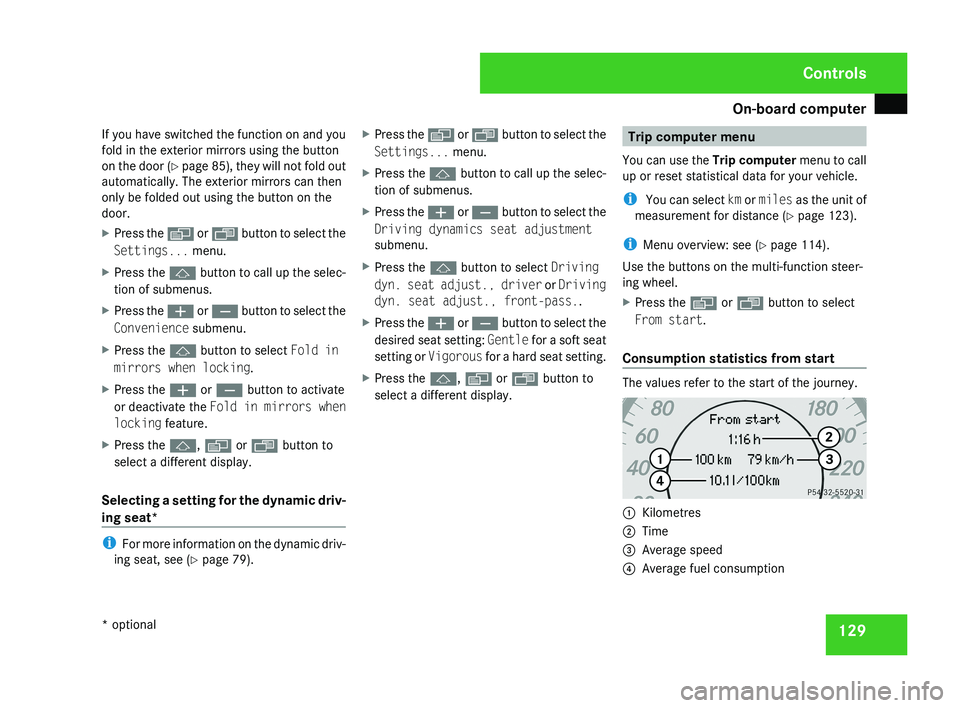
Consumption statistics from start The values refer to the start of the journey.
1
Kilometres
2 Time
3 Average speed
4 Average fuel consumption Controls
* optional
219_AKB; 2; 4, en-GB
mkalafa,
2007-11-13T09:28:36+01:00 - Seite 129