2008 MERCEDES-BENZ CLS COUPE seat adjustment
[x] Cancel search: seat adjustmentPage 9 of 329
6
Door
Automatic locking . . . . . . . . . . . . . . 69
Display message . . . . . . . . . . . . . . 229
Emergency locking . . . . . . . . . . . . . 267
Emergency unlocking . . . . . . . . . . . 266
Opening (from the inside) . . . . . . . . 69
Door control panel
Overview . . . . . . . . . . . . . . . . . . . . . 37
Drinks holder
see Cup holder
Driver's airbag . . . . . . . . . . . . . . . . . . . 46
Driver's door Unlocking (KEYLESS GO) . . . . . . . . . 69
Driver's seat position . . . . . . . . . . . . . 90
Driving abroad . . . . . . . . . . . . . . . . . . 208
Driving safety system . . . . . . . . . . . . . 57 ABS . . . . . . . . . . . . . . . . . . . . . . . . . 57
ADAPTIVE BRAKE . . . . . . . . . . . . . . . 60
Adaptive brake lamps . . . . . . . . . . . 58
BAS . . . . . . . . . . . . . . . . . . . . . . . . . 58
EBV . . . . . . . . . . . . . . . . . . . . . . . . . 60
ESP ®
. . . . . . . . . . . . . . . . . . . . . . . . 59
Driving system . . . . . . . . . . . . . . . . . . 132
Airmatic DC . . . . . . . . . . . . . . . . . . 146
Cruise control . . . . . . . . . . . . . . . . 132
Distronic . . . . . . . . . . . . . . . . . . . . 135
HOLD . . . . . . . . . . . . . . . . . . . . . . . 144
Parktronic . . . . . . . . . . . . . . . . . . . 148
Speedtronic . . . . . . . . . . . . . . . . . . 142 Driving tip
Braking . . . . . . . . . . . . . . . . . . . . . . 206
Distronic . . . . . . . . . . . . . . . . . . . . 141
Driving abroad . . . . . . . . . . . . . . . . 208
Driving on flooded roads . . . . . . . . 208
Driving on wet roads . . . . . . . . . . . 208
Winter . . . . . . . . . . . . . . . . . . . . . . 205
DVD audio
Operation (on-board computer) . . . 119
DVD video
Operation (on-board computer) . . . 120
Dynamic driving seat . . . . . . . . . . . . . 79
Select Seat adjustment (on-board
computer) . . . . . . . . . . . . . . . . . . . 129 E
Easy-entry/exit feature Activating/deactivating (on-
board computer)
. . . . . . . . . . . . . . 128
Easy-entry feature . . . . . . . . . . . . . . . . 83
Easy-exit feature . . . . . . . . . . . . . . . . . 83
EBV (electronic brake-power distri-
bution) . . . . . . . . . . . . . . . . . . . . . . . . . 60
Display message . . . . . . . . . . . . . . 231
Electrical/electronic equipment
Retrofitting . . . . . . . . . . . . . . . . . . . 299
Electronic brake-power distribution
see EBV Electronic Stability Program
see ESP ®
e mark . . . . . . . . . . . . . . . . . . . . . . . . . 299
Emergency key element Lost . . . . . . . . . . . . . . . . . . . . . . . . 261
Emergency locking
Vehicle . . . . . . . . . . . . . . . . . . . . . . 267
Emergency running mode
Automatic transmission . . . . . . . . . 257
Emergency unlocking
Boot . . . . . . . . . . . . . . . . . . . . . . . . 267
Vehicle . . . . . . . . . . . . . . . . . . . . . . 266
Engine
Display message . . . . . . . . . . . . . . 237
Running irregularly . . . . . . . . . . . . . 256
Starting problems . . . . . . . . . . . . . 255
Starting with KEYLESS GO . . . . . . . 102
Starting with the key . . . . . . . . . . . 101
Technical data . . . . . . . . . . . . . . . . 302
Engine diagnostic warning lamp . . . 247
Engine electronics . . . . . . . . . . . . . . . 299
Malfunction . . . . . . . . . . . . . . . . . . 255
Engine number . . . . . . . . . . . . . . . . . . 301
Engine oil . . . . . . . . . . . . . . . . . . . . . . 314
Checking the oil level (dipstick) . . . 195
Consumption . . . . . . . . . . . . . . . . . 195
Display message . . . . . . . . . . . . . . 237
Filler neck . . . . . . . . . . . . . . . . . . . 195 Index
219_AKB; 2; 4, en-GB
mkalafa,
2007-11-13T09:28:36+01:00 - Seite 6
Page 78 of 329
Seats
75Seats
Depending on the vehicle's equipment, seat
adjustments can be made either manually/
electrically or electrically*. G
Risk of injury
The seats can still be adjusted when there
is no key in the ignition lock. For this rea-
son, children should never be left unsuper-
vised in the vehicle. They could become
trapped by a seat adjustment movement. G
Risk of accident
Only adjust the driver's seat when the vehi-
cle is stationary. You will otherwise be dis-
tracted from the road and traffic conditions
and you could lose control of the vehicle as
a result of the seat moving. This could
cause an accident. G
Risk of injury
Make sure that nobody can become trap-
ped as you adjust the seat.
Observe the notes concerning the airbag
system.
Secure children as recommended; see the
"Children in the vehicle" section. !
When you move the seats, make sure that
there are no objects in the footwell or
behind the seats. Otherwise, you could
damage the seats and the objects.
i The head restraints in the front seats are
fitted with the NECK-PRO system
(Y page 49). For this reason, it is not pos-
sible to remove the head restraints from
the front seats.
For design reasons, the rear-compartment
head restraints cannot be removed.
Please contact a Mercedes-Benz Service
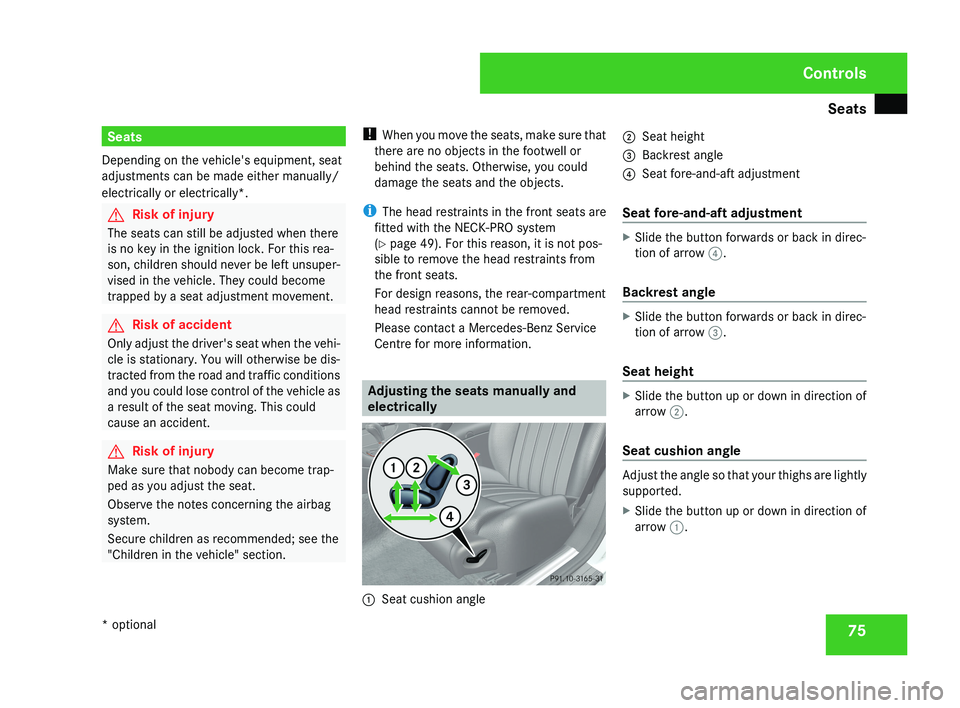
Centre for more information. Adjusting the seats manually and
electrically1
Seat cushion angle 2
Seat height
3 Backrest angle
4 Seat fore-and-aft adjustment
Seat fore-and-aft adjustment
X Slide the button forwards or back in direc-
tion of arrow 4.
Backrest angle
X Slide the button forwards or back in direc-
tion of arrow 3.
Seat height
X Slide the button up or down in direction of
arrow 2.
Seat cushion angle
Adjust the angle so that your thighs are lightly
supported.
X Slide the button up or down in direction of
arrow 1.
Controls
* optional
219_AKB; 2; 4, en-GB
mkalafa,
2007-11-13T09:28:36+01:00 - Seite 75
Page 80 of 329
Seats
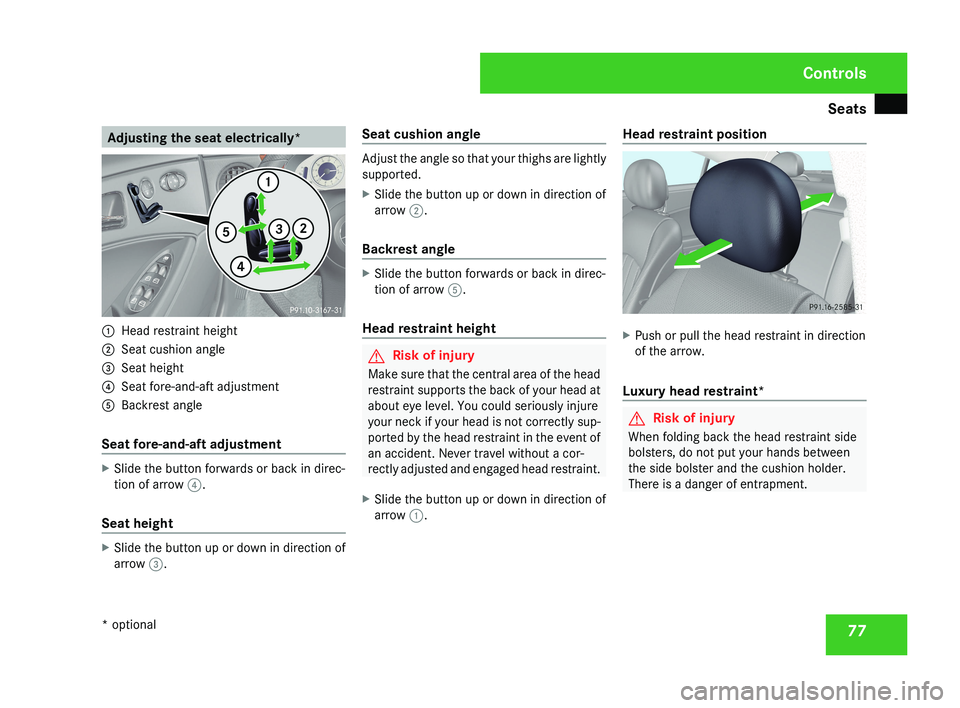
77Adjusting the seat electrically*1
Head restraint height
2 Seat cushion angle
3 Seat height
4 Seat fore-and-aft adjustment
5 Backrest angle
Seat fore-and-aft adjustment
X Slide the button forwards or back in direc-
tion of arrow 4.
Seat height
X Slide the button up or down in direction of
arrow 3. Seat cushion angle
Adjust the angle so that your thighs are lightly
supported.
X
Slide the button up or down in direction of
arrow 2.
Backrest angle
X Slide the button forwards or back in direc-
tion of arrow 5.
Head restraint height
G Risk of injury
Make sure that the central area of the head
restraint supports the back of your head at
about eye level. You could seriously injure
your neck if your head is not correctly sup-
ported by the head restraint in the event of
an accident. Never travel without a cor-
rectly adjusted and engaged head restraint.
X Slide the button up or down in direction of
arrow 1. Head restraint position
X
Push or pull the head restraint in direction
of the arrow.
Luxury head restraint*
G Risk of injury
When folding back the head restraint side
bolsters, do not put your hands between
the side bolster and the cushion holder.
There is a danger of entrapment.
Controls
* optional
219_AKB; 2; 4, en-GB
mkalafa,
2007-11-13T09:28:36+01:00 - Seite 77
Page 81 of 329
Seats
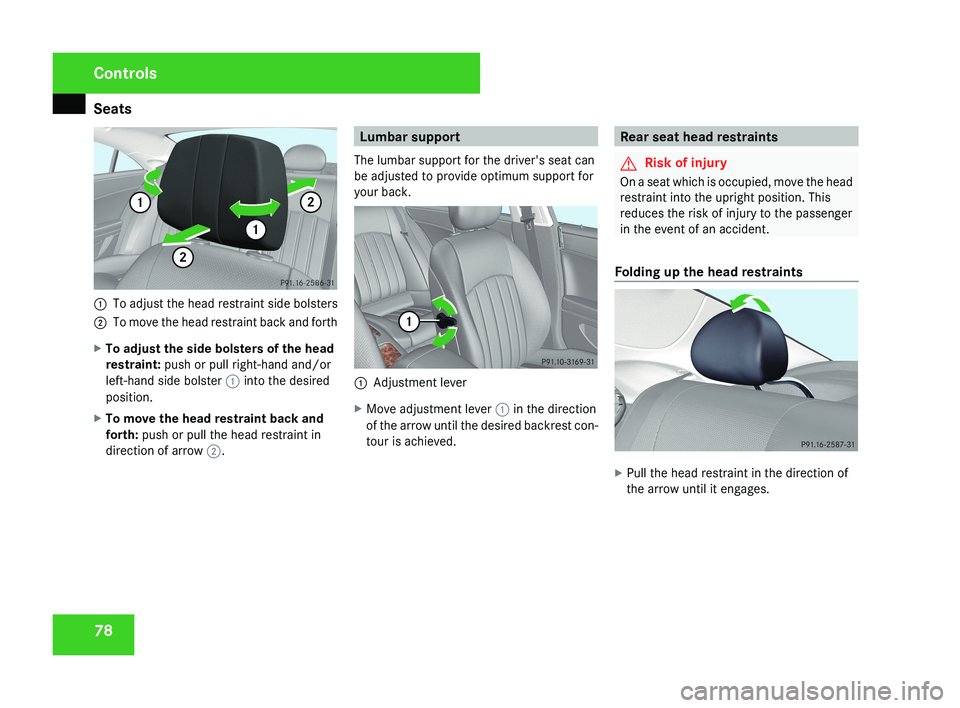
781
To adjust the head restraint side bolsters
2 To move the head restraint back and forth
X To adjust the side bolsters of the head
restraint: push or pull right-hand and/or
left-hand side bolster 1 into the desired
position.
X To move the head restraint back and
forth: push or pull the head restraint in
direction of arrow 2.
Lumbar support
The lumbar support for the driver's seat can
be adjusted to provide optimum support for
your back.
1 Adjustment lever
X Move adjustment lever 1 in the direction
of the arrow until the desired backrest con-
tour is achieved.
Rear seat head restraints
G Risk of injury
On a seat which is occupied, move the head
restraint into the upright position. This
reduces the risk of injury to the passenger
in the event of an accident.
Folding up the head restraints
X Pull the head restraint in the direction of
the arrow until it engages.
Controls
219_AKB; 2; 4, en-GB
mkalafa,
2007-11-13T09:28:36+01:00 - Seite 78
Page 83 of 329
Seats
80
3
Massage function
4 Upper back support
5 Lumbar region support
6 Seat cushion length
X To activate/deactivate: press button 1.
The indicator lamp in the button lights up/
goes out.
When switched on, the message Driving
dynamics seat adjustment appears in
the multi-function display for five seconds.
Massage function (PULSE) The massage function helps you to prevent
muscle tension on long journeys.
X
Press button 3.
The indicator lamp in the button lights up.
The air cushions in the lumbar region
vibrate for approximately five minutes. Seat ventilation*
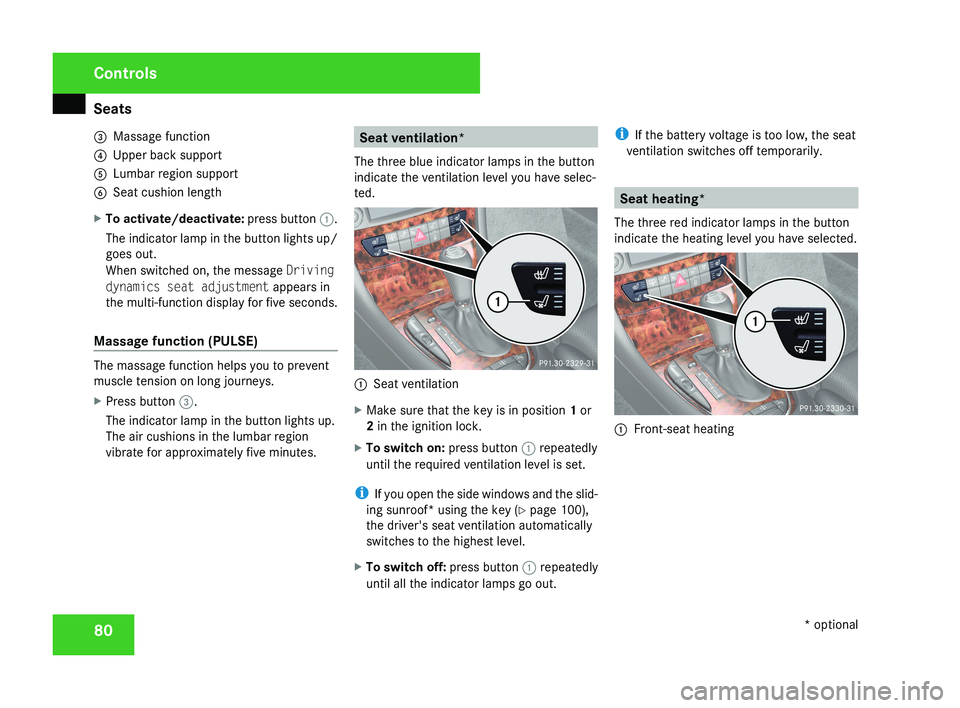
The three blue indicator lamps in the button
indicate the ventilation level you have selec-
ted. 1
Seat ventilation
X Make sure that the key is in position 1 or
2 in the ignition lock.
X To switch on: press button 1 repeatedly
until the required ventilation level is set.
i If you open the side windows and the slid-
ing sunroof* using the key ( Y page 100),
the driver's seat ventilation automatically
switches to the highest level.
X To switch off: press button 1 repeatedly
until all the indicator lamps go out. i
If the battery voltage is too low, the seat
ventilation switches off temporarily. Seat heating*
The three red indicator lamps in the button
indicate the heating level you have selected. 1
Front-seat heating Controls
* optional
219_AKB; 2; 4, en-GB
mkalafa,
2007-11-13T09:28:36+01:00 - Seite 80
Page 84 of 329
Steering wheel
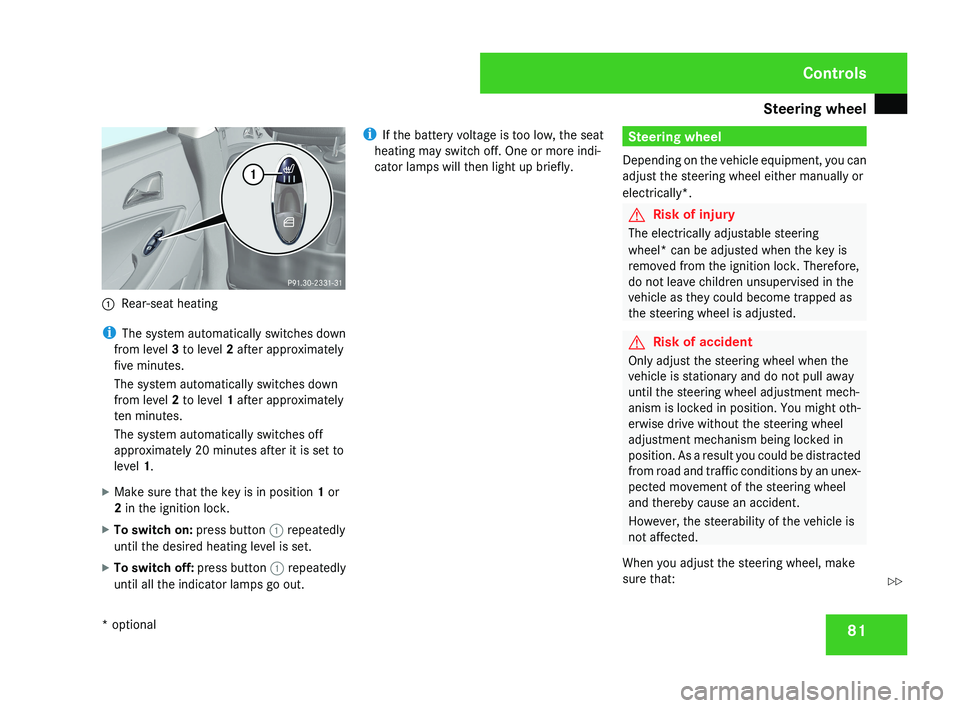
811
Rear-seat heating
i The system automatically switches down
from level 3 to level 2 after approximately
five minutes.
The system automatically switches down
from level 2 to level 1 after approximately
ten minutes.
The system automatically switches off
approximately 20 minutes after it is set to
level 1.
X Make sure that the key is in position 1 or
2 in the ignition lock.
X To switch on: press button 1 repeatedly
until the desired heating level is set.
X To switch off: press button 1 repeatedly
until all the indicator lamps go out. i
If the battery voltage is too low, the seat
heating may switch off. One or more indi-
cator lamps will then light up briefly.
Steering wheel
Depending on the vehicle equipment, you can
adjust the steering wheel either manually or
electrically*.
G Risk of injury
The electrically adjustable steering
wheel* can be adjusted when the key is
removed from the ignition lock. Therefore,
do not leave children unsupervised in the
vehicle as they could become trapped as
the steering wheel is adjusted.
G Risk of accident
Only adjust the steering wheel when the
vehicle is stationary and do not pull away
until the steering wheel adjustment mech-
anism is locked in position. You might oth-
erwise drive without the steering wheel
adjustment mechanism being locked in
position. As a result you could be distracted
from road and traffic conditions by an unex-
pected movement of the steering wheel
and thereby cause an accident.
However, the steerability of the vehicle is
not affected.
When you adjust the steering wheel, make
sure that:
Controls
* optional
219_AKB; 2; 4, en-GB
mkalafa,
2007-11-13T09:28:36+01:00 - Seite 81
Z
Page 90 of 329
Memory functions*
87
X
Press the M memory button.
X Press one of storage position switches 1,
2 or 3 within three seconds.
The settings are stored in the selected pre-
set position. A tone sounds when the set-
tings have been completed. Calling up a stored setting
G
Risk of accident
Only activate the memory function on the
driver’s side when the vehicle is stationary.
You could otherwise be distracted from the
traffic conditions by the steering wheel and
seat moving of their own accord, and as a
result cause an accident.
X Press and hold the relevant storage posi-
tion switch 1, 2 or 3 until the seat, steering
wheel and mirrors are in the stored posi-
tion.
i The setting procedure is interrupted as
soon as you release the storage position
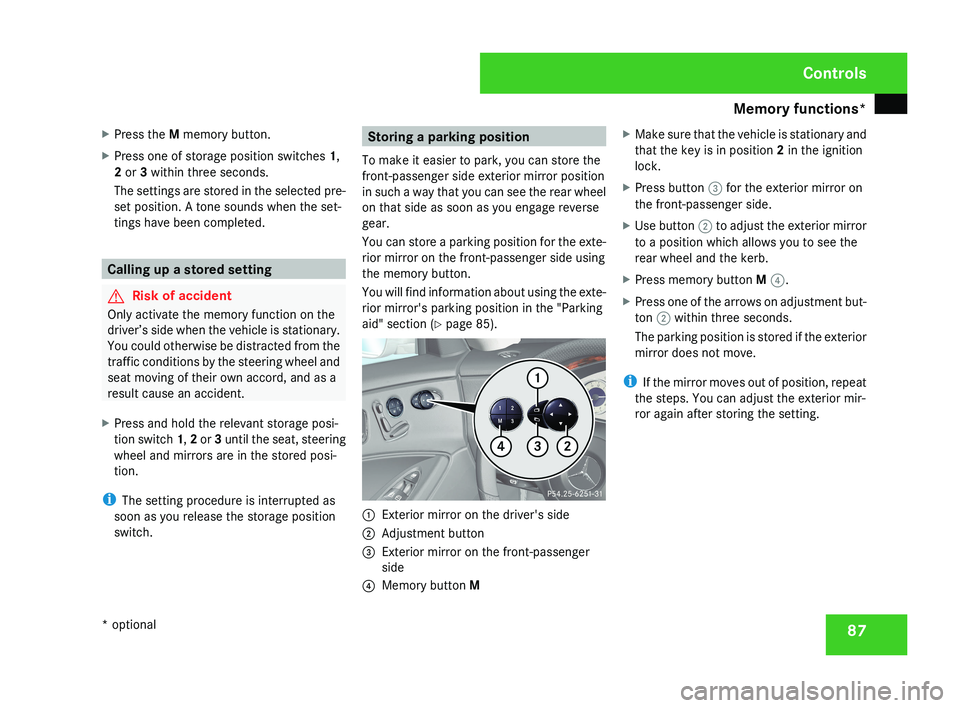
switch. Storing a parking position
To make it easier to park, you can store the
front-passenger side exterior mirror position
in such a way that you can see the rear wheel
on that side as soon as you engage reverse
gear.
You can store a parking position for the exte-
rior mirror on the front-passenger side using
the memory button.
You will find information about using the exte-
rior mirror's parking position in the "Parking
aid" section ( Y page 85).1
Exterior mirror on the driver's side
2 Adjustment button
3 Exterior mirror on the front-passenger
side
4 Memory button M X
Make sure that the vehicle is stationary and
that the key is in position 2 in the ignition
lock.
X Press button 3 for the exterior mirror on
the front-passenger side.
X Use button 2 to adjust the exterior mirror
to a position which allows you to see the
rear wheel and the kerb.
X Press memory button M 4.
X Press one of the arrows on adjustment but-
ton 2 within three seconds.
The parking position is stored if the exterior
mirror does not move.
i If the mirror moves out of position, repeat
the steps. You can adjust the exterior mir-
ror again after storing the setting.
Controls
* optional
219_AKB; 2; 4, en-GB
mkalafa,
2007-11-13T09:28:36+01:00 - Seite 87
Page 93 of 329
Seat belts
90
already secured, the
< seat belt warning
lamp lights up for six seconds after the engine
has been started. The < seat belt warning
lamp then goes out if both the driver and the
front passenger have fastened their seat belt.
i Further information about the < seat
belt warning lamp (Y page 249). Belt height adjustment
You can adjust the seat belt height on the
driver's seat and front-passenger seat.
Adjust the belt to a height that allows it to be
routed across the middle of your shoulder.1 Release catch X
To raise: slide the belt sash guide upwards.
The belt sash guide engages in various posi-
tions.
X To lower: press and hold release button
1.
X Slide the belt sash guide downwards.
X Let go of release button 1 and make sure
that the belt sash guide has engaged.
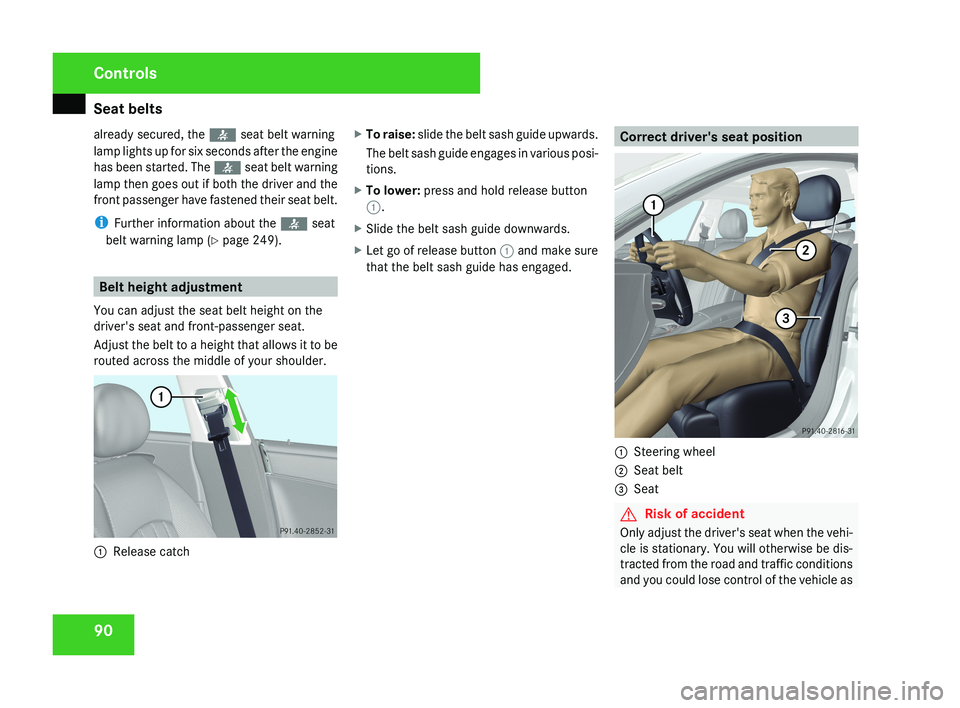
Correct driver's seat position
1 Steering wheel
2 Seat belt
3 Seat
G Risk of accident
Only adjust the driver's seat when the vehi-
cle is stationary. You will otherwise be dis-
tracted from the road and traffic conditions
and you could lose control of the vehicle as
Controls
219_AKB; 2; 4, en-GB
mkalafa,
2007-11-13T09:28:36+01:00 - Seite 90