2008 MERCEDES-BENZ CLS COUPE door lock
[x] Cancel search: door lockPage 72 of 329
Opening and closing
69
approximately six seconds until the battery
check lamp flashes twice.
The KEYLESS GO key will now function as fol-
lows:
X To unlock the driver's door: pull the door
handle on the driver's door.
X To unlock centrally: pull the door handle
on the front-passenger door or on the rear
doors.
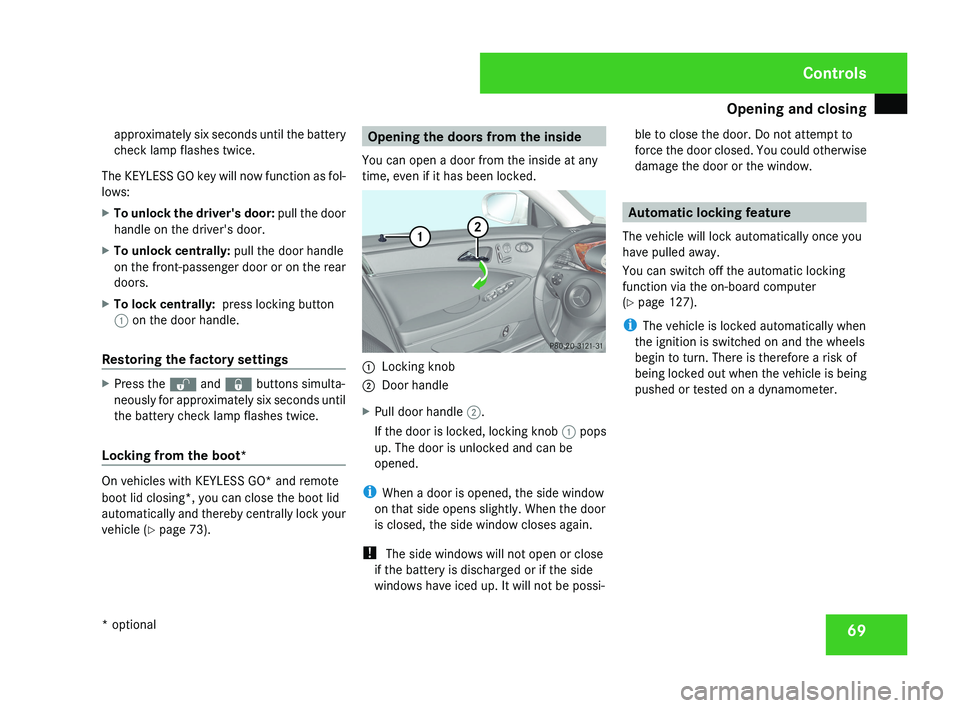
X To lock centrally: press locking button
1 on the door handle.
Restoring the factory settings X
Press the k and j buttons simulta-
neously for approximately six seconds until
the battery check lamp flashes twice.
Locking from the boot* On vehicles with KEYLESS GO* and remote
boot lid closing*, you can close the boot lid
automatically and thereby centrally lock your
vehicle (
Y page 73). Opening the doors from the inside
You can open a door from the inside at any
time, even if it has been locked. 1
Locking knob
2 Door handle
X Pull door handle 2.
If the door is locked, locking knob 1 pops
up. The door is unlocked and can be
opened.
i When a door is opened, the side window
on that side opens slightly. When the door
is closed, the side window closes again.
! The side windows will not open or close
if the battery is discharged or if the side
windows have iced up. It will not be possi- ble to close the door. Do not attempt to
force the door closed. You could otherwise
damage the door or the window. Automatic locking feature
The vehicle will lock automatically once you
have pulled away.
You can switch off the automatic locking
function via the on-board computer
(Y page 127).
i The vehicle is locked automatically when
the ignition is switched on and the wheels
begin to turn. There is therefore a risk of
being locked out when the vehicle is being
pushed or tested on a dynamometer. Controls
* optional
219_AKB; 2; 4, en-GB
mkalafa,
2007-11-13T09:28:36+01:00 - Seite 69
Page 73 of 329
Opening and closing
70 Locking/unlocking the vehicle from
the inside
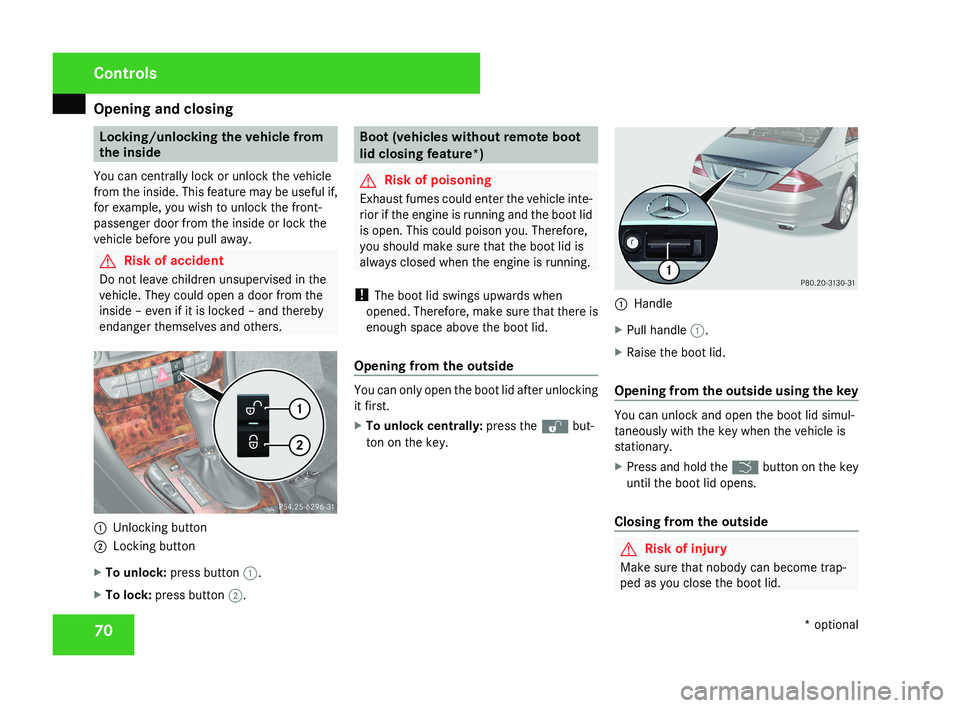
You can centrally lock or unlock the vehicle
from the inside. This feature may be useful if,
for example, you wish to unlock the front-
passenger door from the inside or lock the
vehicle before you pull away. G
Risk of accident
Do not leave children unsupervised in the
vehicle. They could open a door from the
inside – even if it is locked – and thereby
endanger themselves and others.1 Unlocking button
2 Locking button
X To unlock: press button 1.
X To lock: press button 2.
Boot (vehicles without remote boot
lid closing feature*)
G Risk of poisoning
Exhaust fumes could enter the vehicle inte-
rior if the engine is running and the boot lid
is open. This could poison you. Therefore,
you should make sure that the boot lid is
always closed when the engine is running.
! The boot lid swings upwards when
opened. Therefore, make sure that there is
enough space above the boot lid.
Opening from the outside
You can only open the boot lid after unlocking
it first.
X To unlock centrally: press the k but-
ton on the key.
1 Handle
X Pull handle 1.
X Raise the boot lid.
Opening from the outside using the key
You can unlock and open the boot lid simul-
taneously with the key when the vehicle is
stationary.
X Press and hold the i button on the key
until the boot lid opens.
Closing from the outside
G Risk of injury
Make sure that nobody can become trap-
ped as you close the boot lid.
Controls
* optional
219_AKB; 2; 4, en-GB
mkalafa,
2007-11-13T09:28:36+01:00 - Seite 70
Page 86 of 329
Mirrors
83Easy-entry/exit feature*
The Easy-entry/exit feature makes getting in
and out of your vehicle easier.
The steering wheel swings upwards when
you:
R remove the key from the ignition lock
R open the driver's door when the key is in
the ignition lock or in position 1
The steering wheel is moved automatically to
the position previously set when the key is
inserted into the ignition lock with the driver's
door closed. G
Risk of injury
Make sure that nobody can become trap-
ped when you activate the easy-entry/exit
feature.
If there is a risk of becoming trapped, stop
the adjustment procedure. To halt the pro-
cedure:
R press the steering-column adjustment
switch
R press one of the memory function posi-
tion buttons
The steering column stops moving immedi-
ately. Never leave children unsupervised in the
vehicle. They could open the driver's door
and thereby unintentionally activate the
easy-entry feature and become trapped.
The most recent position of the steering
wheel is stored when you switch off the igni-
tion or when you store a memory position
(Y page 86).
You can activate and deactivate the Easy-
entry/exit feature via the on-board computer
(Y page 128). Mirrors
Before starting off, adjust the mirrors in such
a way that you can get a good overview of
road and traffic conditions. Rear-view mirror
X Adjust the rear-view mirror manually.
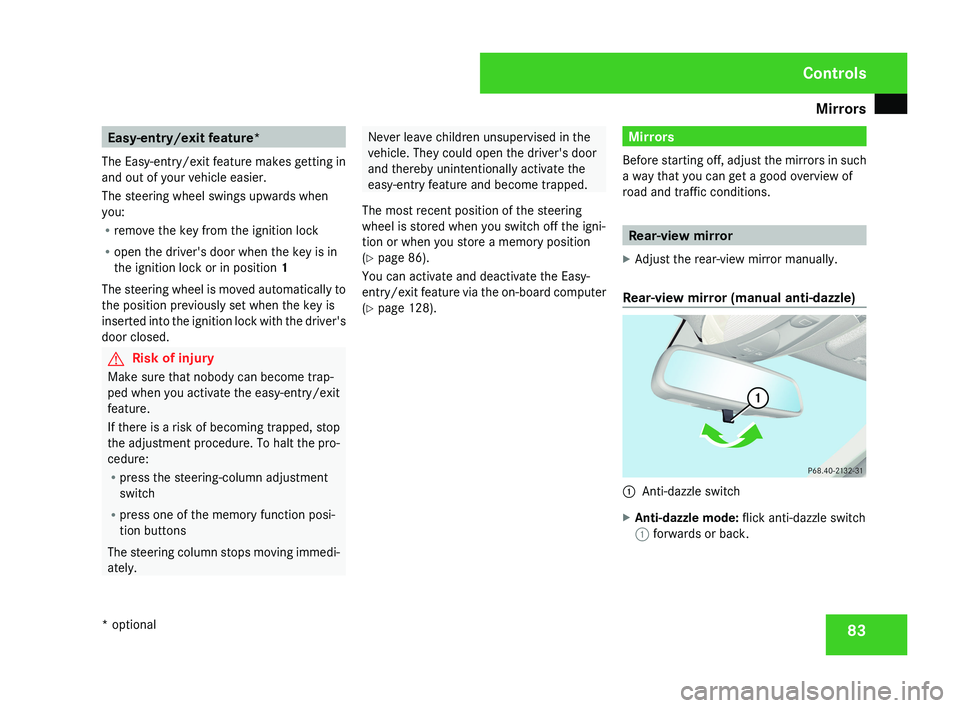
Rear-view mirror (manual anti-dazzle) 1
Anti-dazzle switch
X Anti-dazzle mode: flick anti-dazzle switch
1 forwards or back. Controls
* optional
219_AKB; 2; 4, en-GB
mkalafa,
2007-11-13T09:28:36+01:00 - Seite 83
Page 88 of 329
Mirrors
85
R
The exterior mirrors fold in automatically as
soon as you lock the vehicle from the out-
side.
R The exterior mirrors fold out again auto-
matically as soon as you unlock the vehicle
and then open the driver's or front-
passenger door.
i If you have activated this function and fold
in the exterior mirrors using button 1, they
will not be folded out automatically. You
can then only fold out the exterior mirrors
using button 1. Automatic anti-dazzle mirrors*
The rear-view mirror and the exterior mirror
on the driver's side automatically go into anti-
dazzle mode if the ignition is switched on and
incident light from headlamps strikes the sen-
sor in the rear-view mirror.
The mirrors do not go into anti-dazzle mode if
reverse gear is engaged and the interior light-
ing is switched on. G
Risk of accident
If the incident light from headlamps cannot
strike the sensor in the rear-view mirror, for
instance when the rear window blind* is extended, the mirrors' automatic anti-daz-
zle function will not operate.
Incident light could then dazzle you. This
may prevent you from observing the traffic
conditions, thereby causing an accident. In
this case, adjust the rear-view mirror man-
ually.
G
Risk of injury
Electrolyte may escape if the glass in an
automatic anti-dazzle mirror breaks.
Electrolyte is an aggressive irritant and
must not be allowed to come into contact
with your skin, eyes or respiratory organs.
If electrolyte comes into contact with your
eyes or skin, rinse thoroughly with clean
water immediately. Consult a doctor if nec-
essary.
! If electrolyte comes into contact with the
vehicle paintwork, immediately rinse off
the undried liquid completely with clean
water. It will otherwise result in damage to
the paintwork. Parking aid*
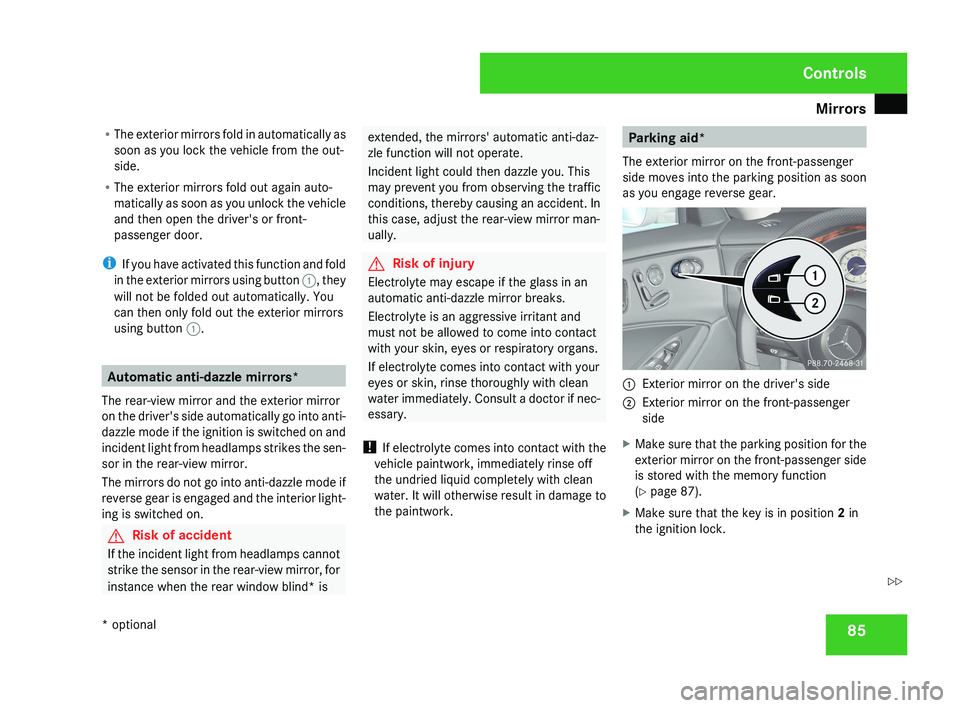
The exterior mirror on the front-passenger
side moves into the parking position as soon
as you engage reverse gear.1 Exterior mirror on the driver's side
2 Exterior mirror on the front-passenger
side
X Make sure that the parking position for the
exterior mirror on the front-passenger side
is stored with the memory function
(Y page 87).
X Make sure that the key is in position 2 in
the ignition lock.
Controls
* optional
219_AKB; 2; 4, en-GB
mkalafa,
2007-11-13T09:28:36+01:00 - Seite 85
Z
Page 95 of 329
Lights
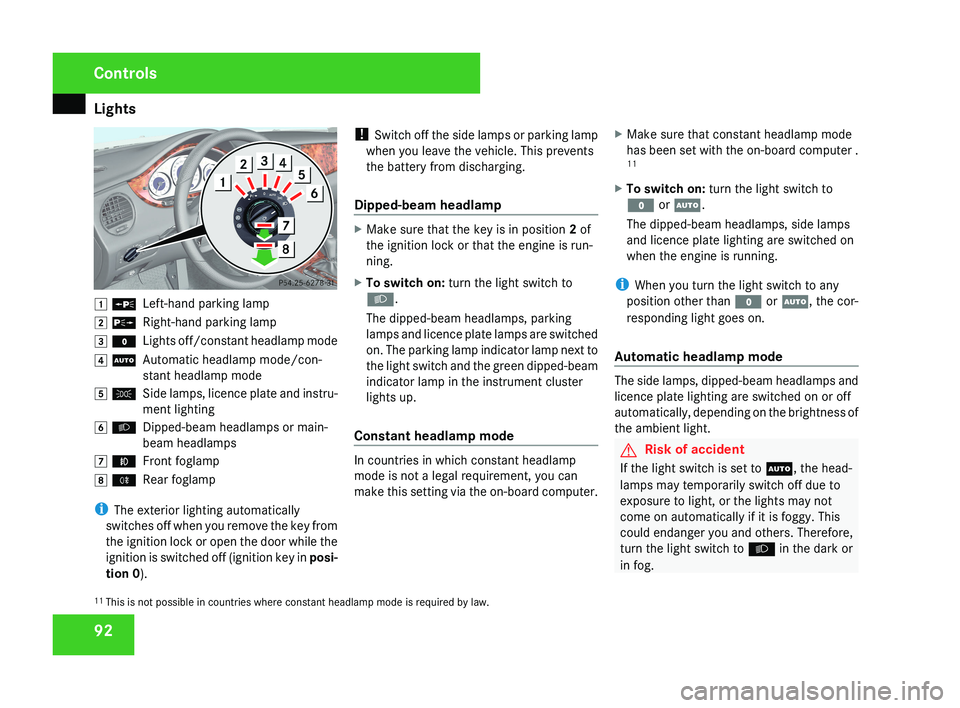
92$ a
Left-hand parking lamp
% g Right-hand parking lamp
& M Lights off/constant headlamp mode
( U Automatic headlamp mode/con-
stant headlamp mode
) C Side lamps, licence plate and instru-
ment lighting
* B Dipped-beam headlamps or main-
beam headlamps
, ¥ Front foglamp
. † Rear foglamp
i The exterior lighting automatically
switches off when you remove the key from
the ignition lock or open the door while the
ignition is switched off (ignition key in posi-
tion 0 ). !
Switch off the side lamps or parking lamp
when you leave the vehicle. This prevents
the battery from discharging.
Dipped-beam headlamp
X Make sure that the key is in position 2 of
the ignition lock or that the engine is run-
ning.
X To switch on: turn the light switch to
B.
The dipped-beam headlamps, parking
lamps and licence plate lamps are switched
on. The parking lamp indicator lamp next to
the light switch and the green dipped-beam
indicator lamp in the instrument cluster
lights up.
Constant headlamp mode
In countries in which constant headlamp
mode is not a legal requirement, you can
make this setting via the on-board computer. X
Make sure that constant headlamp mode
has been set with the on-board computer .
11
X To switch on: turn the light switch to
M or U.
The dipped-beam headlamps, side lamps
and licence plate lighting are switched on
when the engine is running.
i When you turn the light switch to any
position other than M or U, the cor-
responding light goes on.
Automatic headlamp mode
The side lamps, dipped-beam headlamps and
licence plate lighting are switched on or off
automatically, depending on the brightness of
the ambient light.
G Risk of accident
If the light switch is set to U, the head-
lamps may temporarily switch off due to
exposure to light, or the lights may not
come on automatically if it is foggy. This
could endanger you and others. Therefore,
turn the light switch to B in the dark or
in fog.
11 This is not possible in countries where constant headlamp mode is required by law.
Controls
219_AKB; 2; 4, en-GB
mkalafa,
2007-11-13T09:28:36+01:00 - Seite 92
Page 99 of 329
Lights
96When in reverse gear: the cornering light on
the outside of the bend comes on.
Switching off X
Switch off the turn signal.
i The cornering light is activated until you
turn the steering wheel back to the straight-
ahead position and the turn signal switches
off. The cornering light may remain lit for a
short time, but no more than three minutes.
It then goes out, even if the turn signal is
still switched on. Interior lighting
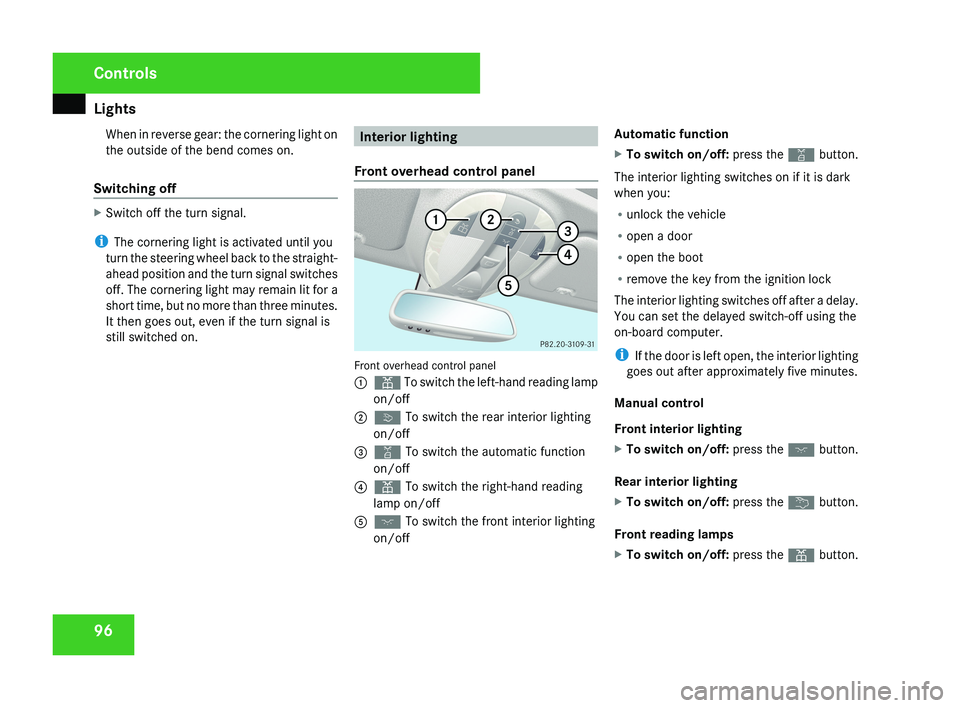
Front overhead control panel Front overhead control panel
1
X To switch the left-hand reading lamp
on/off
2 ò To switch the rear interior lighting
on/off
3 ¡ To switch the automatic function
on/off
4 X To switch the right-hand reading
lamp on/off
5 ð To switch the front interior lighting
on/off Automatic function
X
To switch on/off: press the ¡ button.
The interior lighting switches on if it is dark
when you:
R unlock the vehicle
R open a door
R open the boot
R remove the key from the ignition lock
The interior lighting switches off after a delay.
You can set the delayed switch-off using the
on-board computer.
i If the door is left open, the interior lighting
goes out after approximately five minutes.
Manual control
Front interior lighting
X To switch on/off: press the ð button.
Rear interior lighting
X To switch on/off: press the ¦ button.
Front reading lamps
X To switch on/off: press the X button. Controls
219_AKB; 2; 4, en-GB
mkalafa,
2007-11-13T09:28:36+01:00 - Seite 96
Page 102 of 329
Side windows
99G
Risk of injury
Do not leave children unsupervised in the
vehicle, even if they are secured in a child
restraint system. The children could:
R be seriously or even fatally injured on
parts of the vehicle
R be seriously or even fatally injured by
prolonged exposure to extremely high or
extremely low temperatures
If children open a door, they could:
R seriously or even fatally injure other peo-
ple
R get out of the vehicle, thereby injuring
themselves or be seriously or even fatally
injured by a passing vehicle
Activate the child-proof locks if children are
travelling in the vehicle. They could other-
wise open doors or windows while the vehi-
cle is in motion and thereby injure them-
selves or others.
i It is also possible to open and close the
side windows from the outside using the
"Summer opening" (Y page 100) and "Con-
venience closing" (Y page 100) features
respectively. You can disable the controls for the rear
side windows from the driver's seat
(Y page 49).
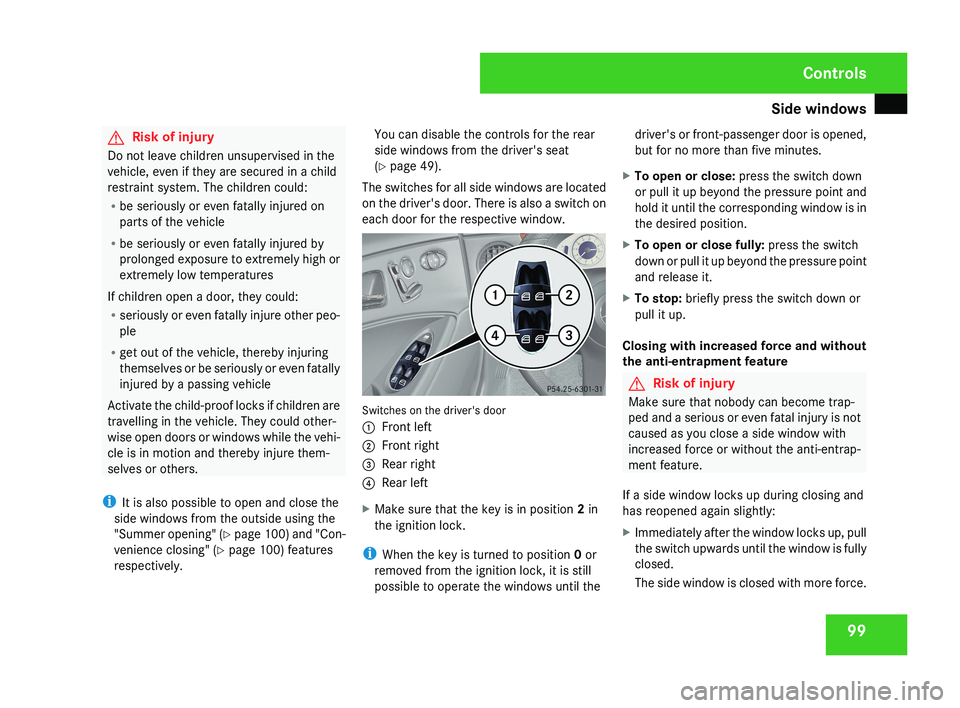
The switches for all side windows are located
on the driver's door. There is also a switch on
each door for the respective window.Switches on the driver's door
1 Front left
2 Front right
3 Rear right
4 Rear left
X Make sure that the key is in position 2 in
the ignition lock.
i When the key is turned to position 0 or
removed from the ignition lock, it is still
possible to operate the windows until the driver's or front-passenger door is opened,
but for no more than five minutes.
X To open or close: press the switch down
or pull it up beyond the pressure point and
hold it until the corresponding window is in
the desired position.
X To open or close fully: press the switch
down or pull it up beyond the pressure point
and release it.
X To stop: briefly press the switch down or
pull it up.
Closing with increased force and without
the anti-entrapment feature
G Risk of injury
Make sure that nobody can become trap-
ped and a serious or even fatal injury is not
caused as you close a side window with
increased force or without the anti-entrap-
ment feature.
If a side window locks up during closing and
has reopened again slightly:
X Immediately after the window locks up, pull
the switch upwards until the window is fully
closed.
The side window is closed with more force.
Controls
219_AKB; 2; 4, en-GB
mkalafa,
2007-11-13T09:28:36+01:00 - Seite 99
Page 103 of 329
Side windows
100
If a side window locks up again during closing
and has reopened again slightly:
X
Immediately after the window locks up, pull
the switch upwards until the window is fully
closed.
The side window is closed without the anti-
entrapment feature. Resetting the windows
Each side window must be reset if the battery
was disconnected or discharged.
X Make sure that the key is in position 2 in
the ignition lock.
X Pull the switch upwards until the window is
closed, and hold it in this position for
another second. Summer opening
You can ventilate the vehicle before a journey.
To do this, you can use the key to simultane-
ously:
R open the side windows
R open the sliding/tilting sunroof*
R Switch on the seat ventilation*
i The "Summer opening" feature can only
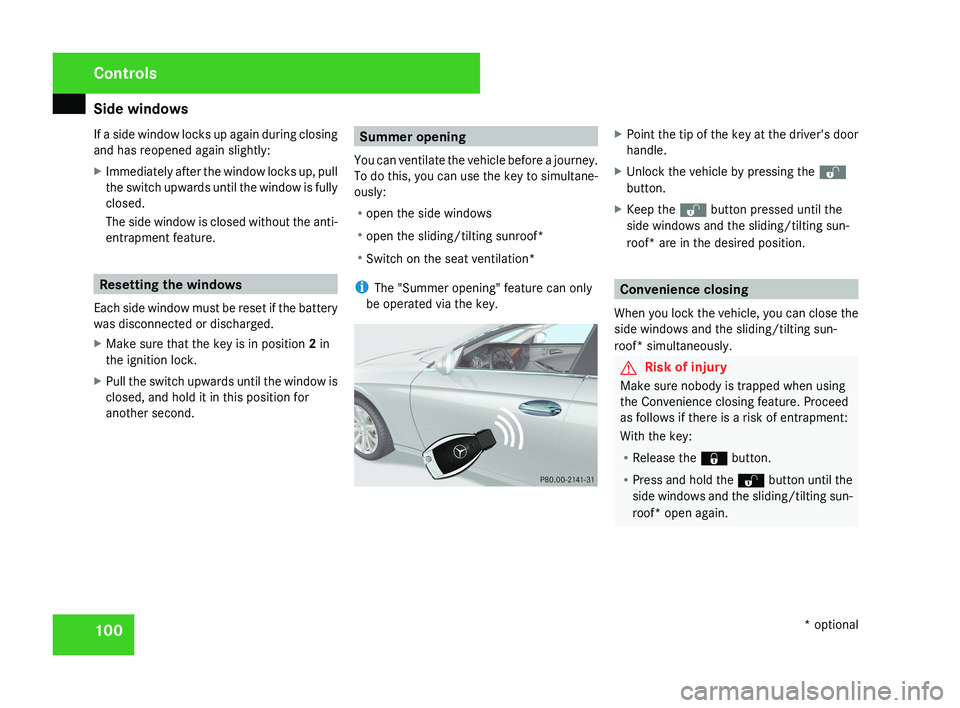
be operated via the key.X Point the tip of the key at the driver's door
handle.
X Unlock the vehicle by pressing the k
button.
X Keep the k button pressed until the
side windows and the sliding/tilting sun-
roof* are in the desired position.
Convenience closing
When you lock the vehicle, you can close the
side windows and the sliding/tilting sun-
roof* simultaneously.
G Risk of injury
Make sure nobody is trapped when using
the Convenience closing feature. Proceed
as follows if there is a risk of entrapment:
With the key:
R Release the j button.
R Press and hold the k button until the
side windows and the sliding/tilting sun-
roof* open again.
Controls
* optional
219_AKB; 2; 4, en-GB
mkalafa,
2007-11-13T09:28:36+01:00 - Seite 100