Page 260 of 329
Troubleshooting
257Automatic transmission
Problem Possible cause/consequence Suggested solutions
The transmission has problems
shifting gear The transmission is losing oil. X
Have the transmission checked at a qualified specialist workshop
immediately. The acceleration ability is deteri-
orating.
The transmission no longer
changes gear. The transmission is in emergency
mode.
It is only possible to shift into
2nd gear and reverse gear. X
Stop the vehicle.
X Move the selector lever to P.
X Turn the key to position 0 in the ignition lock.
X Wait at least 10 seconds before restarting the engine.
X Move the selector lever to position D or R.
If D
is selected, the transmission shifts into 2nd gear; if R is selec-
ted, the transmission shifts into reverse gear.
X Have the transmission checked at a qualified specialist workshop
immediately. Practical advice
219_AKB; 2; 4, en-GB
mkalafa,
2007-11-13T09:28:36+01:00 - Seite 257
Page 261 of 329
Troubleshooting
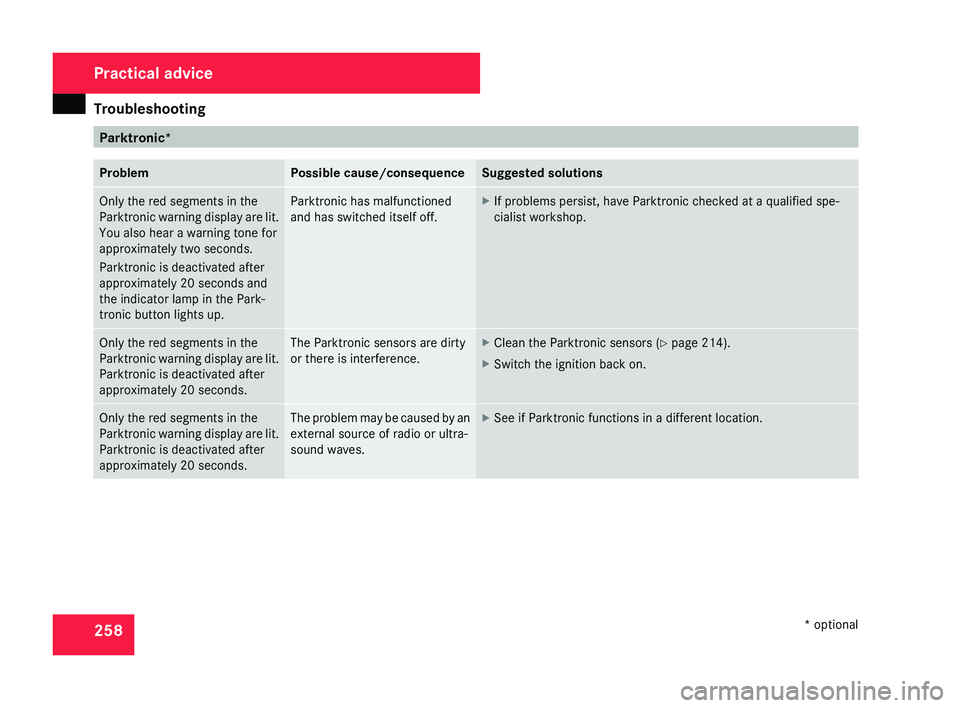
258 Parktronic*
Problem Possible cause/consequence Suggested solutions
Only the red segments in the
Parktronic
warning display are lit.
You also hear a warning tone for
approximately two seconds.
Parktronic is deactivated after
approximately 20 seconds and
the indicator lamp in the Park-
tronic button lights up. Parktronic has malfunctioned
and has switched itself off. X
If problems persist, have Parktronic checked at a qualified spe-
cialist workshop. Only the red segments in the
Parktronic
warning display are lit.
Parktronic is deactivated after
approximately 20 seconds. The Parktronic sensors are dirty
or there is interference. X
Clean the Parktronic sensors ( Y page 214).
X Switch the ignition back on. Only the red segments in the
Parktronic
warning display are lit.
Parktronic is deactivated after
approximately 20 seconds. The problem may be caused by an
external source of radio or ultra-
sound waves. X
See if Parktronic functions in a different location. Practical advice
* optional
219_AKB; 2; 4, en-GB
mkalafa,
2007-11-13T09:28:36+01:00 - Seite 258
Page 262 of 329
Troubleshooting
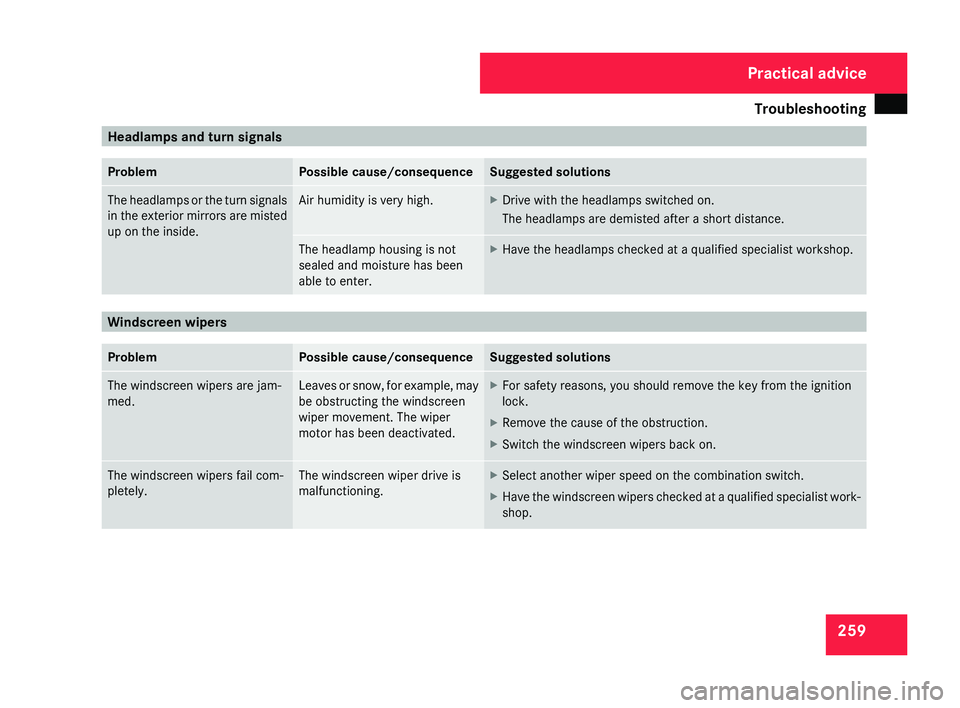
259Headlamps and turn signals
Problem Possible cause/consequence Suggested solutions
The headlamps or the turn signals
in
the exterior mirrors are misted
up on the inside. Air humidity is very high. X
Drive with the headlamps switched on.
The headlamps are demisted after a short distance. The headlamp housing is not
sealed and moisture has been
able to enter. X
Have the headlamps checked at a qualified specialist workshop. Windscreen wipers
Problem Possible cause/consequence Suggested solutions
The windscreen wipers are jam-
med. Leaves or snow, for example, may
be obstructing the windscreen
wiper movement. The wiper
motor has been deactivated. X
For safety reasons, you should remove the key from the ignition
lock.
X Remove the cause of the obstruction.
X Switch the windscreen wipers back on. The windscreen wipers fail com-
pletely. The windscreen wiper drive is
malfunctioning. X
Select another wiper speed on the combination switch.
X Have the windscreen wipers checked at a qualified specialist work-
shop. Practical advice
219_AKB; 2; 4, en-GB
mkalafa,
2007-11-13T09:28:36+01:00 - Seite 259
Page 265 of 329
Troubleshooting
262 Problem Possible cause/consequence Suggested solutions
The key cannot be turned in the
ignition lock. The key has been in position
0 for
a considerable time. X
Remove the key and reinsert it into the ignition lock.
X Check the starter battery and recharge it if necessary
(Y page 290).
X Start the engine. The on-board voltage is too low. X
Switch off non-essential consumers, e.g. seat heating* or interior
lighting, and try to turn the key again.
If this does not work:
X Check the starter battery and recharge it if necessary
(Y page 290).
or
X Jump-start the vehicle (Y page 291).
or
X Consult a qualified specialist workshop. Practical advice
* optional
219_AKB; 2; 4, en-GB
mkalafa,
2007-11-13T09:28:36+01:00 - Seite 262
Page 267 of 329
Troubleshooting
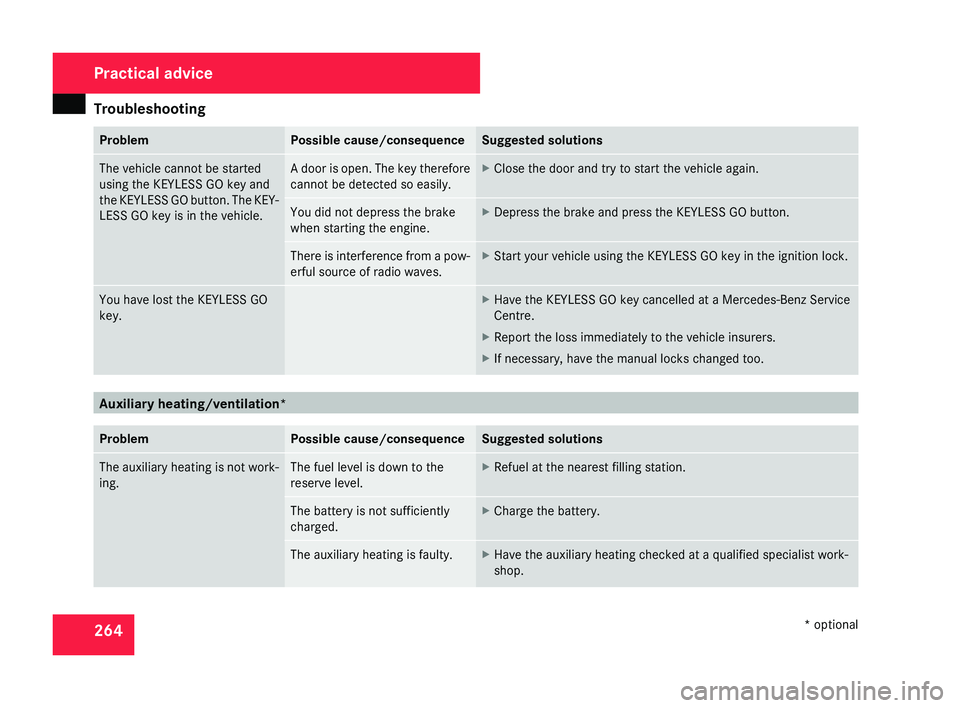
264 Problem Possible cause/consequence Suggested solutions
The vehicle cannot be started
using the KEYLESS GO key and
the
KEYLESS GO button. The KEY-
LESS GO key is in the vehicle. A door is open. The key therefore
cannot be detected so easily. X
Close the door and try to start the vehicle again. You did not depress the brake
when starting the engine. X
Depress the brake and press the KEYLESS GO button. There is interference from a pow-
erful source of radio waves. X
Start your vehicle using the KEYLESS GO key in the ignition lock. You have lost the KEYLESS GO
key. X
Have the KEYLESS GO key cancelled at a Mercedes-Benz Service
Centre.
X Report the loss immediately to the vehicle insurers.
X If necessary, have the manual locks changed too. Auxiliary heating/ventilation*
Problem Possible cause/consequence Suggested solutions
The auxiliary heating is not work-
ing. The fuel level is down to the
reserve level. X
Refuel at the nearest filling station. The battery is not sufficiently
charged. X
Charge the battery. The auxiliary heating is faulty. X
Have the auxiliary heating checked at a qualified specialist work-
shop. Practical advice
* optional
219_AKB; 2; 4, en-GB
mkalafa,
2007-11-13T09:28:36+01:00 - Seite 264
Page 269 of 329
Locking/unlocking in an emergency
266 Locking/unlocking in an emergency
Emergency key
If the vehicle can no longer be unlocked or
locked with the key or the KEYLESS GO
key*, use the emergency key element.
If you use the emergency key element to
unlock and open the driver's door or the boot
lid, the anti-theft alarm system* will be trig-
gered ( Y page 61).
There are several ways to turn off the alarm:
X Press the k or j button on the key.
or
X Insert the key into the ignition lock.
or
X Press the KEYLESS GO but-
ton* ( Y page 74).
or
X Lock or unlock the vehicle using KEYLESS
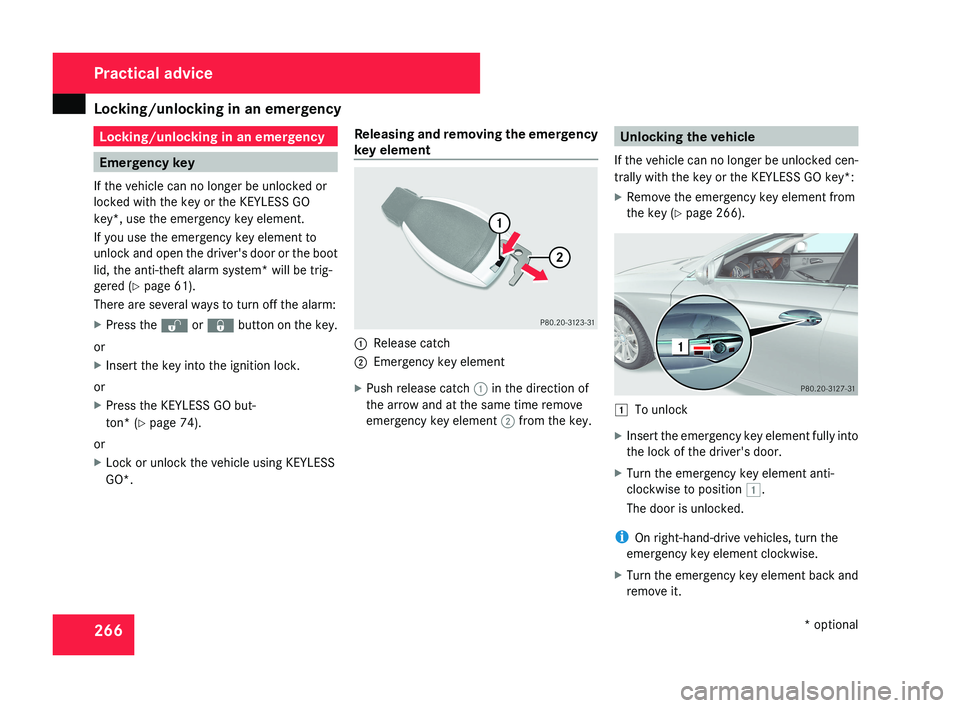
GO*. Releasing and removing the emergency
key element 1
Release catch
2 Emergency key element
X Push release catch 1 in the direction of
the arrow and at the same time remove
emergency key element 2 from the key. Unlocking the vehicle
If the vehicle can no longer be unlocked cen-
trally with the key or the KEYLESS GO key*:
X Remove the emergency key element from
the key (Y page 266). $
To unlock
X Insert the emergency key element fully into
the lock of the driver's door.
X Turn the emergency key element anti-
clockwise to position $.
The door is unlocked.
i On right-hand-drive vehicles, turn the
emergency key element clockwise.
X Turn the emergency key element back and
remove it. Practical advice
* optional
219_AKB; 2; 4, en-GB
mkalafa,
2007-11-13T09:28:36+01:00 - Seite 266
Page 278 of 329
Replacing the wiper blades
275Replacing the wiper blades
G
Risk of accident
The windscreen will no longer be properly
wiped if the wiper blades are worn. This
may prevent you from observing the traffic
conditions, thereby causing an accident.
Replace the wiper blades twice a year, ide-
ally in spring and autumn. G
Risk of accident
The wiper arms could start moving and
cause an injury if you leave the windscreen
wipers switched on.
Remove the key from the ignition lock
before replacing the wiper blades.
! Make sure that you touch only the wiper
arm of the windscreen wiper to avoid dam-
aging the windscreen wiper blades. Removing
Vehicles without KEYLESS GO* X
Make sure that the key is in position 1 or
2 in the ignition lock.
X Set the windscreen wipers to posi-
tion u (Y page 98) on the combination
switch.
X When the wiper arms have reached a ver-
tical position, turn the key to position 0 and
remove it from the ignition lock.
X Fold the wiper arm away from the wind-
screen until it engages.
X Set the wiper blade at right angles to the
wiper arm.
Vehicles with KEYLESS GO* X
Switch off the engine.
X Take your foot off the brake pedal.
X Set the windscreen wipers to posi-
tion u (Y page 98) on the combination
switch.
X Press the KEYLESS GO button repeatedly
until the windscreen wipers start. X
When the wiper arms have reached a ver-
tical position, press the KEYLESS GO but-
ton again.
X Fold the wiper arm away from the wind-
screen until it engages.
X Set the wiper blade at right angles to the
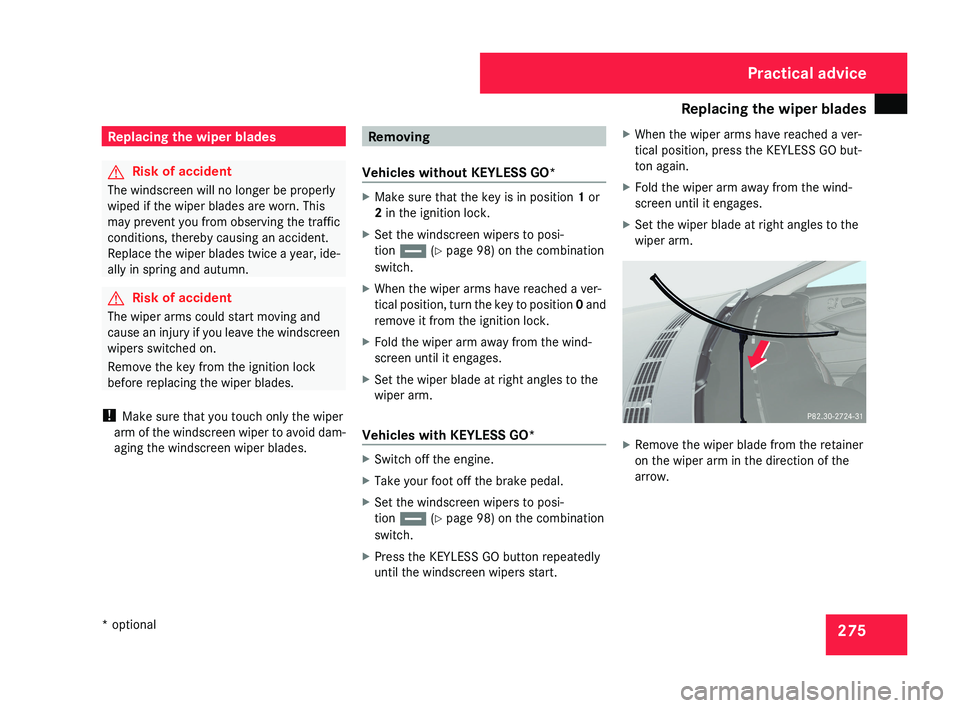
wiper arm. X
Remove the wiper blade from the retainer
on the wiper arm in the direction of the
arrow. Practical advice
* optional
219_AKB; 2; 4, en-GB
mkalafa,
2007-11-13T09:28:36+01:00 - Seite 275
Page 279 of 329
Flat tyre
276 Fitting
X Slide the new wiper blade into the retainer
on the wiper arm in the opposite direction
to the arrow.
X Turn the wiper blade parallel to the wiper
arm.
X Fold the wiper arm back onto the wind-
screen. Flat tyre
Your vehicle may be equipped with:
R a TIREFIT kit (Y page 217)
R a "Minispare" emergency spare
wheel*
(Y page 218)
R a collapsible emergency spare
wheel* (Y page 218)
R a spare wheel* (Y page 218)
R the MOExtended run-flat sys-
tem* (Y page 287) Preparing the vehicle
i Vehicle preparation is not necessary on
vehicles with MOE tyres*.
X Stop your vehicle as far away from traffic
as possible on solid, non-slippery, level
ground.
X Switch on the hazard warning lamps.
X Firmly depress the parking brake.
X Move the selector lever to P. X
All occupants must get out of the vehicle.
Make
sure that they are not endangered as
they do so.
X Make sure that no one is near the danger
area whilst a wheel is being changed. Any-
one who is not directly assisting in the
wheel change should, for example, stand
behind the barrier.
X Switch off the engine.
X Remove the key from the ignition lock.
X Place the warning triangle ( Y page 216) or
warning lamps at a suitable distance.
Observe legal requirements. G
Risk of injury
The jack is designed only to raise the vehi-
cle for a short time while a wheel is being
changed.
If you intend to work under the vehicle, it
must be placed on stands.
Make
sure that the jack is placed on a firm,
non-slip, level surface. Do not use wooden
blocks or similar as jacking supports. Oth-
erwise, the jack will not be able to achieve
its load-bearing capacity due to the restric-
ted height. Practical advice
* optional
219_AKB; 2; 4, en-GB
mkalafa,
2007-11-13T09:28:36+01:00 - Seite 276